background image

Finishing

Stapling a Print Job

The

Staple

feature in the

Finishing

tab lets you create stapled document sets.

You must first select a finisher under

Device options

in

Device Settings

.

Staple

makes

Separation

and

Transparency interleaving

unavailable. The

maximum number of sheets depends upon the finisher model and the selected

Page size

or

Media type

. The

Gutter

feature lets you increase the top and left

margins to accommodate the location of the staples.

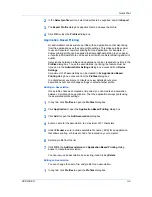
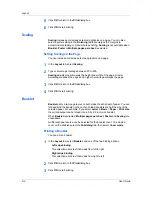
1

In the

Finishing

tab, select

Staple

.

2

In the

Staple

feature, select

Position

and

Count

. Two options are available for

count: All sheets up to the limit displayed in the tab, and every number of pages
so that each number set is stapled separately. The

Position

setting options

vary based on settings in

Finishing edge

, which provides custom staple

locations in the document.

3

Click

OK

to return to the

Print

dialog box.

4

Click

OK

to start printing.

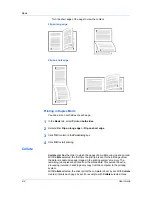
Finishing Edge

Finishing edge

aligns the matching sides of two different page sizes in a

document. For example, the long edge of an A4 page is aligned with the short
edge of an A3 page; or the short edge of a letter size page is aligned with the
short edge of a legal size page.

Finishing edge

can be used with or without the

staple feature.

You can choose the position of staples in a document composed of mixed page
sizes. In contrast, if you are printing a mixed page size document without using

Finishing edge

, staple positions depend on the paper size settings (portrait or

landscape) in the paper cassettes.

Finishing edge

should be selected before any other features in the

Finishing

tab. If set last,

Finishing edge

might change any settings that you previously

made under

Staple

.

Selecting

Finishing edge

makes some other features unavailable, such as

Separation

and

Rotated

.

Finishing edge

cannot be used with the

Poster

feature.

Finishing Edge Combinations

Finishing edge

can be used with the following page size combinations:

A4

and

A3

(210 x 297 mm and 297 x 420 mm)

B5 (JIS)

and

B4

(182 x 257 mm and 257 x 364 mm)

Letter

and

Legal

(8.5 x 11 in. and 8.5 x 14 in.)

Letter

and

Ledger

(8.5 x 11 in. and 11 x 17 in.)

16K

and

8K

(197 x 273 mm and 273 x 394 mm)

Setting the Finishing Edge

You can align the matching sides of two different page sizes in a document.

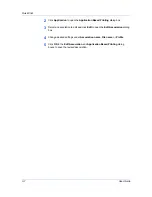
1

In the

Basic

tab, set

Print size

and

Page size

to the same size.

KX DRIVER

6-3

Содержание TASKalfa 255

Страница 1: ...User Guide TASKalfa 255 TASKalfa 305 Printer Driver ...

Страница 2: ...Inc Adobe Acrobat Adobe Reader Photoshop and PostScript are trademarks of Adobe Systems Incorporated UNIX is a trademark in the United States and other countries licensed exclusively through X Open Company Limited All other brand and product names herein are registered trademarks or trademarks of their respective companies Examples of the operations given in this guide support the Windows 7 printi...

Страница 3: ...9 The Add Printer Wizard 1 10 Installing a Printer Driver in Windows 7 and Windows Vista 1 10 Installing a Printer Driver in Windows XP 1 10 Printer Driver Settings Access 1 10 Changing the Default Driver Settings 1 11 Chapter 2 Device Settings Accessing Device Settings 2 1 Device Options 2 2 Setting Device Options 2 2 Auto Configure 2 2 Enabling Auto Configuration 2 2 Memory 2 3 Setting the Memor...

Страница 4: ...inting 3 6 Chapter 4 Basic Basic Settings 4 1 Source and Media Types 4 2 Print Size and Page Size 4 2 Creating a Custom Page Size 4 3 Printing with Custom Size Pages 4 3 Duplex Printing 4 3 Printing in Duplex Mode 4 4 Collate 4 4 Printing Collated Documents 4 5 Quality 4 5 Print Preview 4 5 Previewing a Print Job 4 5 Kyocera Logo 4 6 Displaying Version Information 4 6 Displaying Plug in Informatio...

Страница 5: ...imization Settings 7 5 CIE Optimization 7 5 Halftone Screen 7 6 Adjusting Grayscale 7 7 Selecting Text and Graphics Effects 7 7 Chapter 8 Publishing Cover Mode 8 1 Printing Covers 8 1 Cover Mode Options 8 2 Choosing Cover Media 8 4 Page Insert 8 5 Printing Page Inserts 8 5 Page Insertion Options 8 6 Transparency Interleaving 8 6 Inserting Backing Sheets Between Transparencies 8 7 Chapter 9 Job Job...

Страница 6: ... 10 3 Adding or Editing a Watermark 10 3 Selecting Pages for Watermark 10 4 Security Watermark 10 5 Adding or Editing a Security Watermark 10 6 Adjusting Security Watermark Calibration 10 7 Selecting Pages for Security Watermark 10 7 Configuring Status Monitor 10 8 Setting Status Monitor Preferences 10 9 EMF Spooling 10 10 Selecting EMF Spooling 10 10 Enable Client Profile 10 10 Glossary v User Gu...

Страница 7: ...nded feature set In Windows if the Found New Hardware Wizard dialog box appears during the installation process click Cancel If the Hardware Installation warning dialog box appears click Continue Anyway 2 Insert the Product Library CD into the CD drive After the installation wizard begins the Main Menu appears Note If the Product Library fails to start after inserting the Product Library CD into t...

Страница 8: ...e installer Installing Utilities On the Installation Method page click Utilities to install printer utilities You can also select utilities to install during the Custom Installation procedure Upgrading Driver Components If the installation wizard detects older driver or utility components the Software Component Upgrade page appears 1 Choose the component to upgrade Click Next 2 Confirm your upgrad...

Страница 9: ...splays the IP address contact your system administrator Not available with a USB connection 5 Click Information if you want to open a dialog box with details about IP Address Host Name Printer Model Contact Location and Serial Number Click OK Click Next Not available with a USB connection 6 On the Printer Settings page you can assign a name to your printing system Note With a first time USB connec...

Страница 10: ...ides basic support for your printer The KX XPS DRIVER and XPS minidriver is only available for printing systems used with Windows 7 and Windows Vista The XPS driver is discussed in the Device Settings chapter Minidriver functionality is not documented in this user guide Installing in Custom Mode with a Network Connection using Discover This section describes the custom installation procedure of th...

Страница 11: ...ings where you can choose installed options for your printing system The Device Settings check box appears only in Windows XP When the installation completes successfully click Finish to exit the installation wizard and return to the Product Library CD menu A message may appear if there is a software installation failure Click Finish and retry the installation If the same message appears again con...

Страница 12: ...ick Next 6 On the Confirm Settings page click Install if the settings are correct Click Back to correct the settings Note If the Hardware Installation warning dialog box appears click Continue Anyway 7 The Installation Completed page appears displaying the following driver options Print a test page This selection verifies a connection with the printer and creates a print out of the installed drive...

Страница 13: ...e not intended for installation Click Next If you only select software packages from the Utility tab you will skip to the Confirm Settings page 7 On the Printer Settings page you can assign a name for your printing system You can also choose to share this printer with others or set this printer as the default printer Make your selections and then click Next 8 On the Confirm Settings page click Ins...

Страница 14: ...turned on and connected using a USB cable Note In Windows 7 and Windows Vista a driver installation will be made from the Microsoft Windows Update site if a certified driver is available and the system is connected to the web We recommend the Custom Mode using Discover for USB connections to ensure a reliable installation 2 On the Installation Method page select Custom Mode 3 The Discover Printing...

Страница 15: ...h to exit the installation wizard and return to the Product Library CD menu A message may appear if there is a software installation failure Click Finish and retry the installation If the same message appears again contact your system administrator The installation of the printer is now complete If prompted restart your computer Optional Printer Components You can expand the functionality of your ...

Страница 16: ...s now complete Click Print a test page if you want to produce sample print output from the newly installed printer To close the Add Printer Wizard click Finish Installing a Printer Driver in Windows XP This section describes how to install a printer driver using the Add Printer Wizard in Windows XP 1 Click Start and Printers and Faxes 2 Click Add a printer 3 The Add Printer Wizard appears Follow t...

Страница 17: ... within each application 1 Click Start and click Devices and Printers Windows 7 or click Control Panel and double click Printers Windows Vista or Printers and Faxes Windows XP 2 Right click on your printing system icon 3 Click Printing Preferences 4 In the Printing Preferences dialog box select the desired features in all tabs 5 Click OK to save the settings KX DRIVER 1 11 ...

Страница 18: ... Description Language and Compatibility settings can also be selected Accessing Device Settings Device Settings can be accessed from Devices and Printers Windows 7 Printers Windows Vista or Printers and Faxes Windows XP folder 1 Click Start and click Devices and Printers Windows 7 or click Control Panel and double click Printers Windows Vista or Printers and Faxes Windows XP 2 Right click the desi...

Страница 19: ... detected by using Auto Configure Before selecting OK in Device Settings check the settings to make sure that they are correct Note The default setting for Windows XP Service Pack 2 is for the Windows Firewall to be set to On The setting can be changed to allow communication between the printing system and your computer In the Windows Security Alert dialog box click Unblock Silent Auto Configurati...

Страница 20: ...ll optional DIMM memory in the printing system 2 In Device Settings Memory type or select the amount of total installed memory by clicking the up and down arrows until the text box shows the correct number of megabytes MB If your printing system includes the Auto Configure feature you can use it to obtain information about the memory size RAM Disk The RAM disk functions as a virtual hard disk savi...

Страница 21: ...gin settings selected in the driver are applied to every print job sent from this computer The available options are as follows Use specific login user name This option can be used to specify a user name and password to use the same User login for every print job If this option is selected the user will not have to type the name and password for each print job Prompt for login user name This optio...

Страница 22: ...tings select User Login 2 Select a User login option Use specific login user name Prompt for login user name The remaining User login options become available when you create a login user name list Note If you select the Use specific login user name or Prompt for login user name option proceed to step 5 3 Select Login User Name List to create and manage Login user name lists 4 Select from the rema...

Страница 23: ...you are prompted to type it again Display account ID list Select this option to display the account ID list at the time of printing The print job can be assigned to a user or group The account ID list is stored in the driver and more than one ID must be established for the list to appear Account ID List Select this option to display the account ID to manage the Account ID list Add edit or delete a...

Страница 24: ...om customizing the Quick Print tab Send Count Information This option lets you embed count information in the print job which can be used by some applications for accounting purposes Count information includes the number of copies produced as well as duplex printing multiple pages per sheet color page count and paper size values When PDF is selected in the PDL settings dialog box only color page c...

Страница 25: ... A profile must be created in the Profiles dialog box accessed from any Printing Preferences tab An association must be created between a profile and an application in the Application Based Printing dialog box accessed from the Profiles dialog box To enable this feature in Device Settings click Administrator Associate Profile with application Lock Settings An administrator can specify settings at ...

Страница 26: ...ng the available driver tabs the administrator must first make selections there for job name and storage The administrator can then ensure that all print jobs use those settings by locking this feature Selecting Lock Job tab also prevents any user changes in the Job tab Lock Security Settings If the Security Watermark plug in is installed the administrator must first make selections for the Securi...

Страница 27: ...to Configure communication using a user name and password Authentication and privacy options are available by selecting Settings Apply to other models This option displays a list of installed printing systems to apply the selected SNMP settings SNMPv3 Options You can select SNMPv3 options for secure communication with the printing system Authentication This option provides an algorithm to check th...

Страница 28: ...NMPv3 dialog box 6 Optional Under Apply to other models you can click Select and choose from available models The SNMP settings are applied to all selected models User Settings User Settings lets you specify user and department names select the default unit of measure and change the driver display language In a client server environment this feature is unavailable to a client logged in as a restri...

Страница 29: ...the desired language from the Select language list 2 Click OK in the User Settings and Properties dialog boxes PDL Page Description Language A Page Description Language PDL specifies the contents and layout of a printed page In Device Settings you can choose from PCL XL Printer Command Language XL PCL 5e KPDL an emulation of PostScript printing or PDF Portable Document Format The printer default i...

Страница 30: ...s to Adobe PDF This feature can be used as an alternative to existing commercial applications for creating PDF documents Documents saved as PDF retain their original appearance and can be viewed and printed with Adobe Reader on Windows Mac OS and UNIX platforms For a document using mixed paper sizes all pages in the PDF use the size of the first page Note With PDF selected in the PDL Settings dial...

Страница 31: ...f graphics created by your application 3 Select Settings when the PDL is set to PCL XL KPDL or PDF If you select PCL XL you can select Skip printing blank pages and Enable smart duplex printing If you select KPDL you can select Allow data passthrough and Enable smart duplex printing If you select PDF you can select from the available PDF Settings 4 Click OK in the PDL Settings and Properties dialo...

Страница 32: ...obe Acrobat this password is required to change the document restrictions in the Files Properties Security section When a document with this password is opened in Adobe Reader it cannot be printed or edited and document data cannot be copied Require password to open document Type a User password The user password must be entered at the time the PDF document is opened This password must be differen...

Страница 33: ...an XPS environment Therefore an XPS driver supports a single PDL setting The XPS driver can be installed from the Product Library CD In the Installation Method menu click Custom Mode and on the Custom Installation page select KX XPS DRIVER To view a print to file XPS document download and install the Microsoft XPS Viewer Compatibility Settings Compatibility Settings lets you specify media source v...

Страница 34: ...and gives priority to the printer driver setting With the check box selected the printer driver Collate setting is used With the check box cleared the application Collate setting is used Selecting Printer Driver Collation You can ignore the collation setting in the application and use the printer driver collation setting 1 In Device Settings Compatibility Settings select Ignore application collati...

Страница 35: ...ed plug in from the driver If removed the plug in features do not appear in the driver interface Note To remove the Output to PDF module PDF must not be selected in the PDL Settings dialog box 1 In Device Settings click Kyocera logo Plug in 2 Select a plug in module from the list and click Delete then Yes 3 Click OK in all dialog boxes KX DRIVER 2 18 ...

Страница 36: ... Options You can set one or more print options on the Quick Print tab You can create your own customized view of print options with Edit Quick Print And you can also select from profiles that have been set with predefined options for frequently run print jobs Common Printing Options The upper section of the Quick Print tab has several icons that represent the most common options for print jobs Cli...

Страница 37: ... printing and EcoPrint can also be found in the Basic and Imaging tabs and Multiple pages per sheet in the Layout tab The Profiles options are accessed from Printing Preferences Collate Collate specifies the order in which the pages of a multiple copy job are printed With Collate selected the first time the print job is sent to the printing system the data is rendered as page images in the printin...

Страница 38: ...an hide the Edit Quick Print button by selecting Hide Edit Quick Print control in Device Settings Administrator Settings The Edit Quick Print button is unavailable when the driver is accessed from an application s Print dialog box Editing Quick Print Options You can select from a limited set of driver features to appear in the Quick Print tab 1 Click Start and click Devices and Printers Windows 7 ...

Страница 39: ...ialog box Quick Print tab 1 From Profiles select a profile 2 Click Apply The side panel displays the options for that profile using an icon and a summary 3 Click OK Profiles dialog box 1 In any of the Printing Preferences tabs click Profiles 2 In the Profiles dialog box select a profile 3 Click Apply The side panel displays the options for that profile 4 Click OK Saving a Profile The Save button l...

Страница 40: ...s The newly edited profile appears in the Profiles dialog box 4 Click Apply to activate the selected profile to the current print job or click OK to close the dialog box Importing a Profile The Import button lets you import a copy of a profile from other printer drivers into your printer driver 1 Click Profiles Import 2 Browse for the existing profile KXP select it and click Open A message appears...

Страница 41: ...inting dialog box accessed from the Profiles dialog box In a client server environment clients can view details about server associations but cannot change settings or select another profile Adding an Association Once profiles have been created or imported you can create an association between a profile and an application Then the application always prints using the associated profile settings 1 I...

Страница 42: ... 3 Select an association to edit and click Edit to open the Edit Association dialog box 4 Change desired settings under Association name File name or Profile 5 Click OK in the Edit Association and Application Based Printing dialog boxes to save the revised association User Guide 3 7 ...

Страница 43: ...ray that the printing system draws paper from Unless you are using a custom paper type you can leave it set to Auto source selection Media type This setting selects the Source based on the types of media that are specified in the printing system In general you can leave it set to Unspecified Destination This setting specifies which output tray is used for the print job output Page Sizes This setti...

Страница 44: ...int job then the printer searches for another source and continues the job Media type instructs the printer to search for the type of paper or media that is requested by the application or the printer driver The choices shown may change depending on the selection in Source If Auto media selection is selected then the printer searches for another tray or cassette using the same media Transparencies...

Страница 45: ...en done click Apply The custom page size appears in the Print size list which is used for enlarging and reducing the sizes of prints To delete a custom page size from the Page Sizes dialog box select the name of the custom page size and click Delete Printing with Custom Size Pages You can print on custom sized pages 1 Load custom sized paper into the MP tray 2 In the Basic tab select the name of y...

Страница 46: ...ecifies the order in which the pages of a multiple copy job are printed With Collate selected the first time the print job is sent to the printing system the data is rendered as page images in the printing system s memory The remaining job copies are printed from the stored data This avoids the extra processing involved in sending every copy from the computer to the printing system With Collate se...

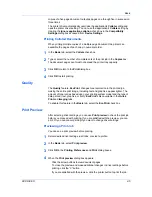
Страница 47: ...king the entire print image including text and graphics appear lighter The amount of toner varies based upon your printing system model and the type of data printed text graphics or both EcoPrint is also available in the Quick Print and Imaging tabs To enable this feature in the Basic tab select the EcoPrint check box Print Preview After selecting driver settings you can use Print preview to check...

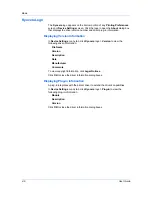
Страница 48: ...ogo Version to view the following driver information File Name Version Description Date Manufacturer Comments To view copyright information click Legal Notices Click OK to close the driver information dialog boxes Displaying Plug in Information A plug in integrates with the printer driver to extend the driver s capabilities In Device Settings or any tab click Kyocera logo Plug in to view the follo...

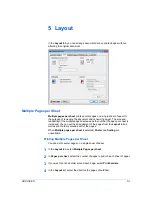
Страница 49: ... increased You can set the arrangement of the pages from the Layout tab as well as print borders around each of the pages When Multiple pages per sheet is selected Poster and Scaling are unavailable Printing Multiple Pages per Sheet You can print several pages on a single sheet of paper 1 In the Layout tab select Multiple Pages per sheet 2 In Pages per sheet select the number of pages to print on ...

Страница 50: ... 4 Click OK to start printing Booklet Booklet prints a two page layout on both sides of each sheet of paper You can fold and bind the booklet in the center Folded booklets are half the size of the selected paper For example if you select Letter in Basic Paper Print size the printed output can be folded into a 5 5 x 8 5 inch size booklet When Booklet is selected Multiple pages per sheet Poster and ...

Страница 51: ...cument data on adjoining sheets Poster appearance is improved when the edges overlap slightly Select the check box then type or select a value between 0 00 and 1 20 inches 0 0 and 30 4 mm This option reduces the final poster size slightly Print crop marks This selection prints a border at the edges of each poster sheet You can crop each sheet on the border before assembling the sheets This option ...

Страница 52: ...n any combination These options ensure a precise assembly of the pages to create the poster 4 In Print format select one of the options for a finished print format 5 Click OK to return to the Print dialog box 6 Click OK to start printing User Guide 5 4 ...

Страница 53: ...right angle in the output tray This feature requires the following Paper size selections are limited to Letter A4 16K or B5 JIS The selected paper size must be loaded into two paper sources one horizontally and one vertically The print job must contain multiple pages and be specified to print multiple copies RAM disk in Device Settings must be enabled Rotating Copies You can stack each copy of a p...

Страница 54: ...re lets you create stapled document sets You must first select a finisher under Device Settings Device options Selecting the Staple feature makes Separation and Transparency interleaving unavailable The maximum number of sheets depends upon the finisher model and the selected Page size or Media type The Gutter feature lets you increase the top and left margins to accommodate the location of the st...

Страница 55: ...short edge of an A3 page or the short edge of a letter size page is aligned with the short edge of a legal size page Finishing edge can be used with or without the staple feature You can choose the position of staples in a document composed of mixed page sizes In contrast if you are printing a mixed page size document without using Finishing edge staple positions depend on the paper size settings ...

Страница 56: ...ate the current selected Finishing edge with Staple positions if selected When the Staple option is used the Position selection determines where staples are placed Use this image to verify your selections for Finishing edge and Staple Custom Finishing Edge Settings The illustrations in the Custom Finishing Edge Settings dialog box help you visualize the page alignments Select the one setting that ...

Страница 57: ... outside margin on the left side of the page Short edge top This selection modifies the outside margin on the top edge of the page Note Availability of Gutter settings vary depending on Finishing edge settings and Orientation and Duplex mode settings in the Basic tab 3 If text extends too close to the edge of the page select Reduce image to fit The text appears slightly reduced and away from the e...

Страница 58: ...ality from the list The number of selections in Print quality depends on the number of resolutions supported by the printing system High quality Proof Draft Select one of these settings to print from the highest to the lowest print resolution Proof is unavailable when PCL 5e is selected in the PDL Settings dialog box Custom Custom lets you choose a setting for Custom Quality and EcoPrint Selecting...

Страница 59: ...f textual elements characters or symbols Common terms for fonts are Bitmap fonts define each character as a pattern of pixels the smallest resolvable rectangular areas of an image Such fonts are not easily scalable and distort when reduced or enlarged Outline fonts in contrast to bitmap fonts are defined as a set of mathematical lines and curves An outline font is more easily scalable designed to ...

Страница 60: ...d on typeface name This function increases print speed and efficiency It is useful for changing a font used throughout a large document by replacing the old font with the desired font Note GDI compatible mode does not support Substitute with device fonts Selecting Font Settings You can specify how TrueType fonts are sent to the printing system 1 In Imaging Font Settings select one of the methods f...

Страница 61: ...TT TrueType icon remains Disabling Device Fonts You can prevent substitution of device fonts for TrueType fonts 1 In Imaging Font Settings select the Disable device fonts check box 2 Click OK to save your settings Graphics Graphics are pictorial representations of information Graphics can be functional charts diagrams or artistic drawings photographs Graphics Settings let you select options for yo...

Страница 62: ... are available when KPDL is selected in the PDL Settings dialog box Reverse image This setting prints images like a photo negative reversing black and white areas of the image Mirror print This setting prints the page content backwards as it would appear in a mirror image Optimization Settings Optimization is a process or methodology of improving a printing system s function or effectiveness In Im...

Страница 63: ...ings click Halftone Screen 2 Clear the Use printer s default screens check box 3 Set the available options to the desired values Ink Lists the halftone screens available For black and white printers this option appears unavailable and is permanently set to Black Frequency Displays the number of rows of dots per inch or centimeter Set the range from 2 0 to 999 9 and select lines inch or lines cm An...

Страница 64: ...slider right or left to increase or decrease the proportion of light to dark in the graphic images of the print job A high contrast setting decreases the grayscale spectrum making light grays lighter and dark grays darker A low contrast setting increases the grayscale spectrum making light grays darker and dark grays lighter You can also change contrast by entering a numeric value in the text box ...

Страница 65: ...ver settings in the Publishing tab Print on both sides must be selected in the Basic tab or Quick Print tab in order to print using the Front inside or Back outside options Although Cover mode and Page insert can be used simultaneously they cannot be used with Transparency interleaving Printing Covers You can choose cover pages for printing 1 In the Publishing tab select Cover mode 2 Select Front ...

Страница 66: ...n Type Front Inserts a blank front cover Front Prints on the outside surface of the front cover Front outside Front Prints on the inside surface of the front cover Front inside Prints on the outside and inside Front surfaces of the front cover Front outside Front inside continued User Guide 8 2 ...

Страница 67: ...rface of the Front and back front cover and inserts a blank back cover Front outside Prints on the inside surface of the front Front and back cover and inserts a blank back cover Front inside Prints on both sides of the front cover Front and back and inserts a blank back cover Front outside Front inside continued KX DRIVER 8 3 ...

Страница 68: ...urface of the Front and back back cover and inserts a blank front cover Back outside Prints on both sides of the back cover Front and back and inserts a blank front cover Back inside Back outside Prints on both sides of the front and Front and back back covers Front outside Front inside Back inside Back outside Choosing Cover Media You can select media for the cover User Guide 8 4 ...

Страница 69: ...be used simultaneously they cannot be used with Transparency interleaving Printing Page Inserts Several ways are available to arrange page inserts you can print on one or both sides or insert a blank sheet 1 In Publishing Page insert select the option corresponding to your desired page arrangement 2 To print on both the front and back of the inserted page select the Print onto front and Print onto...

Страница 70: ...ts on the back side of the inserted page Print onto back Prints on both sides of the inserted Page insert page Print onto front Print onto back Transparency Interleaving Transparency interleaving inserts a backing sheet between printed transparencies The backing sheet also known as an interleaf helps keep transparencies clean and prevents them from clinging together This feature is User Guide 8 6 ...

Страница 71: ...ity Settings Media type does not appear Instead in the Source list select Auto Transparency 2 Click Publishing Transparency interleaving 3 To print the transparency content on the inserted pages also select the Print onto backing check box 4 In the Media for backing list select the Media type of the backing sheet or the Source paper cassette When you choose the media type a source cassette matchin...

Страница 72: ...ting system s operation panel and printing of sensitive documents can be restricted to approved users E MPS is a multitier solution that provides advanced print management directly from the desktop By storing a job in the printing system you can print it from the operation panel without sending it again from the computer To use the Job storage e MPS features you must set a user name in the User Se...

Страница 73: ...g a Proof and Hold Job Proof and hold lets you print one copy of a multicopy job to proof before printing the remaining copies The job is stored in RAM disk memory until the printing system is turned off or the job is manually deleted 1 Click the Basic tab and select the number of copies to be printed 2 Click the Job tab and select Job storage e MPS 3 Click Proof and hold and click OK in both dial...

Страница 74: ...t replaced by new jobs having the same Job name Don t Use Application Name Don t use application name is an option to remove the application name from the job name in job storage features By selecting Don t use application name the file name you choose appears clearly in the job list This feature is applicable only when printing from Microsoft Word or PowerPoint Overwrite Job Name Overwrite job na...

Страница 75: ...osoft Word or PowerPoint documents selecting Don t use application name removes the name of the application so that only the document name appears as the job name Custom This option uses a unique name for each job Type a name in the box up to 79 characters 3 Select an Overwrite job name option in case a job already exists in printing system memory with the same job name Replace existing file If a ...

Страница 76: ...t For example a Prologue Epilogue command file may contain a macro that places a graphic object such as a logo at the top of a letterhead document Selecting a Prologue Epilogue File A Prologue Epilogue file must be available on your computer before it can be added to a print job To create this file use a text editor like Windows Notepad In Advanced Prologue Epilogue select a Prologue Epilogue file...

Страница 77: ...ue select a Prologue Epilogue file name from the list 2 Under Insertion Point select a place to insert the Prologue Epilogue file Unassigning a Prologue Epilogue File If you designate a Prologue Epilogue file as unassigned you are removing it from the print job It remains in the list Unassigned selections are useful when the list contains several Prologue Epilogue files and you want to use some bu...

Страница 78: ...nd of the page is selected this option can be selected to insert the command file into specified pages In the text box type individual page numbers separated by commas or a page range separated by a hyphen For example if you type 2 in the text box the command file is inserted only into page 2 If you type 1 3 5 12 the command file is inserted into page 1 page 3 and pages 5 through 12 If the Pages o...

Страница 79: ...he preview area Click and hold as you drag the pointer to move the watermark image 9 Select the Angle of the watermark with one of the following options Diagonal default This option places the watermark text at the default angle on the page User defined This option lets you type a degree value for the angle An angle is measured in degrees from 0 to 360 You can also change the angle by clicking the...

Страница 80: ...uld not be photocopied or to distinguish between original prints and photocopies Six standard security watermarks are available as text or image and you can create custom security watermark text A notable feature of Security Watermark is the Document guard pattern which prevents the document from being photocopied scanned faxed or printed from memory If a scan fax or print from memory is attempted...

Страница 81: ...he line blank User defined This option inserts your text up to 39 characters All other options display date time or other job information that is obtained from the computer or printer driver when the job is printed 5 Select the desired font size style and angle of the text 6 Select Print as footer also if you want the first available line of security watermark text to be printed at the bottom of t...

Страница 82: ...elect a default or custom security watermark and click Edit 2 After all security watermark options are selected in the Add Security Watermark or Edit Security Watermark dialog box click Adjust Calibration 3 Under Pattern shading and Text contrast select initial options Light Normal Dark Select the shading density of the background pattern Contrast 1 9 Select the level of contrast against the backg...

Страница 83: ...ndow during printing You can start a status monitor for each supported printing system More than one status monitor can be displayed at one time 1 In the Advanced tab click Status Monitor 2 If you want the Status Monitor image to appear during a print job in the Status Monitor dialog box select the Status Monitor check box 3 To view the print job status without changing the Status Monitor setting ...

Страница 84: ...s Monitor Preferences dialog box You can also change the appearance of the Status Monitor image 1 Right click the Status Monitor icon in the system tray 2 Click Preferences 3 Click the Sound Notification tab 4 Select the Enables Event Notification check box 5 Select an event for a Status Monitor alert Cover open Paper jam Add paper Sleep Add toner Toner low Not connected Printing Printing complete...

Страница 85: ... by the Microsoft Windows operating system When a print job is sent from an application it is transferred to the spool file The application writes to and the printer driver reads from the spool file simultaneously For multiple or large documents this quickly returns application control to the user while the printer is still printing the document Note EMF spooling is unavailable when Allow data pas...

Страница 86: ...he more detail there is in the printed output E EcoPrint Imaging feature that changes toner saturation making the entire image text and graphics appear lighter in the printed job The actual amount of toner used depends on the printing system mode and the type of data printed text graphics or both EcoPrint does not increase print speed This feature is also available in the Quick Print and Basic tab...

Страница 87: ...ature lets you print several pages on a single sheet of paper for the purpose of reviewing the document and conserving paper O Optional Printer Components Optional Printer Components include Common Profiles and Plug In Modules and need to be installed separately from the driver installer They are located on the Product Library CD in the Advanced Tools menu P PDF The Adobe portable document format ...

Страница 88: ...asier way to set print options You can choose basic settings or a predefined printer profile rather than having to go to various tabs Quick Print settings can be captured in a group called a profile Profiles support common printing tasks saving you from having to repeatedly select the same settings The Administrator can set the view of the Quick Print tab through the Installation process or Admini...

Страница 89: ...sword User login provides job restriction by user in contrast to the Job accounting feature which assigns privileges by division or department A maximum of 1000 login user names and passwords can be registered at the printing system One hundred user names and passwords can be stored in the printer W Watermark The Watermark feature is available in the Advanced tab A watermark is a recognizable imag...

Страница 90: ......

Страница 91: ......

Страница 92: ...Rev 12 25 2010 9 ...

Отзывы: