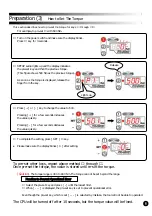
This section describes how to pre-set the torque for keys ① through ④.
For example, to pre-set ① with 600 Nm.
① Turn on the power switch and make sure the display blinks.
Press ① key for 3 seconds.
② SETUP Lamp lights up and the display indicates
the pre-set key and then the previous torque.
(This figure shows 500 Nm as the previous torque).
As soon as the torque is displayed, release the
finger from the key.
③ Press [ + ] or [ - ] key to change the value to 600.
Pressing [ + ] for a few seconds increases
the value quickly.
Pressing [ - ] for a few seconds decreases
the value quickly.
④ To complete the setting, press [ SET ] ② key.
● Please make sure the display blinks [ 0 ] after setting.
To pre-set other keys, repeat above method ① through ④.
Once pre-set the torque, the value is stored until re-set the torque.
(Caution)
The torque range is 400 to 800 Nm. The torque can not be set beyond the range.
① Select the pre-set key and press [ - ] until the lowest limit.
② When [ - - - ] is displayed, the pre-set key is set to prevent operational error.
Even though the pre-set key which is set [ - - - ] is selected by mistake, the tool will not be able to operated.
The CPU will be turned off after 10 seconds, but the torque value will be fixed.
Preparation (3)
How to Set The Torque
Function to Prevent Operational Error
Lights up
Release

