


9
Manual
www.kraun.it
Connecting your device
3
This chapter provides basic instructions for connecting the Integrated Access Device to a
computer or LAN and to the Internet.
In addition to configuring the device, you need to configure the Internet properties of your
computer(s). For more details, see the following sections:
Configuring Ethernet PCs
•
Configuring Wireless PCs
•
This chapter assumes that you have already established a DSL service with your Internet
service provider (ISP). These instructions provide a basic configuration that should be
compatible with your home or small office network setup. Refer to the subsequent chapters for
additional configuration instructions.
Connecting the Hardware
This section describes how to connect the device to the wall phone port, the power outlet and
your computer(s) or network.
WARNING
Before you begin, turn the power off for all devices.
These
include your computer(s), your LAN hub/switch (if applicable),
and the Integrated Access Device.
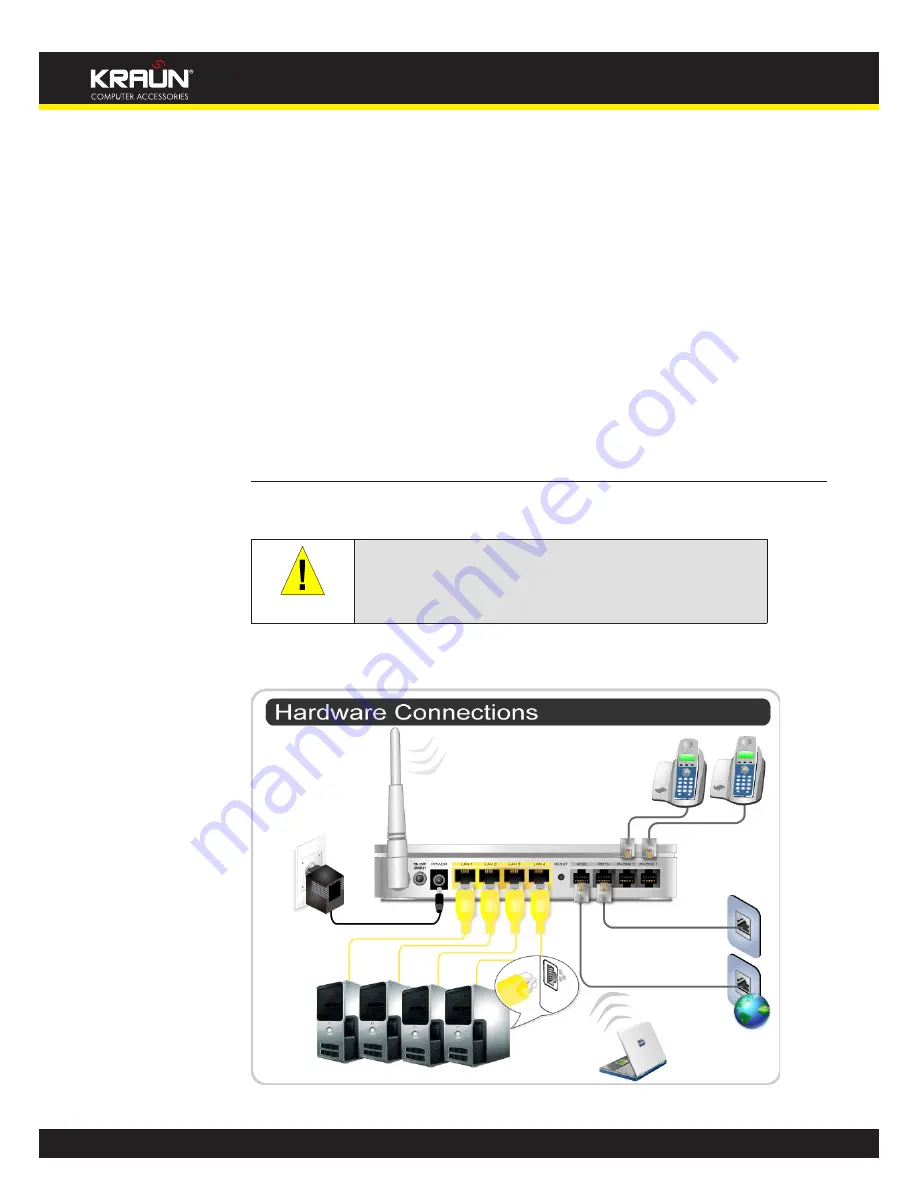
The diagram below illustrates the hardware connections. The layout of the ports on your device
may vary from the layout shown. Refer to the steps that follow for specific instructions.
Overview of Hardware Connections
Figure 5:
Содержание KR.XY
Страница 33: ...33 Manual www kraun it Click 24 Apply Click 25 Reboot The following page is displayed 26 ...
Страница 40: ...40 Manual www kraun it Click 20 Reboot The following page is displayed 21 ...
Страница 48: ...48 Manual www kraun it Click 23 Apply Click 24 Reboot The following page is displayed 25 ...
Страница 55: ...55 Manual www kraun it Click 26 Apply Click 27 Reboot The following page is displayed 28 ...
Страница 73: ...73 Manual www kraun it Click 6 Confirm ...
Страница 95: ...95 Manual www kraun it Enter VCI and VPI setting determined by your ISP 3 Click 4 Next ...
Страница 111: ...111 Manual www kraun it Now you are ready to Surf the Internet 15 ...
Страница 116: ...116 Manual www kraun it Click 15 Apply Your configuration is complete Now you are ready to Surf the Internet 16 ...
Страница 141: ...141 Manual www kraun it Click on 4 Go To Advanced view ...
Страница 147: ...147 Manual www kraun it Click 9 Dialing Plan tab Click 10 Go To Advanced view ...
Страница 148: ...148 Manual www kraun it Click 11 Add ...
Страница 155: ...155 Manual www kraun it Click 4 Add ...
Страница 159: ...159 Manual www kraun it Click 4 Add ...
Страница 163: ...163 Manual www kraun it Click 4 Add ...
Страница 167: ...167 Manual www kraun it Click 4 Add ...
Страница 171: ...171 Manual www kraun it Click 4 Add ...
Страница 175: ...175 Manual www kraun it Click 4 Edit on Policy Name ext int ...
Страница 176: ...176 Manual www kraun it Click 5 Enable of Status Click 6 Apply ...
Страница 180: ...180 Manual www kraun it Click 8 Continue Reboot Later ...
Страница 199: ...199 Manual www kraun it From the left hand 2 Services menu click on Dynamic DNS The following page is displayed ...
Страница 228: ...228 Manual www kraun it Click 5 restart Click 6 Restart ...


