


71
Manual
www.kraun.it
About WDS
WDS Device
Integrated Access Device provides the WDS functionality using an independent WDS Device
that sits between the Bridge and the Wireless Device and performs the following functions:
• Dynamically adding and removing WDS links with other APs.
• Adding/removing WDS remote AP’s MAC address from data packets.
A WDS device has several wds_x ports and one wds_local port. For each WDS link, bridge
opens a channel on a wds_x port and attaches the MAC address of the remote AP (in some
other BSS) to this wds_x port. The packets destined for any STA in the other BSS connected
by a WDS link, are exchanged with the bridge through these individual WDS ports. Bridge also
opens a channel on the filtering/filtermac compound device, which in turn opens a channel onto
the wds_local port.
WDS device uses this port for transmitting and receiving the packets belonging to its own BSS.
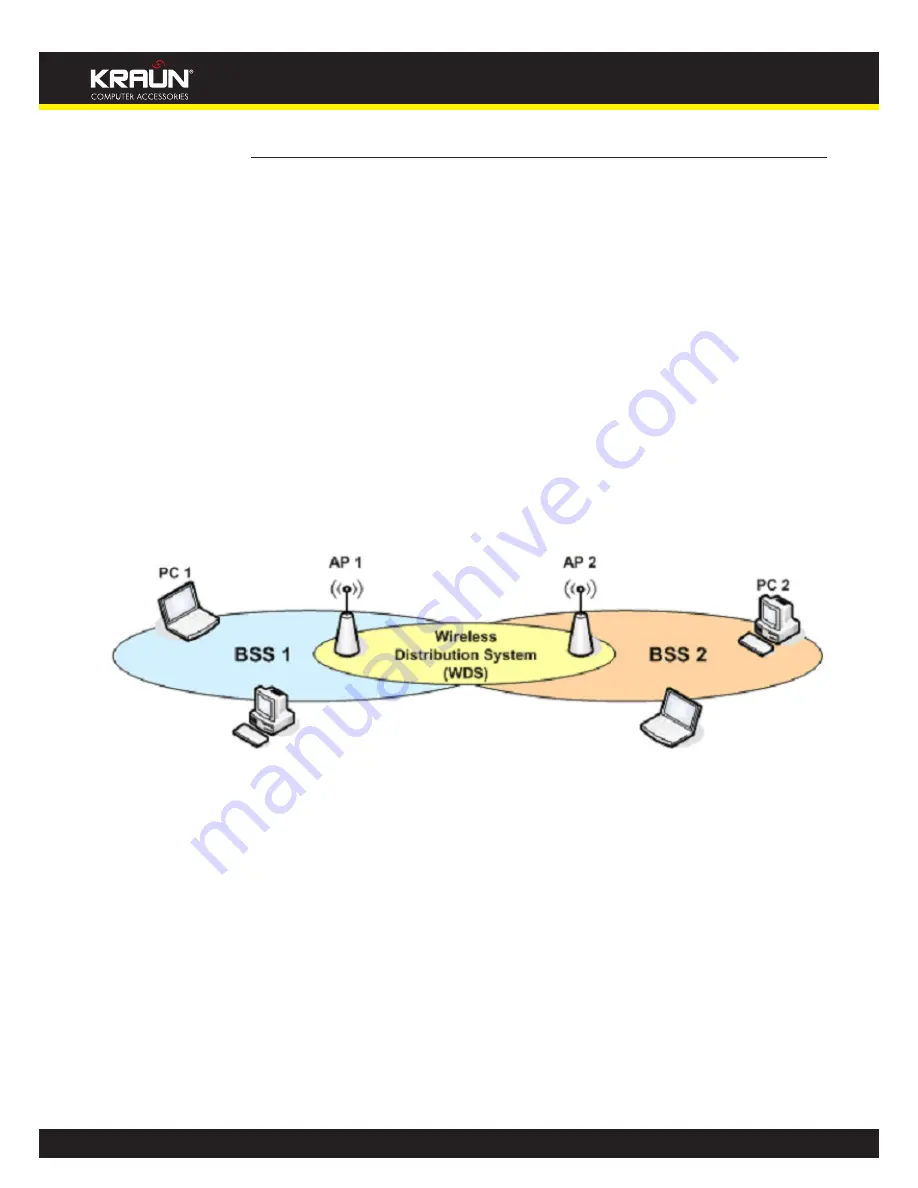
Typical WDS Scenario
Figure: Distribution System connecting two BSS’
In the above figure, there are two BSS’, viz., BSS-1 and BSS-2, placed in the radio range of
each other. Laptops and PCs with wireless stations are associated to the Access Points (APs)
controlling their respective BSS’. Using WDS feature, both the APs are connected to each other
‘wirelessly’.
Now, if a PC or a laptop (say PC-1) in the BSS-1 wants to send some data to a PC (say PC-2) in
the BSS-2, then this data transfer will take place using WDS feature between the two APs.
Integrated Access Device AP allows WDS links towards multiple (up to four) APs. In Integrated
Access Device, the WDS link operates on the same frequency channel as used by the
associated wireless clients.
Содержание KR.XY
Страница 33: ...33 Manual www kraun it Click 24 Apply Click 25 Reboot The following page is displayed 26 ...
Страница 40: ...40 Manual www kraun it Click 20 Reboot The following page is displayed 21 ...
Страница 48: ...48 Manual www kraun it Click 23 Apply Click 24 Reboot The following page is displayed 25 ...
Страница 55: ...55 Manual www kraun it Click 26 Apply Click 27 Reboot The following page is displayed 28 ...
Страница 73: ...73 Manual www kraun it Click 6 Confirm ...
Страница 95: ...95 Manual www kraun it Enter VCI and VPI setting determined by your ISP 3 Click 4 Next ...
Страница 111: ...111 Manual www kraun it Now you are ready to Surf the Internet 15 ...
Страница 116: ...116 Manual www kraun it Click 15 Apply Your configuration is complete Now you are ready to Surf the Internet 16 ...
Страница 141: ...141 Manual www kraun it Click on 4 Go To Advanced view ...
Страница 147: ...147 Manual www kraun it Click 9 Dialing Plan tab Click 10 Go To Advanced view ...
Страница 148: ...148 Manual www kraun it Click 11 Add ...
Страница 155: ...155 Manual www kraun it Click 4 Add ...
Страница 159: ...159 Manual www kraun it Click 4 Add ...
Страница 163: ...163 Manual www kraun it Click 4 Add ...
Страница 167: ...167 Manual www kraun it Click 4 Add ...
Страница 171: ...171 Manual www kraun it Click 4 Add ...
Страница 175: ...175 Manual www kraun it Click 4 Edit on Policy Name ext int ...
Страница 176: ...176 Manual www kraun it Click 5 Enable of Status Click 6 Apply ...
Страница 180: ...180 Manual www kraun it Click 8 Continue Reboot Later ...
Страница 199: ...199 Manual www kraun it From the left hand 2 Services menu click on Dynamic DNS The following page is displayed ...
Страница 228: ...228 Manual www kraun it Click 5 restart Click 6 Restart ...


