COMe-bSL6 – User Guide Rev. 1.4
www.kontron.com
// 41
BIOS does not support being split between two chips. Booting takes place either from the
module SPI or from the baseboard SPI.
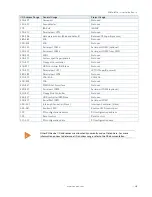
The following table provides a list of supported SPI Boot Flash types for the 8-SOIC package.
Table 25: Supported SPI Boot Flash Types for 8-SOIC Package
Size
Manufacturer
Part Number
Device ID
16MB
Maxim
MX25L12835F
0x20
16MB
Winbond
W25Q128FV
0x40
16MB
Micron
N25Q128A
0xBA
16MB
ISSI
IS25LP128
0x60
3.2.2.
Using an External SPI Flash
Initially, boot on the EFI Shell with an USB key containing the binary used to flash the SPI, plugged in on the system.
Depending on which SPI you would like to flash, you will need to use the (BIOS_DIS1) jumper located on the carrier
Topanga Canyon Type 6 ( J27).
T
o flash the carrier or module Flash chip:
1.
Connect a SPI flash with the correct size (similar to BIOS binary (*.BIN) file size) to the carrier SPI interface.
2.
Open pin A34 (BIOS_DIS0#) and pin B88 (BIOS_DIS1#) to boot from the module BIOS.
3.
Turn on the system and make sure your USB is connected then start the setup. (See Chapter6.1 Starting the uEFI
BIOS).
4.
Check that the following entries are set to their default setting:
Advanced > PCH FW Configuration > Firmware update configuration > ME FW Image Re-Flash > Disabled
Advanced > PCH FW Configuration > Firmware update configuration > Local FW Update > Enabled
Then, change the setup option:
Chipset > PCH-IO Configuration > BIOS Security Configuration > BIOS Lock > Disabled
5.
Save and exit setup.
6.
Reboot system into EFI shell.
7.
Connect pin B88 (BIOS_DIS1#) to ground to enable the external SPI flash.
8.
From the EFI shell, enter the name of the partition of your USB Key in this example; Hit FS0: then enter.
9.
Type
FPT –SAVEMAC –F <biosname.BIN>
10.
Wait until the program ends properly and then power cycle the whole system.
The system is now updated.
Depending on the state of the external SPI flash, the program may display up to two warning
messages printed in red. Do not stop the process at this point! After a few seconds of
timeout, flashing proceeds. For more information, refer to the EMD Customer Section.


