background image

Configuring your Printer via

PageScope Light

206

User Mode 

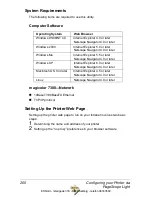
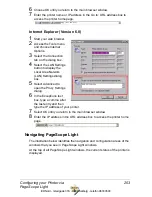
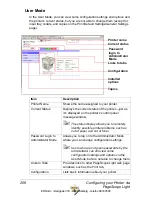
In the User Mode, you can view some configuration settings and options and 
the printer’s current status, but you are not able to change them (except for 
input tray, collate, and copies on the Print/Default Settings/General Settings 
page). 

Item

Description

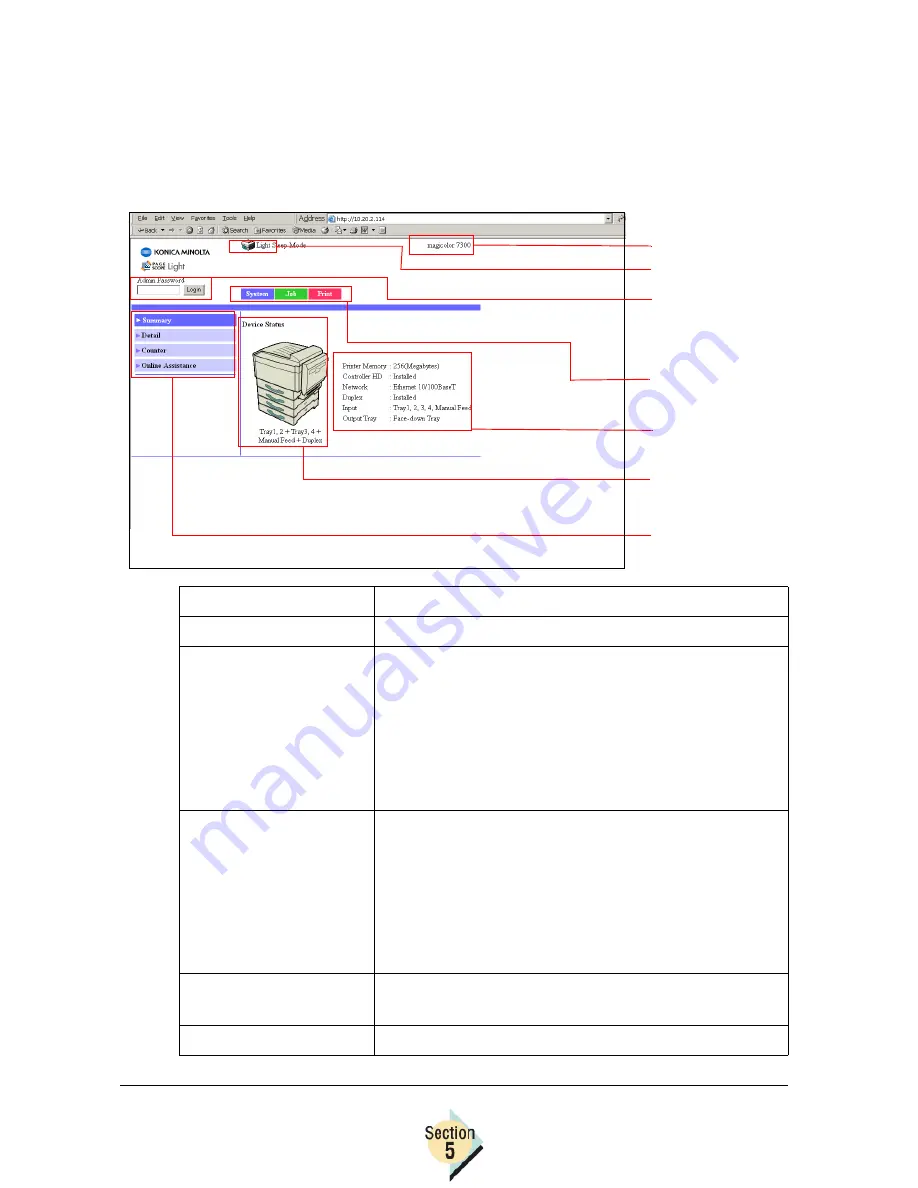
Printer Name

Shows the name assigned to your printer.

Current Status

Displays the current status of the printer—just as 
it’s displayed on the printer’s control panel 
message window.

"#

The status display allows you to remotely 
identify possible printer problems, such as 
out of paper and out of toner.

Password Login to 
Administrator Mode

Allows you to log on to the Administrator Mode, 
where you can change configuration settings.

"#

Users who are not given passwords by the 
administrator can still view some 
configuration settings and options via the 
User Mode, but are not able to change them.

Links to Tabs

Provides links to other PageScope Light web page 
windows, such as the Print tab.

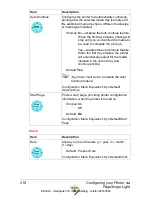
Configuration

Lists basic information about your printer.

Links to tabs

Topics

Current status

Printer name

Configuration

Installed 

options

Password 

login to 
Administrator
Mode

EDNord - Istedgade 37A - 9000 Aalborg - telefon 96333500

Содержание Magicolor 7300

Страница 1: ...magicolor 7300 Reference Guide 1800736 001B EDNord Istedgade 37A 9000 Aalborg telefon 96333500...

Страница 2: ...ogo are trademarks or registered trademarks of KONICA MINOLTA HOLDINGS INC magicolor is a trademark or registered trademark of KONICA MINOLTA PRINTING SOLUTIONS U S A INC Manual Notice KONICA MINOLTA...

Страница 3: ...System 21 Your Printer s Operating System 22 Printer Firmware Updates 22 Installing the Printer Driver on Windows XP 23 KONICA MINOLTA PostScript Drivers 24 Manually Installing the KONICA MINOLTA Pos...

Страница 4: ...MINOLTA PostScript Driver on Windows NT4 54 Customizing Driver Settings 56 PPDs and Utilities for Macintosh 59 Introduction 60 Installing PPD Files 60 Customizing the Printer Description 61 KONICA MIN...

Страница 5: ...INOLTA Status Monitor 111 Download Manager 121 Installing the Download Manager for Windows 122 KONICA MINOLTA PageScope Net Care 129 PageScope Net Care Overview 130 System Requirements 130 Installing...

Страница 6: ...d Pantone Tables 167 Color Profiles 168 Halftone Screens 173 Pantone Tables 175 Inside Your Printer 181 Inside Your Printer 182 Rasterization 183 Printable Areas 184 Printing 184 Printer Features 187...

Страница 7: ...68 Retrieving Accounting Information 268 Accounting File Format 269 Log Accounting Fields 270 Field Definitions 271 Job Accounting Fields 272 Introduction 279 About PJL 280 In This Section 280 Overvie...

Страница 8: ...s to the Printer 290 PJL Commands 293 Introduction 294 Commands 294 Environmental Variables 301 Status Codes 307 Introduction 308 Status Codes 308 DOC Matrix 311 Introduction 312 DOC PJL Command Matri...

Страница 9: ...s Instructions for connecting your printer to a PC using parallel USB and Ethernet connections Chapter 1 2 Connecting to Macintosh Operating Systems Instructions for connecting your printer to a Macin...

Страница 10: ...Chapter Location Chapter Title Begins on page 1 1 Connecting to Windows Operating Systems 3 1 2 Connecting to Macintosh Operating Systems 15 EDNord Istedgade 37A 9000 Aalborg telefon 96333500...

Страница 11: ...1 1 Connecting to Windows Operating Systems EDNord Istedgade 37A 9000 Aalborg telefon 96333500...

Страница 12: ...e These interfaces support only a one to one connection which means that the workstation exclusively owns the connection to the printer Some network environments allow the access of a printer locally...

Страница 13: ...the KONICA MINOLTA PostScript Driver for Windows Pin Description Pin Description 1 Strobe 19 Return 2 Data_1 20 Return 3 Data_2 21 Return 4 Data_3 22 Return 5 Data_4 23 Return 6 Data_5 24 Return 7 Dat...

Страница 14: ...the magicolor 7300 Software Utilities CD ROM 1 Turn on the PC and the printer and make sure the message window displays READY 2 Plug one end of the USB cable into the PC and the other into the printer...

Страница 15: ...Some Windows Operating Systems may require you to repeat step 9 as Plug and Play driver files are installed 10 Select Finish The Plug and Play installation is completed 11 When you have finished remo...

Страница 16: ...cases you may want to modify this address so it doesn t conflict with any other IP address present in your network or in networks attached Your network system administrator should assign the IP addres...

Страница 17: ...rinter b On the control panel change the IP address of your printer through the Interface Ethernet IP Address menu on the control panel Press Key Until Display Reads READY MAGICOLOR 7300 MAIN MENU PRI...

Страница 18: ...he router gateway s IP address here 6 If needed configure additional printer settings Although the settings mentioned above are sufficient for normal operation you might want to change other settings...

Страница 19: ...rinter is working properly by pinging the printer 1 From the Start button menu select Run and then at the prompt type command 2 Select OK 3 From the command line type ping IP Address For example ping...

Страница 20: ...TTL 15 Reply from 161 33 128 5 bytes 32 time 2ms TTL 15 Reply from 161 33 128 5 bytes 32 time 2ms TTL 15 Ping statistics for 161 33 128 5 Packets Sent 4 Received 4 Lost 0 0 loss Approximate round trip...

Страница 21: ...128 5 Pinging 161 33 128 5 with 32 bytes of data Reply from 161 33 128 5 Destination host unreachable Reply from 161 33 128 5 Destination host unreachable Reply from 161 33 128 5 Destination host unre...

Страница 22: ...EDNord Istedgade 37A 9000 Aalborg telefon 96333500...

Страница 23: ...1 2 Connecting to Macintosh Operating Systems EDNord Istedgade 37A 9000 Aalborg telefon 96333500...

Страница 24: ...ling the software for the first time You can connect to your printer by A crossover Ethernet cable Ethernet patch cables and an Ethernet hub Macintosh OS 9 PPDs and Utilities Installation OS 9 Softwar...

Страница 25: ...y have installed on your printer and click OK A desktop printer icon will be created for your printer on the desktop LPR TCP IP Connection a You can connect via Ethernet in either of two ways Plug one...

Страница 26: ...r your printer s IP address for both Printer Address and Queue Choose Verify to confirm a connection to your printer Click OK f Click on the Create button Name your printer and click Save A desktop pr...

Страница 27: ...river and the PPD for your printer Chapter 2 4 Installing the Printer Driver on Windows Me 98 Installation of the PostScript driver and the PPD for your printer Chapter 2 5 Installing the Printer Driv...

Страница 28: ...Windows XP 23 2 3 Installing the Printer Driver on Windows 2000 33 2 4 Installing the Printer Driver on Windows Me 98 43 2 5 Installing the Printer Driver on Windows NT4 51 2 6 PPDs and Utilities for...

Страница 29: ...2 1 Your Printer s Operating System EDNord Istedgade 37A 9000 Aalborg telefon 96333500...

Страница 30: ...ognizes the nature of the code and replaces the older firmware with the new one that is downloaded After downloading the printer restarts with the new printer firmware resident and active Printer Firm...

Страница 31: ...2 2 Installing the Printer Driver on Windows XP EDNord Istedgade 37A 9000 Aalborg telefon 96333500...

Страница 32: ...lities CD ROM and store it in a safe place You also have the option to manually install the printer driver located on the CD ROM See Manually Installing the KONICA MINOLTA PostScript Driver on Windows...

Страница 33: ...iles Select Browse then locate and choose the directory created in step 2 above Select OK and then select Unzip 5 After the files are unzipped close the WinZip Self Extractor and then continue with th...

Страница 34: ...your CD ROM drive If the CD ROM installation application starts close the application before continuing 2 From the Start menu choose Printers and Faxes 3 Select Add a printer from the Printer Tasks me...

Страница 35: ...e Disk then click Browse Browse to the location of the driver see the following table select the inf file select Open and then select OK Driver to be installed Browse to Driver on CD ROM drivers windo...

Страница 36: ...be desirable to limit the number of users that can print in color Selecting magicolor 7300 PostScript Monochrome Only installs the printer without color printing options 8 This screen allows you to r...

Страница 37: ...dd Printer Wizard closes Do Not Share is automatically selected through the port Customizing Driver Settings 1 From the Start menu choose Printers and Faxes and locate the new printer icon 2 Click on...

Страница 38: ...lections select OK If your printer connection uses bidirectional communication the options installed on the printer are automatically identified in the Installed Options list Only options that are not...

Страница 39: ...t Driver on Windows XP 31 For additional printer driver information refer to the printer driver s online help You may continue installing other utilities available on the Software Utilities CD ROM EDN...

Страница 40: ...EDNord Istedgade 37A 9000 Aalborg telefon 96333500...
Страница 41: ...2 3 Installing the Printer Driver on Windows 2000 EDNord Istedgade 37A 9000 Aalborg telefon 96333500...

Страница 42: ...lities CD ROM and store it in a safe place You also have the option to manually install the printer driver located on the CD ROM See Manually Installing the KONICA MINOLTA PostScript Driver for Window...

Страница 43: ...K and then select Unzip 5 After the files are unzipped close the WinZip Self Extractor and then continue with the installation steps described in the next section beginning with step 2 on page 36 Manu...

Страница 44: ...choose Settings Printers 3 Double click on the Add Printer icon Windows 2000 The Add Printer Wizard starts Follow the on screen instructions 4 Select local printer you are attaching to a port not to...

Страница 45: ...tallation on page 105 to create a new port 6 Select Have Disk then click Browse Browse to the location of the driver see the following table select the inf file select Open and then select OK Driver t...

Страница 46: ...ay be desirable to limit the number of users that can print in color Selecting magicolor 7300 PostScript Monochrome Only installs the printer without color printing options 8 This screen allows you to...

Страница 47: ...this printer Select Next twice and then select Finish The Add Printer Wizard closes Customizing Driver Settings 1 From the Start menu choose Settings Printers and locate the new printer icon 2 Right...

Страница 48: ...atically identified in the Installed Options list Only options that are not currently installed on the printer display in the Available Options list 4 In this window you may choose certain options ava...

Страница 49: ...are not print job dependent such as the media size you have in your tray s 6 Finish customizing the settings and then select OK For additional printer driver information refer to the printer driver s...

Страница 50: ...EDNord Istedgade 37A 9000 Aalborg telefon 96333500...
Страница 51: ...2 4 Installing the Printer Driver on Windows Me 98 EDNord Istedgade 37A 9000 Aalborg telefon 96333500...
Страница 52: ...ies CD ROM and store it in a safe place You also have the option to manually install the printer driver located on the CD ROM See Manually Installing the KONICA MINOLTA PostScript Driver for Windows M...

Страница 53: ...llows you to uncompress the installation files Select Browse then locate and choose the directory created in step 2 above Select OK and then select Unzip 5 After the files are unzipped close the WinZi...

Страница 54: ...sure that the CD ROM is in your CD ROM drive If the CD ROM installation application starts close the application before continuing 2 From the Start menu choose Settings Printers 3 Double click on the...

Страница 55: ...7 Select OK twice Driver to be installed Browse to Driver on CD ROM drivers windows me 9x ps language where is the letter of your CD ROM drive Driver downloaded from Internet New directory containing...

Страница 56: ...ngs it may be desirable to limit the number of users that can print in color Selecting KONICA MINOLTA magi color 7300 Mono installs the printer without color printing options 9 Choose the appropriate...

Страница 57: ...the printer icon 3 Choose Properties In the Properties Window select Details Verify that the port and the driver name are correct Then select Setup 4 Choose the Settings tab If your printer connectio...

Страница 58: ...se the Paper tab From this tab you should set the defaults that are not print job dependent such as Paper Size Source and Media Type For additional printer driver information see the printer driver s...

Страница 59: ...2 5 Installing the Printer Driver on Windows NT4 EDNord Istedgade 37A 9000 Aalborg telefon 96333500...
Страница 60: ...he on screen instructions for driver installation The Installer application automatically runs on most PCs If your PC configuration prevents the Installer from auto running browse to the CD and double...

Страница 61: ...k when prompted Save the download file to a new directory on your PC 3 After the download is complete use Windows Explorer to open the new directory created in step 2 4 Double click on the exe file th...

Страница 62: ...hat you are installing the KONICA MINOLTA PostScript Driver for Windows NT4 for the first time 1 If the driver you are installing is on the Software Utilities CD ROM make sure that the CD ROM is in yo...

Страница 63: ...n of the driver you are installing see the following table select the inf file select Open and then select Next Driver to be installed Browse to Driver on CD ROM drivers windows NT4 ps language where...

Страница 64: ...elect Shared enter the share name Select Next and then select Finish The Add Printer Wizard closes Customizing Driver Settings To use the KONICA MINOLTA PostScript printer driver SNMP must be running...

Страница 65: ...automatically identified in the Installed Options list Only options that are not currently installed on the printer display in the Available Options list 4 In this tab you may choose certain options...

Страница 66: ...ent such as the media size you have in your tray s 6 Finish customizing the settings and select OK For additional printer driver information you may also refer to the printer driver s online help You...

Страница 67: ...2 6 PPDs and Utilities for Macintosh EDNord Istedgade 37A 9000 Aalborg telefon 96333500...
Страница 68: ...n does not appear when you double click the KONICA MINOLTA icon then double click the Install icon and this screen appears 4 After reading the Program License Agreement select Agree to continue the in...

Страница 69: ...ct a PostScript Printer list select your printer and then select Create If your network has more than one zone select the zone that your printer is configured for select your printer from the Select a...

Страница 70: ...nection between the selected PPD file and your printer 7 In the setup window select Configure 8 Configure the settings by choosing from the options available in the drop down list boxes Use the scroll...

Страница 71: ...hat you want to print from choose Page Setup from the file menu Choose OK Make sure the proper media size for your job is selected in the drop down list 2 Choose Print from the file menu 3 Choose the...

Страница 72: ...nt all pages in the open document To print a specific range of pages select From and then enter the beginning page number in the From text box and the ending page number in the To text box Paper Sourc...

Страница 73: ...ng in your applications while the print job is processing If you don t have enough free file space on your computer to process a spool file select Foreground printing Print Time Allows you to assign a...

Страница 74: ...g configuration changes Print Sends the print job using the configuration settings you selected in the printer dialog closes the print dialog and restores the last saved configuration settings Item De...

Страница 75: ...ing This setting is disabled grayed out unless an optional duplex unit is installed and identified in the PPD configuration See Customizing the Printer Description on page 61 for additional informatio...

Страница 76: ...ast saved configuration settings Item Description Format Select the file format of the output file PostScript Level Allows you to select from available PostScript levels Data Format Sends the print jo...

Страница 77: ...are converted to CMYK according to the output profile Setting the RGB Gray Treatment to this item results in rich black colors using varying amounts of cyan magenta yellow and black toner Because all...

Страница 78: ...Script Color Matching is the selected Print Color setting Colors As Grayscale Select check this check box if you re printing image colors as gray shades Save Settings Saves configuration changes made...

Страница 79: ...onfiguration items are changed again Cancel Closes the print dialog without printing and without saving configuration changes Print Sends the print job using the configuration settings you selected in...

Страница 80: ...EDNord Istedgade 37A 9000 Aalborg telefon 96333500...

Страница 81: ...2 7 Linux Setup EDNord Istedgade 37A 9000 Aalborg telefon 96333500...

Страница 82: ...daemon centric print system which has a built in and sensible driver configuration syntax PDQ works similarly to and takes the place of LPD To print the pdq command is used instead of lpr PDQ also inc...

Страница 83: ...PPD based options that support printing under Linux CUPS with the use of PPD files allows you to take advantage of the built in printer features such as duplex and multiple media trays and to set the...

Страница 84: ...nts such as choosing the pages to print setting brightness and gamma correction and appear ance of text or image printouts Compatible with many of the command line tools of CUPS It accepts the command...

Страница 85: ...alling lpd are found below 2 Download CUPS 1 1 1 or newer from http www cups org 3 Type rpm i cups x x x linux x x intel rpm use the name of the RPM you have Uninstalling lpd As root from the command...

Страница 86: ...the following lines in the admin section Order deny allow Deny from all Allow from 127 0 0 1 A placed at the beginning of the line comments out the line 2 Using your web browser go to http localhost 6...

Страница 87: ...through XPP XPP lists printers installed from CUPS Printing from Applications The following steps are for quick reference only For more detailed instructions see the documentation provided with each a...

Страница 88: ...sired printer from the list and then select Add New Printer 6 To make your selection the default printer select Default Printer Using XPDQ 1 With your printer already added select the printer from the...

Страница 89: ...2 In the text box replace lpr with xpp and then select OK Netscape When Print is selected Netscape opens a print dialog box From this dialog box different print commands may be entered The following i...

Страница 90: ...UI option Netscape remembers the last option entered so you don t have to reenter the command each time you print Corel WordPerfect WordPerfect offers two ways of setting up a printer personal or syst...

Страница 91: ...y root The steps for setting up a personal or system printer are the same with the exception that for a system printer you must login as root and start WordPerfect with the adm option Corel WordPerfec...

Страница 92: ...CUPS or the drivers provided for PDQ If your printer is not listed go to ftp ftp corel com pub printdrivers for a list of printer drivers 6 Select OK twice 7 With the desired printer highlighted selec...

Страница 93: ...Printing from Applications 85 9 Add any spooler options 10 Select OK EDNord Istedgade 37A 9000 Aalborg telefon 96333500...
Страница 94: ...EDNord Istedgade 37A 9000 Aalborg telefon 96333500...

Страница 95: ...2 8 Connecting to NetWare 5 x 6 x EDNord Istedgade 37A 9000 Aalborg telefon 96333500...

Страница 96: ...x 6 x 1 Insert the Software Utilities CD ROM in your PC s CD ROM drive If the CD ROM does not automatically open double click the KONICA MINOLTA CD ROM icon on your Macintosh desktop 2 Choose the Nex...

Страница 97: ...panel and through PageScope Net Care Configuring the Print Server Context Using PageScope Light In the Configuration page in the web based utility enter values for the following parameters Item Descr...

Страница 98: ...Server Name for the printer Range Up to 63 characters Default Blank Preferred File Server Identifiess the Preferred File Server for the printer Range Up to 63 characters Default Blank Preferred NDS Co...

Страница 99: ...printer in the printer list 2 Choose the NetWare tab 3 Select Enable NetWare and set the Frame Type as Auto for Autodiscovery or Ethernet to set your frame type 4 Enter the Print Mode 5 Select PServer...

Страница 100: ...erver also enter the Preferred NDS Server Name Print Server Password If you want to use a password enter it here but make sure it matches the NWAdmin File Server password Print Server Mode Allows you...

Страница 101: ...one assigned in NetWare setup Print Server Polling Rate Allows you to set the rate at which the print server looks for print jobs Print Server Name If the print server is associated to the NDS tree al...

Страница 102: ...EDNord Istedgade 37A 9000 Aalborg telefon 96333500...
Страница 103: ...lity Chapter 3 3 KONICA MINOLTA Status Monitor Installation and user instructions for the Status Monitor utility Chapter 3 4 Download Manager Installation and user instructions for the Download Manage...

Страница 104: ...Using Printer Utilities 97 3 2 KONICA MINOLTA Crown Print Monitor 101 3 3 KONICA MINOLTA Status Monitor 107 3 4 Download Manager 121 3 5 KONICA MINOLTA PageScope Net Care 129 3 6 NDPS Gateways 141 ED...

Страница 105: ...3 1 Using Printer Utilities EDNord Istedgade 37A 9000 Aalborg telefon 96333500...
Страница 106: ...lays status information to the host via Print Manager Online help is available after installation 101 Download Manager Download fonts overlays and color profiles from your PC Windows only to your prin...

Страница 107: ...our product We make every effort to bring you the very best and as a result occasionally update the printer utility software For the latest printer utilities check your printer s Support page on our...

Страница 108: ...the download file to a new directory on your PC 3 After the download is complete use Windows Explorer to open the new directory created in step 2 above 4 Double click on the exe file that was downloa...

Страница 109: ...3 2 KONICA MINOLTA Crown Print Monitor EDNord Istedgade 37A 9000 Aalborg telefon 96333500...

Страница 110: ...ptive identifier of the port Each port name must be unique The maximum port name is up to 128 characters This name displays in the Print to list box of the Printer Properties dialog box in Print Manag...

Страница 111: ...efore the address is entered in the Network Host Name file the job does not print c Select Cancel to abort adding the port and to exit from the Add Port dialog box 4 Select the Advanced button The Con...

Страница 112: ...ager that the printer is not responding Send Request Timeout 60 Minutes Sets the amount of time the Crown Print Monitor waits for a print job to be sent before it returns control to the Microsoft Prin...

Страница 113: ...Monitor installation The following assumes that Crown Print Monitor has already been installed on your PC Windows XP 2000 NT4 1 From the Start menu choose Settings 2 Choose Printers 3 In Printers wind...

Страница 114: ...5 Select Other 6 Select Crown Port from the list and then select OK The Add Port window appears Follow the instructions on the screen 7 Select OK 8 Select Close in Printer Ports dialog box then selec...

Страница 115: ...3 3 KONICA MINOLTA Status Monitor EDNord Istedgade 37A 9000 Aalborg telefon 96333500...

Страница 116: ...perating System magicolor 7300 connected via Ethernet TCP IP KONICA MINOLTA PostScript Driver for Windows installed If you choose the Compact Installation option when installing the KONICA MINOLTA Sta...

Страница 117: ...n prevents the Installer from auto running browse to the CD and double click on the setup exe file in the root directory to start the Installer application 1 Select the language select OK 2 After revi...

Страница 118: ...ck KONICA MINOLTA Printer Management Utilities and select Custom from the Setup Type list 8 Select Next 9 From the Printer Management Utilities dialog select check KONICA MINOLTA Status Monitor Make s...

Страница 119: ...ow the application options are configured Use the following procedure to detect and recover the printer status conditions Starting the KONICA MINOLTA Status Monitor To begin monitoring printer status...

Страница 120: ...e procedures that must be performed to return the printer to a ready status Because of the nature of some printer errors and warnings not all status messages have a corresponding video file If no vide...

Страница 121: ...nues to run in the background To stop monitoring right click on the application icon in the Windows task bar and choose Exit Help button Opens the KONICA MINOLTA Status Monitor online help file Item D...

Страница 122: ...first printer it finds in the list that is supported as the default printer Notify when supplies read This box is configurable from 0 100 Notify by email for errors warnings Enabling checking this che...

Страница 123: ...This field is provided for you to identify the IP address of your SMTP Mail Server Sender s Address This field allows you to enter an email address that appears as the source of the automatically gene...

Страница 124: ...ail on Determines which type of status messages will cause the application to generate and send an email message There are three types of status messages recognized by the KONICA MINOLTA Status Monito...

Страница 125: ...rigger percentage value that causes the application to send a status message email When a consumables item equals the value in this field the automatic email message feature is activated and a message...

Страница 126: ...ese steps to recover from the problem 1 Double click on the KONICA MINOLTA Status Monitor icon in the Windows Task Bar The KONICA MINOLTA Status Monitor application window opens If not already selecte...

Страница 127: ...tions described by the instructions and illustrated by the video to clear the printer alert status The application icon in the Windows Task Bar changes to a green color to indicate normal printer stat...

Страница 128: ...EDNord Istedgade 37A 9000 Aalborg telefon 96333500...
Страница 129: ...3 4 Download Manager EDNord Istedgade 37A 9000 Aalborg telefon 96333500...

Страница 130: ...port set to the target printer KONICA MINOLTA PostScript Drivers are available from the Software Utilities CD ROM and from the Internet at www konicaminolta net printer Installing from the CD ROM The...

Страница 131: ...he Introduction dialog 3 From the Main Menu dialog select Additional Software 4 After reviewing and accepting the license agreement choose the installation directory or use the default directory setti...

Страница 132: ...pears select Finish 10 After the installation is complete remove the Software Utilities CD ROM from your CD ROM drive and store it in a safe place Downloading a Printer Utility from the Internet Our I...

Страница 133: ...Self Extractor 6 Open the directory containing the unzipped installation files and then continue with the installation steps described in the next section beginning with step 2 on page 126 Manual Inst...

Страница 134: ...e it in a safe place Using the Download Manager The Download Manager application can be opened from within the printer driver or independently Opening the Download Manager from the Printer Driver PC A...

Страница 135: ...gs Printers and locate the printer icon 2 Right click on the printer icon 3 Choose Properties 4 Choose the Details tab and then select Setup 5 Choose the Overlays tab and then select the Download Mana...

Страница 136: ...EDNord Istedgade 37A 9000 Aalborg telefon 96333500...
Страница 137: ...3 5 KONICA MINOLTA PageScope Net Care EDNord Istedgade 37A 9000 Aalborg telefon 96333500...

Страница 138: ...apter explains how to install PageScope Net Care how to start the server and the client how to log in and how to update your installed version of PageScope Net Care For details on how to use PageScope...

Страница 139: ...higher Java Plug in 1 3 or higher Linux x86 kernel 2 2 12 and glibc 2 1 2 11 or higher Netscape 6 x or higher Notes Do not downgrade from the web browser that comes installed with your operating syste...

Страница 140: ...t install suse sh which is also located in the PageScope directory Starting the Server Windows XP 1 Click Start Control Panel 2 Click the Administrative Tools icon Windows XP Professional First click...

Страница 141: ...oots up Linux PageScope Net Care starts automatically on Linux systems once it is installed You can also start it manually or shut it down momentarily and restart it Use root privileges to perform the...

Страница 142: ...Logging In 134 The following log in screen appears Logging In On the main Login screen you can set your preferences for Java mode HTML mode EDNord Istedgade 37A 9000 Aalborg telefon 96333500...

Страница 143: ...wser accesses a Java plug in download site but you must perform the download and installation manually Language You can set the language in which PageScope Net Care text is displayed Choices are Czech...

Страница 144: ...ions in PageScope Net Care Change the PageScope Net Care Server HTTP server port Initialize backup restore or upgrade the database Plug in new device modules Plug in new language modules Update PageSc...

Страница 145: ...ls folder 3 Double click the Services icon 4 Select KONICA MINOLTA PageScope Net Care Service 5 On the Action menu select Stop Windows NT4 1 Click Start Settings Control Panel 2 Double click the Servi...

Страница 146: ...PageScope Net Care server before upgrading it All Platforms 1 If you are running an old version of PageScope shut down the server Specify a different directory for PageScope Net Care than the one wher...

Страница 147: ...le click the Add Remove programs icon A dialog box appears 4 On the Add Remove Programs dialog box select KONICA MINOLTA Pag eScope Net Care in the list of programs Windows 2000 Click the Change Remov...

Страница 148: ...perations 1 Shut down the PageScope Net Care server by typing etc rc d init d nmu stop 2 Run the uninstall sh script in the PageScope_Net_Care directory 3 Delete the PageScope_Net_Care directory by ty...

Страница 149: ...3 6 NDPS Gateways EDNord Istedgade 37A 9000 Aalborg telefon 96333500...

Страница 150: ...NICA MINOLTA NDPS Gateway components are designed for use with printers supporting LPD LPR and the Printer MIB Older printers printers that don t use a CrownNet interface for TCP IP connection or prin...

Страница 151: ...ctory 6 Select Next 7 Verify that the path to the public win32 directory is correct If you need to change the path select the Change button to locate and choose the public win32 directory 8 Select Nex...

Страница 152: ...ps to configure KONICA MINOLTA NDPS components are Create a Broker Create a Manager Create a Printer Agent Setup NDPS Printers using Add Printer Wizard or NetWare Print Manager The following sections...

Страница 153: ...ant to place the broker 2 Select Object and then select Create 3 Select NDPS Broker and then select OK 4 Enter the name for the NDPS Broker 5 Select the button next to the RMS Volume text box Choose t...

Страница 154: ...8 Load the Broker at the Server console by typing Load broker broker name context where broker resides Creating an NDPS Manager 1 In NWAdmin select the container where you want to place the manager 2...

Страница 155: ...the button next to the Database Volume text box 8 Select the Volume where the manager will be created and then select OK 9 Select Create 10 Check the configuration for access control to make sure that...

Страница 156: ...iner where you want to place the Printer Agent 2 Select Object and then select Create 3 Select NDPS Printer and then select OK 4 Type in the name for the Printer Agent s name 5 Select Create and then...

Страница 157: ...Look for the NPDS Manager created in the previous section 8 Select OK The snap in configuration window appears KONICA MINOLTA Gateway Configuration KONICA MINOL KONICA MINOLTA NDPS Gateway Configurat...

Страница 158: ...Finish to complete the configuration of the Printer Agent A message window displays to indicate that the server is creating the object on the server and starts binding the object with the print system...

Страница 159: ...ions see Section 2 for instructions on installing drivers and host software and then add NDPS printers as described in the next section NDPS Printer Setup using Add Printer 1 Select Printers from the...

Страница 160: ...o browse your network Browse for Printer window appears 5 Double click NDPS Printers 6 Double click NDPS Controlled Access Printers 7 Locate and double click the printer you want to add EDNord Istedga...

Страница 161: ...t Yes or No NDPS Printer Setup using NetWare Print Manager 1 Select NWPS32 from the Public Win32 directory Novell Printer Manager window appears 2 Choose New from the Printer menu Novell Printers wind...

Страница 162: ...the printer to be added 6 Select OK Using KONICA MINOLTA NDPS Snap in Controls The KONICA MINOLTA NDPS components have been designed to take advantage of the configuration capabilities and informatio...

Страница 163: ...complete the remaining steps to open the KONICA MINOLTA Printer Control dialog Otherwise see the next section for a description of the KONICA MINOLTA Printer Control dialog 2 From the Novell Printer...

Страница 164: ...pens the Printer Identification dialog which displays general information about the printer and NDPS configuration and allows you to select from available Printer Control DLL Names Features Opens the...

Страница 165: ...KONICA MINOLTA Advanced dialog that allows you to open a Telnet session with the selected printer and to view printer configuration and status information from the printer s internal web pages via Pag...

Страница 166: ...EDNord Istedgade 37A 9000 Aalborg telefon 96333500...

Страница 167: ...lor printing fundamentals used by your printer Chapter 4 2 Color Profiles Halftone Screens and Pantone Tables An introduction to the proper use of color profiles and instructions for installing color...

Страница 168: ...Chapter Location Chapter Title Begins on page 4 1 Color Basics 161 4 2 Color Profiles Halftone Screens and Pantone Tables 167 EDNord Istedgade 37A 9000 Aalborg telefon 96333500...

Страница 169: ...4 1 Color Basics EDNord Istedgade 37A 9000 Aalborg telefon 96333500...

Страница 170: ...eflected light from the object A distinction must be made between light radiated by a source and light reflected from an object Although closely related they represent two different fundamental princi...

Страница 171: ...ght experiment on the previous page Notice that for light sources light emitting objects the following applies Red light mixed with green light produces yellow light Green light mixed with blue light...

Страница 172: ...the subtractive principle To print correct colors we need a module capable of translating the RGB colors of the monitor into CMY K colors used by color laser printers This translation is device depen...

Страница 173: ...a standard color space and then translate this to a color laser printer profile The standard color space most commonly used for these translations is CIE LAB The CIE LAB color space is based on the hu...

Страница 174: ...EDNord Istedgade 37A 9000 Aalborg telefon 96333500...

Страница 175: ...4 2 Color Profiles Halftone Screens and Pantone Tables EDNord Istedgade 37A 9000 Aalborg telefon 96333500...

Страница 176: ...its gamut into the CIE LAB model A color reproducing device such as a color laser printer should ship with a profile that converts these CIE LAB colors to its reproduction method Each color producing...

Страница 177: ...e sent to the print engine Several RGB Source and Destination ICC profiles are integrated into the Color Management Module of KONICA MINOLTA color laser printers You may also download other Source Sim...

Страница 178: ...r and produce undesirable image quality artifacts 2 Name the created profile If you are using a Windows driver you may use any naming convention as long as it follows the 8 3 filename extension standa...

Страница 179: ...wnload Manager to Download a Profile 1 Open the Download Manager See Download Manager on page 121 2 Select Color Profile as the type of file to be downloaded 3 Specify your magicolor 7300 printer 4 Un...

Страница 180: ...file description as you want it to appear in the pull down menu 5 Type the filename no path of the downloaded profile found in the directory list of the hard disk s ata0a ps color profiles directory 6...

Страница 181: ...lving power of the eye halftones appear as continuous tone images Halftones are defined by three characteristics screen frequency or lines per inch the number of lines of dots that compose each inch o...

Страница 182: ...7 189 74 Line Magenta 71 57 189 74 Line Yellow 18 43 189 74 Line Black 18 43 189 74 Line Halftone Screen Toner Color Screen Angle Screen Frequency Spot Function Low Cyan 63 43 134 16 Euclidian Magenta...

Страница 183: ...Pantone Tables from the Internet 1 Use your Internet browser to access www konicaminolta net printer Select the appropriate region 2 From the Need Help or Drivers list box select your printer from the...

Страница 184: ...lta net printer 2 From the Need Help or Drivers list box select your printer from the drop down list 3 In the Drivers PPDs Utilities section choose the Macintosh platform 4 Locate and download the Pan...

Страница 185: ...tables readme and other files are extracted 8 Select Quit after the files are unstuffed 9 See the information contained in the extracted files for additional instructions on using Pantone tables EDNor...

Страница 186: ...EDNord Istedgade 37A 9000 Aalborg telefon 96333500...

Страница 187: ...rinter Configuration Contains the methods and details of printer configuration Features a section about the printer s internal web page and how you can access it using PageScope Light a menu map and i...

Страница 188: ...Chapter Location Chapter Title Begins on page 5 1 Inside Your Printer 181 5 2 Printer Features 187 5 3 Printer Configuration 197 5 4 Accounting 267 EDNord Istedgade 37A 9000 Aalborg telefon 96333500...

Страница 189: ...5 1 Inside Your Printer EDNord Istedgade 37A 9000 Aalborg telefon 96333500...

Страница 190: ...t may be printed by the Operating System Information Pages Remark s Configuration Page Each time your printer is switched on it prints a configuration page displaying the configuration settings of the...

Страница 191: ...ion process with bitmap representations The rasterizer processes the data into four bitmaps one for cyan one for magenta one for yellow and one for black The print engine processes these bitmaps and f...

Страница 192: ...r for each color For each dot color of the Frame Buffer bitmap that is turned on the laser is switched on and writes an electrical dot onto the OPC in the print unit An electrical dot is an isolated a...

Страница 193: ...ostatic attraction 5 Fuser Unit The fuser unit contains pressurized hot rollers As the media passes the fuser the toner images are melted and fused onto the media The printed media is then transported...

Страница 194: ...EDNord Istedgade 37A 9000 Aalborg telefon 96333500...

Страница 195: ...5 2 Printer Features EDNord Istedgade 37A 9000 Aalborg telefon 96333500...

Страница 196: ...completed the network server sends the print job to the printer via the same network This method has two major disadvantages 1 The print data is sent two times across the network increasing the networ...

Страница 197: ...servers when connected to a network decreasing unnecessary network traffic This becomes a major benefit when multiple printers are active in the same network Everyone experiences a much faster through...

Страница 198: ...re copies are needed KONICA MINOLTA technology offers a better solution With your printer you do not have to select collation in the software application when you need multiple copies of your document...

Страница 199: ...rkstation to the printer each time Using Overlays Up to five different overlays may be used for each document For each overlay you may select the following criteria from the printer driver a Disk Prin...

Страница 200: ...ommand following the PostScript grestore command Attention Do not make this change to overlay files generated by any KONICA MINOLTA driver other than the Windows 98 Me PostScript driver After it s edi...

Страница 201: ...KONICA MINOLTA Technical Support Printer based Accounting Printers with an internal hard disk may utilize Printer Based Accounting With Printer Based Accounting individual print job information is sa...

Страница 202: ...he following section Auto Continue for additional information concerning the use of tray chaining Auto Continue If paper of the size specified for the print job is not loaded in the printer printing s...

Страница 203: ...ing a message appears instructing that paper be loaded into that tray In addition if paper of a different type and size is loaded into Tray 2 when the first tray runs out of paper during printing prin...

Страница 204: ...EDNord Istedgade 37A 9000 Aalborg telefon 96333500...

Страница 205: ...5 3 Printer Configuration EDNord Istedgade 37A 9000 Aalborg telefon 96333500...

Страница 206: ...Parameter descriptions accompanied with the menu button icon shown at right have a corresponding menu item that can also be used for setting the default value Just click on the menu icon to jump to th...

Страница 207: ...wser software application is needed on your workstation In addition with the proper password you can change the configuration of the printer without leaving your PC Users who are not given passwords b...

Страница 208: ...etting up the no proxy preferences in your browser software Operating System Web Browser Windows 95 98 NT 4 0 Internet Explorer 4 0 or later Netscape Navigator 4 0 or later Windows 2000 Internet Explo...

Страница 209: ...eens below may be different from yours depending on software versions and operating systems in use Our examples represent the IP address of the printer with xxx xx xxx xxx Always enter your printer s...

Страница 210: ...sword into the Admin Password box at the upper left corner of the screen For the password use the same password as the administrator password for the printer For details consult your printer administr...

Страница 211: ...Settings dialog box 5 Select Advanced to open the Proxy Settings dialog 6 In the Exceptions text box type a comma after the last entry and then type the IP address of your printer 7 Select OK until y...

Страница 212: ...ppears when you click on the current setting Icon Status Description Examples Ready The printer is online and either ready to print or printing READY WARMING UP PROCESSING Attention The printer needs...

Страница 213: ...t job Display Displays the specified records Format Formats the hard disk Get Gets the specified records Login When the correct password is input allows you to log into the Administrator mode Logout W...

Страница 214: ...y allows you to remotely identify possible printer problems such as out of paper and out of toner Password Login to Administrator Mode Allows you to log on to the Administrator Mode where you can chan...

Страница 215: ...er Mode web pages Installed Options Identifies the type of printer that you are browsing and identifies the installed options Topics Allows you to view other PageScope links Tab Purpose Page System Li...

Страница 216: ...k Lists the capacity amount used and amount remaining of the hard disk The hard disk appears only if it is installed Interface Info Lists information about the local and network interfaces Consumables...

Страница 217: ...owner status job type and received time of current print jobs Job History Job History lists the job ID owner title faces printed status finish time job type and number of sheets of completed print jo...

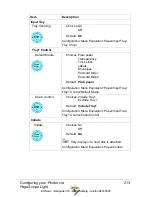
Страница 218: ...ontrol panel menus available and a directory list It display the product name and your printer name Item Description Default Setting General Settings Displays the current input tray duplex option numb...

Страница 219: ...age window The status display allows you to remotely identify possible printer problems such as out of paper and out of toner Logout from Administrator Mode Logs out of the Administrator Mode and retu...

Страница 220: ...iptions of equivalent printer menus User Choice Paper Tab Purpose Page System Is the starting point for all access to the printer s internal PageScope web pages 212 Print Allows you to view such items...

Страница 221: ...stcard Side2 Default Plain paper Configuration Menu Equivalent Paper Input Tray Tray1 Control Default Media Chain Control Choices Include Tray1 Exclude Tray 1 Default Include Tray1 Configuration Menu...

Страница 222: ...214 Quality Item Description AIDC Enables disables Automatic Image Density Control AIDC calibration Choices Enable Disable Default Enable Configuration Menu Equivalent Quality AIDC Menu Select EDNord...

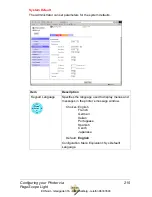
Страница 223: ...Item Description Keypad Language Specifies the language used to display menus and messages in the printer s message window Choices English French German Italian Portuguese Spanish Czech Japanese Defau...

Страница 224: ...Mode Off Default Light Sleep Sleep Timer Choices 15 Minutes 30 Minutes 1 Hour 3 Hours Default 30 Minutes Deep Sleep Choices 00 00 24 00 18 00 06 00 20 00 06 00 22 00 06 00 24 00 06 00 Default 00 00 2...

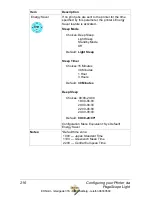
Страница 225: ...ration Menu Equivalent Sys Default Buzzer Control PostScript Job Timeout Range 0 300 Seconds Default 0 Seconds Wait Timeout Range 0 300 Seconds Default 0 Seconds Error Report Choices Yes No Default Ye...

Страница 226: ...tray empties the printer will automatically adjust for the media installed in the second tray and continue printing Default Yes Tray Chain must be On to enable the Auto Continue feature Configuration...

Страница 227: ...ent Sys Default Clock Time Zone Allows you to identify your time zone 0 midnight Greenwich Mean Time Hours Range 12 to 12 Default 0 Minutes Choices 0 30 Default 0 Notes Default time zone 100V Japan St...

Страница 228: ...rinter Item Description Admin Password Identifies the Admin Password Range Up to 4 characters 0000 9999 AAAA ZZZZ Default 0000 Input Admin Password Changes the Admin Password set by the Administrator...

Страница 229: ...ord set by the Administrator This must match the inputted Admin Password Range Up to 4 characters 0000 9999 AAAA ZZZZ Default Blank Item Description Refresh Rate Sets the refresh rate of PageScope Lig...

Страница 230: ...y PageScope Light windows Choices English German French Italian Spanish Czech Portuguese Japanese Chinese Default English Item Description Printer Controller Printer Controller F W Version Displays th...

Страница 231: ...f the person or organization that provides assistance with the printer Range Up to 63 characters Default KONICA MINOLTA Customer Support Contact Info Specifies specific contact information Range Up to...

Страница 232: ...4 Supplies and Accessories Specifies or sets the name of the person or organization that provides assistance with supplies and accessories Range Up to 127 characters Default Blank Item Description EDN...

Страница 233: ...ows you to save the current device settings to a file Restore Settings File Name allows you to browse for a file Send the File to the Device allows you to send a file to the printer to set the device...

Страница 234: ...set the printer controller Configuration Menu Equivalent Sys Default Restore Default Restore Printer Network Reset Network Interface Allows you to reset the printer s network interface Configuration M...

Страница 235: ...oller Firmware Restores the printer controller to factory default settings Includes all settings in Paper Quality Sys Default except Tray Alignment and Control Panel Password Configuration Menu Equiva...

Страница 236: ...228 Administrator Mode Print Tab Local I F Local I F I O TimeOut Changes the I O TimeOut Range 10 300 Seconds Default 15 Configuration Menu Equivalent Interface Parallel IO Timeout Menu Select EDNord...

Страница 237: ...ing your Printer via PageScope Light 229 IPP Item Description IPP Printer Name Allows you to enter the printer name Range Up to 127 characters Default Blank EDNord Istedgade 37A 9000 Aalborg telefon 9...

Страница 238: ...the printer s IP address Range 0 255 for each triplet Default 0 0 0 0 If the IP address is outside the range the following message displays when you choose the Apply button Update unsuccessful The add...

Страница 239: ...s page Choose the browser s Back button and then type an appropriate number Configuration Menu Equivalent Interface Ethernet Subnet Mask Default Gateway Enables the gateway Range 0 255 for each triple...

Страница 240: ...isables the IPP Printing option Choices Enable Disable Default Enable Printer URI Lists Printer URI Authenticity and Security for current printers Operational Support Allows you to choose to activate...

Страница 241: ...nt Enables or disables the NetWare Print option Choices Enable Disable Default Enable Frame Type Identifies the frame type Choices Auto Ethernet 2 802 2 802 3 SNAP Default Auto Bindery NDS Identifies...

Страница 242: ...the printer Range Up to 63 characters Default Blank Preferred NDS Context Identifies the Preferred NDS Context for the printer Range Up to 191 characters Default Blank Preferred NDS Tree Identifies th...

Страница 243: ...via PageScope Light 235 NetWare Status NetWare Server Lists current NetWare server Queue Name Lists current NetWare queue name Queue Status Lists current NetWare queue status EDNord Istedgade 37A 9000...

Страница 244: ...lk Configuration AppleTalk Enables or disables AppleTalk Choices Enable Disable Default Enable Printer Name Sets the printer name Range Up to 31 characters Default Blank Zone Name Sets the zone name R...

Страница 245: ...d Item Description Send SMTP Server Sets the SMTP Server ID Range 0 255 for each triplet Default 0 0 0 0 SMTP Server Time Out Displays SMTP Server Time Out in seconds Range 30 300 Seconds Default 60 S...

Страница 246: ...nge Reset Choose Reset to reset the accounting utility In order for Reset Accounting to work you need to download the PageScope Net Care plug in for the magicolor 7300 from www konicaminolta net print...

Страница 247: ...t the records Item Description Activation Activation Choices On Off Default Off Choose Apply after making a change Reset Choose Reset to reset the accounting utility Number of the record to display in...

Страница 248: ...activation The Apply button allows you to activate or deactivate Server Based Management Number of the record to retrieve as a file By Number Range 50 100 250 500 All Default 50 Choose Get to get the...

Страница 249: ...h the Apply button Item Description Configuration Setting From Address Range Up to 129 characters Default Blank To Address Range Up to 129 characters Default Blank Subject Range Up to 128 characters D...

Страница 250: ...edia for printing statistics page configuration page and font list READY MAGICOLOR 7300 MAIN MENU PRINT MENU MAIN MENU PAPER MAIN MENU QUALITY MAIN MENU INTERFACE MAIN MENU SYS DEFAULT MAIN MENU SERVI...

Страница 251: ...to the media tray Options Default Tray Tray Chain Tray1 Control Tray selection may be overridden by the printer driver If custom size media is installed in Tray1 when TRAY CHAIN is ON the media size m...

Страница 252: ...printing Short Edge Duplex printing in calendar style using portrait orientation Long Edge Duplex printing in book style using portrait orientation Default Off Displayed only when the optional duplex...

Страница 253: ...med on each media tray Select the submenu below and select the tray you wish to align Options Top Adj Normal Top Adj Thick Left Adjust Left Adj Duplex After making an alignment print a test page to se...

Страница 254: ...Range 2 4 to 2 1 mm Default 0 0 mm Why Would a Tray Need Alignment The Top Adj Normal Top Adj Thick Left Adjust and Left Adj Duplex adjustments allow you to modify the way the image is placed on the p...

Страница 255: ...owing settings should be specified For details about each setting contact your network administrator Options IP Address Subnet Mask Gateway H W Address IP Address Set the IP address of this printer on...

Страница 256: ...utomatically using BOOTP Choices On Off Default On H W Address The Ethernet hardware address for this printer can be displayed It cannot be changed Default 00206Bxxxxxx Notes After the Ethernet settin...

Страница 257: ...mat only appears if an optional hard disk is installed Date conventions set at the factory 220 volt DD MM YYYY 100 volt YYYY MM DD 110 volt MM DD YYYY Y Year M Month D Day Default time zone 100V Japan...

Страница 258: ...EEP STANDBY MODE OFF 15 MINUTES 30 MINUTES 1 HOUR 3 HOURS 00 00 24 00 18 00 06 00 20 00 06 00 22 00 06 00 24 00 06 00 Energy Saver If a print job is not received or no operation is performed for a giv...

Страница 259: ...sabled but the control panel s Energy Saver LED is lit which means the Energy Saver button is active to enable the printer to wake up Light Sleep To save energy and extend the life of the fuser the pr...

Страница 260: ...S DEFAULT BUZZER CONTROL ERROR BEEP KEY CLICK YES NO YES NO Buzzer Control Options Error Beep Set whether to sound a buzzer when errors occur Choices Yes No Default Yes Key Click Set whether to genera...

Страница 261: ...Set the maximum amount of time the printer processes a print job before it ends the job 0 Seconds corresponds to no timeout Range 0 300 Seconds Default 0 Seconds Wait Timeout Set the maximum amount o...

Страница 262: ...specified here is required when entering the Interface menu and Sys Default menu Range 0000 9999 to AAAA ZZZZ up to 4 digits or characters in any combination Default 0000 Password 0000 denotes no pas...

Страница 263: ...drive Options User Area Only All Default No default given Displayed only when the optional hard disk drive is installed User Area Only Format user area of hard disk drive including delete fonts overla...

Страница 264: ...CLOCK Clock Set the date time Notes Date conventions set at the factory 220 volt DD MM YYYY 100 volt YYYY MM DD 110 volt MM DD YYYY Y Year M Month D Day Default time zone 100V Japan Standard Time 110V...

Страница 265: ...elected trays Print image is automatically scaled to fit to selected size With Autocontinue NO the printer selects tray paper size which has exactly the same paper size among selected trays Print imag...

Страница 266: ...ult Options Restore I F Restore Printer Restore All Default No default given Restore I F Restore the interface settings except for the PageScope Light Restore Printer Restore all settings in PAPER QUA...

Страница 267: ...age Device Option and About tabs Lets you assign the default printer settings for all print jobs Lets you assigns the printer set tings for only the current print job Retains your settings until chang...

Страница 268: ...entation Color Management Allows you to select the color profile associated with your printer or allow the operating system to make the selection for you Driver Configuration Tabs Layout Tab Contains...

Страница 269: ...mize the printer driver for your printer configuration About Tab Displays the printer driver identification gives you a link to our Internet website and allows you to reset all of the driver s configu...

Страница 270: ...e Setup dialog box choose your printer 3 Select the Properties button 4 Make your selections and then select OK to save your changes 5 Select OK from the Print Setup window 3 via document defaults Win...

Страница 271: ...monitor under Description and a comma delimited list of printers that use the port under Printer Allows you to add delete or configure ports It also allows the printer to get setting and status infor...

Страница 272: ...ion duplexing page order and pages per sheet Features Tab Windows XP Windows 2000 and Windows NT4 Allows you to choose printing resolution quick color settings and user default settings From this tab...

Страница 273: ...you a link to our Internet website and allows you to reset all of the driver s configuration items to their original values Printer Driver Configuration Items For information about printer controls an...

Страница 274: ...EDNord Istedgade 37A 9000 Aalborg telefon 96333500...

Страница 275: ...5 4 Accounting EDNord Istedgade 37A 9000 Aalborg telefon 96333500...

Страница 276: ...p or check the user manual on the Software Utilities CD ROM or from the KONICA MINOLTA website at www konicaminolta net printer Retrieving Accounting Information Using PageScope Light You can retrieve...

Страница 277: ...separated by commas to indicate the separating points for columns The character code format for the CSV data is UTF 8 Data Order The first line of the file is used for describing each field name This...

Страница 278: ...information identifying that the Job Accounting has been turned on or off Field Reset Format Choices ON OFF Default ON Button Reset Description In environments where PageScope Net Care is used and the...

Страница 279: ...and the history of printer activities Field Number of record to display in the User Window Format Choices 50 100 250 500 or ALL Default 50 Button Display Description This field displays the informatio...

Страница 280: ...Job ID is assigned when the printer recognizes the data it is receiving as a job Notes The current count remains in memory even after the printer is turned off Field Division ID Notes Not supported o...

Страница 281: ...cription This field displays the time when the final page of the job was delivered to the output bin Example 2003 03 05 16 48 35 Notes This format is supported by Microsoft Excel Field Job Type Format...

Страница 282: ...d displays the number of faces printed in the job Example 5 faces x 4 copies x simplex the value is 20 Field Sheets Format Numeric 1 999 Description This field displays the number of physical sheets o...

Страница 283: ...ly one output tray Field Finishing Notes Not supported on the magicolor 7300 Field Duplex Format Numeric 1 digit Space String 1 8 characters Description This field displays the duplex printing mode Ex...

Страница 284: ...USB IEEE1284 and Internal Field Paper Size Format Numeric 1 3 digits Space String 1 8 characters Description This field displays the paper size used by the job Examples 31 11x17 and 39 letter Field M...

Страница 285: ...uration Chapter 6 3 Issuing PJL Commands Identifies the methods that can be used to send PJL commands to your printer Chapter 6 4 PJL Commands Identifies the PJL commands supported by your printer Cha...

Страница 286: ...on Chapter Title Begins on page 6 1 Introduction 279 6 2 Conventions 283 6 3 Issuing PJL Commands 289 6 4 PJL Commands 293 6 5 Status Codes 307 6 6 DOC Matrix 311 EDNord Istedgade 37A 9000 Aalborg tel...

Страница 287: ...6 1 Introduction EDNord Istedgade 37A 9000 Aalborg telefon 96333500...

Страница 288: ...n 6 1 provides a general introduction to PJL Section 6 3 contains the full list of PJL commands supported by your printer and describes the function of each command If you have experience using PJL co...

Страница 289: ...tools your printer can understand The following lists identify the common PJL environmental variables that are supported by your KONICA MINOLTA printer The full list of PJL variables with additional...

Страница 290: ...Supported PJL Command Set 282 RESOLUTION TIMEOUT PERSONALITY EDNord Istedgade 37A 9000 Aalborg telefon 96333500...

Страница 291: ...6 2 Conventions EDNord Istedgade 37A 9000 Aalborg telefon 96333500...

Страница 292: ...the correct method of entering the command and any required or optional arguments that are or can be associated with the command Unless otherwise noted all of the text appearing in this row must be en...

Страница 293: ...ol characters When these appear in the Syntax enter the control code only don t type the characters See the next section for control character definitions Vertical bar appear in command syntax to indi...

Страница 294: ...n in the above example you can continue with a CR LF to begin another PJL command on the next line or you can use the PJL on this line to start another PJL Command No text can follow the UEL placed at...

Страница 295: ...s must be Roman 8 numbers 0 9 characters 48 57 Strings Strings are not used in variables but may be used as values Strings can use any combination of the alpha and numeric characters that follow the g...

Страница 296: ...able is set to AUTO and no ENTER command is received Context Language Selection described next is used instead of Implicit Language Selection Context Language Selection When the printer is configured...

Страница 297: ...6 3 Issuing PJL Commands EDNord Istedgade 37A 9000 Aalborg telefon 96333500...

Страница 298: ...opment This method allows application developers to take advantage of the commands and readback status of the printer to customize application functions that interact with the printer Due to the exten...

Страница 299: ...ther application Refer to the Hewlett Packard Printer Job Language Technical Reference Manual for additional information Using Utility Software Some utility software allows you to communicate with you...

Страница 300: ...EDNord Istedgade 37A 9000 Aalborg telefon 96333500...

Страница 301: ...6 4 PJL Commands EDNord Istedgade 37A 9000 Aalborg telefon 96333500...

Страница 302: ...n be used to change the User Default Settings of the printer DEFAULT is used with environmental variables to set the user default value of a printer parameter See the Environmental Variables on page 3...

Страница 303: ...nother ENTER command or an UEL command is found If the PERSONALITY variable is set to AUTO and no ENTER command is received the printer uses the default language or the language that best fits the for...

Страница 304: ...E Range 0 3 Default 0 PASSWORD Range ASCII 33 255 SP HT Default None NAME Range ASCII 33 255 SP HT Maximum 80 characters Default None Command INITIALIZE Syntax PJL INITIALIZE CR LF Description This co...

Страница 305: ...rs shown in the Syntax are NAME Range ASCII 33 255 SP HT 80 characters maximum Default N A START Range 1 2 147 483 647 Default 1 END Range 1 2 147 483 647 Default All PASSWORD Range 0 65 535 Default 0...

Страница 306: ...optional parameters shown in the Syntax are CHARGENUMBER Function Sets the job specific charge number for accounting purposes Range string Maximum of 8 characters HOST Function Sets the job specific l...

Страница 307: ...t file Notes The ranges for the optional parameters shown in the Syntax are PRINT Range 0 Statistics Page 1 Configuration Page 2 Font List 3 Demo Page 4 Registration Page 5 Menu Map 6 Directory List C...

Страница 308: ...oot firmware 3 Controller firmware Default None ADRS Required only with KIND 2 Range N A Maximum of 8 characters Default None LEN Range N A Maximum of 8 characters Default None SUM Range N A Maximum o...

Страница 309: ...configurations occur when one or more of the Factory default configuration settings are changed and saved as the default printer configuration These changes can be made and saved via the printer s co...

Страница 310: ...er of uncollated copies that are printed Use the QTY variable for collated copies Variable DUPLEX Choices Range OFF ON Description Controls the duplex settings that are available When set to ON duplex...

Страница 311: ...Description Sets the default media type for the current job Variable NUP Choices Range 1 2 4 6 9 16 Description Sets the number of pages printed on each sheet of media Variable OUTPUT Choices Range U...

Страница 312: ...CHOKEI3 CHOU 3 CHOKEI4 CHOU 4 COM10 CUSTOM DL EXECUTIVE FOLIO GOVLEGAL GOVTLETTER JPOST KAI 8 CHINESE8K KAI 16 CHINESE16K KAI 32 CHINESE32K LEGAL LETTER MONARCH OVERSIZED SPFOLIO STATEMENT 8 x 10 11 x...

Страница 313: ...the printer to search for context clues in the job to decide which personality to assume Variable QTY Choices Range 1 999 Description Identifies the number of collated copies for the current job Use...

Страница 314: ...999 seconds Description Sets the time interval that the printer waits to receive data for the current print job If the wait time exceeds the value set the job ends and the printer is ready to accept o...

Страница 315: ...6 5 Status Codes EDNord Istedgade 37A 9000 Aalborg telefon 96333500...

Страница 316: ...10031 CANCELING JOB 10007 EXECUTING 10023 LIGHT SLEEP 40000 PROCESSING 10023 READY 10001 STANDBY MODE 35078 UPDATING None WAIT None WARMING UP 10003 Warning ADJUST MANL FEED 40026 ADJUST TRAYS 40026...

Страница 317: ...40022 MEDIA JAM VERTICAL TRANS 40022 MEDIA JAM Y 40022 MEDIA SIZE ERR ADD Y 40096 40146 MEDIA SIZE ERROR 40096 40146 MEMORY FULL PRESS CONTINUE None NO MANUAL FEED 40026 NO MANUAL FEED CHECK UNIT 400...

Страница 318: ...E KCMY 40038 TONER LOW KCMY 40038 TRANS BELT LOW 40131 TRAYX EMPTY 41xxx WASTE NEAR FULL 40141 WASTE TONER ERR REPLACE BOX 40141 WASTE TONER FULL REPLACE BOX 40141 Y EMPTY ADD X 41xxx Service Call SER...

Страница 319: ...6 6 DOC Matrix EDNord Istedgade 37A 9000 Aalborg telefon 96333500...

Страница 320: ...e an equivalent PJL command and not all PJL commands are supported by your printer If there is no equivalent PJL command Unsupported appears in the PJL column In cases where a custom PJL command has b...

Страница 321: ...E Supported Version Unsupported Document Control Commands DOC PJL magicolor 7300 IncludeFeature PJL Use PJL by itself on a command line Pages Unsupported EndComments Unsupported EndOfDocument EOJ Supp...

Страница 322: ...pageorientation Unsupported IncludeFeature pagerange JOB START END Supported IncludeFeature pagescaling Unsupported IncludeFeature pagesize SET PAPER Supported IncludeFeature quality Unsupported Inclu...

Страница 323: ...rted IncludeFeature lsiscrlf Unsupported IncludeFeature map Unsupported IncludeFeature number Unsupported IncludeFeature pointsize Unsupported IncludeFeature tabs Unsupported CALS Commands DOC PJL mag...

Страница 324: ...EDNord Istedgade 37A 9000 Aalborg telefon 96333500...

Страница 325: ...72 PageScope Light 268 PageScope Net Care 268 Printer Error 194 Retrieving information 268 Add New Hardware Wizard 6 Additional Syntax Rules 286 Alpha characters 287 Apply button 205 ASCII 290 Auto Co...

Страница 326: ...DEFAULT 294 ENTER 295 EOJ 295 INITIALIZE 296 JOB 297 PJL 297 RESET 299 UEL 299 Configuring your Printer 198 Connections EtherTalk 17 LPR 17 Macintosh 16 PC 4 Consumables Monitoring use 116 OPC 184 Ton...

Страница 327: ...lfiscrlf 314 linesperpage 315 lpmargins 315 lporientation 315 lsiscrlf 315 map 315 mediatype 314 newlayout 314 number 315 offset 314 orientation 314 output 314 pagegrid 314 pageoffsets 314 pageorient...

Страница 328: ...16 ENTER 295 ENTER LANGUAGE 288 Environment Factory Default 301 Modified 301 PJL 301 User Default 301 Environmental Variables 301 EOJ 295 Error messages 117 Escape character 285 Explicit Language Sele...

Страница 329: ...ess 230 J Job Accounting 193 Retention Options 194 JOBS 297 K Kernel Command ENTER 295 UEL 286 Keypad Language 215 L LAN Settings button 203 Language Configuration 287 Context Language Selection 288 E...

Страница 330: ...anager 153 Netscape Navigator 202 NetWare Print Manager 144 Printer Interface Setup 89 Setup 88 No proxy 200 Numeric characters 287 NUP 303 O OK button 205 OPC 184 Operating System 22 182 OUTBIN 303 O...

Страница 331: ...er Console Tool 136 Shutting down the server 136 Uninstalling 139 Upgrading 138 Pantone tables 175 PAPER 304 Paper Menu 243 Parallel 4 PC Connections Ethernet 7 Parallel 4 TCP IP 7 USB 6 PERSONALITY 2...

Страница 332: ...n 183 RESET 299 Reset button 205 RESOLUTION 305 Restore button 205 RGB Source ICC profile 169 RGB values 164 S Save button 205 Sending PJL commands 290 Serverless Printing 188 Service Menu 258 Setting...

Страница 333: ...02 MEDIASOURCE 302 MEDIATYPE 303 NUP 303 OUTBIN 303 PAPER 304 PERSONALITY 305 QTY 305 RESOLUTION 305 TIMEOUT 306 Variables and Values 287 Visual perception 162 W Warning status message Waste near full...

Страница 334: ...EDNord Istedgade 37A 9000 Aalborg telefon 96333500...
Отзывы: