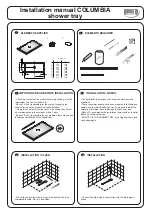
INSTALLATION
How to Install the Faucet
(11)
螺钉
(12)
盒
(10)
(13)
(14)
注意
Secure faucet on lavatory
Unscrew valve cover screw (11) with a
screwdriver and open valve cover (10).
Determine proper mounting location per
rough –in (Fig 1), then punch expansion
tube (13) in. Place valve box against the
wall and then secure control valve
assembly on the wall by bolts (14).
Note: Place the long end of control box
upright, water outlet position shall be
adjusted left/right based on requirements.
For mixture faucet, connect hose (16) one
end to Tee inlet hose assembly (17), and
then another end to control assembly (15)
water inlet; connect water outlet marked
with “water outlet hose” faucet outlet hose
(8), Tee inlet hose assembly connect to
another two ends with angle valve (18).
For cold water faucet, connect hose (16)
one end to control assembly (15) filter
(19), another end connect to angle valve,
then connect control assembly outlet
marked with “water outlet hose” to faucet
outlet hose (8).
1380339-T01-A
4
对于单冷龙头,将软管
(16)
一端与控制
组件
(15)
的滤网
(19)
相连,另一端与角
阀连接,再将控制组件出水口与标有
“出水管”的龙头
出水
软管
(8)
连接。
对于冷热混水龙头,将软管
(16)
一端与
三通进水软管组件
(17)
连接,另一端与
控制组件
(15)
进水口连接,再将出水口
与标有“出水管”的龙头
出水
软管
(8)
连接,三通进水软管组件另外两端与角
阀
(18)
连接。
1.
2.
Install Control Assy
TECHNICAL SPECIFICATION
48
22-- 4.3
37.5
61
16
15
17
18
混水
(Mixer)
19
单冷
(Cold)
10
11
12
14
13
Insert faucet soap hose (9)/wire (8) and
inlet hose (7) through gasket (2), then seat
gasket (2) in the groove on the underside of
the faucet. Insert faucet soap hose (9)/wire
(8) and inlet hose (7) through lavatory
mounting hole, then insert gasket (3), tab
(4) retainer (5) through soap hose (9)/wire
(8), fasten retainer on stud as shown in the
directions, Last, fasten two screws (6) on
retainer, press tab (4) from the top of
screws to secure the faucet.
2
1
4
3
5
8
6
9
7
一
将龙头给皂软管
(9)
及线
(8)
和进水软管
(7)
穿过橡胶垫片
(2)
,并将橡胶垫片
(2)
嵌入龙头
(1)
底部的盘槽中,再将给皂
软管
(9)
及线
(8)
和进水软管
(7)
从面盆安
装孔穿过,从台盆下方依次将垫片
(3)
压片
(4)
固定环
(5)
穿过给皂软管
(9)
及线
(8)
和进水软管
(7)
,将固定环按照图示
方向拧在牙管上,用十字螺丝刀将两个
螺钉
(6)
紧固在固定环上,由螺钉端部
压紧压片
(4)
固定水龙头。
220V
50/60Hz
0.5GPM
1.9L/min
1
~
4000MPa·s
Power: AC 220V, 50/60Hz
Senser Duration: Less than 0.5s
Shut-off Delay: 0.5~1s
Sensing Distance: Automatic adjustment
Flow Rate:
0.5GPM (About 1.9L/min )
Overtime Flowing Control: Automatically stop flushing
when the faucet senses an object for more than 1 minute
continuously
Ambient Temperature: 1~40
Supply Water Temperature: 0.5~71
Supply Water Pressure: 0.05~0.86MPa
Liquid soap volume: about 1.0mL
0.5
0.5
~
1
适用皂液粘度:
皂液瓶容量:约
1500mL
1
~
40
0.5
~
71
0.05
~
0.86MPa
出皂液量:约
1.0mL
~
4000MPa s
·
Applicable liquid soap viscosity: 1
Soap solution bottle capacity: about 1500m
L