


106
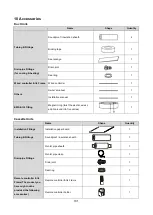
13 Installation Details
13.1Location selection
13.1.1
Indoor unit location selection
The place shall easily support the indoor
unit’s weight.
The place can ensure the indoor unit
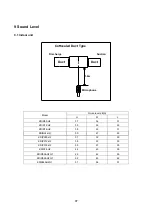
installation and inspection.
The place can ensure the indoor unit
horizontally installed.
The place shall allow easy water drainage.
The place shall easily connect with the
outdoor unit.
The place where air circulation in the room
should be good.
There should not be any heat source or
steam near the unit.
There should not be any oil gas near the unit
There should not be any corrosive gas near
the unit
There should not be any salty air neat the
unit
There should not be strong electromagnetic
wave near the unit
There should not be inflammable materials
or gas near the unit
There should not be strong voltage vibration.
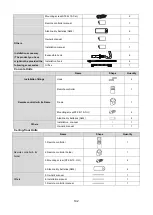
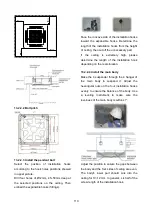
13.1.2
Outdoor unit location selection
The place shall easily support the outdoor
unit’s weight.
Locate the outdoor unit as close to indoor
unit as possible
The piping length and height drop cannot
exceed the allowable value.
The place where the noise, vibration and
outlet air do not disturb the neighbors.
There is enough room for installation and
maintenance.
The air outlet and the air inlet are not
impeded, and not face the strong wind.
It is easy to install the connecting pipes and
cables.
There is no danger of fire due to leakage of
inflammable gas.
It should be a dry and well ventilation place
The support should be flat and horizontal
Do not install the outdoor unit in a dirty or
severely polluted place, so as to avoid
blockage of the heat exchanger in the
outdoor unit.
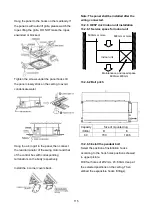
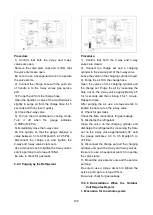
If is built over the unit to prevent direct
sunlight, rain exposure, direct strong wend,
snow and other scraps accumulation, make
sure that heat radiation from the condenser
is not restricted.
More than 30cm/11.81in
More than 60cm/23.62in
More than 200cm/78.74in
More than 30cm/11.81in
More than
60cm/23.62in
(Service space
)
Fence
or
obst
acles
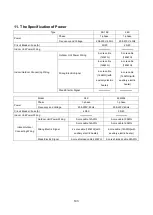
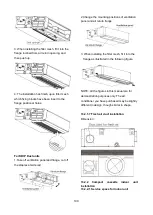
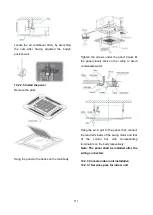
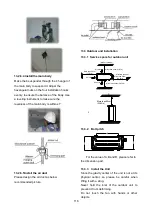
13.2 Indoor unit installation
13.2.1
KDIR
&
KDIP
Duct indoor
unit installation
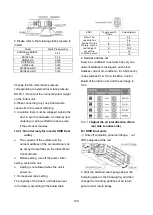
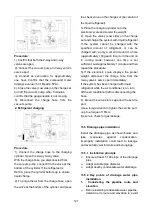
13.2.1.1 Service space for indoor unit
A5/A6 Duct
200mm(7.87in) or more
300mm(11.81in) or more
600mmx600mm/23.62inx23.62in
Check orifice
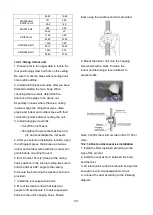
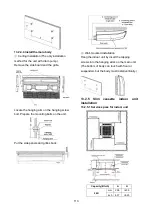
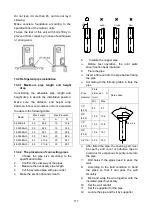
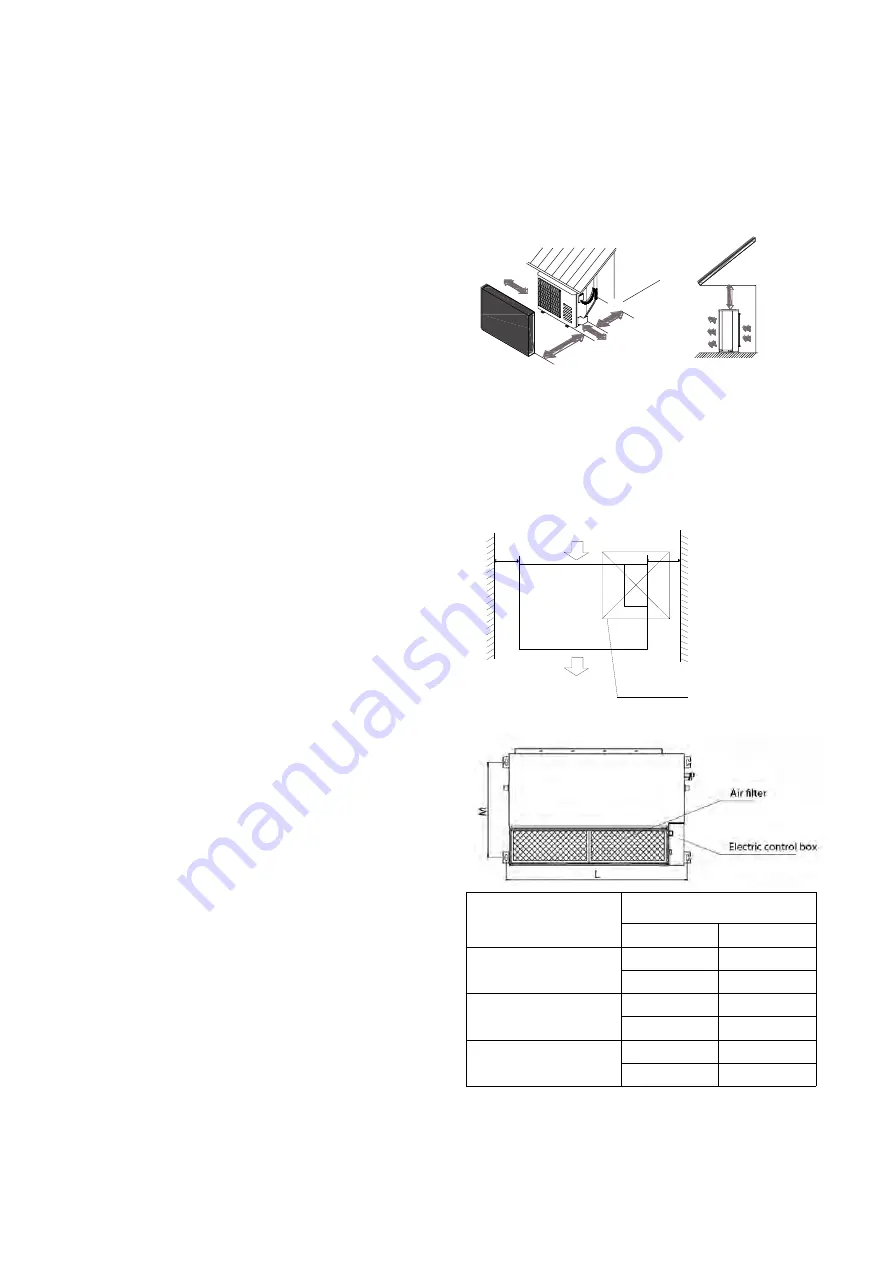
13.2.1.2 Bolt pitch
Model
Size of outline dimension
mounted plug
L
M
KDIR09-H2
KDIR12-H2
740
350
29.13
13.78
KDIR18-H2
960
350
37.80
13.78
KDIR24-H2
960
350
37.80
13.78
Содержание KDIP012-H2
Страница 8: ...5 2 2 Part names of Indoor Outdoor units Cassette Units ...
Страница 9: ...6 KDIR Duct Units ...
Страница 10: ...7 KDIP Duct Units ...
Страница 11: ...9 Ceiling floor Units ...
Страница 12: ...10 HESP DUCT Units ...
Страница 19: ...19 2 3 4 7 Outside Water Pump for Optional When Ceiling Installation ...
Страница 31: ...33 KSIE024 H220 O KSIR036 H218 inch 37 2 16 1 31 9 40 6 26 5 15 9 ...
Страница 34: ...36 Ceiling floor Units ...
Страница 39: ...41 KTIR036 H2G1 KTIR048 H2G1 ...
Страница 40: ...43 KUIR18 H2 KUIR24 H2 ...
Страница 41: ...44 KFUF036 H2G1 KFUF048 H2G1 ...
Страница 42: ...45 KFUF060 H2G1 ...
Страница 43: ...46 KFUF036 H2G1 KFUF048 H2G1 ...
Страница 44: ...47 KDIP090 H2 KDIP012 H2 KDIP018 H2 KDIP24 H2 ...
Страница 69: ...74 6 2 Outdoor Unit KSIE018 H220 O KSIE024 H220 O ...
Страница 70: ...75 KSIE009 H221 O KSIE012 H220 O ...
Страница 71: ...77 KSIR036 H218 ...
Страница 77: ...83 KDIR09 H2 Code 0 Code 1 Code 2 Code 3 Code 4 ...
Страница 78: ...84 KDIR12 H2 Code 0 Code 1 Code 2 Code 3 Code 4 ...
Страница 79: ...85 KDIR18 H2 Code 0 Code 1 Code 2 Code 3 Code 4 ...
Страница 80: ...86 KDIR24 H2 Code 0 Code 1 Code 2 Code 3 Code 4 ...
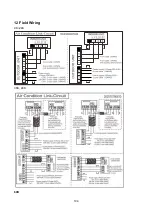
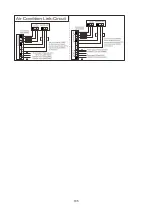
Страница 96: ...104 12 Field Wiring 9K 24K 36K 48K 60K ...
Страница 97: ...105 ...
Страница 147: ...155 P U P V ...
Страница 148: ...156 P W P N ...
Страница 174: ...184 4 Remove the evaporator support board 5 Screw off the fixing screws to remove the evaporator 4 screws 1 screw ...
Страница 181: ...191 4 Remove the evaporator fixing clamps to disassemble the evaporator Fixing clamps 1 screw ...
Страница 188: ...221 5 Remove the four fixing screws of the fan motor then remove the motor 5 ...
Страница 201: ...234 6 Remove the grounding screw 7 Remove the Wires 1 2 3 or L1 L2 S Then remove the electronic control box 7 5 ...