
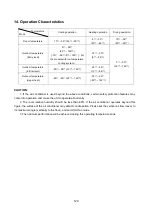


134
15.4.6.1 Timing range is 24 hours.
15.4.6.2 Timer on. The machine will turn on
automatically when reaching the setting time.
15.4.6.3 Timer off. The machine will turn off
automatically when reaching the setting time.
15.4.6.4 Timer on/off. The machine will turn on
automatically when reaching the setting “on”
time, and then turn off automatically when
reaching the setting “off” time.
15.4.6.5 Timer off/on. The machine will turn off
automatically when reaching the setting “off”
time, and then turn on automatically when
reaching the setting “on” time.
15.4.6.6 The timer function will not change the
AC current operation mode. Suppose AC is off
now, it will not start up firstly after setting the
“timer off” function. And when reaching the
setting time, the timer LED will be off and the
AC running mode has not been changed.
15.4.6.7 The setting time is relative time.
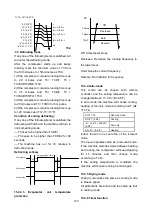
15.4.7 Sleep function mode
15.4.7.1 The sleep function is available in
cooling, heating or auto mode.
15.4.7.2. Operation process in sleep mode is as
follow:
When cooling, the setting temperature rises 1
℃
(1.8°F) (be lower than 30
℃
(86°F)) every one
hour, 2 hours later the setting temperature
stops rising and the indoor fan is fixed at low
speed.
When heating, the setting temperature
decreases 1
℃
(1.8°F) (be higher than 17
℃
(62.6°F)) every one hour, 2 hours later the
setting temperature stops rising and indoor fan
is fixed at low speed. (Anti-cold wind function
has the priority).
15.4.7.3 Operation time in sleep mode is 7
hours. After 7 hours, the unit does not switch off,
but for console, the unit switches off.
15.4.7.4 Timer setting is available.
15.4.8 Auto-Restart function
The indoor unit is equipped with auto-restart
function, which is carried out through an
auto-restart module. In case of a sudden power
failure, the module memorizes the setting
conditions before the power failure. The unit will
resume the previous operation setting (not
including sleep function) automatically after 3
minutes when power returns.
15.4.9 Follow me
1) If the indoor PCB receives the signal which
results from pressing the FOLLOW ME button
on remote controller or wired remote controller,
the buzzer will emit a sound and this indicates
the follow me function is initiated. But when the
indoor PCB receives signal which sent from
remote controller every 3 minutes, the buzzer
will not respond. When the unit is running with
follow me function, the PCB will control the unit
according to the temperature from follow me
signal, and the temperature collection function
of room temperature sensor will be shielded.
2) When the follow me function is available,
the PCB will control the unit according to the
room temperature from the remote controller
and the setting temperature.
3) The PCB will take action to the mode
change information from remote controller
signal, but it will not affected by the setting
temperature.
4) When the unit is running with follow me
function, if the PCB doesn’t receive any signal
from remote controller for 7 minutes or pressing
FOLLOW ME button again, the follow me
function will be turned off automatically, and the
temperature will control the unit according to
the room temperature detected from its own
room temperature sensor and setting
temperature.
15.4.10 8
℃
Heating(optional)
In heating operation, the preset temperature of
the air conditioner can be as lower as 8
℃
(46.4°F), which keeps the room temperature
steady at 8
℃
(46.4°F) and prevents household
things freezing when the house is unoccupied
for a long time in severe cold weather.
Содержание KDIP012-H2
Страница 8: ...5 2 2 Part names of Indoor Outdoor units Cassette Units ...
Страница 9: ...6 KDIR Duct Units ...
Страница 10: ...7 KDIP Duct Units ...
Страница 11: ...9 Ceiling floor Units ...
Страница 12: ...10 HESP DUCT Units ...
Страница 19: ...19 2 3 4 7 Outside Water Pump for Optional When Ceiling Installation ...
Страница 31: ...33 KSIE024 H220 O KSIR036 H218 inch 37 2 16 1 31 9 40 6 26 5 15 9 ...
Страница 34: ...36 Ceiling floor Units ...
Страница 39: ...41 KTIR036 H2G1 KTIR048 H2G1 ...
Страница 40: ...43 KUIR18 H2 KUIR24 H2 ...
Страница 41: ...44 KFUF036 H2G1 KFUF048 H2G1 ...
Страница 42: ...45 KFUF060 H2G1 ...
Страница 43: ...46 KFUF036 H2G1 KFUF048 H2G1 ...
Страница 44: ...47 KDIP090 H2 KDIP012 H2 KDIP018 H2 KDIP24 H2 ...
Страница 69: ...74 6 2 Outdoor Unit KSIE018 H220 O KSIE024 H220 O ...
Страница 70: ...75 KSIE009 H221 O KSIE012 H220 O ...
Страница 71: ...77 KSIR036 H218 ...
Страница 77: ...83 KDIR09 H2 Code 0 Code 1 Code 2 Code 3 Code 4 ...
Страница 78: ...84 KDIR12 H2 Code 0 Code 1 Code 2 Code 3 Code 4 ...
Страница 79: ...85 KDIR18 H2 Code 0 Code 1 Code 2 Code 3 Code 4 ...
Страница 80: ...86 KDIR24 H2 Code 0 Code 1 Code 2 Code 3 Code 4 ...
Страница 96: ...104 12 Field Wiring 9K 24K 36K 48K 60K ...
Страница 97: ...105 ...
Страница 147: ...155 P U P V ...
Страница 148: ...156 P W P N ...
Страница 174: ...184 4 Remove the evaporator support board 5 Screw off the fixing screws to remove the evaporator 4 screws 1 screw ...
Страница 181: ...191 4 Remove the evaporator fixing clamps to disassemble the evaporator Fixing clamps 1 screw ...
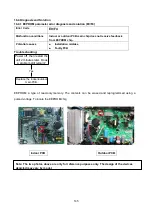
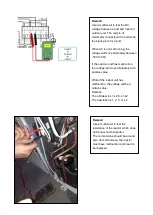
Страница 188: ...221 5 Remove the four fixing screws of the fan motor then remove the motor 5 ...
Страница 201: ...234 6 Remove the grounding screw 7 Remove the Wires 1 2 3 or L1 L2 S Then remove the electronic control box 7 5 ...