
14
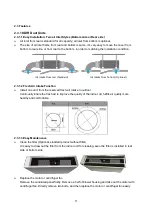
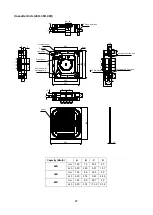
2.3.2 Cassette Units
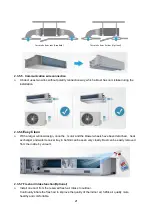
2.3.2.1
Lower Noise
Optimize air channel system design to ensure the maximum quietness and comfort.
Noise max down 6dB.
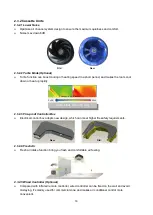
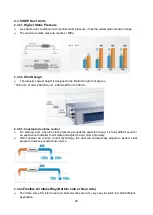
2.3.2.2
Turbo Mode (Optional)
Turbo function can boost cooling or heating speed in a short period, and makes the room cool
down or heat up rapidly.
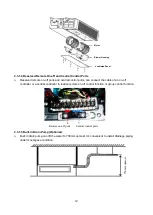
2.3.2.3
Fire-proof Controller Box
Electrical control box adopts new design, which can meet higher fire safety requirements.
2.3.2.4
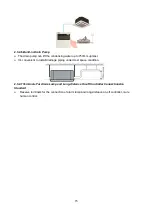
Fresh Air
Fresh air intake function bring you fresh and comfortable air feeling.
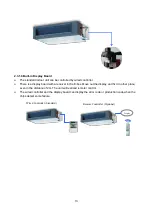
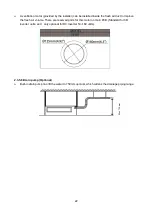
2.3.2.5 Wired Controller (Optional)
Compared with infrared remote controller, wired controller can be fixed on the wall and avoid
mislaying. It's mainly used for commercial zone and makes air conditioner control more
convenient.
Old
New
Turbo Mode (After 30 min)
Cold
Hot
Common vs. Turbo
Old
New
Содержание KDIP012-H2
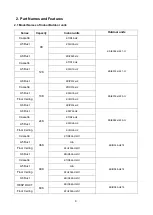
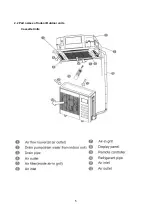
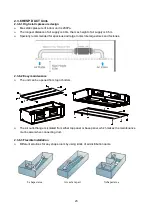
Страница 8: ...5 2 2 Part names of Indoor Outdoor units Cassette Units ...
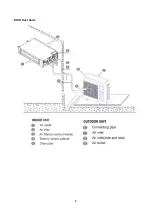
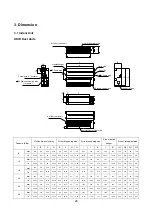
Страница 9: ...6 KDIR Duct Units ...
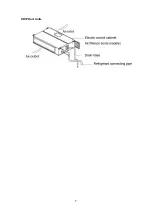
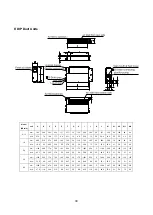
Страница 10: ...7 KDIP Duct Units ...
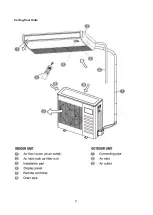
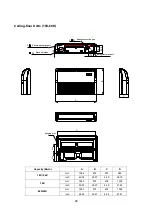
Страница 11: ...9 Ceiling floor Units ...
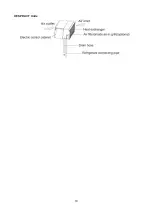
Страница 12: ...10 HESP DUCT Units ...
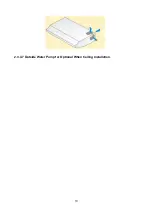
Страница 19: ...19 2 3 4 7 Outside Water Pump for Optional When Ceiling Installation ...
Страница 31: ...33 KSIE024 H220 O KSIR036 H218 inch 37 2 16 1 31 9 40 6 26 5 15 9 ...
Страница 34: ...36 Ceiling floor Units ...
Страница 39: ...41 KTIR036 H2G1 KTIR048 H2G1 ...
Страница 40: ...43 KUIR18 H2 KUIR24 H2 ...
Страница 41: ...44 KFUF036 H2G1 KFUF048 H2G1 ...
Страница 42: ...45 KFUF060 H2G1 ...
Страница 43: ...46 KFUF036 H2G1 KFUF048 H2G1 ...
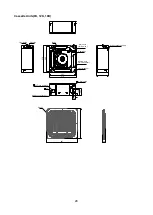
Страница 44: ...47 KDIP090 H2 KDIP012 H2 KDIP018 H2 KDIP24 H2 ...
Страница 69: ...74 6 2 Outdoor Unit KSIE018 H220 O KSIE024 H220 O ...
Страница 70: ...75 KSIE009 H221 O KSIE012 H220 O ...
Страница 71: ...77 KSIR036 H218 ...
Страница 77: ...83 KDIR09 H2 Code 0 Code 1 Code 2 Code 3 Code 4 ...
Страница 78: ...84 KDIR12 H2 Code 0 Code 1 Code 2 Code 3 Code 4 ...
Страница 79: ...85 KDIR18 H2 Code 0 Code 1 Code 2 Code 3 Code 4 ...
Страница 80: ...86 KDIR24 H2 Code 0 Code 1 Code 2 Code 3 Code 4 ...
Страница 96: ...104 12 Field Wiring 9K 24K 36K 48K 60K ...
Страница 97: ...105 ...
Страница 147: ...155 P U P V ...
Страница 148: ...156 P W P N ...
Страница 174: ...184 4 Remove the evaporator support board 5 Screw off the fixing screws to remove the evaporator 4 screws 1 screw ...
Страница 181: ...191 4 Remove the evaporator fixing clamps to disassemble the evaporator Fixing clamps 1 screw ...
Страница 188: ...221 5 Remove the four fixing screws of the fan motor then remove the motor 5 ...
Страница 201: ...234 6 Remove the grounding screw 7 Remove the Wires 1 2 3 or L1 L2 S Then remove the electronic control box 7 5 ...