

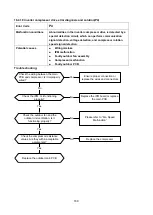


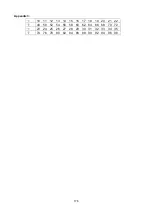

164
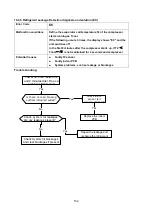
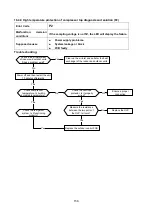
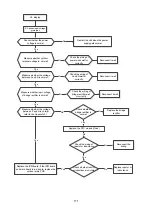
16.4.14. J2 Malfunction
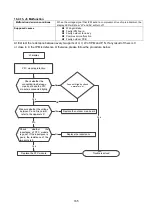
Malfunction conditions
When the compressor discharge temperature (T5) is more
than 115
℃
for 10 seconds, the compressor will stop
and not
restart until T5 is less than 90
℃
.
Possible causes
●
Refrigerant leakage
●
Wiring mistake
●
Faulty discharge temperature sensor
●
Faulty outdoor PCB
J2 displayed
J2 displayed
Temperature protection of
compressor discharge
Temperature protection of
compressor discharge
Is the compressor discharge
temperature more than 115°C
?
Is the compressor discharge
temperature more than 115°C
?
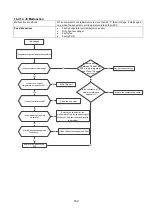
Are
the
compressor
discharge
temperature
sensor and PCB connected
properly according to the
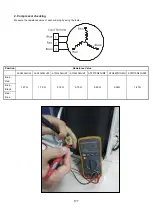
wiring diagrams?
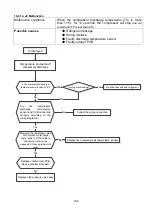
Are
the
compressor
discharge
temperature
sensor and PCB connected
properly according to the
wiring diagrams?
Measure the resistance value
of compressor discharge
temp. sensor. If the value is
not normal
, refer to the
Appendix
2. Does a problem stil
exist?
Measure the resistance value
of compressor discharge
temp. sensor. If the value is
not normal
, refer to the
Appendix
2. Does a problem stil
exist?
No
Yes
Yes
No
Correct the wiring connection
Correct the wiring connection
Stop the leak and add refrigerant
Stop the leak and add refrigerant
Replace the compressor discharge temp. sensor
Replace the compressor discharge temp. sensor
No
Yes
Replace high pressure valve assy
Replace high pressure valve assy
Yes
No
Replace outdoor main PCB.
Does a problem still exist?
Replace outdoor main PCB.
Does a problem still exist?
No
Is refrigerant leaking?
Is refrigerant leaking?
Содержание KDIP012-H2
Страница 8: ...5 2 2 Part names of Indoor Outdoor units Cassette Units ...
Страница 9: ...6 KDIR Duct Units ...
Страница 10: ...7 KDIP Duct Units ...
Страница 11: ...9 Ceiling floor Units ...
Страница 12: ...10 HESP DUCT Units ...
Страница 19: ...19 2 3 4 7 Outside Water Pump for Optional When Ceiling Installation ...
Страница 31: ...33 KSIE024 H220 O KSIR036 H218 inch 37 2 16 1 31 9 40 6 26 5 15 9 ...
Страница 34: ...36 Ceiling floor Units ...
Страница 39: ...41 KTIR036 H2G1 KTIR048 H2G1 ...
Страница 40: ...43 KUIR18 H2 KUIR24 H2 ...
Страница 41: ...44 KFUF036 H2G1 KFUF048 H2G1 ...
Страница 42: ...45 KFUF060 H2G1 ...
Страница 43: ...46 KFUF036 H2G1 KFUF048 H2G1 ...
Страница 44: ...47 KDIP090 H2 KDIP012 H2 KDIP018 H2 KDIP24 H2 ...
Страница 69: ...74 6 2 Outdoor Unit KSIE018 H220 O KSIE024 H220 O ...
Страница 70: ...75 KSIE009 H221 O KSIE012 H220 O ...
Страница 71: ...77 KSIR036 H218 ...
Страница 77: ...83 KDIR09 H2 Code 0 Code 1 Code 2 Code 3 Code 4 ...
Страница 78: ...84 KDIR12 H2 Code 0 Code 1 Code 2 Code 3 Code 4 ...
Страница 79: ...85 KDIR18 H2 Code 0 Code 1 Code 2 Code 3 Code 4 ...
Страница 80: ...86 KDIR24 H2 Code 0 Code 1 Code 2 Code 3 Code 4 ...
Страница 96: ...104 12 Field Wiring 9K 24K 36K 48K 60K ...
Страница 97: ...105 ...
Страница 147: ...155 P U P V ...
Страница 148: ...156 P W P N ...
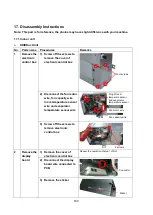
Страница 174: ...184 4 Remove the evaporator support board 5 Screw off the fixing screws to remove the evaporator 4 screws 1 screw ...
Страница 181: ...191 4 Remove the evaporator fixing clamps to disassemble the evaporator Fixing clamps 1 screw ...
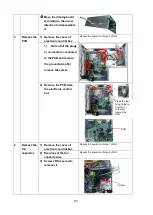
Страница 188: ...221 5 Remove the four fixing screws of the fan motor then remove the motor 5 ...
Страница 201: ...234 6 Remove the grounding screw 7 Remove the Wires 1 2 3 or L1 L2 S Then remove the electronic control box 7 5 ...