
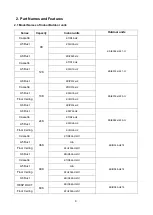
Model Numbers:
Indoor Unit:
KDIR09-H2
,
KTIR09-H2,
KDIR12-H2,
KTIR12-H2,
KDIR18-H2
,
KTIR018-H2
,
KUIR18-H2
,
KDIR24-H2,
KTIR24-H2,
KUIR24-H2,
KTIR036-H2G1,
KFUF036-H2G1,
KTIR048-H2G1,
KFUF048-H2G1,
KFUF060-H2G1
;
KDIP09-H2,
KDIP012-H2
;
KDIP018-H2
;
KDIP24-H2
;
KDIR036-H2G1
;
KDIR048-H2G1
;
KDIS060-H2G1
;
Outdoor Unit:
KSIE009-H221-O
;
KSIE012-H220-O
;
KSIE018-H220-O
;
KSIE024-H220-O
;
KSIR036-H218
;
KSIR048-H218
;
KSIR060-H218
Light commercial
Air Conditioner
SERVICE MANUAL
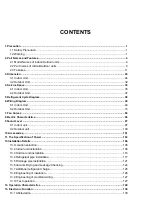
Table of Contents
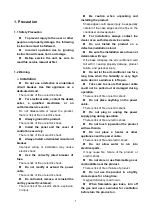
1. Precaution
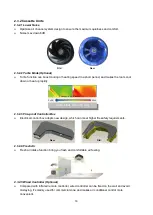
2. Part Names And Functions
3. Dimension
4. Service space
5. Refrigerant Cycle Diagram
6. Wiring Diagram
7. Static Pressure
8. Electric Characteristics
9. Sound Level
10. Accessories
11. The Specification of Power
12. Installation Details
13. Operation Characteristics
14. Electronic Function
15. Solar Panel
16. Troubleshooting
17. Disassembly Instructions
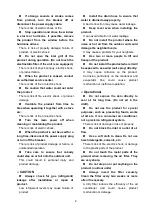
WARNING
Installation MUST conform with local building codes or, in the absence of local codes, with the
National Electrical Code NFPA70/ANSI C1-1993 or current edition and Canadian Electrical
Code Part1 CSA C.22.1.
The information contained in the manual is intended for use by a qualified service technician
familiar with safety procedures and equipped with the proper tools and test instruments
Installation or repairs made by unqualified persons can result in hazards to you and others.
Failure to carefully read and follow all instructions in this manual can result in equipment
malfunction, property damage, personal injury and/or death.
This service manual is for the use of the service engineer only
Содержание KDIP012-H2
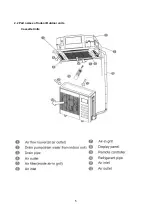
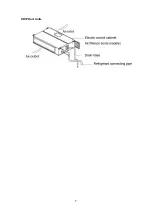
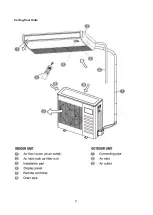
Страница 8: ...5 2 2 Part names of Indoor Outdoor units Cassette Units ...
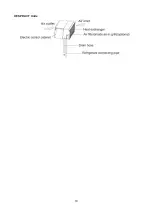
Страница 9: ...6 KDIR Duct Units ...
Страница 10: ...7 KDIP Duct Units ...
Страница 11: ...9 Ceiling floor Units ...
Страница 12: ...10 HESP DUCT Units ...
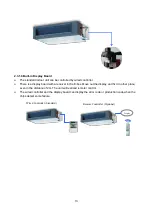
Страница 19: ...19 2 3 4 7 Outside Water Pump for Optional When Ceiling Installation ...
Страница 31: ...33 KSIE024 H220 O KSIR036 H218 inch 37 2 16 1 31 9 40 6 26 5 15 9 ...
Страница 34: ...36 Ceiling floor Units ...
Страница 39: ...41 KTIR036 H2G1 KTIR048 H2G1 ...
Страница 40: ...43 KUIR18 H2 KUIR24 H2 ...
Страница 41: ...44 KFUF036 H2G1 KFUF048 H2G1 ...
Страница 42: ...45 KFUF060 H2G1 ...
Страница 43: ...46 KFUF036 H2G1 KFUF048 H2G1 ...
Страница 44: ...47 KDIP090 H2 KDIP012 H2 KDIP018 H2 KDIP24 H2 ...
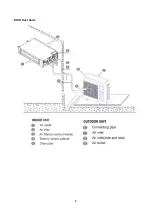
Страница 69: ...74 6 2 Outdoor Unit KSIE018 H220 O KSIE024 H220 O ...
Страница 70: ...75 KSIE009 H221 O KSIE012 H220 O ...
Страница 71: ...77 KSIR036 H218 ...
Страница 77: ...83 KDIR09 H2 Code 0 Code 1 Code 2 Code 3 Code 4 ...
Страница 78: ...84 KDIR12 H2 Code 0 Code 1 Code 2 Code 3 Code 4 ...
Страница 79: ...85 KDIR18 H2 Code 0 Code 1 Code 2 Code 3 Code 4 ...
Страница 80: ...86 KDIR24 H2 Code 0 Code 1 Code 2 Code 3 Code 4 ...
Страница 96: ...104 12 Field Wiring 9K 24K 36K 48K 60K ...
Страница 97: ...105 ...
Страница 147: ...155 P U P V ...
Страница 148: ...156 P W P N ...
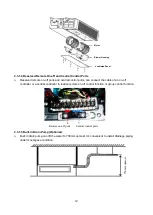
Страница 174: ...184 4 Remove the evaporator support board 5 Screw off the fixing screws to remove the evaporator 4 screws 1 screw ...
Страница 181: ...191 4 Remove the evaporator fixing clamps to disassemble the evaporator Fixing clamps 1 screw ...
Страница 188: ...221 5 Remove the four fixing screws of the fan motor then remove the motor 5 ...
Страница 201: ...234 6 Remove the grounding screw 7 Remove the Wires 1 2 3 or L1 L2 S Then remove the electronic control box 7 5 ...