23
24
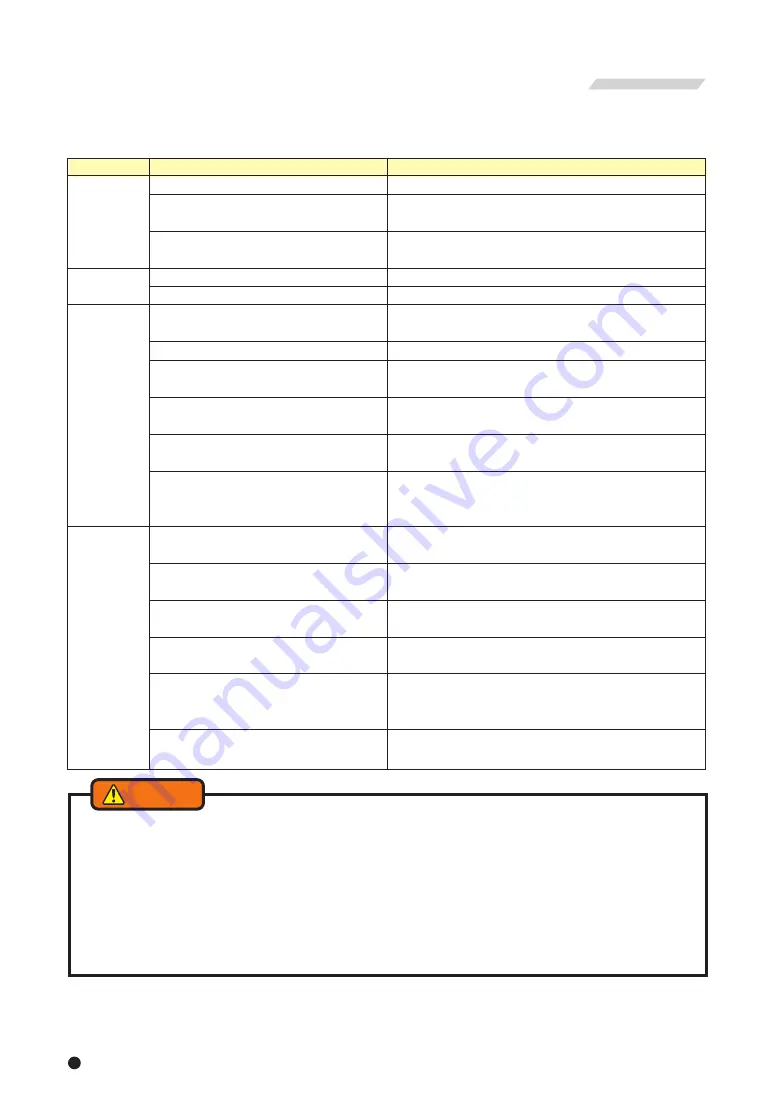
Check the points specified in the table below and take the appropriate countermeasure.
7-1. In the case of malfunction
In the case of malfunction, contact the distributor where you purchased the product or our branch office listed on the
back cover.
7-2. Where to contact in the case of malfunction
7. Malfunction and Countermeasures
・If the chuck failed due to a seizure or breakage, remove the chuck from the machine, following the disassembly
steps in page 22. When the jaws and covers cannot be removed due to a blockage of workpiece, do not
disassemble forcibly but please contact us or our agent.
・If these countermeasures do not correct the problem or improve the situation. Immediately stop using the
machine. Continuous use of a broken product or a defective product may cause a serious accident by the chuck
or the work flying out.
・Only experienced and trained personnel should do repairs and fix malfunctions. Repair of a malfunction by a
person who has never received instruction from an experienced person, the distributor or our company may
cause a serious accident.
Table 8
8. Attachment
Following pages are described for machine tool manufacturers (personnel who attach a chuck to a machine). Please
read following instruction carefully when you attach or detach a chuck to machine, and please sufficiently understand
and follow the instructions for safe operation.
・Attach the manual switching valve at a position where it is easy to operate for the attaching equipment.
・Install the hydraulic unit at a position where the drain hose is not kinked and the needle of the pressure gauge is
easily read.
For Machine Tool Manufactures
8-1. Outline drawing of attachment
Fig.15
Defective
Cause
Countermeasure
Disassemble and replace the broken part.
Disassemble, correct the seized part with oilstone, etc., or replace
the part.
Check the piping and the electric system, and if there is no
abnormality, disassemble and clean the cylinder.
Disassemble and clean.
Remove the draw pipe and retighten it again.
Adjust so that the jaw is near the center of the stroke when
gripping the work.
Check that the correct hydraulic pressure is obtained.
Form again based on the correct forming method.
Calculate the cutting force and check that it is suitable for the
specification of the chuck.
Supply grease from the grease nipple, and open and close the jaw
several times without gripping a work.
Lower the rotation speed to a speed at which the required gripping
force can be obtained. Align the cores sufficiently to eliminate
such swinging.
Check the end surface run-out and the outer periphery, and
retighten the chuck attaching bolts.
Remove the top jaw, and clean the serration part thoroughly.
Tighten the top jaw attaching bolt at the specified torque.
(Refer to page 17)
Is the plug for forming parallel to the chuck end surface? Is the
plug for forming not deformed due to the gripping force?
Lower the height of the top jaw. (Replace it with the standard size)
or check the gripping contact surface and make it uniform.
Lower the gripping force in the range possible to process to
prevent deformation.
The chuck inside will break.
The sliding surface is seized.
The cylinder is not operating.
A large amount of cutting powder is inside.
The draw pipe loosened.
The stroke of the jaw is insufficient.
The gripping force is insufficient.
The forming diameter of the top jaw is not
consistent with the work diameter.
The cutting force is too large.
Insufficient grease lubrication.
The rotation speed is too high. Swinging occurs
due to incorrect alignment of cores of work
feeder, steady rest, tail stock, etc.
The outer periphery of the chuck is running out.
Dust is attached on the serration part of the
master jaw and the top jaw.
The attaching bolt of the top jaw is not tightened
sufficiently.
The forming method of the soft jaw is
inappropriate.
The height of the top jaw is too high, the top jaw
is deformed, the top jaw attaching bolt is
elongated.
The gripping force is too large leading to the
work being deformed.
The chuck
does not
operate.
Insufficient
stroke of the jaw.
The Work
slips.
Precision
failure.
WARNING
NC lathe
SOL.
Support
Draw pipe
Draw bar
Back plate
Cylinder
Cylinder adaptor
Chuck
Top jaw
Lathe
rear cover
Manual
switching valve
Solenoid
valve
Line filter
Pressure gauge
Hydraulic pump
Pressure
adjusting screw
Flexible hose
Use one with large inside
diameter as possible
Drain hose
Return onto
the oil surface
Tank
Содержание HW-08
Страница 31: ......


