


K134sm8e6
8-165
8. 4. 3. 151
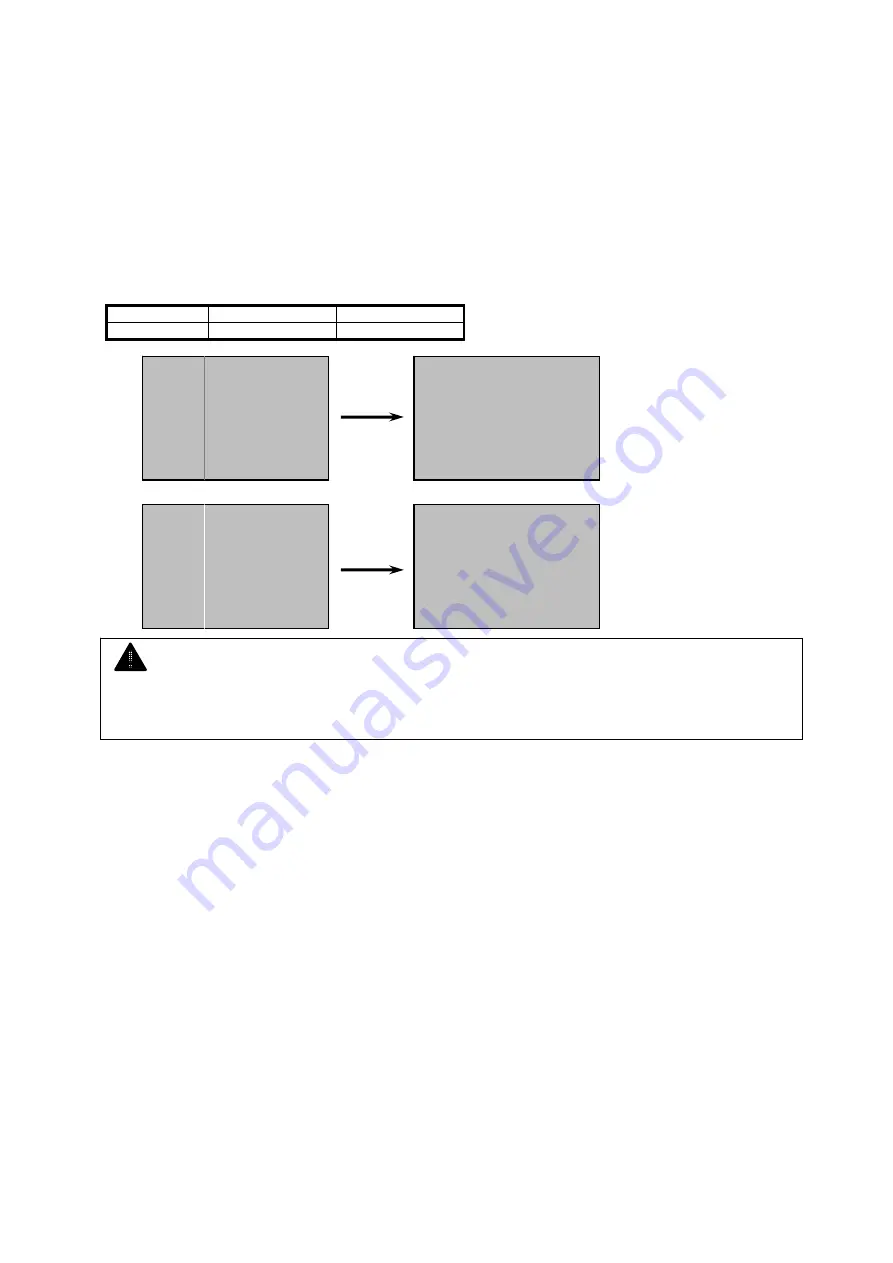
Darkness adjustment for the boundary between blocks
A & B (No. 814)
Item No. 814 adjusts the darkness of only few limited pixels on the boundary between blocks A
and B. If there is a white vertical line or dark one on the boundary of blocks A and B that can not
be removed completely by adjusting the Item No. 767 (Horiontal Alignment of LED Head block A &
B), such vertical lines may become less visible if you change the setting of this item No.814.
- Increment of value increases the darkness of only very few pixels on the boundary between
blocks A and B, which makes a dark vertical line on the boundary lighter and less visible.
- Decrement of value decreases the darkness of only very few pixels on the boundary between
blocks A and B, which makes a white vertical line on the boundary darker and less visible.
Default Value
Setting Range
Step of increment
2
1 to 5
-
Decrease
Increase
NOTE
Please adjust the Item No. 767 (Horiontal Alignment of LED Head block A & B) first. If it does
not remove vertical white or dark line in boundary part, adjust this item No.814.
Содержание 7170K
Страница 1: ...KIP 7170K Service Manual Version A...
Страница 46: ...K134sm2e5 2 28 7 Press GUIDES 8 Press Help 9 Press Settings SETTINGS screen appears...
Страница 54: ...K134sm2e5 2 36 3 Press Door Icon to log in Maintenance GUI Home 4 Press Map Icon in Maintenance GUI Home...
Страница 59: ...K134sm2e6 2 41 2 Open Diagnostics folder 3 Double click Hardware Utilities and K129 diag X X X X XX...
Страница 60: ...K134sm2e6 2 42 4 Run K129 Diag Other ways to run the K129 Diag are described on the next page Reference...
Страница 76: ...K134sm2e6 2 58 31 Type 4 with keypad and then click OK on the bottom 32 Click OK on the bottom...
Страница 108: ...K134sm4e1 4 4 120V model 230V model 8 7 10 11 12 15 14 13 9...
Страница 189: ...K134sm5e4 5 36 64 Press GUIDES 65 Press Help...
Страница 190: ...K134sm5e4 5 37 66 Press Settings SETTINGS screen appears 67 Press PRINTER SERVICE on the SETTINGS screen Scroll...
Страница 191: ...K134sm5e4 5 38 68 Press LAUNCH 69 Press Door Icon to log in Maintenance GUI 70 Press Clear Reset...
Страница 192: ...K134sm5e4 5 39 71 Select 00006 Bias 3 Count from Clear Reset menu Press Edit 72 Confirmation screen appears Press Yes...
Страница 195: ...K134sm5e5 5 42 5 Remove 9 screws 5 to remove Frame 2 6 6 Remove 2 screws 7 to remove Bracket Assy 8 6 8 7 5 5...
Страница 257: ...K134sm5e9 5 104 45 Turn Nail Lower 75 to remove it from the bracket Replace Nail Lower with a new one 75 75...
Страница 331: ...K134sm5eE 5 178 4 Remove Belt 4 4 NOTE Belt 4 is automatically unfastened if only you open the Engine Unit 4...
Страница 384: ...K134sm5eH 5 231 3 Remove both Covers 3 5 6 pulling their sides outward 5 6...
Страница 395: ...K134sm5eH 5 242 6 Remove the Blower 9 BL3 BL4 moving as the following photos 9 9...
Страница 410: ...K134sm5eI 5 257 5 Remove 2 screws 10 Grip Ring and Bearing 11 to remove Bracket 9 Remove Belt 8 8 10 10 9 11 8...
Страница 431: ...K134sm5eJ 5 278 7 Remove 2 screws 10 to remove Motor Assy 11 Replace Motor Assy with new one 10 11...
Страница 438: ...K134sm5eJ 5 285 20 Remove 6 screws 29 to remove Sheet Guide 30 21 Remove 3 screws 31 31 29 29 29 29 30...
Страница 475: ...K134sm5eJ 5 322 20 Remove 6 screws 29 to remove Sheet Guide 30 21 Remove 3 screws 31 31 29 29 29 29 30...
Страница 502: ...K134sm6e1 6 15...
Страница 547: ...K134sm7e3 7 45 6 Close Diagnostics folder and then double click Touch Icon to go back to UI Home Screen...
Страница 551: ...K134sm7e3 7 49 6 Select Settings 6 Scroll to right side on the screen by swiping Find COUNTER MISMATCH and select it...
Страница 563: ...K134Ksm8e2 8 4 4 Press GUIDES 5 Press Help...
Страница 564: ...K134Ksm8e2 8 5 6 Press Setting to indicate SETTINGS page...
Страница 566: ...K134Ksm8e2 8 7 9 Press the door icon on the bottom left to run the Maintenance GUI Maintenance GUI Home Screen...
Страница 571: ...K134Ksm8e2 8 12 You will be able to check the current version of Maintenance GUI in Version Info Reference...
Страница 579: ...K134Ksm8e2 8 20 7 Press No of Sheet button to indicate the Ten Key enter the number of sheets to print and then press OK...
Страница 585: ...K134Ksm8e2 8 26 5 Press No of Sheet button to indicate the Ten Key enter the number of sheets to print and then press OK...
Страница 594: ...K134Ksm8e2 8 35 2 Press All Items 3 Press Export...
Страница 730: ...K134Ksm8e7 8 171 8 5 Information It is possible to monitor several kinds of data information of printer...
Страница 747: ...K134Ksm8e7 8 188 8 9 2 Operation in Error Mask 1 Press Error Mask...
Страница 748: ...K134Ksm8e7 8 189 2 Check items that you want to mask Then the concerning sensor starts to ignore the checked Error...
Страница 749: ...K134Ksm8e7 8 190 8 9 3 Operation in Jam Mask 1 Press Jam Mask...
Страница 750: ...K134Ksm8e7 8 191 2 Select the desired target...
Страница 754: ...K134Ksm8e7 8 195 8 11 2 Changing Counter Value 1 Press Total Count 2 Press Edit...
Страница 756: ...K134Ksm8e7 8 197 5 Press Edit to enable new value 6 Close the following message pressing OK...
Страница 759: ...K134Ksm8e7 8 200 8 12 Program Update Printer control programs such as firmware and FPGA hardware are updated...
Страница 763: ...K134Ksm8e7 8 204 8 13 Version Info Version Info indicates the versions of printer control programs...
Страница 769: ...K134Ksm8e7 8 210 3 Press Toner Supply Setup for supplying additional toner to the developer unit...
Страница 777: ...K134Ksm8e7 8 218 8 19 Communication Reset NOTE This function is not used in the market...
Страница 786: ...K134sm8e8 8 227 2 Click Receive 3 The current parameters are retrieved and displayed in the list...
Страница 826: ...K134sm8e8 8 267 2 Click Receive 3 The current parameters are retrieved and displayed in the list...
Страница 839: ...K134sm8e8 8 280 29 Double click on the row No 15 Stitch Setting 1...
Страница 863: ...K134sm9e1 Chapter 9 Appendix...
Страница 864: ...KIP 7170 Overall Circuit Diagram USA 120V_KCS...
Страница 865: ...KIP 7170 Overall Circuit Diagram 230V_KCS...


