


Explanation for EMC
1. When this product is installed in North America.
This product complies with part 15 of the FCC Rules. Operation is subject to the following two
conditions: (1) This product may not cause harmful interference, and (2) this device must
accept any interference received, including interference that may cause undesired operation.
FCC CAUTION
Changes or modifications not expressly approved by the party responsible for compliance could void the user’s
authority to operate the product.
Note: This product has been tested and found to comply with the limits for a Class A digital equipment, pursuant to
part 15 of the FCC Rules. These limits are designed to provide reasonable protection against harmful interference
when the product is operated in a commercial environment. This product generates, uses, and can radiate radio
frequency energy and, if not installed and used in accordance with the instruction manual,, may cause harmful
interference to radio communications. Operation of this product in a residential area is likely to cause harmful
interference in which case the user will be required to correct the interference at his own expense.
This product complies with Part 15 of FCC Rules and Industry Canada licence-exempt RSS standard(s). Operation is
subject to the following two conditions: (1) this product may not cause interference, and (2) this product must accept
any interference, including interference that may cause undesired operation of this product.
Le présent appareil est conforme aux la partie 15 des règles de la FCC et CNR d’Industrie Canada applicables aux appareils radio
exempts de licence. L’exploitation est autorisée aux deux conditions suivantes : (1) I’appareil ne doit pas produire de brouillage, et
(2) I’utilisateur de I’appareil doit accepter tout brouillage radioélectrique subi, même si le brouillage est susceptible d’en
comprometter le fonctionnement.
Contains FCC ID: VP8-13551
Contains IC: 7391A-13551
2. When this product is installed in Europe
This product complies with the requirements in CISPR 22 Rules for a Class A computing equipment.
Operation of this product in a residential area may cause unacceptable interference to radio and TV reception
requiring the operator to take whatever steps are necessary to correct the interference.
Do not install product around other electronic equipment or other precision instruments.
Other equipment may be affected by electrical noise during operation.
If the product is installed near other electronic equipment, such as a TV or a radio, interference to said
equipment, such as noise or flickering, may occur.
Use a separate power line and install the PRINTER as far as possible from said equipment.
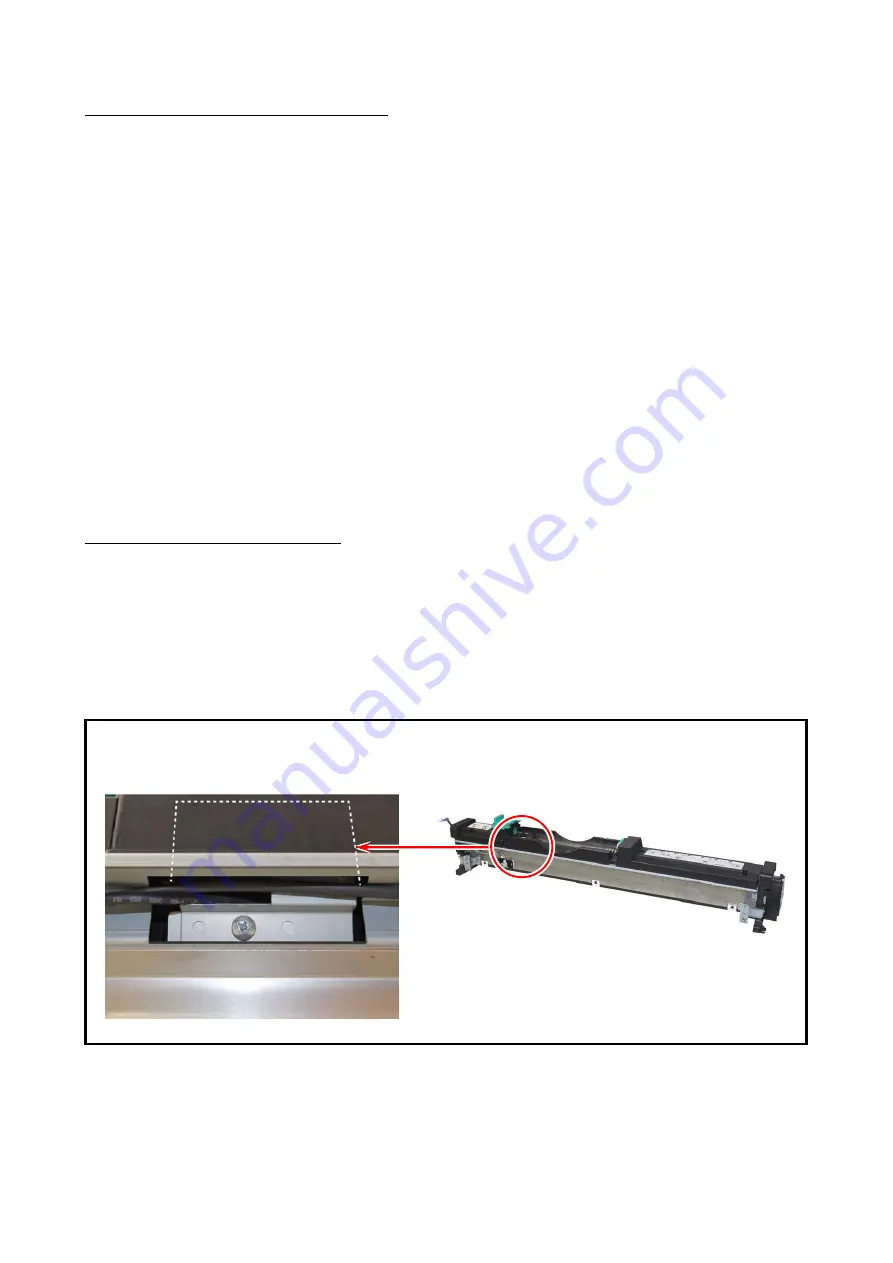
The position of the photograph has 13551 (Developer unit).
(Refer to [4 Setup of the Machine] Step 11.)
Содержание 7170K
Страница 1: ...KIP 7170K Service Manual Version A...
Страница 46: ...K134sm2e5 2 28 7 Press GUIDES 8 Press Help 9 Press Settings SETTINGS screen appears...
Страница 54: ...K134sm2e5 2 36 3 Press Door Icon to log in Maintenance GUI Home 4 Press Map Icon in Maintenance GUI Home...
Страница 59: ...K134sm2e6 2 41 2 Open Diagnostics folder 3 Double click Hardware Utilities and K129 diag X X X X XX...
Страница 60: ...K134sm2e6 2 42 4 Run K129 Diag Other ways to run the K129 Diag are described on the next page Reference...
Страница 76: ...K134sm2e6 2 58 31 Type 4 with keypad and then click OK on the bottom 32 Click OK on the bottom...
Страница 108: ...K134sm4e1 4 4 120V model 230V model 8 7 10 11 12 15 14 13 9...
Страница 189: ...K134sm5e4 5 36 64 Press GUIDES 65 Press Help...
Страница 190: ...K134sm5e4 5 37 66 Press Settings SETTINGS screen appears 67 Press PRINTER SERVICE on the SETTINGS screen Scroll...
Страница 191: ...K134sm5e4 5 38 68 Press LAUNCH 69 Press Door Icon to log in Maintenance GUI 70 Press Clear Reset...
Страница 192: ...K134sm5e4 5 39 71 Select 00006 Bias 3 Count from Clear Reset menu Press Edit 72 Confirmation screen appears Press Yes...
Страница 195: ...K134sm5e5 5 42 5 Remove 9 screws 5 to remove Frame 2 6 6 Remove 2 screws 7 to remove Bracket Assy 8 6 8 7 5 5...
Страница 257: ...K134sm5e9 5 104 45 Turn Nail Lower 75 to remove it from the bracket Replace Nail Lower with a new one 75 75...
Страница 331: ...K134sm5eE 5 178 4 Remove Belt 4 4 NOTE Belt 4 is automatically unfastened if only you open the Engine Unit 4...
Страница 384: ...K134sm5eH 5 231 3 Remove both Covers 3 5 6 pulling their sides outward 5 6...
Страница 395: ...K134sm5eH 5 242 6 Remove the Blower 9 BL3 BL4 moving as the following photos 9 9...
Страница 410: ...K134sm5eI 5 257 5 Remove 2 screws 10 Grip Ring and Bearing 11 to remove Bracket 9 Remove Belt 8 8 10 10 9 11 8...
Страница 431: ...K134sm5eJ 5 278 7 Remove 2 screws 10 to remove Motor Assy 11 Replace Motor Assy with new one 10 11...
Страница 438: ...K134sm5eJ 5 285 20 Remove 6 screws 29 to remove Sheet Guide 30 21 Remove 3 screws 31 31 29 29 29 29 30...
Страница 475: ...K134sm5eJ 5 322 20 Remove 6 screws 29 to remove Sheet Guide 30 21 Remove 3 screws 31 31 29 29 29 29 30...
Страница 502: ...K134sm6e1 6 15...
Страница 547: ...K134sm7e3 7 45 6 Close Diagnostics folder and then double click Touch Icon to go back to UI Home Screen...
Страница 551: ...K134sm7e3 7 49 6 Select Settings 6 Scroll to right side on the screen by swiping Find COUNTER MISMATCH and select it...
Страница 563: ...K134Ksm8e2 8 4 4 Press GUIDES 5 Press Help...
Страница 564: ...K134Ksm8e2 8 5 6 Press Setting to indicate SETTINGS page...
Страница 566: ...K134Ksm8e2 8 7 9 Press the door icon on the bottom left to run the Maintenance GUI Maintenance GUI Home Screen...
Страница 571: ...K134Ksm8e2 8 12 You will be able to check the current version of Maintenance GUI in Version Info Reference...
Страница 579: ...K134Ksm8e2 8 20 7 Press No of Sheet button to indicate the Ten Key enter the number of sheets to print and then press OK...
Страница 585: ...K134Ksm8e2 8 26 5 Press No of Sheet button to indicate the Ten Key enter the number of sheets to print and then press OK...
Страница 594: ...K134Ksm8e2 8 35 2 Press All Items 3 Press Export...
Страница 730: ...K134Ksm8e7 8 171 8 5 Information It is possible to monitor several kinds of data information of printer...
Страница 747: ...K134Ksm8e7 8 188 8 9 2 Operation in Error Mask 1 Press Error Mask...
Страница 748: ...K134Ksm8e7 8 189 2 Check items that you want to mask Then the concerning sensor starts to ignore the checked Error...
Страница 749: ...K134Ksm8e7 8 190 8 9 3 Operation in Jam Mask 1 Press Jam Mask...
Страница 750: ...K134Ksm8e7 8 191 2 Select the desired target...
Страница 754: ...K134Ksm8e7 8 195 8 11 2 Changing Counter Value 1 Press Total Count 2 Press Edit...
Страница 756: ...K134Ksm8e7 8 197 5 Press Edit to enable new value 6 Close the following message pressing OK...
Страница 759: ...K134Ksm8e7 8 200 8 12 Program Update Printer control programs such as firmware and FPGA hardware are updated...
Страница 763: ...K134Ksm8e7 8 204 8 13 Version Info Version Info indicates the versions of printer control programs...
Страница 769: ...K134Ksm8e7 8 210 3 Press Toner Supply Setup for supplying additional toner to the developer unit...
Страница 777: ...K134Ksm8e7 8 218 8 19 Communication Reset NOTE This function is not used in the market...
Страница 786: ...K134sm8e8 8 227 2 Click Receive 3 The current parameters are retrieved and displayed in the list...
Страница 826: ...K134sm8e8 8 267 2 Click Receive 3 The current parameters are retrieved and displayed in the list...
Страница 839: ...K134sm8e8 8 280 29 Double click on the row No 15 Stitch Setting 1...
Страница 863: ...K134sm9e1 Chapter 9 Appendix...
Страница 864: ...KIP 7170 Overall Circuit Diagram USA 120V_KCS...
Страница 865: ...KIP 7170 Overall Circuit Diagram 230V_KCS...


