background image

ENGLISH

Mars Series: Quick Setup Guide

NVR User’s Manual

13

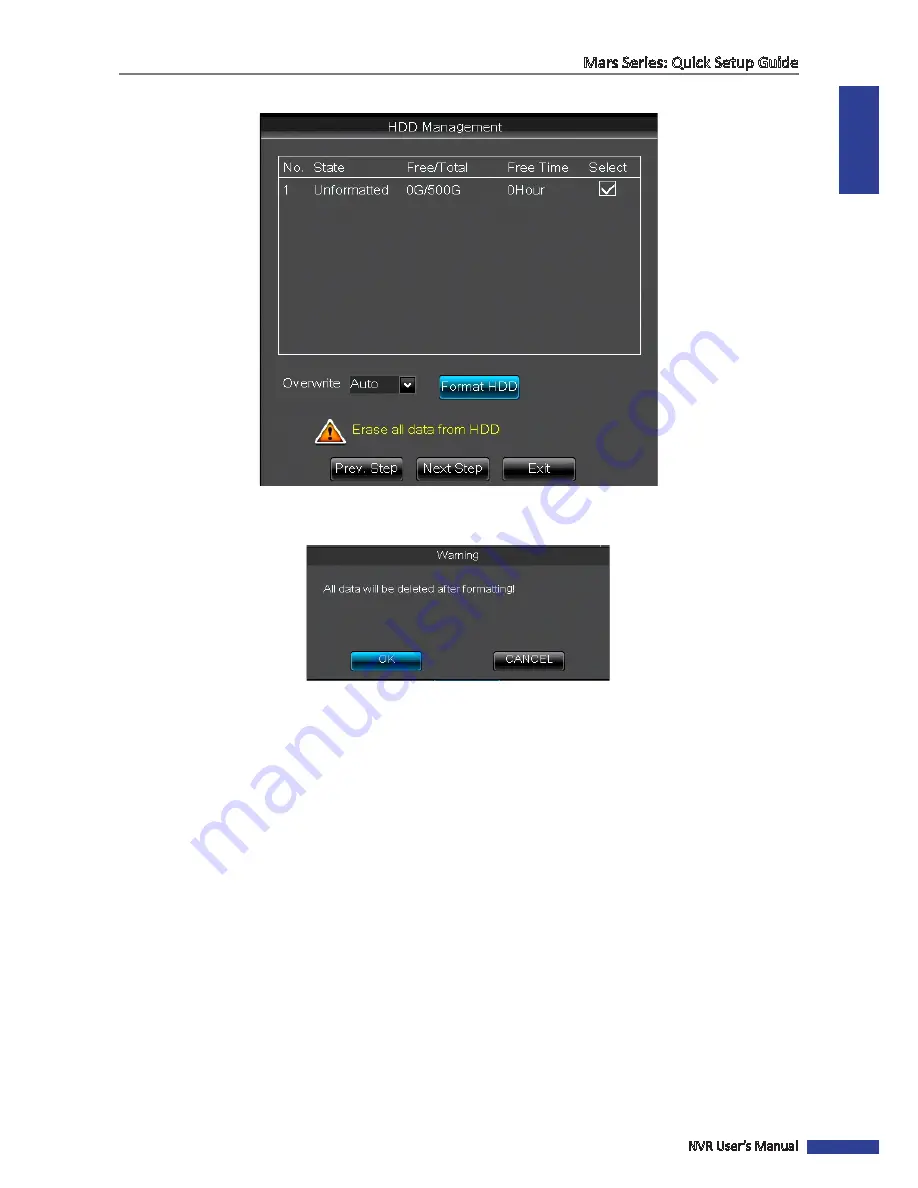
HDD Management

If you start up the NVR for the first time, you need to format the HDD. To format the HDD, check the 

Select

 checkbox 

and click 

Format HDD

. A warning menu opens where you are asked to confirm your selection. Click 

OK

.

For the initial setup, keep the 

Overwrite

 option 

Auto

 as by default. This is the time period when the old recordings are 

overwritten. You can configure it later via NVR’s Main Menu.

NOTE:

 By default the NVR starts recording automatically after the HDD is formatted and the connection to the cameras 

is established.

Click 

Next Step

 to move to the next window.

Содержание MR-4020

Страница 1: ...MARS NVR Combo Kit USER MANUAL MR 4040 MR 4020 Default user name admin Default password 123456 NVR ...

Страница 2: ...5 of the FCC Rules Operation is subject to the following two conditions 1 This device may not cause harmful interference 2 This device must accept any interference received including interference that may cause undesired operation Copyright Limitation of Liability This publication is provided AS IS without warranty of any kind either expressed or implied including but not limited to the implied wa...

Страница 3: ...use worn damaged or bare cables Always avoid open circuit voltage The added voltages increase the severity of electric shock hazard Always wear insulated gloves while you adjust equipment Electric power should be turned off and insulated gloves should be worn when making any equipment adjustment to assure shock protection Always wear protective clothing such as long sleeve shirts while you are ins...

Страница 4: ...ing the Live Viewing Screen 18 Pop Up Menu on Live Viewing Screen 22 Basic NVR Operation 24 Using the Supplied USB Mouse 24 Virtual Keyboard 24 Locking the Screen 24 Using the Supplied Remote Control 25 Rebooting Shutting Down the NVR 26 Accessibility Features 27 Downloading New KView App 27 Using Cloud Storage 29 How to Create a Dropbox Account 29 How to Configure the Cloud Storage Settings 30 Ad...

Страница 5: ...oud Storage 59 System General 61 System Users 62 System Info 63 Advanced Maintain 64 Advanced Events 67 Remote Access Via Web Client 68 Logging In 68 Interface Overview 69 Live Viewing 70 Switching Screen Modes 71 Viewing and Recording 72 Viewing or Hiding Channels 72 Recording Channels Manually 72 Taking Snapshots 72 About the Main Menu 73 Local Settings 74 Loggin Off 74 Appendix 75 Troubleshooti...

Страница 6: ...f you are interested in learning more about the functions and accessibility options of your NVR then you can find advanced configuration in the latter part of the manual Step 1 Unpack Your NVR Please take a moment to check if all the necessary items are included in the package If anything is missing or damaged please contact your dealer immediately When you purchase the Mars Series NVR the package...

Страница 7: ...ll or remove the hard disk drive while the device power is turned ON To install the HDD follow the instructions below 1 Remove the cover Loosen the screws as shown Push back then lift up the cover to remove it 2 Install and secure the HDD Connect the data and power cables Align the HDD on the holes on the to the HDD and place the HDD on NVR case and secure the HDD the NVR case using the four 4 sup...

Страница 8: ...has a built in IR receiver on front panel allowing you to use the remote control However if the distance between the remote control and the NVR is too large you need to install an IR extender into the IR extender port NOTE The IR extender is not included 2 HDMI Output This is considered as the main output of the NVR We recommend using this output for the best available video output quality For ult...

Страница 9: ...ernal alarm sensors and an alarm output device for example a siren 7 WAN Port This port is for connecting the NVR to the network usually directly into the network switch or router 8 LAN 1 LAN 4 Port These ports are for the main video input from the IP cameras When connecting the IP camera s to these ports make sure to use the supplied Ethernet RJ45 cables The channel labels of the ports appear in ...

Страница 10: ...MI connect it to the HDMI Output on the NVR 2 Connect the IP cameras to the NVR and NVR to the network VGA ALARM SENSOR G 1 2 3 4 WAN HDMI IR EXT AUDIO OUTPUT LAN 4 LAN 2 LAN 3 LAN 1 CAUTION RISK OF ELECTRIC SHOCK DO NOT OPEN 19V WAN LAN 4 LAN 2 LAN 3 LAN 1 WAN LAN LAN LAN LAN Internet Use the supplied Ethernet cable to connect the camera output to the video input on the NVR NOTE The power supply ...

Страница 11: ...UTPUT LAN 4 LAN 2 LAN 3 LAN 1 CAUTION RISK OF ELECTRIC SHOCK DO NOT OPEN 19V 19V 19V A Connect the supplied power cable to the power adapter B Plug in the power cable to the power outlet C Connect the power adapter 19V 4A only to the Power Input on the NVR D Press the Power Switch to switch ON the NVR After the NVR is switched ON the Startup Wizard appears on your monitor TV screen please see the ...

Страница 12: ... you to choose how you want the NVR to operate All items on the wizard are also accessible via the NVR s Main Menu see Main Menu on page 35 Startup Wizard If you do not want to go through the Startup Wizard but access the Live Viewing screen immediately step 6 you can click Exit A confirmation message appears on the screen click OK If you want to disable the Startup Wizard after reboot click Yes N...

Страница 13: ...g menu opens where you are asked to confirm your selection Click OK For the initial setup keep the Overwrite option Auto as by default This is the time period when the old recordings are overwritten You can configure it later via NVR s Main Menu NOTE By default the NVR starts recording automatically after the HDD is formatted and the connection to the cameras is established Click Next Step to move...

Страница 14: ...ve button Date Format Choose how you would like the date to appear on the screen We recommend to use the standard formats in your location Time Format Choose how you would like the time to appear on the screen The available options are 24 hour format or 12 hour format DST Configure the Daylight Saving Time if it is applicable in your region By default the DST is set Disable NTP Skip the NTP Networ...

Страница 15: ...r network type is Static ask your ISP for assistance on determining the IP address Subnet mask Gateway and DNS 1 2 server If your network type is DHCP your NVR will optain the connection parameters like IP address Subnet Mask Gateway and DNS 1 2 automatically Client Port and HTTP Port For time being keep the default port values These ports are important to configure if you want to use UPnP feature...

Страница 16: ...er you complete Step 5 you should be able to see the Live Viewing screen You should see a live video from the connected camera s in about 30 seconds NOTE The example below is a live view from four cameras Please see Understanding the Live Viewing Screen on page 18 for more detail about the Live Viewing screen ...

Страница 17: ...ws into the three holes at mounting location the end of the camera Mount Bracket and secure them into the holes on the wall using a screwdriver 1 Locate your ideal camera position on the selected surface for example on the wall CAUTION Please avoid installing the camera near the indoor lights for example under fluorescent light and do NOT point the camera to the light directly 3 Adjust the camera ...

Страница 18: ...izard is the Live Viewing screen It is considered the main screen On this screen you see the live views from the connected cameras Please be noted that the conneciton to the cameras may take up to 30 seconds 4 Split Screen four cameras connected default screen Live Viewing Screen 4 Cameras Connected Those channels that do not have any cameras connected are in the status Connecting ...

Страница 19: ...ENGLISH Mars Series Understanding the Live Viewing Screen NVR User s Manual 19 Live Viewing Screen 3 Cameras Connected 1 Empty Channel ...

Страница 20: ... Screen 20 NVR User s Manual Full Screen Mode one channel in full screen You need to double click on a channel live view to see the channel in full screen If you want to exit the full screen mode double click again Live Viewing Screen Full Screen Mode ...

Страница 21: ...motion is detected for that camera By default motion detection is activated for all cameras If you want to modify this setting see Alarm Motion on page 56 H If you see this icon on a live view it means the NVR cannot detect a HDD or the HDD is not formatted Please make sure you have installed a HDD into the NVR see Step 2 Install the Hard Disk Drive HDD on page 7 or see Device HDD on page 58 R M I...

Страница 22: ...e right mouse button on Live Viewing screen or press the MENU button on the remote control 1 2 3 4 5 6 7 8 9 No Connector Description 1 Main Menu This is the Main Menu where you can configure all the settings of the NVR 2 Lock Lock the access to the Main Menu You need to type the user name and password before entering the Main Menu 3 View 4 Switch to a 4 split display For example after viewing cha...

Страница 23: ...ord Search on page 44 6 Start Stop Record Click to Start stop manual recording Please be noted that if you start a manual recording the recording will stop only when you click again REC button 7 Start Stop SEQ Click to start stop viewing channels in a sequence You can set the sequence time in Display Output on page 38 8 PIP 1x1 View one channel in full screen with another channel enclosed in a sma...

Страница 24: ...mode Double click again to exit the full screen mode Drag an area line In motion mode allows to select the motion area In menu mode allows to adjust the values of sliders and scales Virtual Keyboard The virtual keyboard automatically appears on the screen if data entry is required Click to toggle the keyboard to upper case Click to enter the text Click to delete a character Typed characters are di...

Страница 25: ...isplay all channels 4 MENU Press to enter or exit the Main Menu 5 SEL Press to enter the selected menu item and edit the setting 6 Press to move up in the Main Menu 7 Press to move left or right in the Main Menu 8 Press to move down in the Main Menu 9 Audio Search Not applicable 10 Mute Not applicable 11 Press to rewind during video playback 12 Press to play recorded video or enter the recording s...

Страница 26: ...own the NVR open the Main Menu Advanced Maintain and click the corresponding button CAUTION To protect your data on the NVR always shut down the NVR using the Shut Down menu button Before reboot or shut down a Warning message appears on the screen to confirm your choice Click OK Warning Before Reboot Warning Before Shut Down ...

Страница 27: ...nction Downloading New KView App The outstanding feature of this NVR is that you do not need to do any complicated network settings to set up the NVR for remote live view on smart phone pad In a DHCP typical personal home LAN Local Area Network do the following Step 1 Connect the NVR to network a Connect the power adapter to the NVR See Step 4 Switch ON the NVR on page 11 b Connect an RJ 45 cable ...

Страница 28: ...lowing Tap Scan to scan the QR code sticker on the top of the NVR Manually enter the 20 symbol QR code as shown on the sticker and click OK Step 5 Enter the password and change the NVR name if necessary Default User Name admin Default Password 123456 After all settings are complete tap OK Step 6 View the Multiple Live Screen ...

Страница 29: ...opbox virtual storage Before setting up the cloud storage on the NVR you need to make sure your Dropbox account is created and activated and your NVR is connected to the Internet see Network Network on page 49 How to Create a Dropbox Account To create an account for accessing Dropbox service do the following If you are using a PC open the web browser and navigate to www dropbox com The main page o...

Страница 30: ... as well then the snapshots are transferred to the Dropbox on a motion detection and on time interval simultaneously For example a camera is installed on the front door When someone enters the room the motion is triggered The snapshots are then sent to the cloud storage Drive Name Enter the cloud storage name for your NVR When linking the KGuard Cloud Uploader to your Dropbox the Drive Name will b...

Страница 31: ...Enable e mail function SSL Enable if your e mail server requires the SSL verification If you are not sure please consult your e mail service provider For example if you are using Gmail then this option should be enabled SMTP Port Enter the SMTP port of your e mail server For example if you are using Gmail the SMTP port is 465 SMTP Server Enter the SMTP Server address of your e mail Sender Email En...

Страница 32: ... sent to the Receiver s e mail account Click OK to continue NOTE If you use the default SMTP server and received the error message then please check your receiver e mail address and network settings NOTE An e mail will be sent to the Receiver e mail account after clicking Activate Cloud and a given time 3 minutes for activating the cloud storage There are two options to activate as follows Open yo...

Страница 33: ...he cloud account activation When the activation is complete a new folder is added to your Dropbox folder list For cloud storage activation from your smart phone pad you can download New KView app and use the QR scanner QR Tools to scan the QR code on the Remark message on the NVR s screen and connect to Dropbox ...

Страница 34: ...nual Then enter your Dropbox e mail address and password and click Sign In to activate the cloud storage Follow the on screen instructions to complete the cloud account activation When the activation is complete a new folder is added to your Dropbox folder list ...

Страница 35: ...e status of the cameras footage color setup video output resolution setting privacy zones and more Record Configure the recording options for example resolution and setting up recording schedules for channels Search Search for recordings play the recording option events and logs by different types Network Configure the NVR s access parameters to the network define the parameters for example resolu...

Страница 36: ...ain Menu have a short explanation when you hover the cursor over the field Click Apply to save changes click Exit to close the menu or right click on the menu click Default to restore default values Click Copy To to copy the current settings to all channels or one specific channel ...

Страница 37: ... Display Live Channel In this menu you can configure how the channels are displayed on the Live Viewing screen Select the channel from the drop down menu NOTE The channels appear in the numerical order depending in which of the LAN 1 LAN 4 ports it is connected Name If you do not like the default name of the channel just click on the field and using the on screen keyboard input the new name It is ...

Страница 38: ... not displayed on LIve Viewing screen it does not affect the recording from the channel on HDD unless you have disabled the recording for the channel Display Output Video Output This is the video output of the main monitor that you use for live view display View Setup If the View Setup is disabled you will see SEQ Time menu option This option allows you to set the time in seconds how long you want...

Страница 39: ...mpty channel for live view Single Mode Quad Mode VGA HDMI Resolution Select the highest resolution your monitor TV supports The higher the resolution the more details you will see on your images The NVR will restart after you change the resolution Init DEV This is the default video output Transparency Set how you want the settings menu to be displayed To adjust the transparency click and slide the...

Страница 40: ...rivacy zone s Privacy Zone You need to enable the function in order to use it NOTE The privacy zone is valid only to the specific channel If you wish to copy the same settings to other channels use Copy function Area Setup If you want to define two privacy areas check both Area1 and Area2 if only one then check Area 1 or Area 2 Mask Area Click Setup to open the channel in full screen mode and star...

Страница 41: ...et the pre recording condition CH Select the channel to set its recording parameters Record If Record is enabled the video from the selected channel is recorded to the HDD Pre record You can set the recording only when an event is triggered With this feature the NVR starts the recording even before the event occurs to avoid missing important details ...

Страница 42: ...rding schedule can be set up based on Normal mode or Smart mode The Normal mode lets you to set up a schedule daily and hourly by normal continuous recording motion recording and alarm recording with the resolution 720P The Smart mode lets you to set up a schedule daily and hourly by normal recording and alarm recording according to their own set resolutions Slot for Normal recording Slot for Alar...

Страница 43: ...ormal recording for that time slot If you do not want to record all 24 hours in a specified day click on the green slot to mark it No Record gray slot Motion M Recording When the time slot is marked yellow it means the channel records only when a motion is detected during that time slot We recommend to use this type of recording The motion recording means that the recording is triggered only if a ...

Страница 44: ...ng on all the channels for the specified date and time Search Date Click on the Search Date box and specify the date where you want to search the recorded videos Click Search to look for the recordings on that date The result is displayed by date and time in Record State table Replay Time Click on the Replay Time box to specify the beginning time of the footage you want to review in playback and c...

Страница 45: ... on page 42 Click on the date to see all the recordings by time for that day and then click on the time to initiate the playback NOTE After you click Play next to Replay Time box or click on the time in Record State table you will be asked to choose the channel s to play simultaneously Check the channel s you want to see in playback and click Play If you choose only one channel then this channel i...

Страница 46: ...ard the playback If you want to specify the playback timeframe click the button and select among the following options 24 Hours 2 Hours 1 Hour 30 Minutes and Customize time frame To customize the time frame click icon and the icon turns red Click on the time bar where you desire to start and click on the time bar again where you desire to end To stop the video playback click X Playback Time Frame ...

Страница 47: ...footage Double click on the channel and while playing the video click the To stop trimming click the NOTE Trimming video does not alter video saved on your NVR s HDD It only determines the duration of a video being exported to the external storage device After you stop trimming you are asked to confirm to save the file Click Backup When the backup is complete click OK to close the Backup Status sc...

Страница 48: ...the channel to search or select All to search all channels Type Select the type of recording to search among All Normal or Alarm and click Search The recordings will be listed on the table BAK This is a checkbox for backing up the recording s The recording can be saved on an external disk therefore make sure you have connected an external USB storage into the USB port of the NVR Check the recordin...

Страница 49: ...the table NOTE If you want to backup the log to an external storage make sure the USB storage device is connected into the USB port of the NVR Network Network The most common types are DHCP or Static Most probably your network type is DHCP unless the network is manually addressed usually called Static If you need an authentication user name and password to the Internet then choose PPPoE NOTE If yo...

Страница 50: ...ou use Static IP address you need to enter the IP address as 010 000 100 187 85 in the URL box when logging in Web Client IP Address The IP address identifies the NVR in the network The IP address consists of four groups of numbers between 0 to 255 separated by periods For exapmle 010 000 100 187 If your network type is Static and you are not sure what the IP address is please ask your ISP Subnet ...

Страница 51: ...lient By default it has much lower quality than the main stream You can modify the FPS and or bitrate settings Mobile Stream This is how the images will be visible when accessing via smart phone pad You can modify the FPS and or bitrate settings CH Displays the channel where the settings are applied Resolution The screen resolution is set matching the stream type By default the Main Stream resolut...

Страница 52: ... for example 1 minute have not configured the e mail event Schedule and your mailbox has a size limit then your mailbox may become full very fast In this case you may miss the new notifications from the NVR Email You need to enable the e mail function to allow the NVR to send you notification e mails when an event occurs For your convenience you can define a schedule when and what type of events y...

Страница 53: ...r s web page For example KGUARD ORG http www kguard org See page page 54 DDNS Enable the DDNS service Server Select the preferred DDNS server The available options are KGUARD ORG recommended DYNDNS NO IP CHANGEIP DNSEXIT NOTE If you do not have a DDNS account yet you need to create one on the DDNS service provider s web page Host Name Enter the domain name you created on the DDNS service provider ...

Страница 54: ...ENGLISH Mars Series Operating the NVR 54 NVR User s Manual For applying the domain name on KGUARD ORG do the following Then provide a domain name for your NVR For example MyNVR4 ...

Страница 55: ...ENGLISH Mars Series Operating the NVR NVR User s Manual 55 If the domain name registration is successful the following screen displays the domain name and its status ...

Страница 56: ...block for motion detection Setting Motion Area CH Select the channel you want to set the motion detection Enable Enable the motion detection for a channel Area Click Setup to define the motion area See above Sensitivity It is very important to set the motion detection on a suitable seinsitivity level To find the best sensitivity level test the feature For example see how the motion event is trigge...

Страница 57: ... devices to the alarm and sensor I O port on the NVR Alarm In Choose the channel that will trigger the alarm Alarm Type Choose if the sensor is NO normally open or NC normally closed Check the sensor s manual to find out the correct value to use This is the way how the sensor informs the NVR when it has detected something suspicious If you do not want to use this feature disable the Alarm Type fea...

Страница 58: ...matting Click OK Wait until the HDD is formatted For example formatting a 500GB HDD will take about 1 2 minutes When the formatting is complete a notification appears on the screen Click OK Overwrite Use this option to overwrite the old recordings on the HDD The old recordings are measured in days For example if you set the overwrite option to 1 day then the NVR overwrites one day file at a time t...

Страница 59: ...ed on the scheduled time interval When the Time Trigger is set and the Motion Detection as well then the snapshots are transferred to the Dropbox on a motion detection and on time interval simultaneously For example a camera is installed on the front door When someone enters the room the motion is triggered The snapshots are then sent to the cloud storage Drive Name Enter the cloud storage name fo...

Страница 60: ...ng Gmail then this option should be enabled SMTP Port Enter the SMTP port of your e mail server For example if you are using Gmail the SMTP port is 465 SMTP Server Enter the SMTP server address of your e mail Sender Email Enter the e mail address of your e mail This e mail address is used by the NVR only for sending you the certification e mail for asking your acceptance to link the NVR to the Dro...

Страница 61: ...19 2013 Time Format Define the format of the time For example if you keep the default 24Hour and the current time is 5 29 54 PM the time appears on the footages as 17 29 54 DST Stands for Daylight Savings Time Make sure if in your country the DST is observer or not Typically the clocks are adjusted forward one hour near the start of spring and are adjusted backward in autumn Although NTP Network T...

Страница 62: ...ick Update Now to automatically synchronize the time set on NVR with a remote time server on Internet When you have finished with the settings click Apply Language The language of the menus alerts and other communications on NVR Menu Timeouts Define the time the NVR will exit the menus when they are not in use and return to the Live Viewing screen Flicker 50 Hz or 60 Hz depending on your geographi...

Страница 63: ... protect your privacy For your privacy protection please do NOT leave the admin password blank NOTE Only the administrator account is enabled by default SEL Check this checkbox to customize the user account and click Edit When the modifications are done click Apply System Info QR Code In this menu you can review all the technical information concerning your NVR NOTE If you need to scan the QR code...

Страница 64: ...ttings and data are refreshed from the system which optimizes the NVR performance To disable this function set the setting to Disable Reboot Please note that It is recommended to reboot the NVR at least once a week The system supports three types of auto maintenance schedules Options are a Every week Reboots the NVR on a weekly basis In Reboot select Every week and specify the day of the week and ...

Страница 65: ...nd click the Update button NOTE Do not remove the USB flash drive turn off the power or unplug from the power supply while updating Load Default Select this option if you wish to retrieve the default factory default settings When the option menu appears on the screen check the respective setting option box that you want to restore and then click Apply NOTE It is recommended to load defaults for al...

Страница 66: ...ug the USB flash drive to the USB port of the device and click Load Settings Save Settings Select this option to save the NVR current settings such as the video recording settings network configurations and etc To save your current configuration settings plug the USB flash drive to the USB port of the device and click Save Settings NOTE Before saving the settings be sure to plug a USB device into ...

Страница 67: ...ent type you want to configure among Disk Full Disk Error or Video Loss Enable Click to enable the monitoring of the event Alarm Out Check this function only if you have connected an external alarm device to your NVR and if you want the siren to activate when an event is detected Dwell Time This is the time period in seconds you want the NVR to stay in Alarm Out status Show Message Check the box t...

Страница 68: ...the IP address changes In this case ask if your ISP can provide you a static IP address If not then configure the DDNS service See the network settings in Network Network on page 49 and Network DDNS on page 53 Also please make sure the UPnP is configured in the NVR and router or the manual port forwarding is completed in the router Logging In To access the NVR remotely from a PC open your computer...

Страница 69: ...s Remote Setting Allows you to configure the NVR remotely Local Setting Allows you to specify the local disk drive location to save recorded videos captured screen shots and downloaded videos Logout Click to logout from the Web Client 2 Channel Controls Lists all four channels that can be connected to the NVR The icons of each channel are used to manage the channel 3 Display Screen Displays the ch...

Страница 70: ...nnels for viewing 2 Close All Channels Click to close all channels for viewing 3 Previous Click to view the previous channels 4 Next Click to save the changes 5 Full Screen Click to view the channels in full screen mode 6 Display Hide Screen Modes Click to display or hide the screen mode icons 7 Screen Mode Icons Click a screen mode icon to switch the screen display 8 Video Set Click to set the vi...

Страница 71: ...ient NVR User s Manual 71 Switching Screen Modes By default you will see a 4 channel grid display on the screen 4 Channel Grid Double click on the channel view or select a channel and click to see the channel in full screen mode Full Screen Mode ...

Страница 72: ...isplay The view icon indicates the current status The channel is displayed on the screen The channel is not displayed on the screen Recording Channels Manually Click the recording button next to a channel to start or stop manual recording The recording icon indicates the current status The channel is being recorded The channel is not being recorded Taking Snapshots Click the snapshot icon on the P...

Страница 73: ...to the OSD On Screen Display Main Menu items if you want to find more information on a specific item please refer to Main Menu on page 35 To find more information on Playback please see Search Record Search on page 44 Web Client Playback To find more information on configuring the Remote Setting please see Main Menu on page 35 Web Client Remote Setting ...

Страница 74: ...paths and file types click the Local Setting tab in Web Client interface A menu opens Click to select the path You can also configure the File type among avi or 264 H 264 format and set the interval in minutes The file format setting is for saving the video files Web Client Local Setting Click Save to save the modificaitons Loggin Off If you want to log off click the Logout tab in Web Client inter...

Страница 75: ...emote control and the NVR sensor Aim the remote control at a proper distance Check the remote control batteries Question The NVR does not connect to my Dropbox account Answer Make sure your have responded to the NVR s activation e mail within 3 minutes If more time has passed click Activate Cloud button again in NVR s Main Menu See Using Cloud Storage on page 29 Make sure your NVR have an access t...

Страница 76: ...tion Video Video Input 4 LAN ports Video Output 1 VGA 1 HDMI Outputs Video Output Resolution 800x600 1024x768 1280x1024 1440x900 1920x1080 Audio Audio Compression G 711 Audio Output 1 RCA output Recording Video Compression H 264 Recording Resolution 4 x 30fps 720p Recording Mode Manual Always Schedule Motion Detection Alarm Remote Recording HDD Interface 1 SATA HDD Support Up to 4TB Network Networ...

Страница 77: ... Resolution 1280 H x 960 V Lens 3 6mm fixed F1 2 6mm fixed F1 2 Viewing Angle 75 45 Night Vision 20 meters 30 meters Minimum Illumination While Infrared LED on 0 lux Day Night Mode Color during day switches to B W at night Electronics Shutter 1 3 1 10 000 sec Waterproof IP66 Operating Temperature 10 C 60 C 14 F 140 F Power Supply 12 VDC 10 PoE Dimensions 150x63x61mm Weight 420g Trademarks are prop...

Страница 78: ...CO LTD Address 4F No 113 Jian 2nd Road Jhonghe District New Taipei City 23585 Taiwan TEL 886 2 8228 6080 FAX 886 2 8221 6857 Email support kguardsecurity com USA Technical Support Contact TEL 1 949 450 0052 Email support kworldcomputer com Customer Support ...

Отзывы: