background image

Montaggio

93 / 156

12/2019

Installazione nel condotto delle acque di scarico non interrato 

 Installazione nel pavimento

Tenere assolutamente conto della direzione di flusso e posare la guarnizione (vedere freccia <77>, 
Fig. [12] ovvero Fig. [13]).

3.7 

Allineamento orizzontale del corpo base

77

Fig. [12]


77

Fig. [13]


Fig. [14]


Il tubo vuoto per cavi è destinato alla sfiato del vano sopra la pompa. Pertanto non deve essere chiuso ermeticamente.
Per il quadro elettrico è necessaria una presa (Schuko, 230 V).
-  Se, in luogo della valvola di sfiato, deve essere montato un condotto di sfiato, montare il collegamento delle tubazioni 

corrispondente fino al corpo base.
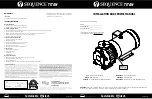
3.6 

Montaggio del corpo base

-  Collegare i due bocchettoni di entrata <56> e del lato di scarico <57>  

con il corpo base <1>, le chiusure rapide  
<64> sul corpo base permettono un montaggio rapido.

- Collegare Ecolift con il sistema di tubazioni,

56

64

64

57

1

Fig. [10]


64

Fig. [11]


Содержание Ecolift SPZ 1000

Страница 1: ...tem SDS inkl integrierter Batteriepufferung Motorische Verriegelung der Rückstauklappe Integrierte Ablauffunktion zur Oberflächenentwässerung Produktvorteile Stempel Fachbetrieb Technische Änderungen vorbehalten D Seite 1 GB Page 27 F Page 54 I Pagina 79 NL Pagina 105 PL Strona 131 85101 Lenting Z 53 2 487 Ecolift Einbau in die Bodenplatte Ecolift freiliegend mit Sicherheit geprüfte Qualität Bauar...

Страница 2: ...Gefahr durch elektrischen Schlag bei abgeschraubtem Stecker 8 2 4 3 Gefahr durch gesundheitsgefährdende Atmosphäre 8 2 4 4 Gefahr für die Gesundheit 9 2 4 5 Gefahr durch Lärm 9 2 4 6 Gefahr durch Hitze 9 2 4 7 Gefahr durch unerwartetes Anlaufen einer Pumpe 9 3 Montage 10 3 1 Baugruppen und Funktionsmerkmale Lieferumfang 10 3 2 Allgemeines zur Montage 12 3 3 Einbauvorschlag Schwarze Wanne 12 3 4 Ei...

Страница 3: ...tieren 20 4 Funktionsprüfung Inbetriebnahme 21 5 Wartung 22 5 1 Allgemeine Hinweise für die Wartung 22 5 2 Wartungsintervalle 22 6 Technische Daten 23 6 1 Pumpen 23 6 2 Schaltgerät Ecolift 23 6 3 Förderstrom 24 7 DOP Leistungserklärung 25 ...

Страница 4: ...e service kundenservice html 1 1 Produktbeschreibung allgemein Die KESSEL Rückstaupumpanlage Ecolift im folgenden Rückstaupumpanlage genannt ist für das Abpumpen von fäkalienfreiem und fäkalienhaltigem Abwasser vorgesehen In den Grundkörper sind die Baugruppen für die Pumpen den Drucksensor und die motorisch angetriebene Rückstauklappe eingebaut Im Normalbetrieb läuft das Abwasser rückstaufrei dur...

Страница 5: ... 2 Bezug auf eine Abbildung Arbeitsschritt 3 Arbeitsschritt in nummerierter Reihenfolge Aufzählung Kursiv Kursive Schriftdarstellung Bezug zu einem Abschnitt Punkt im Steuerungs Menü VORSICHT Warnt vor einer Gefährdung von Personen und Material Eine Missachtung der mit diesem Symbol gekennzeichneten Hinweise kann schwere Verletzungen und Materialschäden zur Folge haben Hinweis Technische Hinweise ...

Страница 6: ...lage 2 Artikelnummer 3 Anschlussspannung und Anschlussfrequenz 4 Hydraulische Daten 5 Allgemeine Daten 6 Seriennummer 7 Fertigungsdatum 8 Revisionsstand 9 Normenbezeichung 10 Auftragsnummer 65 66 Abb 2 RevStd X X TT MM JJ JJ S3 xx ED IP xx 3mWS 48h xxxxx Ecolift XY U xxxV xxHz I x xA P1 x xkW Ser Nr xxxxxxx Q xxm h H xxm www kessel com Auftr Nr xxxxxxx DIN EN 12050 1 2 1 2 3 9 8 6 4 5 10 7 Abb 3 ...

Страница 7: ... 5 Verlängerungsstück optional max 2 Stück 20 Pumpeneinheit 26 Motorische Klappeneinheit 37 Dichtung 41 Kabeldurchführung 42 Durchführung Druckleitung 56 Zulauf Seite 57 Ablauf Seite 58 Elektropack E Pack 1 5 2 Variante Ecolift freiliegend 1 Grundkörper 16 Anschluss Druckleitung 20 Pumpeneinheit 26 Motorische Klappeneinheit 56 Zulauf Seite 57 Ablauf Seite 58 Elektropack E Pack 1 42 20 26 37 5 37 3...

Страница 8: ...elungen der Unfallverhütungsvorschriften UVVen vorgenommen werden 2 3 Organisatorische Sicherheitsmaßnahmen Die Betriebs und Wartungsanleitung ist stets verfügbar zu halten 2 4 Gefahren die vom Produkt ausgehen 2 4 1 Gefahr durch besondere Örtlichkeit Umgebungsbedingungen Gefahr durch giftige und gesundheitsgefährdende Dämpfe Gase und Stoffe z B Bakterien Viren Befindet sich die Rückstaupumpanlage...

Страница 9: ...ückstaupumpanlage kann einen hohen Lärmpegel verursachen Tragen Sie bei Bedarf entsprechende Schutzausrüstung und sorgen Sie für schalldämmende Maßnahmen 2 4 6 Gefahr durch Hitze Gefahr von Verbrennungen beim Berühren heißer Oberflächen Abwasserpumpen entwickeln bei längerem Lauf eine hohe Temperatur an der Gehäuseoberfläche Schutzausrüstung Handschuhe tragen oder Pumpen entsprechend abkühlen lass...

Страница 10: ...2 2019 3 Montage 3 1 Baugruppen und Funktionsmerkmale Lieferumfang Montage in einer freiligenden Abwasserleitung 1 Pumpe 2 Alarmsonde 3 Rückstauklappe 4 Motor 5 Rückstausonde 6 Anschluss Druckleitung Abb 6 1 2 4 3 5 6 ...

Страница 11: ...Montage 11 156 12 2019 Einbau in die Bodenplatte 1 Geruchsverschluss für Bodenablauf 2 Pumpe 3 Alarmsonde 4 Rückstauklappe 5 Rückstausonde 6 Motor 7 Anschluss Druckleitung 1 2 3 6 5 4 7 Abb 7 ...

Страница 12: ...eb genommen 3 3 Einbauvorschlag Schwarze Wanne Schematische Darstellung 1 Ecolift 2 Dichtungsset Art Nr 83 073 Verlängerungsstück mit Flansch und Gegenflansch für den Anschluss an eine bauseitige Dichtbahn 3 Verlängerungsstück Art Nr 83070 a Fliesen f Schutzbeton b Estrich g Schaltgerät c Dämmung h Druckleitung d Betonboden e Abdichtung BWS Bemessungswasserstand g a b c d h 3 1 BWS e f 2 Abb 8 ...

Страница 13: ...zur Wand oder anderen Objekten für Wartungsarbeiten einhalten Beruhigungsstrecke vor und nach der Ecolift min 1 m einhalten Druckleitung gem DIN EN 12056 ausführen mit Rückstauschleife über die örtlich festgelegte Rückstauebene und unmittelbar an eine erweiterte mind DN70 belüftete Grund oder Sammelleitung anschließen Drucklose Rohranschlüsse z B HT Rohr sind für Druckleitungen unzulässig Kabellee...

Страница 14: ...Raumes oberhalb der Pumpe Es darf deshalb nicht luftdicht verschlossen werden Für das Schaltgerät wird eine Steckdose Schuko 230V benötigt Soll anstelle des Entlüftungsventils eine Entlüftungsleitung montiert werden entsprechende Rohrleitungsverbindung bis zum Grundkörper montieren 3 6 Grundkörper montieren Die beiden Stutzen Zulauf 56 und Ablaufseite 57 mit dem Grundkörper 1 verbinden die Schnell...

Страница 15: ... Einbau in freiliegende Abwasserleitung Einbau in die Bodenplatte Unbedingt auf die Fließrichtung achten und Dichtung einlegen Siehe Pfeil 77 Abb 12 bzw Abb 13 3 7 Grundkörper waagerecht ausrichten 77 Abb 12 77 Abb 13 Abb 14 ...

Страница 16: ...e weiße Wanne Dichtung 37 in Grundkörper 1 einlegen und auf Sitz der Dichtung achten Anschließend Oberseite der Dichtung fetten Verlängerungsstück mittiger Flansch 33 einschieben und in Position bringen Dichtmanschette mittig in WU Beton positionieren Auf waagrechte Lage der Dichtmanschette im Beton achten Die Manschette kann hierzu an den Löchern in den Ecken der Manschette abgespannt werden 48 4...

Страница 17: ...len Einsatzfällen im Schachtverbau im Falle einer Überflutung zu gewährleisten ist die Entlüftungsleitung mind 10 cm über die Rückstauebene zu führen Die Entlüftungsleitung muss so verlegt werden dass sie weder den Zugang zu Wartungszwecken noch die anderen Leitungsverbindungen Druckleitung Kabelleerrohr behindert Entlüftungsventil 11 aus der Pumpeneinheit 20 herausschrauben siehe Abb 17 Am Anschl...

Страница 18: ...körpers am Zwischenstück 1 montieren und die Mutter 23 von der Außenseite mit ca 10 Nm anziehen Bauseitige Druckleitung am Anschlussstück anschließen 3 12 Nur bei Einbau in freiliegende Abwasserleitung Verbindungsstück 80 zwischen Pumpenanschluss stutzen 18 und Anschlussstück 22 montieren und beide Schnellverschlüsse 25 verriegeln 1 22 23 21 24 Abb 18 18 80 22 25 Abb 19 ...

Страница 19: ...örper heranführen und montieren Für Richtungsänderungen max 45 Bögen verwenden Sollte das Kabelleerrohr im Aufsatzstück installiert werden muss dieses mit der KESSEL Sägeglocke Art Nr 500 101 oder einer handelsüblichen Sägeglocke Ø 60 mm und der Rohrdurchführungsdichtung Art Nr 850 114 ausgeführt werden DN50 DN70 41 Abb 20 ...

Страница 20: ...werden damit zu Wartungszwecken noch bis zum Grundkörper hinunter gegriffen werden kann Dichtung 37 fettfrei in die Nut am Grundkörper 1 einsetzen Dichtlippen der Dichtung 37 einfetten Aufsatzstück 3 in den Grundkörper hineinschieben und ausrichten 3 15 Zulaufdeckel montieren Die Montage erfolgt zum Schutz vor Verunreinigungen durch z B Baumaterial Dabei Dichtungsbereich sauber halten Dichtung auß...

Страница 21: ...ntauchen 3 Prüfen ob Rückstauklappe zufährt Motorengeräusch Hebel legt sich selbsttätig um 4 Angeschlossenen Wasserversorger laufen lassen 5 Prüfen ob Pumpe anläuft und hausseitig anstauendes Wasser abpumpt 6 Wasserversorger abdrehen 7 Anlage pumpt selbsttätig das Restwasser ab 8 Rückstausonde aus Wasserglas nehmen und in der Anlage montieren Prüfen dass Rückstauklappe wieder korrekt öffnet Motore...

Страница 22: ...das Risiko von eindringendem Wassers darf der Schacht so lange nicht betreten werden bis ein gefahrloser Aufenthalt darin möglich ist Nach jeder Wartungsarbeit an der Rückstaupumpanlage Funktionsprüfung durchführen 5 2 Wartungsintervalle Wartung von Rückstaupumpanlagen Die Rückstaupumpanlage muss regelmäßig durch einen hierfür Fachkundigen gewartet werden Die Zeitabstände dürfen nicht größer sein ...

Страница 23: ...IP 68 bei max 3 mWS und max 48 h Schutzklasse I Motorschutz integriert Steckertyp Phoenix Stecker Anschlusskabel 5 m 3x1 mm Erforderliche Absicherung Siehe Anleitung Schaltgerät Betriebsart S3 50 6 2 Schaltgerät Ecolift Betriebsspannung VAC 50Hz 230 Leistung standby W 2 5 Leistung W 1200 Potentialfreier Kontakt Option Umschaltkontakt V DC A 42 0 5 Einsatztemperatur C 0 bis 40 Schutzart IP 54 Schut...

Страница 24: ...SPZ 1000 mit Schneidrad 1 0 0 3 9 5 2 0 0 6 8 9 3 0 0 8 8 3 4 0 1 1 7 6 5 0 1 4 6 9 6 0 1 7 6 1 7 0 1 9 5 2 Max Förderm Q m3 h Max Förderm Q l sec Förderhöhe H mWS 8 0 2 2 4 2 9 0 2 5 3 2 10 0 2 8 2 1 10 9 3 0 1 0 1 2 3 4 5 6 7 8 9 2 4 6 8 10 Q m3 h H m Abb 23 ...

Страница 25: ...DOP Leistungserklärung 25 156 12 2019 7 DOP Leistungserklärung ...

Страница 26: ...26 156 DOP Leistungserklärung 12 2019 ...

Страница 27: ...play and self diagnosis system SDS incl integrated battery back up Motor driven locking of the backwater flap Integrated drain function for surface water drainage Product advantages Stamp of specialist company Subject to technical modifications 85101 Lenting Z 53 2 487 Ecolift for installation in concrete floor slab Ecolift for exposed installation mit Sicherheit geprüfte Qualität Bauart geprüft u...

Страница 28: ... electric shock when plug has been screwed off 34 2 4 3 Risk caused by hazardous atmosphere 34 2 4 4 Health risks 35 2 4 5 Risk caused by noise 35 2 4 6 Risk caused by heat 35 2 4 7 Risk caused by unexpected pump start up 35 3 Installation 36 3 1 Assemblies and functional characteristics scope of delivery 36 3 2 General points related to installation 38 3 3 Installation suggestion black tub 38 3 4...

Страница 29: ...over 46 4 Functional check commissioning 47 5 Maintenance 48 5 1 General maintenance information 48 5 2 Maintenance intervals 48 6 Technical data 49 6 1 Pumps 49 6 2 Ecolift control unit 49 6 3 Pumping flow 50 7 DoP Declaration of Performance 51 ...

Страница 30: ...ion general The KESSEL backwater pumping station Ecolift referred to as the backwater pumping station from here onwards has been designed for pumping off wastewater with and without sewage The assemblies for the pumps pressure sensor and motor driven backwater flap are installed in the drain body In normal operation the wastewater passes through the backwater pumping station to the sewage channel ...

Страница 31: ...ext to a legend number in an illustration 2 Reference to an illustration Working step 3 Working step in numbered sequence List Italics Italic case design Reference to a section item in the control menu CAUTION Warns of a risk to persons and material Ignoring the instructions marked with this symbol can lead to serious injuries and material damage Note Technical notes which must be given particular...

Страница 32: ...ystem 2 Article number 3 Connection voltage and connection frequency 4 Hydraulic data 5 General data 6 Serial number 7 Date of manufacture 8 Revision index 9 Name of standard 10 Order number 65 66 Fig 2 RevStd X X TT MM JJ JJ S3 xx ED IP xx 3mWS 48h xxxxx Ecolift XY U xxxV xxHz I x xA P1 x xkW Ser Nr xxxxxxx Q xxm h H xxm www kessel com Auftr Nr xxxxxxx DIN EN 12050 1 2 1 2 3 9 8 6 4 5 10 7 Fig 3 ...

Страница 33: ...inflow cover 5 Extension section optional max 2 units 20 Pump unit 26 Motor driven flap unit 37 Seal 41 Cable duct 42 Opening for pressure pipe 56 Inflow side 57 Outlet side 58 Electronic equipment 1 5 2 Variant Ecolift for exposed installation 1 Drain body 16 Connection of the pressure pipe 20 Pump unit 26 Motor driven flap unit 56 Inflow side 57 Outlet side 58 Electronic equipment 1 42 20 26 37 ...

Страница 34: ...list staff and under adherence to all the valid accident prevention regulations UVV 2 3 Organisational safety measures The operating and maintenance instructions must always be kept available 2 4 Risks caused by the product 2 4 1 Risk caused by special location ambient conditions Risk caused by toxic and hazardous vapours gases and substances e g bacteria viruses If the backwater pumping station i...

Страница 35: ...ing station can cause a high noise level Wear appropriate protective equipment if necessary and take sound insulating measures 2 4 6 Risk caused by heat Risk of burning by touching hot surfaces When in operation for longer periods wastewater pumps develop a high temperature on the housing surface Wear protective equipment gloves or allow the pumps to cool down accordingly 2 4 7 Risk caused by unex...

Страница 36: ... 3 Installation 3 1 Assemblies and functional characteristics scope of delivery Installation in an exposed drainage pipe 1 pump 2 alarm probe 3 backwater flap 4 motor 5 backwater probe 6 connection pressure pipe 1 2 4 3 5 6 Fig 6 ...

Страница 37: ...Installation 37 156 12 2019 Installation in the concrete slab 1 odour trap for floor drain 2 pump 3 alarm probe 4 backwater flap 5 backwater probe 6 motor 7 connection pressure pipe 1 2 3 6 5 4 7 Fig 7 ...

Страница 38: ... on a building site 3 3 Installation suggestion black tub Schematic illustration 1 Ecolift 2 Sealing gasket set art 83 073 extension section with flange and counterflange for connection to an on site sealing sheet 3 Extension Section art 83 070 a Tiles f Protective concrete b Screed g Control unit c Insulation h Pressure pipe d Concrete floor e Seal BWS Design flood g a b c d h 3 1 BWS e f 2 Fig 8...

Страница 39: ...tic illustation 1 Ecolift 2 Extension set with central flange for installation in impermeable concrete art 83 075 a Tiles f Insulation b Seal g Clean layer c Screed h Control unit d Concrete floor i Pressure pipe e Insulation BWS Design flood BWS a b c d f g h i e 1 2 Fig 9 ...

Страница 40: ...When selecting the installation location take the position for the control unit into consideration The electric components have cable lengths of 5 metres extensions are available as optional extras For the pump to be lifted out of the drain body completely for maintenance work there must be a sufficient length of pump connection cable within the drain body The cable conduit serves to vent the spac...

Страница 41: ...tion in an exposed drainage pipe Installation in the concrete slab Always pay attention to the direction of flow and insert sealing gasket see arrow 77 Fig 12 and Fig 13 3 7 Aligning the drain body horizontally 77 Fig 12 77 Fig 13 Fig 14 ...

Страница 42: ...the sealing gasket 37 in the drain body 1 and make sure the sealing gasket is in place correctly Then grease the upper side of the sealing gasket Push the extension section central flange 33 in and move it into position Position the sealing sleeve centrally in the impermeable concrete Ensure that the sealing sleeve is aligned horizontally in the concrete The sealing sleeve can be tightened using t...

Страница 43: ...rder to ensure the function of the system in chamber installation in case of flooding the venting pipe is to be laid at least 10 cm above backwater level The venting pipe must be routed in such a way that it does not hinder access for maintenance purposes nor the other pipe connections pressure pipe cable conduit pipe Screw the venting valve 11 out of the pump unit 20 see Fig 17 Fix the venting pi...

Страница 44: ...side of the drain body on the extension section 1 and tighten the nut 23 from the outside using approx 10 Nm Connect the on site pressure pipe to the connecting piece 3 12 Only for installation in an exposed drainage pipe Fit a connection piece 80 between the pump connection muff 18 and connection piece 22 and lock both the quick release closures 25 1 22 23 21 24 Fig 18 18 80 22 25 Fig 19 ...

Страница 45: ...t 41 DN50 on the drain body and fit it For changes of direction use max 45 bends If the cable conduit has to be installed in the upper section drill a hole with the KESSEL hole saw article number 500 101 or a standard Ø 60 mm hole saw and put in the pipe sealing gasket article number 850 114 DN50 DN70 41 Fig 20 ...

Страница 46: ...icians can still reach down to the drain body for maintenance purposes Insert the sealing gasket 37 grease free into the groove on the drain body 1 Grease the sealing lips of the sealing gasket 37 Push the upper section 3 into the drain body and align it 3 15 Installing the inflow cover This is fitted to protect the drain from soiling through e g construction material For this Keep the sealing are...

Страница 47: ... backwater flap closes motor noise lever switches automatically 4 Make water run through the connected water supply pipes 5 Check whether the pump starts up and pumps off the water that accumulates on the house side 6 Shut off the water supply pipes 7 The system pumps off residual water automatically 8 Remove the backwater probe from the water vessel and mount it in the system Check that the backw...

Страница 48: ... time If there is a risk of water entering the inspection chamber must not be entered until there is no danger involved After all maintenance work carry out a function test on the backwater pumping station 5 2 Maintenance intervals Maintenance of backwater pumping stations The backwater pumping station must be maintained regularly by an appropriate technical specialist The intervals may not exceed...

Страница 49: ...max 3 mWS and max 48 h Protective class I Motor protection integrated Plug type Phoenix plug Connection cable 5 m 3 x 1 mm Required fuse protection See control unit instructions Mode of operation S3 50 6 2 Ecolift control unit Operating voltage VAC 50Hz 230 Standby capacity W 2 5 Capacity W 1200 Potential free contact option switchover contact V DC A 42 0 5 Working temperature C 0 to 50 Protective...

Страница 50: ...Z 1000 mit Schneidrad 1 0 0 3 9 5 2 0 0 6 8 9 3 0 0 8 8 3 4 0 1 1 7 6 5 0 1 4 6 9 6 0 1 7 6 1 7 0 1 9 5 2 Max Förderm Q m3 h Max Förderm Q l sec Förderhöhe H mWS 8 0 2 2 4 2 9 0 2 5 3 2 10 0 2 8 2 1 10 9 3 0 1 0 Values for SPZ 1000 with macerator Max pumping capacity Max pumping capacity Max pumping height ...

Страница 51: ...DoP Declaration of Performance 51 156 12 2019 7 DoP Declaration of Performance ...

Страница 52: ...52 156 DoP Declaration of Performance 12 2019 ...

Страница 53: ...todiagnostic SDS avec piles de sauvegarde intégrées Verrouillage motorisé du clapet anti retour Fonction siphon intégrée d écoulement des eaux de surface Avantages du produit Cachet du revendeur spécialisé Sous réserve de modifications techniques 85101 Lenting Z 53 2 487 Ecolift Installation dans la dalle de fondationl Ecolift Installation hors sol mit Sicherheit geprüfte Qualität Bauart geprüft u...

Страница 54: ...onditions ambiantes 60 2 4 2 Risque lié au coup électrique en cas de fiche dévissée 60 2 4 3 Risque lié à une atmosphère nuisible à la santé 60 2 4 4 Risque pour la santé 61 2 4 5 Nuisances sonores 61 2 4 6 Risque lié à la chaleur 61 2 4 7 Risque lié au démarrage imprévu d une pompe 61 3 Montage 62 3 1 Sous groupes et éléments fonctionnels détail de livraison 62 3 2 Conseils de montage d ordre gén...

Страница 55: ...fonctionnel mise en service 73 5 Maintenance 74 5 1 Conseils de maintenance d ordre général 74 5 2 Intervalles de maintenance 74 6 Caractéristiques techniques 75 6 1 Pompes 75 6 2 Gestionnaire Ecolift 75 6 3 Débit de refoulement 76 7 DoP Déclaration de performance 77 ...

Страница 56: ...s de traitement et de commande sont à votre disposition sur http www kessel de service kundenservice html 1 1 Description générale du produit Le clapet anti retour avec pompe KESSEL Ecolift ci après nommé le clapet anti retour avec pompe est destiné au refoulement des eaux grises et eaux vannes Les composants des pompes le capteur de pression et le clapet anti retour à commande motorisée sont inté...

Страница 57: ...dans une figure 2 Renvoi à une figure Étape opératoire 3 Étape opératoire par ordre d apparition numéroté Énumération Italique Caractères en italique renvoi à une section un point dans le menu de commande ATTENTION avertit d un danger corporel et matériel Une inobservation des informations caractérisées par ce pictogramme risque de provoquer des blessures et des dégâts matériels graves Observation...

Страница 58: ...gnalétique 1 Désignation du poste 2 Référence 3 Tension et fréquence d alimentation 4 Données hydrauliques 5 Données d ordre général 6 Numéro de série 7 Date de fabrication 8 Version de mise à jour 9 Désignation normative 10 Numéro de commande 65 66 Fig 2 RevStd X X TT MM JJ JJ S3 xx ED IP xx 3mWS 48h xxxxx Ecolift XY U xxxV xxHz I x xA P1 x xkW Ser Nr xxxxxxx Q xxm h H xxm www kessel com Auftr Nr...

Страница 59: ...trée 5 Pièce de rallonge en option au plus 2 pièces 20 Unité de la pompe 26 Unité motorisée du battant 37 Joint d étanchéité 41 Passe câble 42 Passage de la conduite de refoulement 56 Côté entrée 57 Côté sortie 58 Kit electrique 1 5 2 Variante Ecolift à installer hors sol 1 Corps de base 16 Raccord de la conduite de refoulement 20 Unité de la pompe 26 Unité motorisée du battant 56 Côté entrée 57 C...

Страница 60: ...faire dans le respect de toutes les réglementations des prescriptions de prévention des accidents en vigueur 2 3 Consignes de sécurité organisationnelles Les instructions d utilisation et de maintenance doivent être disponibles en permanence 2 4 Risques liés au produit 2 4 1 Risque lié à des lieux particuliers aux conditions ambiantes Risque lié aux vapeurs gaz et substances toxiques ou nuisible à...

Страница 61: ...evé en fonctionnement Portez un équipement de protection adéquat au besoin et prévoyez une insonorisation appropriée 2 4 6 Risque lié à la chaleur Risque de brûlures au contact des surfaces chaudes Les pompes d assainissement développent une température élevée à la surface du carter après un fonctionnement de longue durée Porter un équipement de protection des gants ou patienter jusqu au refroidis...

Страница 62: ...1 Sous groupes et éléments fonctionnels détail de livraison Montage dans une conduite d eau usée hors sol 1 Pompe 2 Sonde d alarme 3 Clapet anti retour 4 Moteur 5 Sonde de reflux 6 Raccord de la conduite de refoulement 1 2 4 3 5 6 Fig 6 ...

Страница 63: ... 12 2019 Pose dans la dalle de fondation 1 Dispositif anti odeur pour siphon de sol 2 Pompe 3 Sonde d alarme 4 Clapet anti retour 5 Sonde de reflux 6 Moteur 7 Raccord de la conduite de refoulement 1 2 3 6 5 4 7 Fig 7 ...

Страница 64: ...tier 3 3 Suggestion de montage cuve noire Représentation schématique 1 Ecolift 2 Jeu de joints d étanchéité Réf n 83 073 Pièce de rallonge avec bride et contre bride pour raccordement à une feuille d étanchéité du maître d ouvrage 3 Pièce de rallonge Réf n 83 070 a Carrelage f Sous sol b Chape g Gestionnaire c Isolation h Conduite de refoulement d Dalle de béton e Étanchéité BWS Niveau d eau de ré...

Страница 65: ...e section d apaisement en amont et en aval de l Ecolift au moins 1 m Exécuter la conduite de refoulement suivant DIN EN 12056 avec lyre de relevage au dessus du niveau de reflux local directement raccordée à une conduite de base ou groupée ventilée d un DN d au moins 70 les raccords de tuyaux sans pression p ex les tuyaux HT sont interdits pour les conduites de refoulement Poser le conduit de câbl...

Страница 66: ...e à l air Le gestionnaire nécessite une prise de courant fiche à contact de protection 230 V S il est prévu de monter une conduite de purge d air à la place de la vanne de purge d air il est impératif de poser le raccord de tuyauterie s y rapportant jusqu au corps de base 3 6 Montage du corps de base Relier les deux manchons côté entrée 56 et côté sortie 57 avec le corps de base 1 les fermetures r...

Страница 67: ...ation d eau usée hors sol Pose dans la dalle de fondation Veiller impérativement au sens du flux correct et insérer le joint d étanchéité voir la flèche 77 Fig 12 ou Fig 13 3 7 Positionnement horizontal du corps de base 77 Fig 12 77 Fig 13 Fig 14 ...

Страница 68: ... 37 dans le corps de base 1 et veiller au logement correct du joint d étanchéité Graisser ensuite la face supérieure du joint d étanchéité Glisser la pièce de rallonge dans la bride médiane 33 et l amener à la position voulue Positionnez la membrane d étanchéitée au centre de la dalle béton Assurez vous qu elle soit bien positionnée horizontalement La membrane d étanchéitée peut être visser à l ai...

Страница 69: ...r la bonne utilisation des trous d homme en cas d inondation le conduit de ventilation doit être ramené à 10 cm au moins au dessus du niveau de refoulement Poser la conduite de ventilation en veillant à ce qu elle ne gêne ni l accès pour les interventions de maintenance ni les autres raccords de tuyauterie conduite de refoulement conduit pour câbles Dévisser la vanne de purge 11 de l unité de la p...

Страница 70: ...ur de la cuve à la pièce de rallonge 1 et serrer l écrou 23 de l éxterieur avec env 10 Nm Raccorder la conduite de refoulement à prévoir sur site au raccord 3 12 Uniquement en cas de pose dans une canalisation d eau usée hors sol Monter la pièce de jonction 80 entre le raccord de pompe 18 et la pièce de raccordement 22 et verrouiller les deux fermetures rapides 25 1 22 23 21 24 Fig 18 18 80 22 25 ...

Страница 71: ...N de 50 du corps de base et le monter Se servir de coudes d au plus 45 pour les changements de direction Si le conduit de câble doit être installé dans la rehausse celui ci doit être percé avec la scie à cloche KESSEL REF 500101 ou une scie à cloche standard Ø 60 mm et le joint passe câble REF 850 114 DN50 DN70 41 Fig 20 ...

Страница 72: ...au cours des interventions de maintenance Engager le joint d étanchéité 37 sans graisse dans la gorge du corps de base 1 Graisser les bagues à lèvre du joint d étanchéité 37 Glisser la rehausse 3 dans le corps de base et l aligner 3 15 Montage du couvercle d entrée Le montage s effectue pour protéger le poste contre les saletés p ex dues aux matériaux de construction Veiller simultanément à la pro...

Страница 73: ...que le clapet antiretour se ferme bruit de moteur le levier se rabat automatiquement 4 Faire fonctionner la conduite d alimentation en eau 5 Vérifier que la pompe démarre et refoule l eau accumulée 6 Couper la conduite d alimentation en eau 7 Le système refoule l eau résiduelle automatiquement 8 Retirer la sonde de reflux du réservoir d eau et la monter dans le système S assurer que le clapet anti...

Страница 74: ...e inondation Il est impératif tant que le risque d une infiltration ou d un écoulement d eau dans le regard existe de patienter jusqu à ce qu un séjour sans risque dans le regard soit possible Soumettre le clapet anti retour avec pompe à un contrôle fonctionnel après chaque intervention de maintenance 5 2 Intervalles de maintenance Maintenance des clapets anti retour avec pompe La maintenance du c...

Страница 75: ...au maximum et 48 h maximum Catégorie de protection I Protection du moteur intégrée Type de fiche Fiche Phoenix Câble de raccordement 5 m 3x1 mm Fusible requis Voir les instructions du gestionnaire Mode de service S3 50 6 2 Gestionnaire Ecolift Tension de service volts C A 50 Hz 230 Puissance en veille W 2 5 Puissance W 1200 Contact libre en option contact de commutation volts C C A 42 0 5 Plage de...

Страница 76: ... 1 7 6 5 0 1 4 6 9 6 0 1 7 6 1 7 0 1 9 5 2 Max Förderm Q m3 h Max Förderm Q l sec Förderhöhe H mWS 8 0 2 2 4 2 9 0 2 5 3 2 10 0 2 8 2 1 10 9 3 0 1 0 1 2 3 4 5 6 7 8 9 2 4 6 8 10 Q m3 h H m Fig 23 Valeurs pour SPZ 1000 avec roue porte lame Max débit réfoulé Max débit réfoulé Max hauteur de refoulement ...

Страница 77: ...DoP Déclaration de performance 77 156 12 2019 7 DoP Déclaration de performance ...

Страница 78: ...78 156 DoP Déclaration de performance 12 2019 ...

Страница 79: ...nessione con display e sistema di auto diagnostica SDS include bufferizzazione batteria integrata Chiusura motorizzata della clapet antiriflusso Funzione di scarico integrata per il drenaggio superficiale Vantaggi del prodotto Timbro del rivenditore specializzato Modifiche tecniche riservate 85101 Lenting Z 53 2 487 Ecolift per Installazione nel pavimento Ecolift per Installazione non interrata mi...

Страница 80: ...icolo di scossa elettrica in presenza di un connettore svitato 86 2 4 3 Percoli causati dalle atmosfere nocive 86 2 4 4 Pericoli per la salute 87 2 4 5 Pericoli causati dal rumore 87 2 4 6 Pericoli causati dal calore 87 2 4 7 Pericoli causati dall avvio inatteso di una pompa 87 3 Montaggio 88 3 1 Gruppi costruttivi e caratteristiche funzionali dotazione 88 3 2 Informazioni generali sul montaggio 9...

Страница 81: ...ollo del funzionamento messa in funzione 99 5 Manutenzione 100 5 1 Avvertenze generali per la manutenzione 100 5 2 Intervalli di manutenzione 100 6 Dati tecnici 101 6 1 Pompe 101 6 2 Quadro elettrico Ecolift 101 6 3 Portata 102 7 DoP Dichiarazione di prestazione 103 ...

Страница 82: ...di pompaggio Ecolift KESSEL denominata di seguito valvola di non ritorno con sistema di pompaggio è pensata per il pompaggio di svuotamento delle acque di scarico nere e grigie Nel corpo base sono installati i gruppi costruttivi per le pompe il sensore di pressione e la clapet antiriflusso azionata a motore Nel funzionamento normale in assenza di ristagno le acque di scarico fluiscono nel rispetti...

Страница 83: ...gine 2 Riferimento a una figura Passo di lavoro 3 Passo di lavoro in una sequenza numerata Numerazione Corsivo Scritta in corsivo riferimento a una sezione un punto nel menù di comando PRUDENZA avverte circa un pericolo per le persone e il materiale La mancata osservanza delle indicazioni contrassegnate con questo simbolo può causare lesioni gravi e danni materiali Avvertenza avvertenza tecnica ch...

Страница 84: ...ominazione dell impianto 2 Codice articolo 3 Tensione di collegamento e frequenza di collegamento 4 Dati idraulici 5 Dati generali 6 Numero di serie 7 Data di produzione 8 Stato di revisione 9 Denominazione della norma 10 Numero d ordine 65 66 Fig 2 RevStd X X TT MM JJ JJ S3 xx ED IP xx 3mWS 48h xxxxx Ecolift XY U xxxV xxHz I x xA P1 x xkW Ser Nr xxxxxxx Q xxm h H xxm www kessel com Auftr Nr xxxxx...

Страница 85: ...rolunga opzionale max 2 pezzi 20 Unità della pompa 26 Unità della cerniera motorizzata 37 Guarnizione 41 Passante per i cavi 42 Passante del condotto di mandata 56 Lato d entrata 57 Lato di scarico 58 Kit eletrico 1 5 2 Variante Ecolift per l installazione non interrata 1 Corpo base 16 Collegamento al condotto di mandata 20 Unità della pompa 26 Unità della cerniera motorizzata 56 Lato d entrata 57...

Страница 86: ... delle norme antinfortunistiche 2 3 Misure di sicurezza organizzative Le istruzioni per l uso e la manutenzione devono sempre essere disponibili 2 4 Pericoli derivanti dal prodotto 2 4 1 Pericoli causati da particolari condizioni locali ambientali Pericolo a causa di vapori gas o sostanze velenose o nocive ad esempio batteri o virus Qualora la valvola di non ritorno con sistema di pompaggio si tro...

Страница 87: ...llo di rumore elevato In caso di necessità indossare i dispositivi di protezione appropriati e mettere in pratica delle misure di protezione contro il rumore 2 4 6 Pericoli causati dal calore Pericolo di ustioni in caso di contatto con le superfici calde Le pompe delle acque di scarico sviluppano una temperatura elevata sulla superficie dell alloggiamento in caso di funzionamento prolungato Indoss...

Страница 88: ... costruttivi e caratteristiche funzionali dotazione Montaggio in un condotto delle acque di scarico non interrato 1 Pompa 2 Sonda di allarme 3 Clapet antiriflusso 4 Motore 5 Sonda antiriflusso 6 Collegamento del condotto di mandata 1 2 4 3 5 6 Fig 6 ...

Страница 89: ...2 2019 Installazione nel pavimento 1 Chiusura antiodore per scarico per pavimento 2 Pompa 3 Sonda di allarme 4 Clapet antiriflusso 5 Sonda antiriflusso 6 Motore 7 Collegamento del condotto di mandata 1 2 3 6 5 4 7 Fig 7 ...

Страница 90: ...tallazione vasca nera Illustrazione schematica 1 Ecolift 2 Set di guarnizioni cod art 83 073 sezione di estensione con flangia e contro flangia per il collegamento a una guaina impermeabilizzante del cliente 3 Pezzo di prolunga cod art 83 070 a Piastrelle f Calcestruzzo protettivo b Massetto g Quadro elettrico c Isolamento h Condotto di mandata d Pavimento in calcestruzzo e Tenuta BWS Livello acqu...

Страница 91: ... il condotto di mandata a norma DIN EN 12056 con curva antiriflusso al di sopra del piano di riflusso determinato localmente e collegare a una condotta principale o a un collettore allargato almeno DN70 i collegamenti dei tubi depressurizzati ad esempio tubo ad alta temperatura non sono ammessi per i condotti di mandata Posare il tubo vuoto per cavi DN70 da Ecolift al luogo di montaggio del quadro...

Страница 92: ...n luogo della valvola di sfiato deve essere montato un condotto di sfiato montare il collegamento delle tubazioni corrispondente fino al corpo base 3 6 Montaggio del corpo base Collegare i due bocchettoni di entrata 56 e del lato di scarico 57 con il corpo base 1 le chiusure rapide 64 sul corpo base permettono un montaggio rapido Collegare Ecolift con il sistema di tubazioni 56 64 64 57 1 Fig 10 6...

Страница 93: ... delle acque di scarico non interrato Installazione nel pavimento Tenere assolutamente conto della direzione di flusso e posare la guarnizione vedere freccia 77 Fig 12 ovvero Fig 13 3 7 Allineamento orizzontale del corpo base 77 Fig 12 77 Fig 13 Fig 14 ...

Страница 94: ...37 nella corpo base 1 e prestare attenzione alla sede della guarnizione Ingrassare quindi la parte superiore della guarnizione Innestare il pezzo di prolunga nella flangia centrale 33 e portare in posizione Posizionare l anello di tenuta centralmente nel calcestruzzo impermeabile Prestare attenzione alla posizione orizzontale del anello di tenuta nel calcestruzzo A questo scopo il manicotto può es...

Страница 95: ...mento in caso di allagamento in tutte le applicazioni nell installazione in pozzetti il tubo di ventilazione deve essere protato almeno a 10 cm al di sopra del livello di riflusso Il condotto di sfiato deve essere posato in modo che non ostacoli né l accesso a scopo di manutenzione né gli altri collegamenti dei condotti condotto di mandata tubo vuoto per cavi Svitare la valvola di sfiato 11 dall u...

Страница 96: ...al pezzo intermedio 1 e serrare il dado 23 del lato esterno a 10 Nm circa Collegare il condotto di mandata del cliente al pezzo di collegamento 3 12 Solo in caso di installazione nel condotto delle acque di scarico non interrato Montare il pezzo di collegamento 80 tra il bocchettone di collegamento della pompa 18 e il pezzo di collegamento 22 e chiudere entrambe le chiusure rapide 25 1 22 23 21 24...

Страница 97: ...olo n 850 114 3 14 Montaggio del rialzo A seconda della profondità di posa il rialzo profondità di innesto del rialzo 3 deve essere eventualmente accorciato ovvero provvisto di incavi 67 per i collegamenti delle linee inseriti nel corpo base 1 lateralmente Il rialzo 3 è allungabile al massimo con 2 pezzi di prolunga affinché a scopo di manutenzione sia ancora possibile raggiungere il corpo base so...

Страница 98: ...vviene per la protezione dalle impurità causate ad esempio dal materiale edile Al riguardo Tenere pulita l area della guarnizione Ingrassare esternamente la guarnizione Collocare il coperchio d entrata 51 nel rialzo 3 Chiudere entrambe le chiusure del coperchio 78 3 51 78 Fig 22 ...

Страница 99: ...Controllare che il clapet antiriflusso si chiuda rumore del motore la leva si sposta autonomamente 4 Aprire il condotto di alimentazione idrica 5 Controllare che la pompa si accenda e pompi l acqua che si accumula sul lato della casa 6 Chiudere il condotto di alimentazione idrica 7 Il sistema pompa automaticamente l acqua residua 8 Prelevare la sonda per il ristagno dal recipiente dell acqua e mon...

Страница 100: ...ione dell acqua non sarà possibile accedere al pozzetto fino a che non sarà garantita un permanenza priva di rischi al suo interno Eseguire una verifica del funzionamento dopo ogni lavoro di manutenzione alla valvola di non ritorno con sistema di pompaggio 5 2 Intervalli di manutenzione Manutenzione degli impianti di pompaggio per il ristagno L impianto di pompaggio per il ristagno deve essere sot...

Страница 101: ...i protezione I Salvamotore integrato Tipo di connettore Connettore Phoenix Cavo di collegamento 5 m 3x1 mm Protezione necessaria Vedere le istruzioni del quadro elettrico Tipo di funzionamento S3 50 6 2 Quadro elettrico Ecolift Tensione di funzionamento V AC 50 Hz 230 Potenza stand by W 2 5 Potenza W 1200 Contatto a potenziale zero opzionale contatto di commutazione V DC A 42 0 5 Temperatura d imp...

Страница 102: ... 8 3 4 0 1 1 7 6 5 0 1 4 6 9 6 0 1 7 6 1 7 0 1 9 5 2 Max Förderm Q m3 h Max Förderm Q l sec Förderhöhe H mWS 8 0 2 2 4 2 9 0 2 5 3 2 10 0 2 8 2 1 10 9 3 0 1 0 1 2 3 4 5 6 7 8 9 2 4 6 8 10 Q m3 h H m Fig 23 Quantità trasportata max Quantità trasportata max Prevalenza max Valori per SPZ 1000 con lama a disco ...

Страница 103: ...DoP Dichiarazione di prestazione 103 156 12 2019 7 DoP Dichiarazione di prestazione ...

Страница 104: ...104 156 DoP Dichiarazione di prestazione 12 2019 ...

Страница 105: ...ie Plug play besturingskast met zelfdiagnosesysteem SDS inclusief geïntegreerde accubuffering Motorische vergrendeling van de keerklep Geïntegreerde afvoerfunctie voor afwatering van oppervlakkeni Productvoordelen Stempel gespecialiseerd bedrijf Technische wijzigingen voorbehouden 85101 Lenting Z 53 2 487 Ecolift vloerinbouw Ecolift vrijliggend mit Sicherheit geprüfte Qualität Bauart geprüft und ü...

Страница 106: ...e stekker 112 2 4 3 Gevaar door voor de gezondheid gevaarlijke atmosfeer 112 2 4 4 Gevaar voor de gezondheid 113 2 4 5 Gevaar door lawaai 113 2 4 6 Gevaar door hitte 113 2 4 7 Gevaar door onverwacht opstarten van een pomp 113 3 Montage 114 3 1 Modules en functiekenmerken leveringsomvang 114 3 2 Algemene zaken m b t de montage 116 3 3 Inbouwvoorstel Zwarte opvangbak 116 3 4 Inbouwvoorstel Witte opv...

Страница 107: ...ole van de werking inbedrijfstelling 125 5 Onderhoud 126 5 1 Algemene instructies voor het onderhoud 126 5 2 Onderhoudsinterval 126 6 Technische gegevens 127 6 1 Pompen 127 6 2 Besturingskast Ecolift 127 6 3 Transportstroom 128 7 DOP vermogensverklaring 129 ...

Страница 108: ... terugstuwpompinstallatie Ecolift hieronder terugstuwpompinstallatie genoemd is beoogd voor het wegpompen van fecaliënvrij en fecaliënhoudend afvalwater In de basiselement zijn de modules voor de pompen de druksensor en de door een motor aangedreven terugstuwklep gemonteerd Tijdens normaal bedrijf loopt het afvalwater zonder opstuwing door de terugstuwpompinstallatie het afvalwaterriool in Als het...

Страница 109: ...fbeelding 2 Referentie naar een afbeelding Functie 3 Werkstap in genummerde volgorde Opsomming Cursief Cursieve letterweergave Referentie naar een paragraaf punt in het besturingsmenu LET OP Waarschuwt tegen gevaar voor personen en materiaal Het niet opvolgen van de met dit symbool aangeduide instructies kan ernstig letsel en materiaalschade tot gevolg hebben Aanwijzing Technische instructies die ...

Страница 110: ...tikelnummer 3 Aansluitspanning en aansluitfrequentie 4 Hydraulische gegevens 5 Algemene gegevens 6 Serienummer 7 Datum van fabricage 8 Revisiestand 9 Normaanduiding 10 Ordernummer 65 66 Afb 2 RevStd X X TT MM JJ JJ S3 xx ED IP xx 3mWS 48h xxxxx Ecolift XY U xxxV xxHz I x xA P1 x xkW Ser Nr xxxxxxx Q xxm h H xxm www kessel com Auftr Nr xxxxxxx DIN EN 12050 1 2 1 2 3 9 8 6 4 5 10 7 Afb 3 ...

Страница 111: ...el 5 Verlengstuk optioneel max 2 stuks 20 Pompeenheid 26 Motorische klepeenheid 37 Afsluitrubber 41 Kabeldoorvoer 42 Doorvoer persleiding 56 Toevoerzijde 57 Afvoerzijde 58 Elektropakket 1 5 2 Variant Ecolift vrijliggend 1 Basislichaam 16 Aansluiting persleiding 20 Pompeenheid 26 Motorische klepeenheid 56 Toevoerzijde 57 Afvoerzijde 58 Elektropakket 1 42 20 26 37 5 37 3 41 56 57 58 Afb 4 56 57 1 20...

Страница 112: ...entievoorschriften OPV en worden verricht 2 3 Organisatorische veiligheidsmaatregelen De gebruiks en onderhoudshandleiding moet altijd beschikbaar worden gehouden 2 4 Gevaren die uitgaan van het product 2 4 1 Gevaar door speciale plaats omgevingsfactoren Gevaar door giftige en voor de gezondheid gevaarlijke dampen gassen en stoffen bv bacteriën virussen Als de terugstuwpompinstallatie zich in een ...

Страница 113: ...tuwpompinstallatie kan een hoog geluidsniveau veroorzaken Draag indien nodig passende veiligheidsvoorzieningen en zorg voor geluiddempende maatregelen 2 4 6 Gevaar door hitte Gevaar voor verbranding bij het aanraken van hete oppervlakken Als afvalwaterpompen vrij lang lopen ontwikkelen zij een hoge temperatuur aan het oppervlak van de behuizing Draag beschermende uitrusting handschoenen of laat de...

Страница 114: ... 12 2019 3 Montage 3 1 Modules en functiekenmerken leveringsomvang Montage in een vrijliggende afvalwaterleiding 1 Pomp 2 Alarmsonde 3 Terugstuwklep 4 Motor 5 Terugstuwsonde 6 Aansluiting persleiding 1 2 4 3 5 6 Afb 6 ...

Страница 115: ...Montage 115 156 12 2019 Vloerinbouw 1 Stankslot voor vloerafvoer 2 Pomp 3 Alarmsonde 4 Terugstuwklep 5 Terugstuwsonde 6 Motor 7 Aansluiting persleiding 1 2 3 6 5 4 7 Afb 7 ...

Страница 116: ...edrijf genomen 3 3 Inbouwvoorstel Zwarte opvangbak Schematische weergave 1 Ecolift 2 Afsluitrubberset art nr 83 073 Verlengstuk met flens en contraflens voor aansluiting op afdichtbaan op locatie 3 verlengstuk art nr 83 070 a Tegels f Beschermingsbeton b Afwerkvloer g Besturingskast c Isolatie h Persleiding d Betonvloer e Afdichting BWS Dimensioneringswaterpeil g a b c d h 3 1 BWS e f 2 Afb 8 ...

Страница 117: ...n drukloze buisaansluitingen bv HT buis zijn voor drukleidingen niet toegestaan Lege kabelbuis DN70 van de Ecolift naar de montageplaats van de besturingskast leggen Richtingveranderingen uitsluitend met een bocht van 45 uitvoeren Bij het kiezen van de montageplaats rekening houden met de positie van de besturingskast De kabellengte van de elektrische componenten bedraagt 5 meter verlengingen opti...

Страница 118: ...onteren De twee moffen toevoer 56 en afvoerkant 57 met het basiselement 1 verbinden de snelvergrendelingen 64 bij het basiselement maken een snelle montage mogelijk De Ecolift met het buisleidingssysteem verbinden 56 64 64 57 1 Afb 10 64 Afb 11 ...

Страница 119: ...Inbouw in vrijliggende afvalwaterleiding Inbouw in de vloerplaat absoluut op de stromingsrichting letten en afsluitrubber inleggen zie pijl 77 Afb 12 c q Afb 13 3 7 Basiselement horizontaal uitlijnen 77 Afb 12 77 Afb 13 Afb 14 ...

Страница 120: ...t witte opvangbak Afsluitrubber 37 in basiselement 1 leggen en op zitten van het afsluitrubber letten Vervolgens bovenkant van het afsluitrubber invetten Verlengstuk van centrale flens 33 inschuiven en in positie brengen Dichtingsbaan in het midden van de betonvloer positioneren Let op volledige horizontale ligging De dichtingsbaan kan hiervoor middels de gaten in de hoeken worden aangespant 48 47...

Страница 121: ...nctie bij toepassing in schachtsystemen in geval van overstroming te garanderen de ontluchtingsleiding tot min 10cm boven het terugstuwniveau aanleggen De ontluchtingsleiding moet zodanig worden gelegd dat zij noch toegang voor onderhoudsdoeleinden noch de andere leidingverbindingen persleiding lege kabelbuis hindert Ontluchtingsklep 11 uit de pompeenheid 20 schroeven zie Afb 17 Aan de aansluiting...

Страница 122: ...e tank op het tussenstuk 1 monteren en de moeren 23 van de buiten met ca 10 Nm vastdraaien Op locatie aanwezige persleiding op het aansluitstuk aansluiten 3 12 Uitsluitend bij inbouw in vrijliggende afvalwaterleiding Verbindingsstuk 80 tussen pompaansluitingsmoffen 18 en aansluitstuk 22 monteren en beide snelsluitingen 25 vergrendelen 1 22 23 21 24 Afb 18 18 80 22 25 Afb 19 ...

Страница 123: ...ar het basiselement toebrengen en monteren Voor richtingveranderingen max 45 bocht gebruiken Indien deze in het opzetstuk wordt geplaatst deze aanbrengen middels KESSEL gatenzaag art nr 500 101 of een in de handel gebruikelijk gatenzaag Ø 60 mm en de doorvoerdichting DN 50 art nr 850 114 DN50 DN70 41 Afb 20 ...

Страница 124: ...opdat voor onderhoudsdoeleinden nog tot en met het basiselement kan worden gegrepen Afsluitrubber 37 vetvrij in de groef bij het basiselement 1 plaatsen Afdichtingslippen van het afsluitrubber 37 invetten Opzetstuk 3 in het basiselement schuiven en uitlijnen 3 15 Toevoerdeksel monteren Ter bescherming tegen verontreinigingen gebeurt de montage door bv bouwmateriaal Hierbij afdichtingszone schoonho...

Страница 125: ...en 3 Controleren of de terugstuwklep dicht gaat motorgeluid de hendel beweegt automatisch naar de andere stand 4 De aangesloten waterleiding open draaien 5 Controleren of de pomp gaat draaien en in het huis het opstuwende water wegpompt 6 Waterleiding dichtdraaien 7 Installatie pompt restwater automatisch af 8 De terugstuwsonde uit het waterreservoir verwijden en in de installatie monteren Control...

Страница 126: ...ijd vol water lopen Als het risico bestaat dat water binnendringt mag de schacht niet worden binnengegaan voordat men er zonder gevaar kan verblijven Na iedere onderhoudswerkzaamheid aan de terugstuwpompinstallatie functiecontrole uitvoeren 5 2 Onderhoudsinterval Onderhoud van terugstuwpompinstallaties De terugstuwpompinstallatie moet regelmatig worden onderhouden door een hiervoor deskundige pers...

Страница 127: ... IP 68 bij max 3 mWS en max 48 h Beveiligingsklasse I Motorveiligheid geïntegreerd Stekkertype Phoenix stekker Netsnoer 5 m 3x1 mm Vereiste zekering Zie handleiding schakelapparaat Modus S3 50 6 2 Besturingskast Ecolift Bedrijfsspanning VAC 50Hz 230 Vermogen stand by W 2 5 Vermogen W 1200 Potentiaalvrij contact optie omschakelcontact V DC A 42 0 5 Gebruikstemperatuur C 0 tot 50 Beschermingsklasse ...

Страница 128: ... 3 0 0 8 8 3 4 0 1 1 7 6 5 0 1 4 6 9 6 0 1 7 6 1 7 0 1 9 5 2 Max Förderm Q m3 h Max Förderm Q l sec Förderhöhe H mWS 8 0 2 2 4 2 9 0 2 5 3 2 10 0 2 8 2 1 10 9 3 0 1 0 Waarden voor SPZ 1000 met snijwiel Max transporthoeveelheid Max transporthoeveelheid Max opvoerhoogte 1 2 3 4 5 6 7 8 9 2 4 6 8 10 Q m3 h H m Afb 23 ...

Страница 129: ...DOP vermogensverklaring 129 156 12 2019 7 DOP vermogensverklaring ...

Страница 130: ...130 156 DOP vermogensverklaring 12 2019 ...

Страница 131: ...zy SDS ze zintegrowanym podtrzymywaniem bateryjnym Napędzana silnikiem blokada klapy zwrotnej Zintegrowana funkcja wpustu do odwadniania powierzchni Zalety produktu Pieczęć firmy specjalistycznej Zmiany techniczne zastrzeżone 85101 Lenting Z 53 2 487 Ecolift do zabudowy w płycie podłogowej Ecolift do zabudowy na swobodnym przewodzie kanalizacyjnym mit Sicherheit geprüfte Qualität Bauart geprüft un...

Страница 132: ...zenia 138 2 4 2 Zagrożenie związane z możliwością porażenia prądem elektrycznym przy odkręconej wtyczce 138 2 4 3 Zagrożenie związane z atmosferą szkodliwą dla zdrowia 138 2 4 4 Zagrożenie dla zdrowia 139 2 4 5 Zagrożenie związane z hałasem 139 2 4 6 Zagrożenie związane z wysoką temperaturą 139 2 4 7 Zagrożenie wskutek nieoczekiwanego rozruchu pompy 139 3 Montaż 140 3 1 Podzespoły i funkcje zakres...

Страница 133: ...ziałania uruchomienie 151 5 Konserwacja 152 5 1 Ogólne informacje dotyczące konserwacji 152 5 2 Częstotliwość konserwacji 152 6 Dane techniczne 153 6 1 Pompy 153 6 2 Urządzenie sterujące Ecolift 153 6 3 Wydajność pompy 154 7 DOP Deklaracja właściwości użytkowych 155 ...

Страница 134: ...taj http www kessel de service kundenservice html 1 1 Ogólny opis produktu Zawór zwrotny z pompą Ecolift firmy KESSEL w dalszej części zwany zaworem zwrotnym z pompą jest przeznaczony do wypompowywania ścieków zawierających fekalia i bez fekaliów W korpus znajdują się podzespoły pomp czujnika ciśnieniowego i napędzanej silnikiem klapy zwrotnej W normalnym trybie ścieki przepływają bez spiętrzania ...

Страница 135: ... 2 Odniesienie do rysunku Krok roboczy 3 Krok roboczy w ponumerowanej kolejności Wyliczenie Kursywa Tekst pisany kursywą Odniesienie do fragmentu punktu w menu sterowania OSTROŻNIE Ostrzeżenie przed zagrożeniem dla osób lub rzeczy Nieprzestrzeganie wskazówek opatrzonych powyższym symbolem może doprowadzić do poważnych obrażeń ciała lub szkód materialnych Wskazówka Wskazówki techniczne które należy...

Страница 136: ...czceznamionowej 1 Nazwa urządzenia 2 Numer artykułu 3 Napięcie przyłączeniowe i częstotliwość przyłączeniowa 4 Dane hydrauliczne 5 Dane ogólne 6 Numer seryjny 7 Data produkcji 8 Stan rewizji 9 Nazwa normy 10 Numer zlecenia Rys 2 65 66 RevStd X X TT MM JJ JJ S3 xx ED IP xx 3mWS 48h xxxxx Ecolift XY U xxxV xxHz I x xA P1 x xkW Ser Nr xxxxxxx Q xxm h H xxm www kessel com Auftr Nr xxxxxxx DIN EN 12050...

Страница 137: ...maks 2 sztuki 20 Zespół pompy 26 Zespół klapy silnikowej 37 Uszczelka 41 Przepust kablowy 42 Przepust przewodu tłocznego 56 Strona dopływu 57 Strona odpływu 58 Pakiet podzespołów elektronicznych 1 5 2 Wariant Ecolift do zabudowy na swobodnym przewodzie kanalizacyjnym 1 Korpus 16 Przyłącze przewodu tłocznego 20 Zespół pompy 26 Zespół klapy silnikowej 56 Strona dopływu 57 Strona odpływu 58 Pakiet po...

Страница 138: ...ia wszystkich obowiązujących przepisów bezpieczeństwa pracy 2 3 Organizacyjne środki bezpieczeństwa Instrukcję eksploatacji i konserwacji należy przechowywać zawsze w pobliżu 2 4 Zagrożenia ze strony produktu 2 4 1 Zagrożenie związane z miejscem lokalizacji warunkami otoczenia Niebezpieczeństwo wskutek trujących i szkodliwych oparów gazów i pyłów np bakterie wirusy Jeżeli zawór zwrotny z pompą zna...

Страница 139: ... z pompą może powodować wysoki poziom hałasu W razie konieczności należy nosić odpowiednie wyposażenie ochronne oraz przedsięwziąć kroki w celu wykonania izolacji dźwiękochłonnej 2 4 6 Zagrożenie związane z wysoką temperaturą Niebezpieczeństwo poparzenia podczas dotknięcia gorących powierzchni Obudowa pomp ściekowych podczas dłuższej pracy nagrzewa się do wysokiej temperatury Nosić wyposażenie och...

Страница 140: ...02 2019 3 Montaż 3 1 Podzespoły i funkcje zakres dostawy Montaż w swobodnej kanalizacji ściekowej 1 Pompa 2 Sondę alarmową 3 Klapa zwrotna 4 Silnik 5 Sondę spiętrzenia 6 Przyłączenie przewód tłoczny 1 2 4 3 5 6 Rys 6 ...

Страница 141: ...Montaż 141 156 02 2019 Zabudowa w płycie podłogowej 1 Syfon do wpust podłogowy 2 Pompa 3 Sondę alarmową 4 Klapa zwrotna 5 Sondę spiętrzenia 6 Silnik 7 Przyłączenie przewód tłoczny 1 2 3 6 5 4 7 Rys 7 ...

Страница 142: ...a schematyczne przedstawienie 1 Ecolift 2 Zestaw uszczelek nr art 83 073 Element przedłużający z kołnierzem i kołnierzem współpracującym do podłączenie do taśmą uszczelniającą w miejscu instalacji 3 Element przedłużający nr art 83 070 a Płytki f Beton ochronny b Jastrych g Urządzenie sterujące c Izolacja h Przewód tłoczny d Beton e Uszczelnienie BWS Zwierciadło wody g a b c d h 3 1 BWS e f 2 Rys 8...

Страница 143: ...ezciśnieniowe przyłącza rurowe np rura HT przewodów tłocznych są niedozwolone Poprowadzić rurę ochronną na kable DN70 od urządzenia Ecolift do miejsca montażu urządzenia sterującego Zmiany kierunku wykonywać tylko przy użyciu łuków 45 Przy wyborze miejsca montażowego dla urządzenia sterującego należy uwzględnić co następuje Długość kabla komponentów elektrycznych wynosi 5 metrów istnieje możliwość...

Страница 144: ...ontaż korpusu Połączyć obydwa króćce od strony dopływu 56 i od strony odpływu 57 z korpusem 1 szybkozłączki 64 na korpusie umożliwiają sprawny montaż Połączyć urządzenie Ecolift z systemem rurociągu 56 64 64 57 1 Rys 10 64 Rys 11 ...

Страница 145: ...wa na swobodnym przewodzie kanalizacyjnym Zabudowa w płycie podłogowej Koniecznie zwrócić uwagę na kierunek przepływu i włożyć uszczelkę patrz strzałka 77 Rys 12 lub Rys 13 3 7 Ustawienie korpusu poziomo 77 Rys 12 77 Rys 13 Rys 14 ...

Страница 146: ...łogowej biała wanna Włożyć uszczelkę 37 do korpus 1 zwracając uwagę na osadzenie uszczelki Następnie nasmarować górną część uszczelki Wsunąć element przedłużający środkowy kołnierz 33 i ustawić w pozycji Kołnierz uszczelniający umieścić centralnie w betonie wodoszczelnym Zwrócić uwagę na poziome ułożenie kołnierza Kołnierz uszczelniający można dokręcić wykorzystując otwory znajdujące się w rogach ...

Страница 147: ... funkcjonowania systemu w instalacji komorowej w przypadku zalania rura wentylacyjna powinna być zamontowana min 10 cm powyżej poziomu zalewania Przewód odpowietrzający należy poprowadzić w taki sposób aby nie utrudniał on dostępu w celu przeprowadzenia konserwacji ani nie zawadzał połączeniom innych przewodów przewód tłoczny rura ochronna na kable Wykręcić zawór odpowietrzający 11 z zespołu pompy...

Страница 148: ...nątrz zbiornika na łączniku 1 i dociągnąć nakrętkę 23 z zewnątrz z wartością ok 10 Nm Podłączyć do złączki przewód tłoczny klienta 3 12 Tylko w przypadku zabudowy w swobodnym przewodzie kanalizacyjnym Zamontować łącznik 80 między króćcem przyłączeniowym pompy 18 i łączką 22 i zablokować obydwie szybkozłączki 25 1 22 23 21 24 Rys 18 18 80 22 25 Rys 19 ...

Страница 149: ...szczelkę do przejścia rurowego KESSEL nr art 850114 3 14 Montaż nasady Zależnie od głębokości zabudowy należy nasadę głębokość włożenia nasady 3 w razie potrzeby skrócić lub opatrzyć otworami 67 na przewody wprowadzane z boku do korpusu 1 Nasadę 3 można przedłużyć przy użyciu maks 2 elementów przedłużających aby podczas przeprowadzania konserwacji można było sięgnąć aż do korpusu Włożyć uszczelkę ...

Страница 150: ...aż wykonywany jest w celu ochrony przed zabrudzeniami np materiałem budowlanym Należy przy tym Zachować czystość obszaru uszczelnienia Nasmarować uszczelkę z zewnątrz Włożyć pokrywę dopływową 51 do nasady k 3 Zamknąć obydwa zamknięcia pokrywy 78 3 51 78 Rys 22 ...

Страница 151: ... się odgłosy silnika dźwignia przekłada się automatycznie 4 Odkręcić przewody do zaopatrzenia w wodę 5 Sprawdzić czy pompa zostaje wprawiona w ruch i odpompowuje spiętrzającą się wodę od strony domu 6 Zakręcić przewód do zaopatrzenia w wodę 7 System automatycznie pompuje resztki wody 8 Wyjąć sondę spiętrzenia ze szklanego pojemnika z wodą i zamontować w urządzeniu Sprawdzić czy klapa zwrotna ponow...

Страница 152: ...dzie znów bezpieczne Po każdej pracy konserwacyjnej przy zaworze zwrotny z pompą należy dokonać sprawdzenia działania 5 2 Częstotliwość konserwacji Konserwacja zaworów zwrotnych z pompą Zawór zwrotny z pompą musi być regularnie konserwowany przez specjalistę Odstępy czasowe pomiędzy przeglądami nie mogą być dłuższe niż roku w przypadku urządzeń przeznaczonych do użytku przemysłowego 1 rok w przypa...

Страница 153: ...mWS i maks 48 h Klasa ochrony I Ochrona silnika zintegrowana Rodzaj wtyczki Wtyczka Phoenix Kabel instalacyjny 5 m 3x1 mm Wymagane zabezpieczenie Patrz instrukcja urządzenia sterującego Rodzaj trybu S3 50 6 2 Urządzenie sterujące Ecolift Napięcie robocze VAC 50 Hz 230 Moc w stanie stan gotowości W 2 5 Moc W 1200 Zestyk bezpotencjałowy opcja styk przełączny V DC A 42 0 5 Temperatura użytkowania 0 d...

Страница 154: ... 0 2 2 4 2 9 0 2 5 3 2 10 0 2 8 2 1 10 9 3 0 1 0 Werte für SPZ 1000 mit Schneidrad 1 0 0 3 9 5 2 0 0 6 8 9 3 0 0 8 8 3 4 0 1 1 7 6 5 0 1 4 6 9 6 0 1 7 6 1 7 0 1 9 5 2 Max Förderm Q m3 h Max Förderm Q l sec Förderhöhe H mWS 8 0 2 2 4 2 9 0 2 5 3 2 10 0 2 8 2 1 10 9 3 0 1 0 Wartości dla SPZ 1000 z koło tnące Wydajność tłoczenia maks Wydajność tłoczenia maks Wysokość tłoczenia maks 1 2 3 4 5 6 7 8 9 ...

Страница 155: ...DOP Deklaracjawłaściwościużytkowych 155 156 02 2019 7 DOP Deklaracja właściwości użytkowych ...

Страница 156: ...156 156 DOP Deklaracjawłaściwościużytkowych 02 2019 ...

Отзывы: