background image

Interference immunity

tests

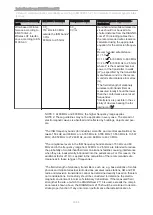
EN 60601 test level

Compliance level

Electromagnetic environment -

Guidelines

Wire-based HF inter‐

ference according to

EN 61000-4-6

Wireless HF interfer‐

ence according to EN

61000-4-3

3 V

eff

150 kHz to 80 MHz

outside the ISM bands

a

3 V/m

80 MHz to 2.5 GHz

3 V

eff

3 V/m

Handheld and mobile wireless de‐

vices should not be used at a

shorter distance from theDIAGNO‐

cam 2170 including cables than

the recommended safe clearance

calculated using the appropriate

equation for the emission frequen‐

cy.

Recommended safe distance:
d = 1.17

P

d= 1.17 

P

for 80 MHz to 800 MHz

d= 2.33 

P

for 800 MHz to 2.5 GHz

where P is the maximal nominal

power of the transmitter in watts

(W) as specified by the transmitter

manufacturer and d is the recom‐

mended safe clearance in metres

(m).

b

The field strength of stationary

wireless radio transmitters as

measured locally

c

should be lower

than the conformance level at all

frequencies.

d

Interference is possible in the vi‐

cinity of devices bearing the fol‐
lowing icon.

NOTE 1: At 80 MHz and 800 MHz, the higher frequency range applies.

NOTE 2: These guidelines may not be applicable in every case. The spread of

electromagnetic waves is absorbed and reflected by buildings, objects and peo‐

ple.

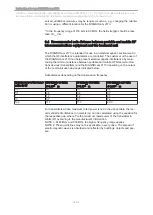
a

The ISM frequency bands (for industrial, scientific, and medical applications) be‐

tween 150 kHZ and 80 MHz are 6.765 MHz to 6.795 MHz; 13.553 MHz to 13.567

MHz; 26.957 MHz to 27.283 MHz, and 40.66 MHz to 40.70 MHz.

b

The compliance levels in the ISM frequency bands between 150 kHz and 80

MHz and in the frequency range from 80 MHz to 2.5 GHz are intended to reduce

the probability of mobile/handheld communications facilities causing interference

when they are inadvertently introduced into the patient area. For this reason, the

additional factor of 10/3 is applied in the calculation of the recommended safe

clearances in these ranges of frequencies.

c

The field strength of stationary transmitters, such as, e.g. base stations of mobile

phones and mobile terrestrial radio devices, amateur radio stations, AM and FM

radio and television transmitters, cannot be determined exactly based on theoreti‐

cal considerations. A site study should be considered to determine the electro‐

magnetic environment in terms of stationary transmitters. If the measured field

strength at the site, at which the DIAGNOcam 2170 is used, exceeds the compli‐

ance levels shown above, the DIAGNOcam 2170 should be monitored to demon‐

strate proper function. If any uncommon performance characteristics are ob‐


Instructions for use DIAGNOcam 2170
9 Data on electromagnetic compatibility according to EN 60601-1-2 | 9.3 Immunity to electromagnetic inter‐

ference

63/64

Содержание DIAGNOcam 2170

Страница 1: ...Instructions for use DIAGNOcam 2170 Always be on the safe side...

Страница 2: ...Distributed by KaVo Dental GmbH Bismarckring 39 D 88400 Biberach Phone 49 7351 56 0 Fax 49 7351 56 1488 Manufacturer Kaltenbach Voigt GmbH Bismarckring 39 D 88400 Biberach www kavo com...

Страница 3: ...itch 12 3 3 IDs and labels 13 3 3 1 Rating plate 13 3 4 Technical Specifications 13 4 First use 15 4 1 Hardware requirements 15 4 2 Software installation 15 4 2 1 Start the installation routine 15 4 2...

Страница 4: ...58 8 Accessories 59 9 Data on electromagnetic compatibility according to EN 60601 1 2 61 9 1 Electromagnetic Transmissions 61 9 2 Resistance to electromagnetic interference 61 9 3 Immunity to electro...

Страница 5: ...PI Processing instructions 1 1 2 Symbols See the Safety Warning Symbols section Important information for users and technicians CE mark European Community A product bearing this mark meets the requir...

Страница 6: ...dental suppli er KaVo provides ongoing training and special courses for dealer technicians To guarantee constant readiness for use and maintenance of value of the KaVO products the products must be r...

Страница 7: ...optional step includes necessary measures for hazard prevention 2 2 3 Description of hazard levels Safety instructions with three hazard levels are used in this document to prevent personal and prope...

Страница 8: ...ng correctly to protect himself the patient and third parties from danger to avoid contamination from the product Note The product must be cleaned and serviced according to instructions if it is not t...

Страница 9: ...ssed disinfected sterilized according to the section Preparation methods Additional information can be obtained from KaVo www kavo com or your den tal supplier For final disposal contact Germany To re...

Страница 10: ...invisible laser Eye damage Do not point the device toward the eyes when the laser is active Do not operate the device when the housing is damaged or opened Do not use the handpiece on the patient when...

Страница 11: ...tion Recondition the DIAGNOcam handpiece and tips after use CAUTION Risk of laceration from improper use Laceration Do not use the handpiece on the patient without an adapted probe Do not use a damage...

Страница 12: ...Aperture for the laser Forked light barriers for probe iden tification 3 1 2 Handpiece with attached tip Occlusal tip Control button 2 Ring switch Handpiece Control button 1 USB 2 0 cable with anti ki...

Страница 13: ...3 1 3 Occlusal tip Tip large Tip small Opening for camera window Aperture for laser beam Instructions for use DIAGNOcam 2170 3 Product description 3 1 System components 11 64...

Страница 14: ...t are automatical ly saved Long Laser and camera are being turned off Actuation Control button 1 Function Brief Select the next tooth in the tooth dia gram in a clockwise direction Long Quick run thro...

Страница 15: ...Classification application part type BF CE mark according to 93 42 EEC medical devices Labelling according to 2002 96 EC Follow the Instructions for use 3 4 Technical Specifications Complete system P...

Страница 16: ...Illumination Type Laser diode Number 2 Wavelength 780 nm Opt power 15 mW opt power according to DIN EN 60825 1 downstream of the occlusal tips max 1 mW Optical system Image angle 105 Viewing directio...

Страница 17: ...er 11 with express settings must be installed and have been started once Please make sure to comply with the system requirements of other software and hardware systems to be run in conjunction with Ki...

Страница 18: ...m Click on Next in the setup start window to start the installation Read the license agreements and select the option I accept the agreements and click Next Instructions for use DIAGNOcam 2170 4 First...

Страница 19: ...aved to the target directory The target directory must be on a local hard disk It is recommended to use the suggested directory path C Programs KaVo KiD A target directory on a network drive can cause...

Страница 20: ...Define the document directory Continue the installation Instructions for use DIAGNOcam 2170 4 First use 4 2 Software installation 18 64...

Страница 21: ...Complete the installation clicking on Finish Select the language German or English Instructions for use DIAGNOcam 2170 4 First use 4 2 Software installation 19 64...

Страница 22: ...Click Next to install the drivers Program files are stored in the target directory Instructions for use DIAGNOcam 2170 4 First use 4 2 Software installation 20 64...

Страница 23: ...Click Install to install them Click Continue installation to install the software Instructions for use DIAGNOcam 2170 4 First use 4 2 Software installation 21 64...

Страница 24: ...Click Continue installation to install the hardware Wait for the installation to be completed Instructions for use DIAGNOcam 2170 4 First use 4 2 Software installation 22 64...

Страница 25: ...re all the other computers and turned off after all other computers are turned off for example in the evening if at all Note If you intend to install KiD on the network the network server needs to be...

Страница 26: ...ver A database server can be installed without the KiD software This is necessary in case of a Windows 2000 server since KiD does not support this system Instructions for use DIAGNOcam 2170 4 First us...

Страница 27: ...n installing the database server or if the server release is not found se lect a document directory Select Additional Tasks Instructions for use DIAGNOcam 2170 4 First use 4 2 Software installation 25...

Страница 28: ...Confirm the installation settings Conclude installation Instructions for use DIAGNOcam 2170 4 First use 4 2 Software installation 26 64...

Страница 29: ...be deactivated at all other workstations Note If Microsoft SQL Server is already installed on this computer this version can be used The user account used for installation must have administrator rig...

Страница 30: ...Network is being scanned for SQL databases with authorisations Make the selection and click on Next Instructions for use DIAGNOcam 2170 4 First use 4 2 Software installation 28 64...

Страница 31: ...Create a desktop icon and click on Next To install click on Install Instructions for use DIAGNOcam 2170 4 First use 4 2 Software installation 29 64...

Страница 32: ...Click on Finish to complete the installation Re start the computer and click on Finish Instructions for use DIAGNOcam 2170 4 First use 4 2 Software installation 30 64...

Страница 33: ...4 2 4 Installing a VDDS interface Start setup click on Next Carry out the installation Instructions for use DIAGNOcam 2170 4 First use 4 2 Software installation 31 64...

Страница 34: ...ormation can be obtained at www kavo com The remote service software Netviewer is installed automatically during installa tion of KiD Moreover Netviewer can also be run by means of the Internet site s...

Страница 35: ...ssion number for Netviewer Enter the session number and click on Connect This starts up the remote service Note The Technical Service can access the remote maintenance only if the customer confirms th...

Страница 36: ...window shows that the KaVo Service is connected to your system The Netviewer window was closed click close to disconnect Instructions for use DIAGNOcam 2170 4 First use 4 3 Remote maintenance by means...

Страница 37: ...ng in the forked light barriers Note Tips must not be forced or twisted while attaching them Tips must be slid to the limit stop on the handpiece Otherwise areas within the picture may remain covered...

Страница 38: ...the tip do not touch the control buttons Pull the tip off the handpiece by applying a moderate amount of force pull with your left hand and push slightly with your right thumb Do not touch the control...

Страница 39: ...device is used upon inserting the USB plug in the computer and when the computer is turned on If a tip is attached when the handpiece is turned on the safety check does not run The laser light is not...

Страница 40: ...and position of tooth fillings The indication range includes premolar and molar teeth The occlusal probe comes with a spacer For optimal high contrast images the spacer is to be placed on the neighbo...

Страница 41: ...frame using the ring switch The freeze frame is assigned to the selected tooth in the tooth diagram Note Teeth having assigned pictures are light blue in the tooth diagram To switch to review mode rem...

Страница 42: ...before unplugging the DIAGNOcam Start the DIAGNOcam Turn on the PC laptop Plug the DIAGNOcam without tip into the PC laptop and wait until three acoustical signals are emitted Start up the DIAGNOcam s...

Страница 43: ...ent Click on the Create new patient symbol Enter name of the patient and save it by clicking on the OK symbol Tool bar Step 3 Select patient Instructions for use DIAGNOcam 2170 5 Operation 5 6 DIAGNOc...

Страница 44: ...Double click on patient name or confirm by clicking on OK Step 4 Start up the camera Instructions for use DIAGNOcam 2170 5 Operation 5 6 DIAGNOcam Function 42 64...

Страница 45: ...lick on the DIAGNOcam field and open it Start up the recording mode Click on the DIAGNOcam Live field Step 5 Select tooth Attach tip Instructions for use DIAGNOcam 2170 5 Operation 5 6 DIAGNOcam Funct...

Страница 46: ...e tooth scheme If a tooth selected only the images of the selected tooth are displayed If no tooth is selected an exclamation mark is shown instead of the tooth num ber All images recorded or images t...

Страница 47: ...Position the DIAGNOcam accordingly on the tooth Instructions for use DIAGNOcam 2170 5 Operation 5 6 DIAGNOcam Function 45 64...

Страница 48: ...play an earlier image from the lower row in image 3 click on the corresponding image in the lower row with the mouse to select it blue framed Icon Definition Ring switch is red Disabled Ring switch is...

Страница 49: ...ng If the teeth are displayed too brightly it may be advantageous to change the AEW values accordingly Use Default to reset to factory settings DIAGNOcam Review Mode Images can viewed and compared in...

Страница 50: ...review mode from recording mode DIAGNOcam video Pull off the tip Click on the Folder symbol Attach a tip to return to view mode Instructions for use DIAGNOcam 2170 5 Operation 5 6 DIAGNOcam Function...

Страница 51: ...es made Click on the Cancel symbol to cancel the last change made Click on the Printer symbol to print the image Click on the Delete symbol to delete the image Click on the Export image symbol to expo...

Страница 52: ...he field showing the number 48 A light blue exclamation mark is shown to the left of the tooth scheme The images that are not assigned to a tooth are shown in the carousel in the middle and bottom of...

Страница 53: ...t top window region to display the active front image in the carousel in the upper window region The selected window region on top is shown with a dark blue frame Use the navigation arrows to scroll f...

Страница 54: ...ht The active images in the carousel are displayed sequentially in the selected window region The image stays fixed in the non selected window region Enlarging dividing an image Double click on either...

Страница 55: ...region into two windows The image is displayed reduced in size in the top left or right window region The previously displayed image is displayed in the respective other window region Instructions fo...

Страница 56: ...s from penetrated liquids Do not allow any liquids to enter the device 6 1 Preparations for cleaning Note The software must always be closed before unplugging the DIAGNOcam Remove tip 6 2 Cleaning Not...

Страница 57: ...not subject the DIAGNOcam to spray disinfection KaVo recommends the following products based on material compatibility The microbiological efficacy must be ensured by the disinfectant manufacturer Mic...

Страница 58: ...w cleaning Bag the tips prior to sterilisation The KaVo products released for sterilisation have a maximum temperature resist ance of 138 KaVo recommends e g STERIclave B 2200 2200P made by KaVo Citom...

Страница 59: ...Checking the tips Hold tips against a light source e g daylight source and check the optical fi bres seen in the sleeve for contamination and defects Instructions for use DIAGNOcam 2170 6 Reconditioni...

Страница 60: ...next start up Always close the software be fore unplugging the DIAGNOcam If error messages are displayed at start up close all programs and shut down and reboot the PC laptop Turn off the DIAGNOcam wi...

Страница 61: ...8 Accessories 1 005 1300 Tip large 1 005 1360 Tip small Instructions for use DIAGNOcam 2170 8 Accessories 59 64...

Страница 62: ...accessories USB extension cable 3 m Mat no 1 005 1076 CD DIAGNOcam multi user Mat no 1 009 6958 CD DIAGNOcam single user Mat no 1 009 5110 CD VDDS plugin software Mat no 1 009 6960 Instructions for u...

Страница 63: ...nected to a public power supply that also sup plies residential buildings Emission of harmonics according to EN 61000 3 2 Class A The DIAGNOcam 2170 device is suitable for use in all facilities in clu...

Страница 64: ...ption for period 40 UT 60 interruption for 5 periods 70 UT 30 interruption for 25 periods 5 UT 95 interruption for 5 s 250 periods 5 UT 95 interruption for period 40 UT 60 interruption for 5 periods 7...

Страница 65: ...o ple a The ISM frequency bands for industrial scientific and medical applications be tween 150 kHZ and 80 MHz are 6 765 MHz to 6 795 MHz 13 553 MHz to 13 567 MHz 26 957 MHz to 27 283 MHz and 40 66 MH...

Страница 66: ...tance depending on the transmission frequency Rated power of the trans mitter in W 150 kHz to 80 MHz d 1 17 P m 80 MHz to 800 MHz d 1 17 P m 800 MHz to 2 5 GHz d 2 33 P m 0 01 0 1 0 1 0 2 0 1 0 4 0 4...

Страница 67: ......

Страница 68: ...1 006 3964 Fk 20120823 04 en...

Отзывы: