background image

27

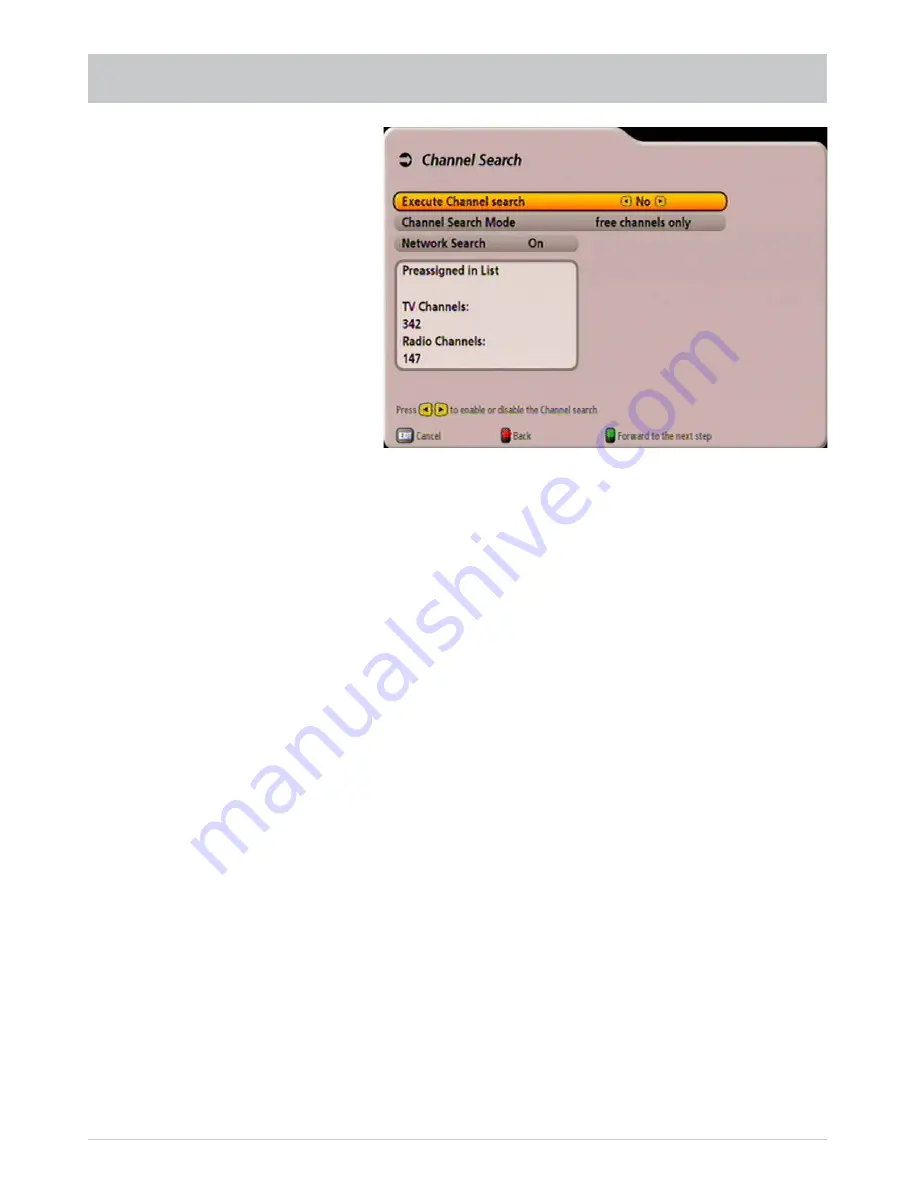
Execute Channel search

Use the 

 buttons to select (yes or no) whether you wish to start a channel search. It is not 

essential to start a channel search; instead you can use the factory pre-programmed channels. However 
the channels do change from time to time (e.g. their frequencies change), which the receiver does not 
automatically detect, and can then be found only by performing a channel search.

If you selected “No”, you can press the 

!

 (green) button to skip directly to the next item of the fi rst 

installation.

If you selected “Yes”, you can press the 

 button to progress to the next selection item.

Channel Search Mode

Use the 

 buttons to select whether you wish to search for “free & scrambled”, “free channels only” 

or “scrambled only” channels.

To view scrambled channels you need the appropriate CA (Conditional Access) module and a 
valid smart card together with a valid subscription to a pay TV provider.

Press the 

 button to move to the next selection item.

Network Search

If you set the network search to “Off”, only the factory stored transponders of the satellites you 
previously selected will be searched for new and as yet unlisted channels.
If you set the network search to “On”, the transponder network enables additional transponders that 
have not yet been stored to be located. They are then stored and searched for new channels in 
the same way as the existing transponders.

Press the 

!

 (green) button to start the channel search, or if you set channel search to “Off” you are 

guided straight to the next item in the fi rst installation process.
When the search has been completed, you will see the following message (example):

FIRST INSTALLATION: Channel search

Содержание UFS 902

Страница 1: ...Operating Manual HDTV receiver for satellite reception UFS 902 ...

Страница 2: ...ly this unit may be used by the end customer only for private non commercial purposes and for the licensed content It may not be used for commercial purposes The use of products or processes that are sold or used with this unit is not included in this statement The use of reverse engineering is not permitted in respect of the licensed technologies nor is disassembly RECORDING FUNCTION FROM SOFTWAR...

Страница 3: ...ettings Customize screen menu Front display in standby The information in this operating manual was correct at the time of going to press We reserve the right however to make changes at any time and without prior notice If new software is released for your receiver and this affects the information in the operating manual e g changes to the menus and or functions if we believe it necessary we will ...

Страница 4: ...be copied directly from the related EPG view to the timer The USB 2 0 host port on the rear of the unit allows software updates to be loaded to the receiver SWITCHING OFF THE RECEIVER AND UPDATING THE EPG By pressing the button you can switch the receiver out of TV mode to the standby mode and back again The receiver has the facility to update the EPG overnight i e at 03 00 the receiver automatica...

Страница 5: ... CONTROL 10 FIRST INSTALLATION 12 OPERATING INSTRUCTIONS 29 ON SCREEN DISPLAYS OSD 32 EPG ELECTRONIC PROGRAMME GUIDE 36 COMMON INTERFACE 47 TELETEXT 49 EDITING CHANNEL LIST 50 SEARCHING FOR CHANNELS CHANNEL SEARCH 56 PARENTAL CONTROL 62 SETTINGS 63 SERVICE MENU 68 OPERATING FROM THE FRONT PANEL 72 TECHNICAL APPENDIX 73 SHORT TECHNICAL GLOSSARY 80 SUBJECT INDEX 84 TROUBLESHOOTING 86 FOR YOUR NOTES ...

Страница 6: ... manufacturer accepts no liability for accidents caused by the user opening the unit Connections Incorrect wiring of the connections can lead to malfunctions or defects on the unit Long periods of absence storms accessibility of the mains connector Always turn off the unit at the mains switch if you will be absent for a long time or there is a storm Disconnect it from the mains by unplugging the m...

Страница 7: ...el controls and displays 1 On Off switch with mains disconnect 2 Mains power cable 3 RS 232 port for Service only 4 Optical data stream output SPDIF Sony Philips Digital Interface Format for Dolby Digital AC 3 audio 5 USB 2 0 port USB A connector 6 HDMI socket for connection to a TV set 7 2 x Cinch plug audio outputs L R 8 Cinch plug video output composite colour 9 3 x Cinch connections for compon...

Страница 8: ... strip the insulation from the cable as shown in the following illustration and carefully twist the F standard connectors on to the ends of the cables until they are securely seated When fitting the connector make sure that no wires from the braid are touching the inner conductor so no short circuit can occur The quality of the reception signal depends on this connection The presets for the contro...

Страница 9: ...m connect the audio cinch sockets to the input sockets on the hi fi system using an appropriate cable see Connection Example The fibre optic output is intended for the connection of a Dolby Digital system see Connection Example Remove the cover on the rear of the remote control Insert the two batteries supplied into the remote control Ensure correct polarity of the batteries the and markings are i...

Страница 10: ...Change channel in the programme preview EPG Currently not used Currently not used Stand by Teletext yellow Open channel options sound subtitles selection blue Media selection Open channel OSD channel information Channel selection up down Confirm entry open channel list Cursor buttons Open EPG Electronic Programme Guide Change channel in the programme preview EPG The button symbols shown here can a...

Страница 11: ... receiver On the remote control simultaneously press address 1 Then switch the receiver off again at the power switch and do the same for the other units for the second receiver for the third receiver and for the fourth receiver Make sure only one receiver is on at a time To switch the remote control to an infrared code When you have configured all receivers to their infrared code to switch betwee...

Страница 12: ... and Set Up sections First switch your TV set on and select the AV channel slot Switch on your receiver at the power switch at the rear of the unit The following display appears Select the menu language you want using the buttons Available options German English French Italian Spanish Czech Dutch Polish Turkish and Russian Press the green button to move to the next menu Also note the bars at the b...

Страница 13: ... signal at the TV Scart socket here Select the signal that your TV set can process FBAS Color Video Baseband Signal RGB Red Green Blue signal not currently available or Y C S Video signal luminance chrominance Press the green button to move to the next menu HDMI YUV Format Select here the video resolution that is to be used on your TV Either 1080i resolution 1920 x 1080 half screen images 576p res...

Страница 14: ...r switch over from one received satellite to another If your reception system does not support DiSEqC select the setting LNB only If your receiver is connected to a single cable system select One Cable Press the button to move to the next menu item Continue with the relevant section of First Installation When selecting the satellite s make sure that your reception position is aligned to the desire...

Страница 15: ... system The following display appears example FIRST INSTALLATION DiSEqC 1 0 Use the buttons to select the first satellite slot Press to open the menu for the satellite settings The following display appears example Satellite and Position Use the buttons to set the desired satellite selection from 17 pre programmed options ...

Страница 16: ...ansponder To check whether the settings that you have made are correct use the buttons to move to the Test transponder field Use the buttons to select the various transponders If your settings are correct you will see at the top right of the screen the live signal of a channel for the currently selected transponder If you are not receiving a signal check your settings again and if necessary call f...

Страница 17: ... tuner When you have selected your desired satellite use the buttons to switch to the selection of the LNB Type LNB Type Here use the buttons to select the LNB type used in your system The choice is between Universal and user defined Universal No further input is required since all necessary frequency ranges are covered by a universal LNB ...

Страница 18: ... the settings that you have made are correct use the buttons to move to the Test transponder field Use the buttons to select the various transponders If your settings are correct you will see at the top right of the screen the live signal of a channel for the currently selected transponder If you are not receiving a signal check your settings again and if necessary call for expert help When you ha...

Страница 19: ... the first satellite satellite 1 of 2 depending on the setting as shown on the screen LNB Type Here use the buttons to select the LNB type used in your system The choice is between Universal Wideband and user defined If in your reception system you use a single cable LNB e g UAS 481 from Kathrein please select here the setting Wideband If you use a single cable matrix EXU 908 or a single cable swi...

Страница 20: ...y for which your LNB was configured When you have completed all setting for the currently selected satellite press the button If you have selected more than one satellite repeat the previous Satellite and Position and LNB Type processes for the number of satellites you selected When you have completed the settings for all the satellites the following display appears Use the button to select the ne...

Страница 21: ...utton Now press the green button The receiver will automatically display the menu for the channel search Continue with the section Execute channel search If no connection to the single cable system could be established you will receive the message Registration was abortive Check your settings and if necessary call for expert help If one or more receivers are already present on the system and an ad...

Страница 22: ...max eight receivers Selection user defined Transmission channel Use the buttons to select a free available transmission channel Transmission frequency Use the number buttons to input the four digit transmission frequency FIRST INSTALLATION Single cable system manual If one or more receivers are already present on the system and an additional receiver is to be connected you must assign the new rece...

Страница 23: ...ettings frequency and transmission channel and if necessary call for expert help Press the button to acknowledge this display Then press the button You will be asked whether you wish to save the changes Use the buttons to select Yes save changes and confirm by pressing the button Now press the green button The receiver will automatically display the menu for the channel search Continue with the se...

Страница 24: ... FIRST INSTALLATION Single cable system manual When the UAS 481 single cable feed system is being used it is essential that the LNB is set to Wideband When the EXR 551 single cable switching matrix is being used it is essential that the LNB is set to Universal If no connection to the single cable system could be established the following display appears Check your settings and if necessary call fo...

Страница 25: ...system you will see the following display FIRST INSTALLATION Single cable system manual If no connection to the single cable system could be established the following display appears Check your settings and if necessary call for expert help When the EXR 552 single cable switching matrix is being used it is essential that the LNB is set to Universal Press the button to acknowledge this display Then...

Страница 26: ...the buttons to switch to the Test connection selection field and press the button The receiver now tests whether a connection to the single cable system can be established or not As soon as the receiver has established a connection to the single cable system you will see the following display Press the button to acknowledge this display Then press the button You will be asked whether you wish to s...

Страница 27: ...ly channels To view scrambled channels you need the appropriate CA Conditional Access module and a valid smart card together with a valid subscription to a pay TV provider Press the button to move to the next selection item Network Search If you set the network search to Off only the factory stored transponders of the satellites you previously selected will be searched for new and as yet unlisted ...

Страница 28: ...utton twice to save the new channel You will then move on to the next step of the first installation the following is displayed FIRST INSTALLATION CHANNEL SEARCH field displayed below Press the buttons to make the setting update time on Set the required type of time update using the buttons The following options are available Actual channel Das Erste the time information is taken from the channel ...

Страница 29: ...ory Pay attention to the bar at the bottom of the on screen display These provide information on what to do next Press the button to open the main menu and press the buttons to select the sub menus Press the button to open the sub menus Press the buttons to select items within the sub menus The settings under the various options are made either by pressing the buttons or using the number buttons Y...

Страница 30: ...30 MENU TREE OPERATING INSTRUCTIONS Main menu Open using the button ...

Страница 31: ...t for the entry of favourite names or search expressions by selecting the required numbers digits using the number buttons You can choose between upper or lower case letters button Use the number buttons to select the desired character About two seconds after selection of the character the cursor moves automatically to the next position The button allows you to delete your entry character by chara...

Страница 32: ...mber of soundtracks yellow button scrambled channel Time Display of start time for current and next programmes Press the button twice to view information on the current channel if transmitted by the channel provider Use the buttons to scroll through the pages By pressing the buttons you can obtain information on the programmes to come on the current channel Press the or button to exit the display ...

Страница 33: ...he buttons without having previously pressed the yellow button OPENING OPTIONS CHANNEL ON SCREEN DISPLAYS OSD You can open the media selection by pressing the blue button The following display appears OPENING MEDIA SELECTION TV RADIO TV mode Receiver returns from the radio mode to the TV mode Radio mode The receiver switches to radio mode Confirm the change by pressing the button or cancel the pro...

Страница 34: ...s to view further soundtrack selection options if these are transmitted by the channel provider Use the buttons to scroll through the available selection options Press the yellow button again or press the button to exit this display again OPTION SELECTION No or bad signal indicates that an error has occurred in the reception system or in the receiver settings or that the transponder is not transmi...

Страница 35: ...he search Use the number buttons to enter the desired search expression for the channel that is sought see also Operating instructions Alphanumeric entries Press the button to start the search see screenshot below for an example of a search result Press the button to view the following additional items of information on a channel see example screenshot at right Signal strength Signal quality Trans...

Страница 36: ...ar Today s date and time Current picture on the selected channel Day of the week and time when the highlighted program will be shown Date and time of the highlighted program with category duration and picture format Selected EPG view At this point you will be shown the age limit for the highlighted program if this is supplied by the channel provider Note If you selected a favourite list before ope...

Страница 37: ...PG view is always performed using the cursor buttons The buttons allow you to select individual channels programs and the buttons allow you to scroll from page to page of the currently selected list Pressing the or the button exits the EPG again and returns to the TV picture You will see information on the current or next following programmes in the EPG only if it is supplied by the channel provid...

Страница 38: ...y entering digits with the number buttons you remain however in Preview view The button allows you to scroll backwards and forwards a day at a time Using the red dot button you can copy the selected programme to the recording settings see Recording section Also note the bars at the bottom of the on screen display These provide information on what to do next button allows you to look ahead in 15 mi...

Страница 39: ...ure Education Music Leisure and Adult Programmes can be assigned to the above categories only if the EPG data has been supplied by the channel provider Select the required category using the buttons You can then use the cursor buttons to select the desired category and if available you can use the button within each category to open further information on the desired programme The button allows yo...

Страница 40: ... see also Operating Instructions Alphanumeric Entries When you have entered the desired search expression press the button to start the search You can then use the cursor buttons to select the desired programme from the search result and if available you can use the button to open further information on the desired programme EPG ELECTRONIC PROGRAMME GUIDE Using the red dot button you can copy the ...

Страница 41: ...es that the data has been supplied by the channel provider Using the red dot button you can copy the selected programme to the recording settings see Recording section Press the or the button to exit the additional information REMINDER FUNCTION CHANGE OVER TO PROGRAMME If you wish to be reminded at the start of a programme you can activate the reminder function for the desired programme The remind...

Страница 42: ...once The recording will be performed once only daily The recording will be performed daily at a time specified by you weekly The recording will be performed once a week on the same day and at the same time user defined The recording will be performed on days specified by you at times specified by you Series recording The selected programme will be set up by the EPG for recording every time it is t...

Страница 43: ...end time When all settings have been made press the button to save the recording settings You can view the scheduled recording in the timer list view of the EPG see section Timer list RECORDING DAILY Use the buttons to select the recording mode daily see screenshot below Use the buttons to switch to the selection field Start and use the buttons or the number buttons to select the desired recording...

Страница 44: ... and you can make no further manual corrections to it Therefore before pressing the red dot button select the programme on the day of the week that in future you will wish to make the weekly recording RECORD USER DEFINED Use the buttons to select the recording mode user defined see screenshot below Use the buttons to switch to the selection field Day and use the buttons to select the re quired day...

Страница 45: ...the complete programme even if transmission times may vary slightly The lead in and run out time is set using the buttons or the number buttons When all settings have been made press the button to save the recording settings You can view the scheduled recordings in the timer list view of the EPG see section Timer list Series recording depends on the EPG data being kept up to date at all times The ...

Страница 46: ... which the recording is scheduled The red dot button allows you to delete a recording that had been scheduled If this is a series recording you will additionally be asked whether you wish to cancel the recording of only one episode or whether you wish to record no further episodes of this series see screenshot Selection is performed using the buttons and is confirmed using the button The button al...

Страница 47: ...ecific to a particular encryption technology is inserted into the CA module Store your card and PIN code securely when not in use The Common Interface CI of the UFS 902 is suitable for the use of one CA Conditional Access module This CI slot is on the left on the front behind the flap The CA module draws in the Smartcard chip contacts pointing downwards and towards socket strip which it then inser...

Страница 48: ...ote that with monthly activation intervals the channel providers have different procedures for activating pay TV cards Activation may therefore be a few days before or after the beginning of a new month During this activation period the CA module and card must be in the slot and the receiver must be turned on a set to the booked pay TV channel Follow the instructions from the pay TV provider If yo...

Страница 49: ...layed in the top left hand corner with the time and date displayed at the top right When the search is finished the teletext broadcast by the relevant program provider appears You have several options for opening the desired pages Enter using the number buttons Scroll through using the buttons Select the options shown at the bottom end by pressing the related colour button red green yellow and blu...

Страница 50: ...l lists sorted alphabetically button Search for a specific channel enter the search expression using the number buttons on the remote control see also the sections Operating Instructions Alphanumeric Entries A channel list is selected in the related category satellites favourites and alphabetic using the buttons as standard the All Satellites channel list is displayed Selection of channels in the ...

Страница 51: ...el will be skipped when zapping through the channels Lock Channel can be viewed only by entering a PIN To favourite A channel can be assigned to any favourite list Start Blockselection Several channels can be selected at the same time and edited together EDITING CHANNEL LIST As soon as you exit the menu under which you made the edit changes you will be asked if you wish to save the changes Use the...

Страница 52: ...ction Channel Search The channel you previously selected will be deleted from the favourite lists also MOVING CHANNELS Use the buttons to select the channel to be moved on the channel list you have selected use the green button to switch to the overall list use the yellow button to switch to the alphabetically sorted list Press the button to open the edit menu and use the buttons to select the Mov...

Страница 53: ...a yellow field in the channel list The F shows that it is a favourite channel the black dot in the yellow field shows in which of the eight favourite lists the channel can be found See the item Editing Favourite Lists for information on how to delete a channel from a favourite list STARTING BLOCK MARKING MARKING SEVERAL CHANNELS Use the buttons to select the channel from which you want to start se...

Страница 54: ...entering a PIN Rename favoritelist The favourite list can be renamed Start Blockselection Several channels can be selected at the same time and edited together REMOVING FROM FAVOURITE LIST Use the buttons to select the channel to be removed from the favourite list you have selected Press the button to open the edit menu and use the buttons to select the Remove from favoritelist function Confirm th...

Страница 55: ...be displayed with which you can enter the desired name alphanumerically using the number buttons on the remote control See also the section Operating Instructions Alphanumeric Entries STARTING BLOCK MARKING MARKING SEVERAL CHANNELS Use the buttons to select the channel as the start point from which you want to select further channels You can only select channels that are listed in succession in yo...

Страница 56: ...ched Manual Channel Search only the selected transponder for the satellite you selected will be searched Search with Service ID Search for a specific channel using its service ID Select the search type you want to rename using the buttons and confirm with AUTOMATIC CHANNEL SEARCH The buttons allow you to select different sets of parameters for the search Also note the bars at the bottom of the on ...

Страница 57: ...th a valid subscription to the relevant pay TV provider Press the button to move to the next selection item Network Search Use the buttons On Off to select whether a network search should be performed If you set the network search to Off only the factory stored transponders of the satellites you previously selected will be searched for new as yet unlisted channels If you set the network search to ...

Страница 58: ...es the newly found channels will be added to the end of the channel list Then press the button to exit the menu The channel list is opened on to the TV screen by pressing the button see also section On screen displays Channel list TV Radio MANUAL CHANNEL SEARCH SEARCHING FOR CHANNELS CHANNEL SEARCH After a search of whatever type the receiver shows all newly found channels in the channel list unde...

Страница 59: ... item The selection items DVB Type FEC Polarisation and Symbol Rate need be entered only if the transponder has yet to be saved DVB Type Press the buttons to select whether the search should be for standard channels DVB S SD or for HDTV channels DVB S2 HDTV FEC Press the buttons to select the applicable error rate Viterbi rate There is no need to enter the error rate when searching for standard ch...

Страница 60: ... of the search and the channels found so far Newly found channels are identified with the designation New after the channel name After completion of the search you will see the following message example Press the button You will be asked whether you wish to save the changes or not Selection is performed using the buttons and is confirmed using the button If you select Yes save changes the newly fo...

Страница 61: ...buttons enter here the service ID of the channel being sought When you have made your settings use the buttons to select Start Search and press the button to start the search You can cancel the search at any time by pressing the button During the search you will see a display that shows you the progress of the search After completion of the search you will see the following message example SEARCHI...

Страница 62: ...EIVER Use the buttons On Off to select whether the receiver should be locked If the receiver is locked it can be operated only by entering the four digit PIN code after it is switched on factory setting 0000 Press the button to exit the menu Press the button to replace the old PIN code with a new one Enter the new four digit PIN For security you must repeat the new PIN code once again Confirm the ...

Страница 63: ...he menu button the buttons on the main menu and Use the and the button to open the TV Video and Audio menu The following display appears see next page Use the buttons to select the further options If there is another sub menu layer press the button to open it If there are no more sub menus make the settings using the buttons or the number buttons Press the button to save your settings and return t...

Страница 64: ...elect the signal that your TV set can process FBAS Color Video Baseband Signal RGB Red Green Blue signal or Y C S Video signal luminance chrominance HDMI YUV format Select here the video resolution that is to be used on your TV Either 1080i resolution 1920 x 1080 half screen images 576p resolution 720 x 576 full screen images 720p resolution 1280 x 720 full screen images or Automatic Show 4 3 even...

Страница 65: ...ps from 10 ms up to 200 ms SETTINGS CUSTOMISING SCREEN MENU SCART HDMI YUV or Here you can configure the functions on of your receiver You can choose between High Normal and Low The table on the following page shows which functions are available at each configuration step FUNCTIONS red button yellow button blue button button button High Favourites selection Options selection TV radio Channel list ...

Страница 66: ... brightness of the receiver front display Select the most comfortable setting for the ambient lighting FRONT DISPLAY BRIGHTNESS Use the buttons to set whether the receiver front display should be switched on or off in stand by mode display of time FRONT DISPLAY IN STANDBY Press the button to align the on screen displays on the TV screen Now you can use the cursor buttons to determine the position ...

Страница 67: ...isplayed below Press the buttons to perform the setting update time on After opening this menu the currently selected time update setting is displayed see example above Das Erste or all channels There are two ways selection using the buttons you can update the time using the receiver 1 You select a specific channel for the time update The time is only updated from this channel in the example above...

Страница 68: ...main menu and The following display appears Current software version Last update run SOFTWARE UPDATE You can also check manually whether new software is available Use the buttons to switch to Software Update and then press the button The following display appears Channel list status ...

Страница 69: ...e unsure whether you wish to load the new software you can initially set the reply to No If you do agree to the changes you can then proceed to download the software Updating channel list If a new channel list is available but only then use the buttons No Yes to select whether you wish to load the new channel list that is available When you have made your settings use the buttons to select Start U...

Страница 70: ...actory Reset and press the button The following display appears Press the button to load the factory default settings The channels and favourite lists remain unchanged SERVICE MENU Information UFS 902 dated 14 03 2008 Dear customer immediately available is SW version 1 01 Further information can be found under www kathrein de ...

Страница 71: ...trol code Simultaneously press buttons for remote control code 1 standard setting for remote control code 2 for remote control code 3 for remote control code 4 After changing the remote control code you must now set your remote control to the code you selected For this simultaneously press buttons for remote control code 1 for remote control code 2 for remote control code 3 for remote control code...

Страница 72: ...layed There are four buttons on the front of the receiver Stand by button You can switch off the receiver by pressing the Stand by button from operating mode to the stand by mode and back on again from the stand by mode to the operating mode TV R button You can change between the TV and the radio mode using the TV R button button By pressing the buttons you can select the channels on the currently...

Страница 73: ...Q Cinch sockets for AV signals composite FBAS stereo audio Q One USB 2 0 port on the rear of the unit Q 8 favourite channel lists for TV and 8 for Radio Q 1 000 timers series and interval timers Q Comp colour RGB and Y C signal output programmable via Scart socket Q Software updates via satellite and from a USB stick both the operational software and the programme lists can be updated Q Language s...

Страница 74: ...2 44 1 48 Frequency range kHz Output voltage mVpp S N dB 65 Memory Flash RAM SDRAM MB 32 128 Processor clock speed MHz 200 Power supply Mains voltage V Hz 100 240 50 60 Power consumption power standby W 26 1 LNB supply horiz vert V mA 14 18 max 400 Control signal kHz 22 ToneBurst DiSEqCTM 1 0 Connections Sat IF input output 2 x F sockets TV VCR connection 1 x Scart sockets Video output analogue 3 ...

Страница 75: ... Blanking signal 16 X Video earth 17 X Blanking signal earth 18 X Video output FBAS Y 19 X Video input 20 Connector shield 21 X The Scart socket can be switched between VHS and S VHS The switch is made by selecting Mainmenu Settings TV Video and Audio For VHS RGB The red signal is connected to terminal 15 the composite colour output to terminal 19 For S VHS C Y The Y output is connected to pin 19 ...

Страница 76: ...76 CONNECTION EXAMPLE TECHNICAL APPENDIX UFS 902 Scart USB 2 0 5V 500 mA max Dolby digital system Hi fi system ...

Страница 77: ...z 4 SCR 3 1748 MHz EXR 551 ERA 14 ERA 14 LCD terr H low 0kHz V 1 2 V high 22kHz H 1 2 1 SCR 0 1400 MHz 2 SCR 1 1516 MHz 1 SCR 0 1400 MHz 2 SCR 1 1516 MHz EXR 552 ESU 33 002 BAYERN RADIO Twin ERA 14 H low V EXR 501 20510029 V high H A KLASSE CLASS Made in EC terr 1 4 1 SCR 0 1400 MHz 2 SCR 1 1516 MHz 3 SCR 2 1632 MHz 4 SCR 3 1748 MHz DC EXR 501 NCF 18 ESU 33 Single RTL Television 712 ESU 33 Single ...

Страница 78: ...78 TECHNICAL APPENDIX UAS 481 Single cable feed system ERA 14 ERA 14 ...

Страница 79: ...r Pos B V high V low H low H high 18V 400mA Pos A H low V low V high H high 18V 400mA ESU 33 Single RTL Television 712 ESU 33 Single RTL Television 712 ERA 14 ESU 33 Single RTL Television 712 ESU 33 Single RTL Television 712 ESU 33 Single RTL Television 712 ESU 33 Single RTL Television 712 ERA 14 ESU 33 002 BAYERN RADIO Twin POWER PASS IN EBC 10 272859 5 2400MHz OUT OUT POWER PASS A K LASSE CLASS ...

Страница 80: ...nication system between a satellite receiver master and the peripheral satellite components slaves such as LNBs multi switches rotating antenna systems It is a single master multi slave system i e there is only ever one master in the satellite system All activities start from the master DiSEqC components If DiSEqC switching matrices are cascaded the master receiver must transmit the DiSEqC signal ...

Страница 81: ...be used in Europe for HDTV standard transmissions HDMI High Definition Multimedia Interface Digital interface for digital video and audio data transmission preferred for HDTV HDTV High Definition Television High resolution television with a resolution 6 times higher or finer than PAL or NTSC However there is no compatibility as the transmission process DVB S2 and the compression technique MPEG 4 a...

Страница 82: ...age to the TV programme After the PID is entered the digital receiver automatically selects the audio data identified by the PID number from the data stream and assigns it to the video signal PIN Personal Identification Number For this unit the PIN is a 4 digit numeric code which must be entered to unlock the unit to allow access to certain functions and channels Programme package The channel pack...

Страница 83: ...nders Analogue transponders transmit only one TV channel and possibly multiple radio channels on a single transmission frequency Digital transponders simultaneously transmit several TV and several radio programmes on a transmission frequency If a programme provider is broadcasting several TV channels via a digital transponder we refer to the provider s channel package The terms digital transponder...

Страница 84: ...S TO THE FAVOURITE LIST 53 DELETING CHANNELS 52 LAST FUNCTION MEMORY 52 LOCKING CHANNELS 53 MOVING CHANNELS 52 SKIPPING CHANNELS 52 STARTING BLOCK MARKING MARKING SEVERAL CHANNELS 53 ERROR MESSAGE 34 EXAMPLES SINGLE CABLE SYSTEMS 77 FACTORY RESET 70 FEATURES 73 IMPORTANT INFORMATION 47 INSERTING THE SMARTCARD AND THE CA MODULE 47 LANGUAGE SELECTION OSD 31 LOCKING MAIN MENU 62 LOCKING RECEIVER 62 M...

Страница 85: ...E CONTROL RC 660 11 SCART SOCKET ASSIGNMENT 75 SEARCH FUNCTION 40 SELECTION OF THE LIST CHANNEL TO BE EDITED 50 SERVICE 2 SETTING A NEW CODE PIN 62 SOFTWARE UPDATE 68 TIMER LIST VIEW 46 TV SETTINGS 64 USB DEVICE MANAGEMENT 71 VHS S VHS SWITCHING 75 VIEW OF FRONT PANEL FLAP FOLDED DOWN 7 VIEW OF REAR PANEL 7 SUBJECT INDEX ...

Страница 86: ... 11 700 MHz and change as necessary Remote control no longer responds Receiver or remote control command set may have been unintentionally changed Set infrared code 1 as described in operating manual under Remote Control RC 660 check batteries Wrong time being displayed The Summertime setting is wrong An incorrect time was imported from the reception signal Check summer time on the Settings Date a...

Страница 87: ... SERVICE If despite studying this operating manual you still have questions about getting started with the unit or using it correctly or if unexpected problems occur please contact your specialist dealer ...

Страница 88: ...Internet http www kathrein de KATHREIN Werke KG Anton Kathrein Straße 1 3 P O Box 100 444 83004 Rosenheim GERMANY 936 3352 B 1108 ZWT Technical data subject to change ...

Отзывы: