background image

DS200 Installation Guide

DS200 Installation Guide

DS200 Installation Guide

DS200 Installation Guide


V003. 25.06.2002


B-15 


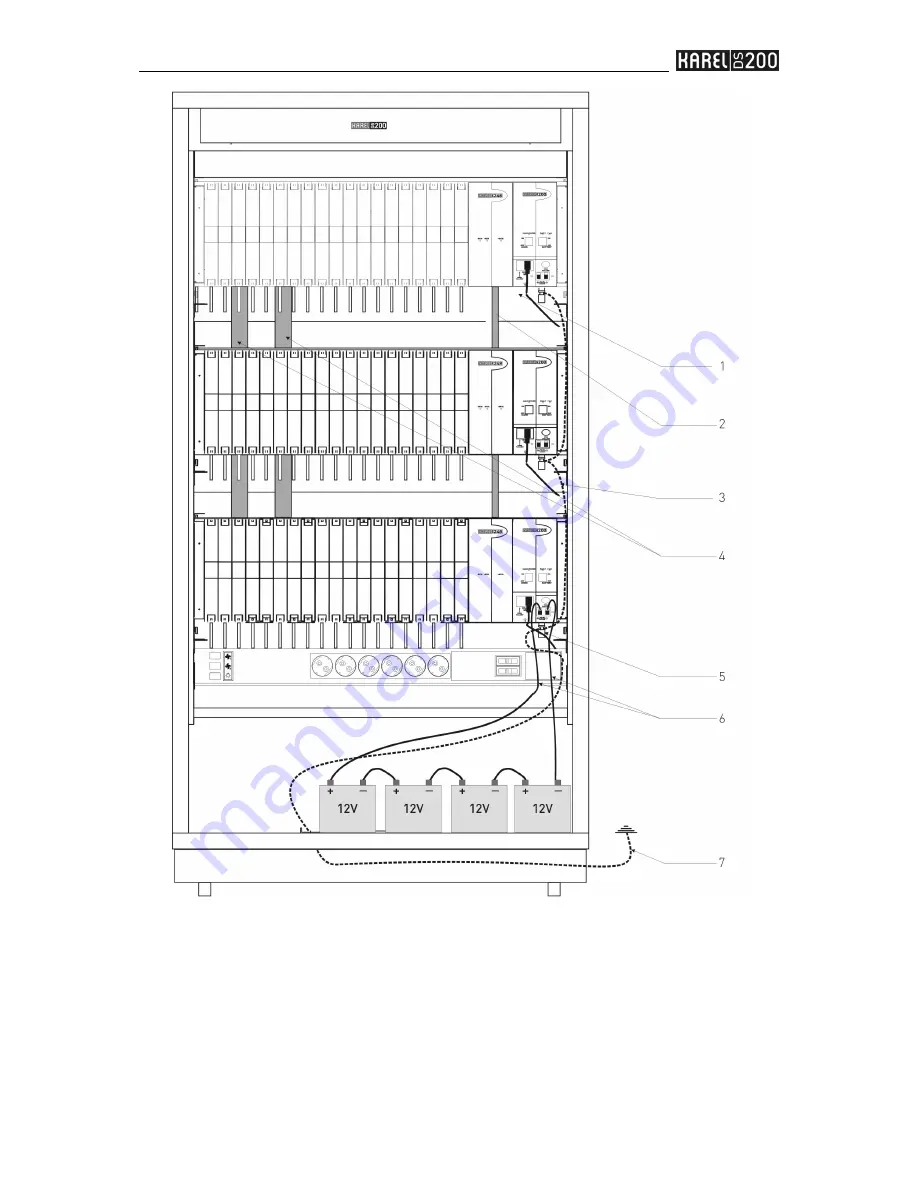
1. 230 VAC cable 

4. BPL200-FC 

7. Main grounding cable  

2. BPLSPS-FC 

5. Grounding screw 


3. Grounding wire 

6. Battery connection cables  


Figure – 9 


Содержание DS200

Страница 1: ...DUNDANT CPU200 DS200 CPUKON CARDS 16 I 4 A 1 THE LAN ADAPTOR CARD 17 I 4 B THE UTIL200 UTILITY MODULE 18 I 4 B 1 nstall ng the conference ch p on UTIL200 18 I 4 C CON2 CON3 LINE CONNECTION CARDS 19 I...

Страница 2: ...om if possible and they should be at least 3 meters away from the exchange otherwise 4 The mains supply should be reserved for the exchange only The power supply of the system should be uninterrupted...

Страница 3: ...ion is over there will be a 10 cm gap between the two racks Figure 1 5 Drive the anchor plugs into the holes whose locations have already been checked and then screw the wall mount bars Note that the...

Страница 4: ...check whether the wall mount bars really carry it 10 In case it is necessary to displace the exchange just lift it upwards cautiously and pull it out IT IS ESSENTIAL TO MOUNT AND DISMOUNT THE WALL MO...

Страница 5: ...e required for measuring the sufficiency of grounding of the electric installation of the building precisely voltages between Neuter Phase and Neuter Ground can be measured for getting a rough idea Th...

Страница 6: ...be connected to the pole of the battery group and the black end to the pole In order to make the connection press the springed latch of the clips insert the corresponding end of the battery cable into...

Страница 7: ...removed and replaced easily 6 Since the installation connections will be made at the back of the cabinet the position of the cabinet should be arranged accordingly The lighting at the back has been pl...

Страница 8: ...onnecting the BPL200 backplanes and BPLSPS FC 5 wire cable is used for connecting BPL200 SPS backplanes In order to connect the backplanes a Primarily attach one end of each BPL200 FC to the BPL200 MA...

Страница 9: ...necessary for 230 VAC are in the drawer type compartment next to the 230 VAC input VENTS OVER THE CABINET FANS MUST NOT BE COVERED BY ANY MEANS DURING OPERATION OF THE SYSTEM CERTAINLY CHECK WHETHER...

Страница 10: ...he fourth racks are of the main rack structure and the connection between these two racks is provided with some additional cards and cables The list of those cards and cables are below 1 CC Extra card...

Страница 11: ...BPL200 FC to the inter rack connector that is at the lower section on the BPL200 backplane of the main rack at the same level with the CPU200 If on the other hand there will not be a redundant CPU200...

Страница 12: ...se slot The cable connections are the same as above Then attach the DS200 CPUKON UTIL200 CPU200 and redundant CPU200 if there is any of the main rack to their corresponding slots as will be described...

Страница 13: ...ame order as they have been connected to the C Master card in the first cabinet See Figure 7 INCORRECT CONNECTION ORDER OF THE PCM CARRIER CABLES WOULD PRECLUDE THE OPERATION OF THE SYSTEM After makin...

Страница 14: ...e cable should be fastened tightly to the rod or to the plate and precautions should be taken against corrosion The cable coming from the grounding plate or grounding system must be connected to the g...

Страница 15: ...der the exchange serially to each other Then connect the battery output through main breaker to the battery input of the main rack which is the lowermost rack Attach the battery output to the connecti...

Страница 16: ...00 Installation Guide DS200 Installation Guide DS200 Installation Guide V003 25 06 2002 B 15 1 230 VAC cable 4 BPL200 FC 7 Main grounding cable 2 BPLSPS FC 5 Grounding screw 3 Grounding wire 6 Battery...

Страница 17: ...the system rack I 3 B SPS248 DC DC POWER SUPPLY SPS248 DC DC Power Supply which includes the SPS248CR Power Card and ring transformer has been mounted in a metal casing Attaching the SPS248 is very s...

Страница 18: ...el of the plastic card slot and push it towards the rack Before you set the module completely connect the DS200 CPU FC cable to CPU200 Then push the CPU200 module inside so as it tightly fits on its c...

Страница 19: ...to one cable with RJ45 connectors on both sides I 4 B THE UTIL200 UTILITY MODULE The UTIL200 Utility Module has been set on the related plastic card slot in the rack See The Technical Reference GuideF...

Страница 20: ...ith 16 pairs which is called CBL 16 is for CON2 The male RJ45s at one end of the CBL 16 cable are attached to the corresponding female connectors on CON2 Cable pairs at the other end of the CBL 16 cab...

Страница 21: ...use friction with the cards nearby as well as they cause the LEDs on the front face not to be seen from outside for they would not fit The connectors on the line connection cards have been included on...

Страница 22: ...ider while establishing the configuration of the system 1 An extension card must be installed in the first general purpose slot of the first rack 2 If EX200 1S2 0 or EX200 1R2 0 module or modules are...

Страница 23: ...e expansion card and set it free as connected to the line connection cable Then do whatever would be necessary by pulling the module out Repeat the steps above in reverse order in order to replace the...

Страница 24: ...ine No Line No Line No Line No 1 White A A A A Blue B B B B 1st Line 2 White A A A A Orange B B B B 2nd Line 3 White A A A A Green B B B B 3rd Line 4 White A A A A Brown B B B B 4th Line 5 White A A A...

Страница 25: ...tion to this order for cabling Pin signal assignments of cabling for the connection between DS200 and Iris ISDN telephones are given in the table below Signal with respect to Iris RJ45 pins of the Iri...

Страница 26: ...Color Signal of Pair Extension No Extension No Extension No Extension No 1 White A A A A Blue B B B B 1st Extension 2 White A A A A Orange B B B B 2nd Extension 3 White A A A A Green B B B B 3rd Exte...

Страница 27: ...R1 Blue T1 T1 T1 T1 2 White T2 T2 T2 T2 Orange R2 R2 R2 R2 1st ISDN line 3 White R1 R1 R1 R1 Green T1 T1 T1 T1 4 White T2 T2 T2 T2 Brown R2 R2 R2 R2 2nd ISDN line 5 White R1 R1 R1 R1 Gray T1 T1 T1 T1...

Страница 28: ...B 7th LB Line 8 Red A A A A Green B B B B 8th LB Line The order of A and B wires are not important for the connection of the cable mentioned above to the extension phone I 4 D 2 10 EX200 4E M 0 E M L...

Страница 29: ...list of those settings are given per line in the table below Line Number Positions of the jumpers for extension settings 1st ISDN BRI line K4 K5 pins 1 2 and K6 K7 pins 1 2 2nd ISDN BRI line K8 K9 pin...

Страница 30: ...JP19 JP22 E M channel 2 JP5 JP8 JP31 JP33 JP36 E M channel 3 JP9 JP12 JP24 JP26 JP29 E M channel 4 JP13 JP16 JP38 JP40 JP43 SIGNALING SIDE E M channel 1 JP2 JP3 JP19 JP21 E M channel 2 JP6 JP7 JP33 JP...

Страница 31: ...el 1 JP1 JP4 JP18 JP21 E M channel 2 JP5 JP8 JP32 JP35 E M channel 3 JP9 JP12 JP25 JP28 E M channel 4 JP13 JP16 JP39 JP42 Type 5 TRUNKING SIDE E M channel 1 JP1 JP4 JP19 JP21 E M channel 2 JP5 JP8 JP3...

Страница 32: ...little bit harder so that the connector for backplane connection fits which is at the back of the EVM200L card In this final step push the module by gently pressing the latches upward downward which...

Страница 33: ...n box on the other into one of the KTS ports that are on the DS200 CPUKON card Additionally connect the first extension of the first EX200 0 16 card blue white pair to the red and green ends of the co...

Страница 34: ...module II 2 TWO RACK WALL TYPE SYSTEM 1 Make sure the entire inner rack and inter rack connections have been made properly 2 Check if the mains and battery switches on the entire SPS200 modules are of...

Страница 35: ...ns must be working while the system is in operation II 4 TWO CABINET SYSTEM 1 Make sure the inner rack inter rack and inter cabinet connections have been made properly 2 Check if the primary mains swi...

Страница 36: ...iguration Beginning with the card in the rightmost slot two LEDs that are on the front plastic panel of each card start to light in a row This action begins with the bottom rack After the entire LEDs...

Страница 37: ...48 VDC LED 48 VDC LED 48 VDC LED 48 VDC LED 5 VDC LED 5 VDC LED 5 VDC LED 5 VDC LED 5 VDC LED 5 VDC LED 5 VDC LED 5 VDC LED SPS248 It is on It is on It is on Module Module Module Module VOUT VOUT VOU...

Страница 38: ...ugh the operator telephone and wait for the dial tone b Cut the power to the card by dialing 800950 then the slot number of the card and finally 0 At that point you are supposed to receive either the...

Страница 39: ...ructure of the system At this point it becomes a necessity to have a good command of the numbering plan of the system Therefore it would be wise to run the ADMIN200 program and review the numbering pl...

Отзывы: