


-
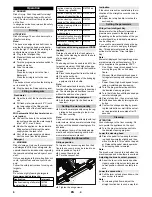
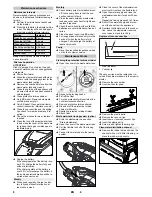
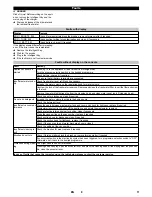
3
1
OFF
Device is switched off
2
Transport mode
Driving to the Place of Use.
3 Eco!efficiency mode
Wet clean the floor (with reduced brush
speed) and vacuum up wastewater
(with reduced suction).
4
Normal mode
Wet clean the floor and vacuum up dirt
water.
5
Intense mode
Wet clean the floor and allow the deter-
gent to react.
6
Vacuum mode
Suck in the dirt fleet.
7
Polishing mode
Polishing the floor without the applica-
tion of liquid.
The disc brush must be installed before the
initial operation (see "Maintenance work").
The brushes are mounted.
Install the batteries (see "Care and Mainte-
nance/Install and connect batteries").
Prior to the initial startup, following a ser-
vice reset or when switching to another bat-
tery type, you must adjust the charging
marker line.
Use the Grey Intelligent Key.
Setting the charging marker line (see
Chapter "Grey Intelligent Key/Setting
the charging marker line“.
We recommend using our batteries as de-
scribed in chapter "Care and Maintenance/
Recommended batteries".
Note:
When using other batteries (e.g. batteries
from other manufacturers), the total dis-
charge protection level for the respective
battery must be reset by the Kärcher after-
sales service.
Note:
The device is equipped with a safety mech-
anism to prevent total discharge, i.e. when
the permissible minimum capacity is
reached, the brush motor and the turbine
are switched off.
Drive the machine directly to the charg-
ing station; avoid any steep gradients in
the process.
DANGER
Danger of injury due to electric shock. Ob-
serve the mains voltage and fuse protec-
tion on the type plate of the device.
Only use the charger in dry rooms with suf-
ficient ventilation!
– Average charging time is approx. 10 -15
hours.
– The built-in charger has electronic con-
trols and is suitable for all recommend-
ed batteries; it automatically switches
off the charging process.
– The built-in battery is shown on the dis-
play during the charging process. If this
is not the case, the charging marker line
must be selected (see "Setting the
charging marker line").
– The appliance must not be used during
the charging process.
몇
DANGER
Risk of explosion!
Prior to
Charging low-maintenance bat-
teries
, the tank must be swivelled upwards
(see chapter "Installing and connecting bat-
teries"). This will prevent the generation of
dangerous gases during the charging pro-
cess under the tank.
While the water tank is folded up, you must
not clean with any water.
When
charging maintenance-free batter-
ies
, the water tank does not need to be
folded up.
Insert the plug of the connecting cable
into the socket. The charging process
will start.
Note
: The selected battery will be dis-
played during charging.
Charge until the display shows a full
charge.
With the initial charge, the control will not
yet be able to detect which battery type has
been installed. Keep charging the batteries
until the display shows a full charge (batter-
ies may still not be completely charged).
The next charging process will have an ac-
curate display and charge power and the
batteries will be fully charged.
Use the appliance until the deep discharge
protection switches off the brush motor and
the turbine after the initial charge of the bat-
tery. This procedure is necessary to adjust
the battery indicator. Only then the correct
battery status is displayed.
몇
WARNING
Danger of causticization!
–
Adding water to the battery in its dis-
charged state can cause the acid to
leak.
–
Use safety glasses while handling bat-
tery acid and follow the safety instruc-
tions to avoid personal injury or damage
to clothes.
–
Should the acid spray on to the skin or
clothes, rinse immediately with lots of
water.
ATTENTION
Risk of damage!
–
Use only distilled or desalinated water
(EN 50272-T3) for filling the battery.
–
Do not add any substances (so-called
performance improving agents), else
warranty claims will not be entertained.
–
Replace batteries with the same battery
type only. Otherwise the charging char-
acterisitc must be readjusted by the af-
tersales service.
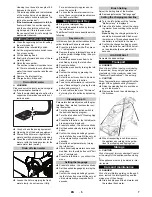
Insert the vacuum bar into the vacuum
bar suspension in such a manner that
the profiled sheet is positioned above
the suspension.
Tighten the wing nuts.
Insert the suction hose.
DANGER
Risk of injury. Pull the Intelligent Key to take
all functions out of operation immediately.
Install the batteries and connect them
(see "Care and Maintenance/Install and
connect batteries").
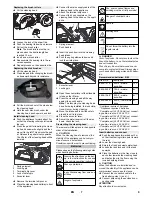
Place long lateral boards of the packag-
ing as a ramp next to the pallet.
Fix the ramp on the pallet with nails.
Place short boards as a support under-
neath the ramp.
Remove the wooden bars in front of the
wheels.
Lift the cleaning head by pressing the
pedal all the way down.
Remove the cardboard with the R
cleaning head.
Plug in the Intelligent Key.
Turn the program selection switch to
transport mode.
Press the driving lever and slowly move
the machine down from the ramp.
Remove the Intelligent Key.
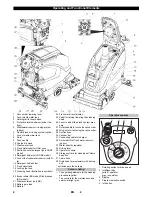
Program selection switch
Before Startup
Installing the Brushes
BD model
BR model
Install batteries
Setting the charging marker line
Using batteries made by other
manufacturers
Charging battery
Charging process
Information on the initial charge
Low maintenance batteries (wet
batteries)
Installing the Vacuum Bar
Unloading
5
EN
Содержание B 60 W Bp
Страница 1: ...B 60 W Bp 001 59645740 07 17...
Страница 2: ...2...


