


-
1
Please read and comply with
these original instructions prior
to the initial operation of your appliance and
store them for later use or subsequent own-
ers.
Before using the appliance for the first time,
read and observe these operating instruc-
tions and the accompanying brochure:
Safety information for brush cleaning units
and spray-extraction units, No.
5.956-251.0.
The appliance may only be operated
when the hood and all lids are closed.
Remove the Intelligent Key (emergency
stop) to take all functions out of opera-
tion immediately.
The appliance must only be operated on
surfaces that do not exceed the max. per-
mitted incline (see "Technical Specifica-
tions").
몇
WARNING
Do not use the appliance on inclines.
Safety devices serve to protect the user
and must not be rendered in operational or
their functions bypassed.
Driving lever
If the drive lever is released, the travel drive
and the brush drive shuts off.
DANGER
Pointer to immediate danger, which leads
to severe injuries or death.
몇
WARNING
Pointer to a possibly dangerous situation,
which can lead to severe injuries or death.
몇
CAUTION
Pointer to a possibly dangerous situation,
which can lead to minor injuries.
ATTENTION
Pointer to a possibly dangerous situation,
which can lead to property damage.
The scrubber vacuum is used for wet
cleaning or polishing of level floors.
– You can adjust the machine to suit the
cleaning task by modifying the settings
for water quantity, contact pressure of
the brushes, detergent quantity and
driving speed.
– The appliance is equipped with a fresh
water and a wastewater reservoir (60 li-
tres each). These allow an effective
cleaning with a long usage life.
– Depending on the selected cleaning
head, the working width is between 550
mm and 650 mm.
– This appliance model is equipped with a
travel drive. The travel speed can be
adjusted with a rotary knob.
– A charger is already integrated in all
models. Batteries can be selected ac-
cording to the configuration (see Chap-
ter "Recommended batteries“)
Note:
The appliance can be equipped with vari-
ous accessories depending on the cleaning
task.
Please request our catalogue or visit us on
the Internet at www.kaercher.com.
Use this appliance only as directed in these
operating instructions.
– The appliance may only be used for the
cleaning of hard surfaces that are not
sensitive to moisture and polishing op-
erations.
– The appliance is not suited for the
cleaning of frozen grounds (e.g. in cold
stores).
– The appliance may only be equipped
with original accessories and spare
parts.
– The appliance is not suited for the use
in potentially explosive environments.
– The machine should not be used to
suck in inflammable gases, undiluted
acids or solvents.
This includes petrol, thinning agents or
hot oil that can form an explosive mix-
ture when it comes in contact with
sucked air. Do not use acetone, undilut-
ed acids and solvents as they are ag-
gressive towards the materials from
which the appliance is made.
– The machine has been approved for
use on surfaces with max. gradients as
listed under "Technical Specifications".
Notes about the ingredients (REACH)
You will find current information about the
ingredients at:
www.kaercher.com/REACH
The warranty terms published by our com-
petent sales company are applicable in
each country. We will repair potential fail-
ures of your accessory within the warranty
period free of charge, provided that such
failure is caused by faulty material or de-
fects in fabrication. In the event of a warran-
ty claim please contact your dealer or the
nearest authorized Customer Service cent-
er. Please submit the proof of purchase.
Contents
Safety instructions . . . . . . . . . . EN
1
Function. . . . . . . . . . . . . . . . . . EN
1
Proper use . . . . . . . . . . . . . . . . EN
1
Environmental protection. . . . . EN
1
Warranty . . . . . . . . . . . . . . . . . EN
1
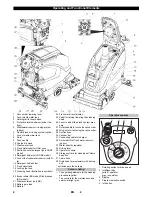
Operating and Functional Ele-
ments. . . . . . . . . . . . . . . . . . . . EN
2
Before Startup . . . . . . . . . . . . . EN
3
Operation. . . . . . . . . . . . . . . . . EN
4
Shutting Down the Appliance . EN
5
Grey Intelligent Key . . . . . . . . . EN
5
Transport . . . . . . . . . . . . . . . . . EN
5
Storage . . . . . . . . . . . . . . . . . . EN
5
Care and maintenance . . . . . . EN
5
Frost protection . . . . . . . . . . . . EN
8
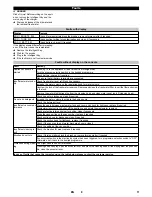
Faults. . . . . . . . . . . . . . . . . . . . EN
9
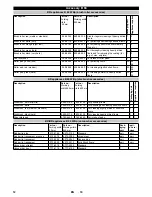
Accessory B 60 . . . . . . . . . . . . EN
10
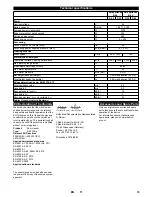
Technical specifications. . . . . . EN
11
EU Declaration of Conformity . EN
11
Accessories and Spare Parts . EN
11
Safety instructions
Safety Devices
Hazard levels
Function
Proper use
Environmental protection
The packaging materials are re-
cyclable. Please do not throw
packaging in the domestic waste
but pass it on for recycling.
Old units contain valuable recy-
clable materials. Batteries, oil
and similar substances may not
be released into the environment.
Therefore please dispose of old
units through suitable collection
systems.
Warranty
3
EN
Содержание B 60 W Bp
Страница 1: ...B 60 W Bp 001 59645740 07 17...
Страница 2: ...2...


