5
§ÿ≥ “¡“√∂‡æ≈‘¥‡æ≈‘π°—∫‚≈°¢Õß “√–∫∫‡ ’¬ß ¡∫Ÿ√≥Ï·∫∫” „π√∂¬πµÏ‰¥È ¥È«¬°“√µËÕ√–∫∫≈”‚æß “¡∑‘»∑“ß
(æ‘ —¬ Ÿß/æ‘ —¬°≈“ß/´—∫«øŸ‡Õ√)
¢ÈÕ§«√∑√“∫∑’Ë ”§—≠:
À“°µ‘¥µ—Èß√–∫∫≈”‚æß “¡∑‘»∑“ß„π√∂¬πµÏ ¢Õ„ÀÈ¥Ÿ®ÿ¥µËÕ‰ªπ’È„ÀÈ¥’
•
°“√µËÕ “¬√–∫∫≈”‚æßµ“¡√Ÿª
•
°ËÕπ„™Èß“π√–∫∫ ¢Õ„Àȇª‘¥√–∫∫¢È“¡‡§√◊բ˓¬ ·≈–µ—Èߧ≈◊Ë𧫓¡∂’˵—¥ ”À√—∫
HPF/LPF
°ËÕπ (‚¥¬‡©æ“– ”À√—∫
HPF
)
‰¡Ë‡™Ëππ—Èπ≈”‚æßÕ“®‡ ’¬‰¥È
•
¥Ÿ√“¬≈–‡Õ’¬¥„π°“√µ—Èߧ˓‰¥È„π§ŸË¡◊Õ°“√„™Èß“πÀπÈ“
18 – 19
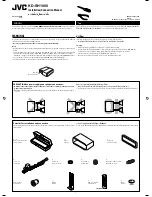
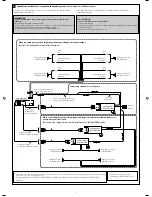
You can enjoy a world of “pure audio” in your car by connecting 3-way network speaker system
(high-range/mid-range/subwoofer).
IMPORTANT:
If you have installed the 3-way network speaker system in the car, make sure of the
following.
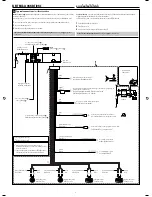
• Connect the speaker system as illustrated below.
• Before using the system, activate crossover network and preset the appropriate cutoff frequencies for
HPF/LPF (especially for HPF); otherwise, it may damage the speakers.
• For details about the setting, see pages 18 and 19 of the INSTRUCTIONS.
C
Speaker connections for 3-way network speaker system /
°“√µËÕ≈”‚æß ”À√—∫√–∫∫≈”‚æß “¡∑‘»∑“ß
Right high-range speaker
≈”‚æßæ‘ í¬ Ÿß¥È“π¢«“
Remote lead (Blue with white stripe)
“¬µ–°—Ë«•–¬–‰°• ( ’πÈ”‡ß‘π≈“¬¢“«)
Y-connector (not supplied for this unit)
¢ÈÕµËÕ√Ÿªµ—«
Y
(‰¡Ë‰¥È„ÀÈ¡“°—∫™ÿ¥ª√–°Õ∫π’È)
Left high-range speaker
≈”‚æßæ‘ í¬ Ÿß¥È“π´È“¬
Connecting subwoofer /
°“√µËÕ™—∫«Ÿ‡øÕ√
Remote lead
“¬µ–°—Ë«•–¬–‰°•
White with black stripe
’¢“«·∂∫¥”
White
’¢“«
Gray with black stripe
’‡∑“·∂∫¥”
Gray
’‡∑“
Green with black stripe
’‡¢’¬«·∂∫¥”
Green
’‡¢’¬«
Purple with black stripe
’¡Ë«ß·∂∫¥”
Purple
’¡Ë«ß
Left mid-range speaker
≈”‚æßæ‘ í¬°≈“ߥȓπ´ô“¬
Right mid-range speaker
≈”‚æßæ‘ í¬°≈“ß¥È“π¢«“
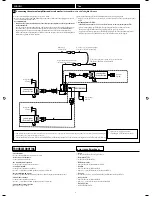
When connecting the speakers (high-range/mid-range) through the speaker output
‡¡◊ËÕ®–µËÕ≈”‚æß (æ‘ —¬ Ÿß/æ‘ —¬°≈“ß)ºË“π¢—È« Ëß —≠≠“≥ÕÕ°≈”‚æß
When connecting the speakers (high-range/mid-range) through the external amplifiers—to
obtain more powerful sound
‡¡◊ËÕ®–µÈÕßµËÕ≈”‚æß (æ‘ —¬ Ÿß/æ‘ —¬°≈“ß)ºË“π‡§√◊ËÕߢ¬“¬‡ ’¬ß¿“¬πÕ° ó‡æ◊ËÕ„Àȇ ’¬ß∑’ˉ¥È¡’æ≈—ß¡“°¢÷Èπ
Subwoofer
´—∫«øŸ‡Õ√
To subwoofer out
™ËÕ߇ ’¬∫µËÕ¢Õß —
≠≠“≥ÕÕ°®“°´—∫«Ÿø‡øÕ√Ï
To LINE OUT (REAR)
™ËÕ߇ ¬∫µËÕ¢Õß
LINE OUT
(
REAR
)
To LINE OUT (FRONT)
™ËÕ߇ ¬∫µËÕ¢Õß
LINE OUT
(
FRONT
)
*
3
Firmly attach the ground wire to the metallic body or to the chassis of the car—to the place uncoated with paint (if coated with paint, remove the paint before attaching the
wire). Failure to do so may cause damage to the unit.
*
3
µËÕ≈«¥ “¬¥‘π„ÀÈ·πËπ‡¢È“°—∫µ—«∂—߇À≈Á° À√◊Õµ—«∂—ß√∂
µ√ß Ë«π∑’ˉ¡Ë¡’ ’‡§≈◊Õ∫ (À“°¡’ ’‡§≈◊Õ∫Õ¬ŸË „ÀÈ¢Ÿ¥ ’ÕÕ°°ËÕπ °ËÕπµËÕ≈«¥ “¬¥‘π) À“°‰¡ËªØ‘∫—µ‘µ“¡§”·π–π”π’È ‡§√◊ËÕßÕ“®™”√ÿ¥
À√◊Õ‡ ’¬À“¬‰¥È
*
4
Signal cord (not supplied for this unit)
*
4
“¬‡§‡∫‘≈ —≠≠“≥ (‰¡Ë‰¥È„ÀÈ¡“°—∫™ÿ¥ª√–°Õ∫π’È)
JVC Amplifier
‡§√◊ËÕߢ¬“¬‡
’¬ß
JVC
JVC Amplifier
‡§√◊ËÕߢ¬“¬‡
’¬ß
JVC
JVC Amplifier
‡§√◊ËÕߢ¬“¬‡
’¬ß
JVC
Right high-range speaker
≈”‚æßæ‘ í¬ Ÿß¥È“π¢«“
Left high-range speaker
≈”‚æßæ‘ í¬ Ÿß¥È“π´È“¬
Left mid-range speaker
≈”‚æßæ‘ í¬°≈“ߥȓπ´ô“¬
Right mid-range speaker
≈”‚æßæ‘ í¬°≈“ß¥È“π¢«“
E/T Instal4-6_SH100#16DDB2.indd 5
E/T Instal4-6_SH100#16DDB2.indd 5
2/14/06 4:44:32 PM
2/14/06 4:44:32 PM


