background image

ENGLISH

14

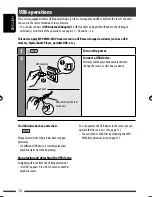
You can perform the following operations from 
the <SET UP> menu.

•  Pairing and delete pairing
•  Connect and disconnect a registered Bluetooth device 

(Phone/Audio)


 <

Bluetooth

 <

Device

=

 Perform 

the following operations.

Pairing and PIN code

When you connect a Bluetooth device to the unit 
for the first time, make pairing between the unit 
and the device. Pairing allows Bluetooth devices to 
communicate with each other.
To make pairing, you may need to enter the PIN 
(Personal Identification Number) code of your Bluetooth 
device you want to connect.
•  Once the connection is established, it is registered in 

the unit even if you reset the unit. Up to five devices 
can be registered in total.

•  Only one device for Bluetooth phone and one for 

Bluetooth audio can be connected at a time.

Connecting a Bluetooth device for the first time 

Preparation:

•  Connect the supplied

 USB


Bluetooth Adapter

 (KS-UBT1) to one of the USB input terminals of the unit.

•  Operate the device to turn on its Bluetooth function.

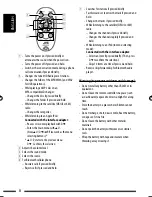
1

Turn on the power.

2

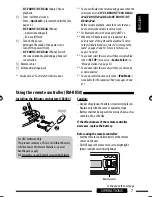
Connect the USB Bluetooth Adapter, 
KS-UBT1.

•  Only one USB Bluetooth Adapter can be 

detected at a time.

KS-UBT1

USB cable from the rear 
of the unit

or

[Turn]


=


[Press]

EN10-17_KD-R900[J]f.indd   14

EN10-17_KD-R900[J]f.indd   14

2/19/09   9:17:24 AM

2/19/09   9:17:24 AM

Содержание KD-R900

Страница 1: ... affichages référez vous à la page 4 For installation and connections refer to the separate manual Para la instalación y las conexiones refiérase al manual separado Pour l installation et les raccordements se référer au manuel séparé For customer Use Enter below the Model No and Serial No which are located on the top or bottom of the cabinet Retain this information for future KD R900 INSTRUCTIONS ...

Страница 2: ... user is encouraged to try to correct the interference by one or more of the following measures Reorient or relocate the receiving antenna Increase the separation between the equipment and receiver Connect the equipment into an outlet on a circuit different from that to which the receiver is connected Consult the dealer or an experienced radio TV technician for help Caution Changes or modification...

Страница 3: ...t be different with the steering wheel remote control function Caution If the temperature inside the car is below 0 C 32 F the movement of animation and text scroll will be halted on the display to prevent the display from being blurred appears on the display When the temperature increases and the operating temperature is resumed these functions will start working again Caution on volume setting D...

Страница 4: ...2H hour then 24Hours or 12Hours To return to the previous menu press BACK To exit from the menu press DISP or MENU Changing the display information and pattern When the power is turned off Check the current clock time Ex When tuner is selected as the source Press and hold until the main menu is called up Repeat this procedure Audio level meter display see Level Meter on page 31 Source operation di...

Страница 5: ...oth cellular phone 16 Using the Bluetooth audio player 18 EXTERNAL DEVICES Listening to the HD Radio Broadcast 19 Listening to the CD changer 20 Listening to the satellite radio 21 Listening to the iPod iPhone 24 When connected with the USB input terminal 24 When connected with the interface adapter 25 Listening to the other external components 26 SETTINGS Selecting a preset sound mode 27 Menu ope...

Страница 6: ...l the volume 2 or select items Turn Confirm the selection Press FM HD RADIO Enter SSM preset mode Hold CD USB FRONT USB REAR iPod FRONT iPod REAR Pause resume playback 2 Press BT FRONT BT REAR Audio Resume playback 2 Press CD USB FRONT USB REAR iPod FRONT iPod REAR BT FRONT Audio 3 BT REAR Audio 3 CD CH Enter playback mode Hold 5 Display window 6 USB Universal Serial Bus input terminal 7 Select th...

Страница 7: ...in Cell Lithium Battery which contains Perchlorate Material special handling may apply See www dtsc ca gov hazardouswaste perchlorate Caution Danger of explosion if battery is incorrectly replaced Replace only with the same or equivalent type Battery shall not be exposed to excessive heat such as sunshine fire or the like If the effectiveness of the remote controller decreases replace the battery ...

Страница 8: ...riefly Rejects calls if pressed and held 7 Searches for stations if pressed briefly Fast forwards or reverses the track if pressed and held Changes the tracks if pressed briefly While listening to the satellite SIRIUS or XM radio Changes the channels if pressed briefly Changes the channels rapidly if pressed and held While listening to an iPod in menu selecting mode Connected with the interface ad...

Страница 9: ...or better reception See also page 33 Tuner Stereo Mono Mono Reception improves but stereo effect will be lost The lights up on the display To restore the stereo effect repeat the same procedure to select Stereo Storing stations in memory Automatic presetting FM SSM Strong station Sequential Memory You can preset up to 18 stations for FM 1 While listening to a station enter SSM screen 2 Select the ...

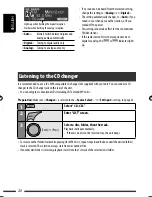
Страница 10: ...reset number 4 3 Selecting preset station or Prohibiting disc ejection To cancel the prohibition repeat the same procedure Disc operations 1 Turn on the power 2 Insert a disc All tracks will be played repeatedly until you change the source or eject the disc Stop playing and ejecting the disc No Disc appears Press SRC to listen to another playback source Turn Press ...

Страница 11: ... folders All Randomly plays all tracks To cancel repeat play or random play select Off To return to the previous menu press BACK Repeat Random Pressing or holding the following buttons allows you to Press Pause resume playback MP3 WMA Select folder Press Select track Hold Reverse fast forward track Selecting a track folder For MP3 WMA discs select the desired folder then the desired track by repea...

Страница 12: ...1 Turn on the power 2 Connect a USB device All tracks will be played repeatedly until you change the source or disconnect a device USB memory If a USB device has been attached Playback starts from where it has been stopped previously If a different USB device is currently attached playback starts from the beginning Stop playing and detaching the USB device Straightly pull it out from the USB input...

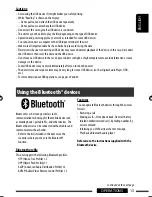
Страница 13: ...not work immediately after you turn on the power The detect time and response time may be very long for some USB devices such as Digital Audio Player HDD etc For more details about USB operations see pages 39 and 40 Using the Bluetooth devices Bluetooth is a short range wireless radio communication technology for the mobile device such as mobile phones portable PCs and other devices The Bluetooth ...

Страница 14: ...tion Number code of your Bluetooth device you want to connect Once the connection is established it is registered in the unit even if you reset the unit Up to five devices can be registered in total Only one device for Bluetooth phone and one for Bluetooth audio can be connected at a time Connecting a Bluetooth device for the first time Preparation Connect the supplied USB Bluetooth Adapter KS UBT...

Страница 15: ...it Pair appears then Pairing OK or Connected Device Name appears on the display when the connection is established Now you can use the device through the unit appears when Bluetooth connection is established Continuedonthenextpage The device remains registered even after you disconnect the device Use Connect Phone or Connect Audio or activate Auto Connect to connect the same device from next time ...

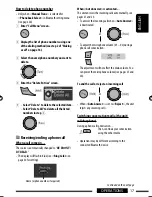
Страница 16: ...Connecting a registered device on page 15 How to enter phone number 1 Select a number 2 Move the entry position 3 Repeat steps 1 and 2 until you finish entering the phone number 4 Confirm the entry 2 Select a device you want to connect Connecting appears then Connected Device Name appears on the display when the device is connected Disconnecting a registered device Select Disconnect Phone or Disco...

Страница 17: ...rsation using the other media Operations may be different according to the connected Bluetooth device How to delete phone number Only when Manual Trans is selected for Phonebook Select in Bluetooth setting menu see page 36 1 Enter Call Menu screen 2 Display the list of phone numbers using one of the dialing method see step 2 of Making a call on page 16 3 Select the name phone number you want to de...

Страница 18: ...s Resume playback Press Pause playback Select group folder Press Reverse skip forward skip Hold Reverse search forward search Operationmaybedifferentaccordingtotheconnected device Selecting the playback modes You can use only one of the following playback modes at a time For Bluetooth devices that support AVRCP 1 3 1 Enter PLAYBACK MENU screen 2 3 Repeat Track Repeats current track All Repeats all...

Страница 19: ...deliver high quality digital sound AM digital will have FM like quality in stereo and FM digital will have CD like quality with static free and clear reception Furthermore stations can offer text and data such as artist names and song titles When the HD Radio tuner box is connected it can also receive conventional analog broadcasts Many HD Radio stations also offer more than one channel of program...

Страница 20: ... and 3 above until the desired folder track is selected The selection always start from disc number first If another disc folder is selected playback starts from the 1st track of the selected disc folder Auto Initial Switch between digital and analog audio automatically Digital Tuning to digital audio only Analog Tuning to analog audio only Lights up when holding the digital reception Flashes when...

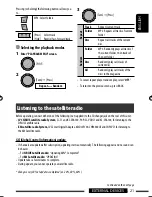
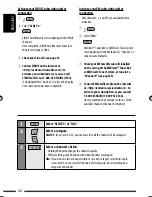
Страница 21: ...previous menu press BACK Repeat Random Listening to the satellite radio Before operating connect either one of the following not supplied to the CD changer jack on the rear of this unit JVC SIRIUS satellite radio System SC C1 and KS SRA100 PnP SC VDOC1 and KS SRA100 for listening to the SIRIUS Satellite radio XM satellite radio System JVC Smart Digital Adapter XMDJVC100 CNP2000UC and CNPJVC1 for l...

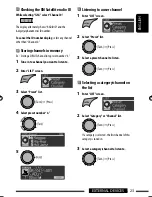
Страница 22: ...s ID see page 33 4 Contact SIRIUS on the internet at http activate siriusradio com to activate your subscription or you can call SIRIUS toll free at 1 888 539 SIRIUS 7474 Sub Updated Press Any Key scrolls on the display once subscription has been completed Activate your XM subscription after connection Only Channel 0 1 and 247 are available before activation 1 2 Select XM XMDirect Tuner Box or XMD...

Страница 23: ... Select a category channel to listen to Checking the XM Satellite radio ID While selecting XM select Channel 0 The display alternately shows RADIO ID and the 8 digit alphanumeric ID number To cancel the ID number display select any channel other than Channel 0 Storing channels in memory Ex Storing a SIRIUS channel into preset number 4 1 Tune in to a channel you want to listen to 2 Enter LIST scree...

Страница 24: ...d iPhone devices are connected to both front and rear USB input terminals the unit only detects and charges the first connected device Disconnecting the iPod iPhone will stop playback Press SRC to listen to another playback source For details refer also to the manual supplied with your iPod iPhone Caution Avoid using the iPod iPhone if it might hinder your safety while driving Make sure all import...

Страница 25: ...ble for some iPod Functionsonlyifyouselect All for Albums inthe mainmenu To return to the previous menu press BACK When connected with the interfaceadapter Preparation Make sure Changer is selected in the Source Select Ext Input setting see page 33 1 Select iPod Playback starts automatically 2 Select a song Selecting a track from the menu 1 Enter the main menu This mode will be canceled if no oper...

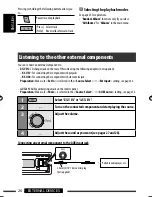
Страница 26: ...ol panel Preparation Make sure Show is selected in the Source Select AUX Source setting see page 33 1 Select EXT IN or AUX IN 2 Turn on the connected component and start playing the source 3 Adjust the volume 4 Adjust the sound as you want see pages 27 and 28 Connecting an external component to the AUX input jack 3 5 mm 3 16 stereo mini plug not supplied Portable audio player etc Pressing or holdi...

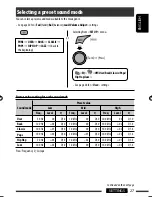
Страница 27: ...ader Bal balance Loud Volume Adjust settings or Preset value setting for each sound mode Sound mode Preset value Low Mid High Freq Level Q Freq Level Q Freq Level Q User 50 Hz 00 Q1 0 1 0 kHz 00 Q1 0 10 0 kHz 00 Q1 0 Rock 100 Hz 03 Q1 0 1 0 kHz 00 Q1 0 10 0 kHz 02 Q1 4 Classic 100 Hz 01 Q1 0 1 0 kHz 00 Q1 0 10 0 kHz 03 Q1 4 Pops 100 Hz 02 Q1 0 1 0 kHz 01 Q1 0 10 0 kHz 02 Q1 4 Hip Hop 50 Hz 04 Q1 0...

Страница 28: ...the frequency 2 Press 5 to adjust the level 3 Turn the control dial to djust the Q slope Sound elements Range selectable items Low Mid High Frequency 50 Hz 100 Hz 200 Hz 0 5 kHz 1 0 kHz 2 0 kHz 5 0 kHz 10 0 kHz 15 0 kHz Level 6 to 6 6 to 6 6 to 6 Q Q0 7 Q1 0 Q1 4 Q2 0 Q0 7 Q1 0 Q1 4 Q2 0 Q0 7 Q1 0 Q1 4 Q2 0 5 Repeat steps 3 and 4 to adjust other frequency ranges 6 Store the adjustment made Low Ô M...

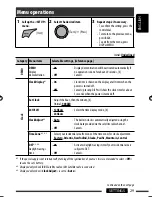
Страница 29: ... 5 seconds when the power is turned off Set Clock Adjust the hour then the minute 4 Initial 1 00AM 24H 12H 12Hours 24Hours Select the time display mode 4 Clock Adjust 2 Auto Off The built in clock is automatically adjusted using the clock data provided via the satellite radio channel Cancels Time Zone 2 3 Select your residential area from one of the time zones for clock adjustment Eastern Atlantic...

Страница 30: ... text message the display only illuminate in blue Cancels Audio Fad Bal 5 6 Fader Balance R6 F6 L6 R6 Fad fader Press 5 to adjust the front and rear speaker output balance Initial 0 Bal balance Press 4 to adjust the left and right speaker output balance Initial 0 Loud Loudness Loud1 Loud2 Loud3 Off Boost low and high frequencies to produce a well balanced sound at a low volume level Cancels Volume...

Страница 31: ...ignals are sent to the front rear speakers Beep Key touch tone On Off Activates the key touch tone Deactivates the key touch tone Amplifier Gain 7 High Power Low Power Off Vol 00 Vol 50 Vol 00 Vol 30 Select if the maximum power of each speaker is less than 50 W to prevent damaging the speaker Deactivates the built in amplifier Display Dimmer On Off Auto Time Set Dims the display and button illumin...

Страница 32: ...s clear and legible Initial Level 05 Bluetooth Device See pages 14 16 for settings Settings See pages 35 37 for settings Tuner Area Change US EU SA When using in North Central South America AM FM intervals are set to 10 kHz 200 kHz When using in any other areas AM FM intervals are set to 9 kHz 50 kHz 100 kHz during auto search When using in South American countries where FM interval is 100 kHz AM ...

Страница 33: ...lection 6 Disable BT FRONT BT REAR in source selection USB 20 Drive Change Select to change the drive when a multiple drives device is connected to the USB input terminal FRONT REAR iPod 21 iPod Switch iPod iPhone control Headunit Mode iPod Mode Controls iPod playback through the unit Controls iPod playback through the iPod iPhone Audiobooks Speed control of Audiobooks Normal Faster Slower You can...

Страница 34: ...olor Color Select User 2 Enter User setting mode 3 Select Day Color or Night Color Ex When Day Color is selected 4 Select a primary color then adjust the level Repeat this procedure until you have adjust all the three primary colors If 00 is selected for all the primary colors nothing appear on the display 5 Confirm the settings 6 Exit from the setting Select User to show your own colors for the b...

Страница 35: ...T1 to one of the USB input terminals of the unit 1 Bluetooth Settings 2 Select a setting item Quick Call Ô Auto Connect Ô Auto Answer Ô Message Notice Ô MIC Setting Ô Ringing Tone Ô Phonebook Trans Ô Phonebook Select Ô Initialize Ô Information Ô back to the beginning IftheconnectedBluetoothphonedoesnotsupport TextMessagenotification viaBluetooth theunit willnotreceiveanynotificationuponthearrivalo...

Страница 36: ...message by ringing and displaying Received Message The display illuminates in blue see Ring Color on page 30 Off The unit does not inform you of the arrival of a message MIC Setting Only for the device being connected for BT FRONT BT REAR Adjust the volume of the microphone connected to the unit Level 01 02 03 Ringing Tone You can preset the ringing source when a call Text Message comes in In Unit...

Страница 37: ...o move to the next or previous character position 3 Repeat steps 1 and 2 until you finish entering the title 4 Store the title To erase the entire title In step 2 on the left column Available characters Upper case Lower case Numbers and symbols Title assignment Information JVC Device Name Shows the unit name JVC Address Shows address of USB Bluetooth Adapter JVC Software Ver Shows the software ver...

Страница 38: ... the lens inside the unit The pickup lens inside the unit is dirty The files on the CD R CD RW are written using the Packet Write method Basic operations Turning on the power By pressing SRC on the unit you can also turn on the power If the source is ready playback also starts Turning off the power If you turn off the power while listening to a track playback will start from where it had been stop...

Страница 39: ... recorded in VBR variable bit rate Files recorded in VBR have a discrepancy in the elapsed time display and do not show the actual elapsed time In particular this difference becomes noticeable after performing the search function This unit cannot play back the following files MP3 files encoded in MP3i and MP3 PRO format MP3 files encoded in an inappropriate format MP3 files encoded with Layer 1 2 ...

Страница 40: ...ed some of the USB device connected through a USB card reader This unit may not play back files in a USB device properly when using a USB extension cord This unit cannot assure proper functions or supply power to all types of USB devices Bluetooth operations General While driving do not perform complicated operation such as dialing the numbers using phone book etc When you perform these operations...

Страница 41: ... more about SIRIUS Satellite radio or to sign up visit http www sirius com For the latest channel listings and programming information or to sign up for XM Satellite radio visit http www xmradio com iPod iPhone operations You can control the following types of iPods iPhone A Connected with the USB cable iPod with video 5th Generation 1 iPod classic 1 2 iPod nano iPod nano 2nd Generation iPod nano ...

Страница 42: ... trademarks or trademarks of Microsoft Corporation in the United States and or other countries The Bluetooth word mark and logos are owned by the Bluetooth SIG Inc and any use of such marks by Victor Company of Japan Limited JVC is under license Other trademarks and trade names are those of their respective owners HD Radio and the HD Radio Ready logo are proprietary trademarks of iBiquity Digital ...

Страница 43: ...k Tracks on the CD R CD RW cannot be skipped Insert a finalized CD R CD RW Finalize the CD R CD RW with the component which you used for recording Disc can neither be played back nor ejected Unlock the disc see page 10 Eject the disc forcibly see page 3 Disc sound is sometimes interrupted Stop playback while driving on rough roads Change the disc Check the cords and connections Disc cannot be reco...

Страница 44: ...not displayed e g album name This unit can only display letters capital A Z small a z numbers and a limited number of symbols see page 37 USB device Noise is generated The track played back is not an MP3 WMA WAV track Skip to another file Do not add the extension code mp3 wma or wav to non MP3 WMA WAV tracks Reading keeps flashing on the display Readout time varies depending on the USB device Do n...

Страница 45: ...pears on the display search from the Bluetooth device again The unit does not make pairing with the Bluetooth device Enter the same PIN code for both the unit and target device Echo or noise occurs Adjust the microphone unit s position Phone sound quality is poor Reduce the distance between the unit and the Bluetooth cellular phone Move the car to a place where you can get a better signal receptio...

Страница 46: ... changer correctly and press the reset button of the CD changer Reset 01 Reset 07 appears on the display Press the reset button of the CD changer The CD changer does not work at all Reset the unit see page 3 Satellite radio CALL 1 888 539 SIRIUS TO SUBSCRIBE scrolls on the display while listening to the SIRIUS Satellite radio Starts subscribing to SIRIUS Satellite radio see page 22 No sound can be...

Страница 47: ...radio The unit is loading the channel information and audio Text information are temporarily unavailable Reset 08 appears on the display Check the connection between the satellite radio and this unit Satellite radio does not work at all Reconnect this unit and the satellite radio correctly and reset this unit iPod iPhone The iPod iPhone does not turn on or does not work Check the connecting cable ...

Страница 48: ...cable and its connection Charge the battery No sound can be heard when connecting an iPod nano Disconnect the headphones from the iPod nano Update the firmware version of the iPod nano Reset 01 Reset 07 appears on the display Disconnect the adapter from both this unit and iPod Then connect it again Reset 08 appears on the display Check the connection between the adapter and this unit JVC bears no ...

Страница 49: ...isc by the edges Do not touch its recording surface When storing a disc in its case gently insert the disc around the center holder with the printed surface facing up Make sure to store discs in cases after use Center holder To keep discs clean A dirty disc may not play correctly If a disc does become dirty wipe it with a soft cloth in a straight line from center to edge Do not use any solvents fo...

Страница 50: ...Ω load full scale Output Impedance 1 kΩ Other Terminal USB input terminal USB cable AUX auxiliary input jack CD changer jack Steering wheel remote input TUNER SECTION Frequency Range FM with channel interval set to 100 kHz or 200 kHz 87 5 MHz to 107 9 MHz with channel interval set to 50 kHz 87 5 MHz to 108 0 MHz AM with channel interval set to 10 kHz 530 kHz to 1 710 kHz with channel interval set ...

Страница 51: ...Mass storage class Compatible File System FAT 32 16 12 Playable Audio Format MP3 WMA WAV Max Current DC 5 V 500 mA BLUETOOTH Version Bluetooth 2 0 certified Power Class Class 2 Radio possible distance 10 m Service Area 10 m Profile HFP 1 5 OPP 1 1 A2DP 1 2 AVRCP 1 3 GENERAL Power Requirement Operating Voltage DC 14 4 V 11 V to 16 V allowance Grounding System Negative ground Allowable Operating Tem...

Страница 52: ...Instructions CD RECEIVER Having TROUBLE with operation Please reset your unit Refer to page of How to reset your unit Still having trouble USA ONLY Call 1 800 252 5722 http www jvc com We can help you ...

Страница 53: ...equently consult your JVC car audio dealer It is recommended to connect speakers with a maximum power of more than 50 W both at the rear and at the front with an impedance of 4 Ω to 8 Ω If the maximum power is less than 50 W change Amplifier Gain setting to prevent the speakers from being damaged see page 31 of the INSTRUCTIONS To prevent short circuits cover the terminals of the UNUSED leads with...

Страница 54: ...C de equipos de audio para automóviles o a una compañía que suministra tales herramientas Si usted no está seguro de cómo instalar correctamente la unidad hágala instalar por un técnico cualificado INSTALLATION MONTAGE DANS LE TABLEAU DE BORD L illustration suivante est un exemple d installation typique Si vous avez des questions ou avez besoin d information sur des kits d installation consulter v...

Страница 55: ... atentamente el conexionado del vehículo Una conexión incorrecta podría producir daños graves en la unidad Los cordones del cable de alimentación y los del conector procedentes de la carrocería del automóvil podrían ser de diferentes en color 1 Conecte los conductores de color del cable de alimentación en el orden especificado en la ilustración de abajo 2 Conecte el cable de antena 3 Por último co...

Страница 56: ...rs Altavoces delanteros Enceintes avant JVC Amplifier Amplificador de JVC JVC Amplificateur Rear speakers Altavoces posteriores Enceintes arrière Y connector not supplied for this unit Conector en Y no suministrado con esta unidad Connecteur Y non fourni avec cet appareil JVC Amplifier Amplificador de JVC JVC Amplificateur Subwoofer Subwoofer Caisson de grave Front speakers Altavoces delanteros En...

Страница 57: ...inal of the unit Apple iPod iPhone Apple iPod iPhone Apple iPod iPhone USB 2 0 cable Cable USB 2 0 Câble USB 2 0 D Connecting the USB devices Conexión de dispositivos USB Connexion des périphériques USB Connecting the microphone unit Conexión de la unidad de micrófono Connexion du microphone Adjust the microphone angle Ajuste el ángulo del micrófono Ajustez l angle du microphone Microphone Micrófo...

Страница 58: ...t the unit is turned off You can connect the following JVC components to the CD changer jack JVC component Model name CD changer CD CH CH X1500 etc HD RadioTM tuner box KT HD300 You can also connect the following components through the various JVC adapters or system Connection cords may need to be purchased separately Component Adapter System Model name iPod Interface adapter for iPod KS PD100 XMD...

Страница 59: ...stallation and connections refer to the separate manual Pour l installation et les raccordements se référer au manuel séparé INSTRUCTIONS For canceling the display demonstration see page 4 Pour annuler la démonstration des affichages référez vous à la page 4 ...

Страница 60: ... this will block outside sounds making driving dangerous Stop the car before performing any complicated operations Temperature inside the car If you have parked the car for a long time in hot or cold weather wait until the temperature in the car becomes normal before operating the unit Information for Users on Disposal of Old Equipment and Batteries European Union only These symbols indicate that ...

Страница 61: ... menu This unit is equipped with the steering wheel remote control function See the Installation Connection Manual separate volume for connection Some of the operations might be different with the steering wheel remote control function Caution If the temperature inside the car is below 0 C the movement of animation and text scroll will be halted on the display to prevent the display from being blu...

Страница 62: ... control dial once to proceed to adjust the minute Select 24H 12H hour then 24Hours or 12Hours To return to the previous menu press BACK To exit from the menu press DISP or MENU Changing the display information and pattern When the power is turned off Check the current clock time Ex When tuner is selected as the source Press and hold until the main menu is called up Repeat this procedure Audio lev...

Страница 63: ...e first time 15 Using the Bluetooth cellular phone 17 Using the Bluetooth audio player 19 EXTERNAL DEVICES Listening to the CD changer 20 Listening to the iPod iPhone 21 When connected with the USB input terminal 21 When connected with the interface adapter 22 Listening to the DAB tuner 23 Listening to the other external components 25 SETTINGS Selecting a preset sound mode 26 Menu operations 27 Cr...

Страница 64: ...ntrol the volume 2 or select items Turn Confirm the selection Press FM Enter SSM preset mode Hold CD USB FRONT USB REAR iPod FRONT iPod REAR Pause resume playback 2 Press BT FRONT BT REAR Audio Resume playback 2 Press CD USB FRONT USB REAR iPod FRONT iPod REAR BT FRONT Audio 3 BT REAR Audio 3 CD CH Enter playback mode Hold 5 Display window 6 USB Universal Serial Bus input terminal 7 Activate deact...

Страница 65: ...ethatyou havenotraisethevolumeleveltoomuch 3 ForBluetoothdevicesthatsupportAVRCP1 3 4 Youcannotselectthesesourcesiftheyarenotready ornotconnected 5 Youcannotselectthesesourcesiftheyweredisabled inthe SET UP menu see Source Select in Menuoperations onpage31 6 Youcanusethisfunctiononlywhen iPod Mode isavailablefortheconnectediPod seepages21 and38 Using the remote controller RM RK50 Installing the li...

Страница 66: ...essed briefly Rejects calls if pressed and held 7 Searches for stations DAB services if pressed briefly Searches for DAB ensembles if pressed and held Fast forwards or reverses the track if pressed and held Changes the tracks if pressed briefly While listening to an iPod in menu selecting mode Connected with the interface adapter Selects an item if pressed briefly Then press D to confirm the selec...

Страница 67: ...s hard to receive activate monaural mode for better reception See also page 30 Tuner Stereo Mono Mono Reception improves but stereo effect will be lost The lights up on the display To restore the stereo effect repeat the same procedure to select Stereo Turn Press Storing stations in memory Automatic presetting FM SSM Strong station Sequential Memory You can preset up to 18 stations for FM 1 While ...

Страница 68: ...ypes or a PTY code 3 Start searching for your favorite programme If a station is broadcasting a programme of the same PTY code as you have selected that station is tuned in PTY codes News Affairs Info Sport Educate Drama Culture Science Varied Pop M music Rock M music Easy M music Light M music Classics Other M music Weather Finance Children Social Religion Phone In Travel Leisure Jazz Country Nat...

Страница 69: ...Y code see page 30 The PTY indicator goes off When a DAB tuner is connected TA PTY Standby Reception also searches for services See also page 30 The unit will not switch to Traffic Announcement or PTY programme when a call connection is established through BT FRONT BT REAR Tracing the same programme Network Tracking Reception When driving in an area where FM reception is not sufficient enough this...

Страница 70: ...repeat the same procedure Pressing or holding the following buttons allows you to Press Pause resume playback MP3 WMA AAC Select folder Press Select track Hold Reverse fast forward track Selecting a track folder For MP3 WMA AAC discs select the desired folder then the desired track by repeating the control dial procedures To return to the previous menu press BACK Selecting the playback modes You c...

Страница 71: ...on the control panel and USB cable from the rear of the unit You can use these two terminals at the same time You can also connect a USB Bluetooth Adapter KS UBT1 and or an Apple iPod iPhone to the USB input terminal s For details of the operations see pages 14 19 and 21 23 This unit can play MP3 WMA AAC WAV tracks stored in a USB mass storage class device such as a USB memory Digital Audio Player...

Страница 72: ...all important data has been backed up to avoid losing the data Electrostatic shock at connecting a USB device may cause abnormal playback of the device In this case disconnect the USB device then reset this unit and the USB device Do not leave a USB device in the car expose to direct sunlight or high temperature to avoid deformation or cause damages to the device Some USB devices may not work imme...

Страница 73: ...ice for the first time Preparation Connect the supplied USB Bluetooth Adapter KS UBT1 to one of the USB input terminals of the unit Operate the device to turn on its Bluetooth function 1 Turn on the power 2 Connect the USB Bluetooth Adapter KS UBT1 Only one USB Bluetooth Adapter can be detected at a time You can perform the following operations from the SET UP menu Pairing and delete pairing Conne...

Страница 74: ...he unit 1 Move to the next or previous number position 2 Select a number 3 Repeat steps 1 and 2 until you finish entering a PIN code 4 Confirm the entry Wait Pair appears on the display 3 Use the Bluetooth device to search and connect On the device to be connected enter the same PIN code you have just entered for this unit Wait Pair appears then Pairing OK or Connected Device Name appears on the d...

Страница 75: ...Phonebook Select settings 3 Select the name phone number you want to call When the sound is stopped or interrupted during the use of a Bluetooth device turn off then turn on the unit If the sound is not yet restored connect the device again See Connecting a registered device on the left column How to enter phone number 1 Select a number Continuedonthenextpage Connecting a registered device 1 Selec...

Страница 76: ... in The source is automatically changed to BT FRONT BT REAR The display will flash in blue see Ring Color on page 28 for setting When Auto Answer is activated The unit answers the incoming calls automatically see page 33 To answer the incoming call when Auto Answer is deactivated To adjust the microphone volume during a phone call conversation The adjustment will not affect the main volume You can...

Страница 77: ...lect group folder Press Reverse skip forward skip Hold Reverse search forward search Operationmaybedifferentaccordingtotheconnected device Selecting the playback modes You can use only one of the following playback modes at a time For Bluetooth devices that support AVRCP 1 3 1 Enter PLAYBACK MENU screen 2 3 Repeat Track Repeats current track All Repeats all tracks Group Repeats all tracks of curre...

Страница 78: ...e desired folder track is selected The selection always start from disc number first If another disc folder is selected playback starts from the 1st track of the selected disc folder Pressing or holding the following buttons allows you to MP3 Select folders Press Select track Hold Reverse fast forward track Selecting the playback modes 1 Enter PLAYBACK MENU screen 2 3 Repeat Track Repeats current ...

Страница 79: ... iPhone devices are connected to both front and rear USB input terminals the unit only detects and charges the first connected device Disconnecting the iPod iPhone will stop playback Press SRC to listen to another playback source For details refer also to the manual supplied with your iPod iPhone Caution Avoid using the iPod iPhone if it might hinder your safety while driving Make sure all importa...

Страница 80: ...nctionsonlyifyouselect All for Albums inthe mainmenu To return to the previous menu press BACK When connected with the interfaceadapter Preparation Make sure Changer is selected in the Source Select Ext Input setting see page 31 1 Select iPod Playback starts automatically 2 Select a song Selecting a track from the menu 1 Enter the main menu This mode will be canceled if no operations are done for ...

Страница 81: ... unit Preparation Make sure Changer is selected in the Source Select Ext Input setting see page 31 1 Select DAB 2 Searching for an ensemble When an ensemble is tuned in searching stops To stop searching press the same button again You can also search for an ensemble manually Manual Search Hold either one of the buttons until M appears on the display then press it repeatedly 3 Select a service eith...

Страница 82: ... same programme by activating the Alternative Frequency Reception While receiving a DAB service When driving in an area where a service cannot be received this unit automatically tunes in to another ensemble or FM Radio Data System station broadcasting the same programme While receiving an FM Radio Data System station When driving in an area where a DAB service is broadcasting the same programme a...

Страница 83: ...ack Preparation Make sure Ext In is selected in the Source Select Ext Input setting see page 31 AUX IN AUX auxiliary input jack on the control panel Preparation Make sure Show is selected in the Source Select AUX Source setting see page 31 1 Select EXT IN or AUX IN 2 Turn on the connected component and start playing the source 3 Adjust the volume 4 Adjust the sound as you want see page 26 Connecti...

Страница 84: ...Select EQ 2 Enter User setting mode 3 Select a frequency range Turn Press Turn Press 4 Adjust the sound elements of the selected frequency range 1 Press 4 to adjust the frequency 2 Press 5 to adjust the level 3 Turn the control dial to adjust the Q slope Sound elements Range selectable items Low Mid High Frequency 50 Hz 100 Hz 200 Hz 0 5 kHz 1 0 kHz 2 0 kHz 5 0 kHz 10 0 kHz 15 0 kHz Level 6 to 6 6...

Страница 85: ...the power is turned off Set Clock Adjust the hour then the minute 4 Initial 0 00 24H 12H 12Hours 24Hours Select the time display mode 4 Clock Adjust 2 Auto Off The built in clock is automatically adjusted using the CT clock time data in the Radio Data System signal Cancels EQ EQ Equalizer Select a preset sound mode suitable to the music genre 26 Off User Rock Classic Pops Hip Hop Jazz Color Color ...

Страница 86: ...crease when you change the source Before making an adjustment select the source you want to adjust FIX appears on the display if FM is selected as the source Subwoofer LPF Level Phase Press 4 to select the cutoff frequency to the subwoofer Off All signals are sent to the subwoofer LPF 55Hz LPF 85Hz LPF 120Hz Frequencies higher than 55 Hz 85 Hz 120 Hz are cut off Turn the control dial to adjust the...

Страница 87: ...For DAB text scrolls the detailed DAB text For track information cancels For DAB text shows only headline if any Pressing DISP for more than one second can scroll the display regardless of the setting Tag Display On Off Shows the Tag information while playing MP3 WMA AAC WAV tracks Cancels LCD Type Negative Positive Auto Negative pattern of the display Positive pattern of the display Positive patt...

Страница 88: ...or lights up When the currently received signals become weak the unit switches to another station broadcasting the same programme The REG indicator lights up Cancels not selectable when DAB AF is set to On P Search 10 Programme search On Off Activates Programme Search 11 Cancels DAB AF 11 Alternative frequency reception On Off Traces the programme among DAB services and FM Radio Data System statio...

Страница 89: ...selection USB 19 Drive Change Select to change the drive when a multiple drives device is connected to the USB input terminal FRONT REAR iPod 20 iPod Switch iPod iPhone control Headunit Mode iPod Mode Controls iPod playback through the unit Controls iPod playback through the iPod iPhone Audiobooks Speed control of Audiobooks Normal Faster Slower You can select the playback speed of the Audiobooks ...

Страница 90: ... primary colors nothing appear on the display 5 Confirm the settings 6 Exit from the setting Select User to show your own colors for the buttons and display or You can set the start end time for dimmer 1 Display Dimmer Time Set Setting the time for dimmer Turn Press Turn Press 2 Adjust the dimmer start time 3 Adjust the dimmer end time 4 Exit from the setting Turn Press or Turn Press Ex When Day C...

Страница 91: ... manually Reject The unit rejects all incoming calls Message Notice Only for the device being connected for BT FRONT BT REAR Phone On The unit informs you of the arrival of a message by ringing and displaying Received Message The display illuminates in blue see Ring Color on page 28 Off The unit does not inform you of the arrival of a message You can change the settings listed on the following acc...

Страница 92: ...alize Yes Initialize all the Bluetooth settings No Cancels Information JVC Device Name Shows the unit name JVC Address Shows address of USB Bluetooth Adapter JVC Software Ver Shows the software version Connected Phone Shows connected phone name Connected Audio Shows connected audio device name DisplayedonlywhenaBluetoothphone audioplayeris connected Basic operations Turning on the power By pressin...

Страница 93: ...the reflectance of CD RWs is lower than that of regular CDs If no operation is done for about 30 seconds after pressing MENU button or control dial the operation will be canceled Tuner operations Storing stations in memory During SSM search All previously stored stations are erased and the stations are stored anew When SSM is over the station stored in the lowest preset number will be automaticall...

Страница 94: ... back the following files MP3 files encoded in MP3i and MP3 PRO format MP3 files encoded in an inappropriate format MP3 files encoded with Layer 1 2 WMA files encoded in lossless professional and voice format WMA files which are not based upon Windows Media Audio WMA files copy protected with DRM Files which have data such as AIFF ATRAC3 etc The search function works but search speed is not consta...

Страница 95: ...nnel 1 ch 2 ch This unit can play back MP3 files recorded in VBR variable bit rate The maximum number of characters for folder and file names is 25 characters including mp3 wma m4a wav 128 characters for MP3 WMA AAC WAV Tag This unit can recognize a total of 20 000 files and 2 000 folders 999 files per folder However the display can shows until 999 folders files The unit cannot recognize a USB mas...

Страница 96: ... not be displayed correctly Some characters such as accented letters cannot be shown correctly on the display Communication between the iPod and the unit is not stable If the text information includes more than 16 characters it scrolls on the display This unit can display up to 40 characters for iPod and up to 64 characters for iPod FRONT iPod REAR Notice When operating an iPod some operations may...

Страница 97: ...lassic 100 Hz 01 Q1 0 1 0 kHz 00 Q1 0 10 0 kHz 03 Q1 4 Pops 100 Hz 02 Q1 0 1 0 kHz 01 Q1 0 10 0 kHz 02 Q1 4 Hip Hop 50 Hz 04 Q1 0 1 0 kHz 02 Q1 0 10 0 kHz 01 Q1 4 Jazz 100 Hz 03 Q1 0 1 0 kHz 00 Q1 0 10 0 kHz 03 Q1 4 Freq Frequency Q Q slope Available characters on the display Upper case Numbers and symbols JVC bears no responsibility for any loss of data in an iPod iPhone and or USB mass storage c...

Страница 98: ...cannot be selected Check the Source Select AM Source setting see page 31 Disc playback Disc cannot be played back Insert the disc correctly CD R CD RW cannot be played back Tracks on the CD R CD RW cannot be skipped Insert a finalized CD R CD RW Finalize the CD R CD RW with the component which you used for recording Disc can neither be played back nor ejected Unlock the disc see page 12 Eject the ...

Страница 99: ...ck This is caused by how the tracks are recorded on the disc eg variable bit rate Please Eject appears on the display Insert a disc that contains MP3 WMA AAC tracks No File appears on the display Selected folder is an empty folder Select another folder that contains MP3 WMA AAC tracks Not Support appears on the display and track skips Skip to the next track encoded in an appropriate format or to t...

Страница 100: ...ce is not connected properly Connect the USB device again Not Support appears on the display and track skips Check whether the track is a playable file format Correct characters are not displayed e g album name This unit can only display letters capital A Z small a z numbers and a limited number of symbols see page 39 While playing a track sound is sometimes interrupted The tracks have not been pr...

Страница 101: ... into the magazine No Magazine appears on the display Insert the magazine Reset 08 appears on the display Connect this unit and the CD changer correctly and press the reset button of the CD changer Reset 01 Reset 07 appears on the display Press the reset button of the CD changer The CD changer does not work at all Reset the unit see page 3 iPod iPhone The iPod iPhone does not turn on or does not w...

Страница 102: ...appears on the display Check the cords and connections The DAB tuner does not work at all Reconnect this unit and the DAB tuner correctly and reset the unit see page 3 Microsoft and Windows Media are either registered trademarks or trademarks of Microsoft Corporation in the United States and or other countries The Bluetooth word mark and logos are owned by the Bluetooth SIG Inc and any use of such...

Страница 103: ...he disc by the edges Do not touch its recording surface When storing a disc in its case gently insert the disc around the center holder with the printed surface facing up Make sure to store discs in cases after use Center holder To keep discs clean A dirty disc may not play correctly If a disc does become dirty wipe it with a soft cloth in a straight line from center to edge Do not use any solvent...

Страница 104: ...0 000 Hz Signal to Noise Ratio 70 dB Line Out Level Impedance 5 0 V 20 kΩ load full scale Subwoofer Out Level Impedance 5 0 V 20 kΩ load full scale Output Impedance 1 kΩ Other Terminal USB input terminal USB cable AUX auxiliary input jack CD changer jack Steering wheel remote input TUNER SECTION Frequency Range FM 87 5 MHz to 108 0 MHz AM MW 522 kHz to 1 620 kHz LW 144 kHz to 279 kHz FM Tuner Usab...

Страница 105: ... 1 1 USB 2 0 Data Transfer Rate Full Speed Full Speed Maximum 12 Mbps Low Speed Maximum 1 5 Mbps Compatible Device Mass storage class Compatible File System FAT 32 16 12 Playable Audio Format MP3 WMA AAC WAV Max Current DC 5 V 500 mA BLUETOOTH Version Bluetooth 2 0 Certified Power Class Class 2 Radio possible distance 10 m Service Area 10 m Profile HFP 1 5 OPP 1 1 A2DP 1 2 AVRCP 1 3 GENERAL Power ...

Страница 106: ...standards regarding electromagnetic compatibility and electrical safety European representative of Victor Company of Japan Limited is JVC Technical Services Europe GmbH Postfach 10 05 04 61145 Friedberg Germany Cher e client e Cet appareil est conforme aux directives et normes européennes en vigueur concernant la compatibilité électromagnétique et à la sécurité électrique Représentant européen de ...

Страница 107: ... the INSTRUCTIONS To prevent short circuits cover the terminals of the UNUSED leads with insulating tape The heat sink becomes very hot after use Be careful not to touch it when removing this unit Heat sink Dissipateur de chaleur AVERTISSEMENTS Pour éviter tout court circuit nous vous recommandons de débrancher la borne négative de la batterie et d effectuer tous les raccordements électriques avan...

Страница 108: ...TALLATION MONTAGE DANS LE TABLEAU DE BORD L illustration suivante est un exemple d installation typique Si vous avez des questions ou avez besoin d information sur des kits d installation consulter votre revendeur d autoradios JVC ou une compagnie d approvisionnement Si l on n est pas sûr de pouvoir installer correctement cet appareil le faire installer par un technicien qualifié Bracket 3 Support...

Страница 109: ...rise d entrée de microphone see diagram voir le diagramme USB cable approx 1 2 m Câble USB environ 1 2 m see diagram voir le diagramme E F B D H G A C N J I K M L P O A If your car is equipped with the ISO connector Si votre voiture est équippée d un connecteur ISO Connect the ISO connectors as illustrated Connectez les connecteurs ISO comme montré sur l illustration From the car body De la carros...

Страница 110: ...iture et connectez les à l amplificateur Front speakers see diagram Enceintes avant voir le diagramme Rear speakers Enceintes arrière You can connect amplifiers to upgrade your car stereo system Connect the remote lead blue with white stripe to the remote lead of the other equipment so that it can be controlled through this unit For amplifier only Disconnect the speakers from this unit connect the...

Страница 111: ... other countries iPhone is a trademark of Apple Inc Vous pouvez connecter le iPod iPhone à la prise USB en utilisant le câble USB 2 0 accessoire du iPod iPhone Vous ne pouvez pas connecter un ordinateur à la prise USB de l appareil iPod est une marque iPod est une marque de commerce d Apple Inc enregistrée aux États Unis et dans les autres pays iPhone est une marque de commerce de Apple Inc USB ca...

Страница 112: ...below When connecting two components in series Lors de la connexion de deux appareils en série A KT DB1000 B 5 CD CH KS PD100 KS U57 KS U58 CD changer jack Prise du changeur CD 5 iPod is a trademark of Apple Inc registered in the U S and other countries iPod est une marque de commerce d Apple Inc enregistrée aux États Unis et dans les autres pays 5 To use these components set the external input se...

Страница 113: ...ENGLISH KD R905 CD RECEIVER KD R905 INSTRUCTIONS For canceling the display demonstration see page 4 For installation and connections refer to the separate manual ...

Страница 114: ...ass 1M laser radiation when open Do not view directly with optical instruments 4 REPRODUCTION OF LABEL CAUTION LABEL PLACED OUTSIDE THE UNIT European Union only Warning If you need to operate the unit while driving be sure to look around carefully or you may be involved in a traffic accident For safety Do not raise the volume level too much as this will block outside sounds making driving dangerou...

Страница 115: ...ction then press to confirm the selection is used to indicate the available items settings operations in the SET UP menu Caution If the temperature inside the car is below 0 C the movement of animation and text scroll will be halted on the display to prevent the display from being blurred appears on the display When the temperature increases and the operating temperature is resumed these functions...

Страница 116: ...2H hour then 24Hours or 12Hours To return to the previous menu press BACK To exit from the menu press DISP or MENU Changing the display information and pattern When the power is turned off Check the current clock time Ex When tuner is selected as the source Press and hold until the main menu is called up Repeat this procedure Audio level meter display see Level Meter on page 27 Source operation di...

Страница 117: ...or the first time 14 Using the Bluetooth cellular phone 16 Using the Bluetooth audio player 18 EXTERNAL DEVICES Listening to the CD changer 19 Listening to the iPod iPhone 20 When connected with the USB input terminal 20 When connected with the interface adapter 21 Listening to the other external components 22 SETTINGS Selecting a preset sound mode 23 Menu operations 25 Creating your own color Use...

Страница 118: ... selection Press FM Enter SSM preset mode Hold CD USB FRONT USB REAR iPod FRONT iPod REAR Pause resume playback 2 Press BT FRONT BT REAR Audio Resume playback 2 Press CD USB FRONT USB REAR iPod FRONT iPod REAR BT FRONT Audio 3 BT REAR Audio 3 CD CH Enter playback mode Hold 5 Display window 6 USB Universal Serial Bus input terminal 7 Select the sound mode 8 Change the display information 9 Flip dow...

Страница 119: ...R2025 Caution Danger of explosion if battery is incorrectly replaced Replace only with the same or equivalent type Battery shall not be exposed to excessive heat such as sunshine fire or the like If the effectiveness of the remote controller decreases replace the battery Before using the remote controller Aim the remote controller directly at the remote sensor on the unit DO NOT expose the remote ...

Страница 120: ...e Answers calls if pressed briefly Rejects calls if pressed and held 7 Searches for stations if pressed briefly Fast forwards or reverses the track if pressed and held Changes the tracks if pressed briefly While listening to an iPod in menu selecting mode Connected with the interface adapter Selects an item if pressed briefly Then press D to confirm the selection Skips 10 items at a time if presse...

Страница 121: ...s hard to receive activate monaural mode for better reception See also page 28 Tuner Stereo Mono Mono Reception improves but stereo effect will be lost The lights up on the display To restore the stereo effect repeat the same procedure to select Stereo Storing stations in memory Automatic presetting FM SSM Strong station Sequential Memory You can preset up to 18 stations for FM 1 While listening t...

Страница 122: ...reset number 4 3 Selecting preset station or Prohibiting disc ejection To cancel the prohibition repeat the same procedure Disc operations 1 Turn on the power 2 Insert a disc All tracks will be played repeatedly until you change the source or eject the disc Stop playing and ejecting the disc No Disc appears Press SRC to listen to another playback source Turn Press ...

Страница 123: ... folders All Randomly plays all tracks To cancel repeat play or random play select Off To return to the previous menu press BACK Repeat Random Pressing or holding the following buttons allows you to Press Pause resume playback MP3 WMA Select folder Press Select track Hold Reverse fast forward track Selecting a track folder For MP3 WMA discs select the desired folder then the desired track by repea...

Страница 124: ...1 Turn on the power 2 Connect a USB device All tracks will be played repeatedly until you change the source or disconnect a device USB memory If a USB device has been attached Playback starts from where it has been stopped previously If a different USB device is currently attached playback starts from the beginning Stop playing and detaching the USB device Straightly pull it out from the USB input...

Страница 125: ...not work immediately after you turn on the power The detect time and response time may be very long for some USB devices such as Digital Audio Player HDD etc For more details about USB operations see pages 35 and 36 Using the Bluetooth devices Bluetooth is a short range wireless radio communication technology for the mobile device such as mobile phones portable PCs and other devices The Bluetooth ...

Страница 126: ...tion Number code of your Bluetooth device you want to connect Once the connection is established it is registered in the unit even if you reset the unit Up to five devices can be registered in total Only one device for Bluetooth phone and one for Bluetooth audio can be connected at a time Turn Press Connecting a Bluetooth device for the first time Preparation Connect the supplied USB Bluetooth Ada...

Страница 127: ...it Pair appears then Pairing OK or Connected Device Name appears on the display when the connection is established Now you can use the device through the unit appears when Bluetooth connection is established Continuedonthenextpage Turn Press The device remains registered even after you disconnect the device Use Connect Phone or Connect Audio or activate Auto Connect to connect the same device from...

Страница 128: ...Connecting a registered device on page 15 How to enter phone number 1 Select a number 2 Move the entry position 3 Repeat steps 1 and 2 until you finish entering the phone number 4 Confirm the entry 2 Select a device you want to connect Connecting appears then Connected Device Name appears on the display when the device is connected Disconnecting a registered device Select Disconnect Phone or Disco...

Страница 129: ...rsation using the other media Operations may be different according to the connected Bluetooth device How to delete phone number Only when Manual Trans is selected for Phonebook Select in Bluetooth setting menu see page 32 1 Enter Call Menu screen 2 Display the list of phone numbers using one of the dialing method see step 2 of Making a call on page 16 3 Select the name phone number you want to de...

Страница 130: ...s Resume playback Press Pause playback Select group folder Press Reverse skip forward skip Hold Reverse search forward search Operationmaybedifferentaccordingtotheconnected device Selecting the playback modes You can use only one of the following playback modes at a time For Bluetooth devices that support AVRCP 1 3 1 Enter PLAYBACK MENU screen 2 3 Repeat Track Repeats current track All Repeats all...

Страница 131: ...until the desired folder track is selected The selection always start from disc number first If another disc folder is selected playback starts from the 1st track of the selected disc folder Pressing or holding the following buttons allows you to MP3 Select folders Press Select track Hold Reverse fast forward track Selecting the playback modes 1 Enter PLAYBACK MENU screen 2 3 Repeat Track Repeats ...

Страница 132: ... iPhone devices are connected to both front and rear USB input terminals the unit only detects and charges the first connected device Disconnecting the iPod iPhone will stop playback Press SRC to listen to another playback source For details refer also to the manual supplied with your iPod iPhone Caution Avoid using the iPod iPhone if it might hinder your safety while driving Make sure all importa...

Страница 133: ...ble for some iPod Functionsonlyifyouselect All for Albums inthe mainmenu To return to the previous menu press BACK When connected with the interfaceadapter Preparation Make sure Changer is selected in the Source Select Ext Input setting see page 29 1 Select iPod Playback starts automatically 2 Select a song Selecting a track from the menu 1 Enter the main menu This mode will be canceled if no oper...

Страница 134: ...ntrol panel Preparation Make sure Show is selected in the Source Select AUX Source setting see page 29 1 Select EXT IN or AUX IN 2 Turn on the connected component and start playing the source 3 Adjust the volume 4 Adjust the sound as you want see pages 23 and 24 Connecting an external component to the AUX input jack 3 5 mm stereo mini plug not supplied Portable audio player etc Pressing or holding...

Страница 135: ...ader Bal balance Loud Volume Adjust settings or Turn Press Preset value setting for each sound mode Sound mode Preset value Low Mid High Freq Level Q Freq Level Q Freq Level Q User 50 Hz 00 Q1 0 1 0 kHz 00 Q1 0 10 0 kHz 00 Q1 0 Rock 100 Hz 03 Q1 0 1 0 kHz 00 Q1 0 10 0 kHz 02 Q1 4 Classic 100 Hz 01 Q1 0 1 0 kHz 00 Q1 0 10 0 kHz 03 Q1 4 Pops 100 Hz 02 Q1 0 1 0 kHz 01 Q1 0 10 0 kHz 02 Q1 4 Hip Hop 50...

Страница 136: ... to adjust the frequency 2 Press 5 to adjust the level 3 Turn the control dial to djust the Q slope Sound elements Range selectable items Low Mid High Frequency 50 Hz 100 Hz 200 Hz 0 5 kHz 1 0 kHz 2 0 kHz 5 0 kHz 10 0 kHz 15 0 kHz Level 6 to 6 6 to 6 6 to 6 Q Q0 7 Q1 0 Q1 4 Q2 0 Q0 7 Q1 0 Q1 4 Q2 0 Q0 7 Q1 0 Q1 4 Q2 0 5 Repeat steps 3 and 4 to adjust other frequency ranges 6 Store the adjustment m...

Страница 137: ...ion is done for about 20 seconds 4 Cancels Clock Clock Display 1 On Off Clock time is shown on the display at all times when the power is turned off Cancels pressing DISP will show the clock time for about 5 seconds when the power is turned off Set Clock Adjust the hour then the minute 4 Initial 1 00AM 24H 12H 12Hours 24Hours Select the time display mode 4 EQ EQ Equalizer Select a preset sound mod...

Страница 138: ... Audio Fad Bal 3 4 Fader Balance R6 F6 L6 R6 Fad fader Press 5 to adjust the front and rear speaker output balance Initial 0 Bal balance Press 4 to adjust the left and right speaker output balance Initial 0 Loud Loudness Loud1 Loud2 Loud3 Off Boost low and high frequencies to produce a well balanced sound at a low volume level Cancels Volume Adjust Level 5 Level 5 Initial Level 0 Preset the volume...

Страница 139: ...Hz are cut off All signals are sent to the front rear speakers Beep Key touch tone On Off Activates the key touch tone Deactivates the key touch tone Amplifier Gain 5 High Power Low Power Vol 00 Vol 50 Vol 00 Vol 30 Select if the maximum power of each speaker is less than 50 W to prevent damaging the speaker Display Dimmer On Off Auto Time Set Dims the display and button illumination Cancels Dims ...

Страница 140: ...Contrast Level 01 Level 08 Adjust the display contrast to make the display indications clear and legible Initial Level 05 Bluetooth Device See pages 14 16 for settings Settings See pages 31 33 for settings Tuner IF Band Intermediate frequency band Auto Wide Increases the tuner selectivity to reduce interference noises between adjacent stations Stereo effect may be lost Subject to interference nois...

Страница 141: ...e when a multiple drives device is connected to the USB input terminal FRONT REAR iPod 16 iPod Switch iPod iPhone control Headunit Mode iPod Mode Controls iPod playback through the unit Controls iPod playback through the iPod iPhone Audiobooks Speed control of Audiobooks Normal Faster Slower You can select the playback speed of the Audiobooks sound file in your iPod iPhone Initial selected item de...

Страница 142: ...olor Color Select User 2 Enter User setting mode 3 Select Day Color or Night Color Turn Press Turn Press Ex When Day Color is selected 4 Select a primary color then adjust the level Repeat this procedure until you have adjust all the three primary colors If 00 is selected for all the primary colors nothing appear on the display 5 Confirm the settings 6 Exit from the setting Select User to show you...

Страница 143: ...plied USB Bluetooth Adapter KS UBT1 to one of the USB input terminals of the unit 1 Bluetooth Settings 2 Select a setting item Quick Call Ô Auto Connect Ô Auto Answer Ô Message Notice Ô MIC Setting Ô Ringing Tone Ô Phonebook Trans Ô Phonebook Select Ô Initialize Ô Information Ô back to the beginning IftheconnectedBluetoothphonedoesnotsupport TextMessagenotification viaBluetooth theunit willnotrece...

Страница 144: ...message by ringing and displaying Received Message The display illuminates in blue see Ring Color on page 26 Off The unit does not inform you of the arrival of a message MIC Setting Only for the device being connected for BT FRONT BT REAR Adjust the volume of the microphone connected to the unit Level 01 02 03 Ringing Tone You can preset the ringing source when a call Text Message comes in In Unit...

Страница 145: ...aracter position 3 Repeat steps 1 and 2 until you finish entering the title 4 Store the title To erase the entire title In step 2 on the left column Available characters Upper case Lower case Numbers and symbols Title assignment Information JVC Device Name Shows the unit name JVC Address Shows address of USB Bluetooth Adapter JVC Software Ver Shows the software version Connected Phone Shows connec...

Страница 146: ... the lens inside the unit The pickup lens inside the unit is dirty The files on the CD R CD RW are written using the Packet Write method Basic operations Turning on the power By pressing SRC on the unit you can also turn on the power If the source is ready playback also starts Turning off the power If you turn off the power while listening to a track playback will start from where it had been stop...

Страница 147: ... recorded in VBR variable bit rate Files recorded in VBR have a discrepancy in the elapsed time display and do not show the actual elapsed time In particular this difference becomes noticeable after performing the search function This unit cannot play back the following files MP3 files encoded in MP3i and MP3 PRO format MP3 files encoded in an inappropriate format MP3 files encoded with Layer 1 2 ...

Страница 148: ...ed some of the USB device connected through a USB card reader This unit may not play back files in a USB device properly when using a USB extension cord This unit cannot assure proper functions or supply power to all types of USB devices Bluetooth operations General While driving do not perform complicated operation such as dialing the numbers using phone book etc When you perform these operations...

Страница 149: ... iPod classic iPod nano iPod nano 2nd Generation iPod nano 3rd Generation iPod nano 4th Generation 3 1 Itisnotpossibletobrowsevideofilesonthe Videos menu 2 iPod Mode isavailable seepage20 3 Itisnotpossibletochargethebatterythroughthis unit If the iPod does not play correctly please update your iPod software to the latest version For details about updating your iPod visit http www apple com When yo...

Страница 150: ...trademarks or trademarks of Microsoft Corporation in the United States and or other countries The Bluetooth word mark and logos are owned by the Bluetooth SIG Inc and any use of such marks by Victor Company of Japan Limited JVC is under license Other trademarks and trade names are those of their respective owners Made for iPod means that an electronic accessory has been designed to connect specifi...

Страница 151: ...k Tracks on the CD R CD RW cannot be skipped Insert a finalized CD R CD RW Finalize the CD R CD RW with the component which you used for recording Disc can neither be played back nor ejected Unlock the disc see page 10 Eject the disc forcibly see page 3 Disc sound is sometimes interrupted Stop playback while driving on rough roads Change the disc Check the cords and connections Disc cannot be reco...

Страница 152: ...not displayed e g album name This unit can only display letters capital A Z small a z numbers and a limited number of symbols see page 33 USB device Noise is generated The track played back is not an MP3 WMA WAV track Skip to another file Do not add the extension code mp3 wma or wav to non MP3 WMA WAV tracks Reading keeps flashing on the display Readout time varies depending on the USB device Do n...

Страница 153: ...pears on the display search from the Bluetooth device again The unit does not make pairing with the Bluetooth device Enter the same PIN code for both the unit and target device Echo or noise occurs Adjust the microphone unit s position Phone sound quality is poor Reduce the distance between the unit and the Bluetooth cellular phone Move the car to a place where you can get a better signal receptio...

Страница 154: ...on this unit or the iPod Playback stops The headphones are disconnected during playback Restart the playback operation Cannot Play appears on the display No tracks are stored Import tracks to the iPod Restricted appears on the display Check whether the connected iPod iPhone is compatible with this unit see page 37 Only when connecting with the interface adapter No Files appears on the display No t...

Страница 155: ...he disc by the edges Do not touch its recording surface When storing a disc in its case gently insert the disc around the center holder with the printed surface facing up Make sure to store discs in cases after use Center holder To keep discs clean A dirty disc may not play correctly If a disc does become dirty wipe it with a soft cloth in a straight line from center to edge Do not use any solvent...

Страница 156: ... Q2 0 Frequency Response 40 Hz to 20 000 Hz Signal to Noise Ratio 70 dB Line Out Level Impedance 5 0 V 20 kΩ load full scale Subwoofer Out Level Impedance 5 0 V 20 kΩ load full scale Output Impedance 1 kΩ Other Terminal USB input terminal USB cable AUX auxiliary input jack CD changer jack TUNER SECTION Frequency Range FM 87 5 MHz to 108 0 MHz AM 531 kHz to 1 602 kHz FM Tuner Usable Sensitivity 9 3...

Страница 157: ...te Full Speed Full Speed Maximum 12 Mbps Low Speed Maximum 1 5 Mbps Compatible Device Mass storage class Compatible File System FAT 32 16 12 Playable Audio Format MP3 WMA WAV Max Current DC 5 V 500 mA BLUETOOTH Version Bluetooth 2 0 certified Power Class Class 2 Radio possible distance 10 m Service Area 10 m Profile HFP 1 5 OPP 1 1 A2DP 1 2 AVRCP 1 3 GENERAL Power Requirement Operating Voltage DC ...

Страница 158: ...Having TROUBLE with operation Please reset your unit Refer to page of How to reset your unit ...

Страница 159: ...an impedance of 4 Ω to 8 Ω If the maximum power is less than 50 W change Amplifier Gain setting to prevent the speakers from being damaged see page 27 of the INSTRUCTIONS To prevent short circuits cover the terminals of the UNUSED leads with insulating tape The heat sink becomes very hot after use Be careful not to touch it when removing this unit Heat sink ºËπ ÈÕπ K USB Bluetooth adapter Õÿª å Ÿ ...

Страница 160: ...È ÀÈ Õ ÿµ πµÏÕÕ ËÕπ ô ßµ µíôß ËÕßπ ô ô π Ë Flat head screws M5 8 mm 3 ŸÀ M5 8 3 Note When installing the unit on the mounting bracket make sure to use the 8 mm long screws If longer screws are used they could damage the unit À Àµ ËÕµ µ Èß ÿ ª Õ ß π Ëπ Õß È ÀÈ È Ÿ π 8 È È Ÿ Ë π ÈÕ ÀÈ ÿ ª Õ À ô µ µ Èß ª Õ ºßÀπÈ ªí Ï È Õ ÿ ª Õ ËÕπ Õ ÿ ª Õ ÀȪ ÀπÈ µ Ë π È ËÕπ TROUBLESHOOTING The fuse blows Are the red...

Страница 161: ...µ Ë æß Õß ÿ ª Õ π È LINE OUTPUT È π Ë Ÿß æ ËÕ ÀÈ ËÕß Õß ß ÈÕ Ë ß π ßÕ ŸË Õ ËÕµËÕ Õ æ ø ÕÕ Ï πÕ È ËÕß ÀÈ ÿ Õ µ Õß Õ æ ø ÕÕ Ï πÕ ß æ ËÕª æ Ÿß ÿ π Èß π Õß ËÕß 1 Not supplied for this unit 2 Before checking the operation of this unit prior to installation this lead must be connected otherwise the power cannot be turned on 3 Remote lead 4 Firmly attach the ground wire to the metallic body or to the cha...

Страница 162: ...Õ Ï ø Õ ª µÕ Ï À ÿËπ iPod KS PD100 ËÕß Ëπ æ ß æ æ æ ÈÕ È µËÕ Line Output Õ ª µÕ Ï Line Input KS U57 ËÕß Ëπ æ ß æ æ æ ÈÕ ËÕß 3 5 Stereo Mini Õ ª µÕ Ï AUX Input KS U58 6 To use these components set the external input setting correctly see page 29 of the INSTRUCTIONS 6 π È Ë πª Õ À Ë π È Àȵ Èß Ë Õÿª Ï πÕ ÀÈ Ÿ µÈÕß ŸÀπÈ 29 π π USB cable approx 1 2 m USB ª 1 2 µ USB device Õÿª Ï USB C Connecting the U...

Страница 163: ...ость для жизни здоровья потребителя причинять вред его имуществу или окружающей среде составляет семь 7 лет со дня производства Этот срок является временем в течение которого потребитель данного товара может безопасно им пользоваться при условии соблюдения инструкции по эксплуатации данного товара проводя необходимое обслуживание включающее замену расходных материалов и или соответствующее ремонтн...

Страница 164: ...cident For safety Do not raise the volume level too much as this will block outside sounds making driving dangerous Stop the car before performing any complicated operations Temperature inside the car If you have parked the car for a long time in hot or cold weather wait until the temperature in the car becomes normal before operating the unit European Union only Caution If the temperature inside ...

Страница 165: ...itejects Ifthisdoesnotwork resetyourunit How to read this manual is used to indicate turn the control dial to make a selection then press to confirm the selection is used to indicate the available items settings operations in the SET UP menu Available characters on the display This unit can display Romans alphabets A Z a z Cyrillic alphabets numbers and symbols see below These characters are also ...

Страница 166: ... control dial once to proceed to adjust the minute Select 24H 12H hour then 24Hours or 12Hours To return to the previous menu press BACK To exit from the menu press DISP or MENU Changing the display information and pattern When the power is turned off Check the current clock time Ex When tuner is selected as the source Press and hold until the main menu is called up Repeat this procedure Audio lev...

Страница 167: ...tions 13 Using the Bluetooth devices 14 Connecting a Bluetooth device for the first time 15 Using the Bluetooth cellular phone 17 Using the Bluetooth audio player 19 EXTERNAL DEVICES Listening to the iPod iPhone 20 Listening to the other external components 22 SETTINGS Selecting a preset sound mode 23 Menu operations 24 Creating your own color User Color 28 Setting the time for dimmer 29 Changing ...

Страница 168: ...ld CD USB FRONT USB REAR iPod FRONT iPod REAR Pause resume playback 5 Press BT FRONT BT REAR Audio Resume playback 5 Press CD USB FRONT USB REAR iPod FRONT iPod REAR BT FRONT Audio 2 BT REAR Audio 2 Enter playback mode Hold 5 Display window 6 USB Universal Serial Bus input terminal 7 Activate deactivate TA Standby Reception Enter PTY Searching mode Hold 8 Change the display information 9 Flip down...

Страница 169: ...hevolumeduringpausewhen theselectedsourceisCD USB FRONT USB REAR iPod FRONT iPod REAR BT FRONT BT REAR Beforeresumeplayback checktobesurethatyou havenotraisethevolumeleveltoomuch 6 Youcanusethisfunctiononlywhen iPod Mode isavailablefortheconnectediPod seepages20 and35 Using the remote controller RM RK50 Installing the lithium coin battery CR2025 Caution Danger of explosion if battery is incorrectl...

Страница 170: ...stations if pressed briefly Fast forwards or reverses the track if pressed and held Changes the tracks if pressed briefly Reverse skip forward skip for Bluetooth audio player Warning to prevent accidents and damage Do not install any battery other than CR2025 or its equivalent Do not leave the remote controller in a place such as dashboards exposed to direct sunlight for a long time Store the batt...

Страница 171: ...receive activate monaural mode for better reception Not applicable when the source is FM LOW See also page 27 Tuner Stereo Mono Mono Reception improves but stereo effect will be lost The lights up on the display To restore the stereo effect repeat the same procedure to select Stereo Turn Press Storing stations in memory Automatic presetting FM FM LOW SSM Strong station Sequential Memory You can pr...

Страница 172: ...ogramme types or a PTY code 3 Start searching for your favorite programme If a station is broadcasting a programme of the same PTY code as you have selected that station is tuned in PTY codes News Affairs Info Sport Educate Drama Culture Science Varied Pop M music Rock M music Easy M music Light M music Classics Other M music Weather Finance Children Social Religion Phone In Travel Leisure Jazz Co...

Страница 173: ... The PTY indicator will stop flashing and remain lit To deactivate the PTY Standby Reception select Off for the PTY code see page 27 The PTY indicator goes off The unit will not switch to Traffic Announcement or PTY programme when a call connection is established through BT FRONT BT REAR Tracing the same programme Network Tracking Reception When driving in an area where FM reception is not suffici...

Страница 174: ...repeat the same procedure Pressing or holding the following buttons allows you to Press Pause resume playback MP3 WMA AAC Select folder Press Select track Hold Reverse fast forward track Selecting a track folder For MP3 WMA AAC discs select the desired folder then the desired track by repeating the control dial procedures To return to the previous menu press BACK Selecting the playback modes You c...

Страница 175: ...on the control panel and USB cable from the rear of the unit You can use these two terminals at the same time You can also connect a USB Bluetooth Adapter KS UBT1 and or an Apple iPod iPhone to the USB input terminal s For details of the operations see pages 14 19 and 20 21 This unit can play MP3 WMA AAC WAV tracks stored in a USB mass storage class device such as a USB memory Digital Audio Player...

Страница 176: ...all important data has been backed up to avoid losing the data Electrostatic shock at connecting a USB device may cause abnormal playback of the device In this case disconnect the USB device then reset this unit and the USB device Do not leave a USB device in the car expose to direct sunlight or high temperature to avoid deformation or cause damages to the device Some USB devices may not work imme...

Страница 177: ...ice for the first time Preparation Connect the supplied USB Bluetooth Adapter KS UBT1 to one of the USB input terminals of the unit Operate the device to turn on its Bluetooth function 1 Turn on the power 2 Connect the USB Bluetooth Adapter KS UBT1 Only one USB Bluetooth Adapter can be detected at a time You can perform the following operations from the SET UP menu Pairing and delete pairing Conne...

Страница 178: ...he unit 1 Move to the next or previous number position 2 Select a number 3 Repeat steps 1 and 2 until you finish entering a PIN code 4 Confirm the entry Wait Pair appears on the display 3 Use the Bluetooth device to search and connect On the device to be connected enter the same PIN code you have just entered for this unit Wait Pair appears then Pairing OK or Connected Device Name appears on the d...

Страница 179: ...Phonebook Select settings 3 Select the name phone number you want to call When the sound is stopped or interrupted during the use of a Bluetooth device turn off then turn on the unit If the sound is not yet restored connect the device again See Connecting a registered device on the left column How to enter phone number 1 Select a number Continuedonthenextpage Connecting a registered device 1 Selec...

Страница 180: ... in The source is automatically changed to BT FRONT BT REAR The display will flash in blue see Ring Color on page 25 for setting When Auto Answer is activated The unit answers the incoming calls automatically see page 30 To answer the incoming call when Auto Answer is deactivated To adjust the microphone volume during a phone call conversation The adjustment will not affect the main volume You can...

Страница 181: ...lect group folder Press Reverse skip forward skip Hold Reverse search forward search Operationmaybedifferentaccordingtotheconnected device Selecting the playback modes You can use only one of the following playback modes at a time For Bluetooth devices that support AVRCP 1 3 1 Enter PLAYBACK MENU screen 2 3 Repeat Track Repeats current track All Repeats all tracks Group Repeats all tracks of curre...

Страница 182: ... explained below are under Headunit Mode 1 Turn on the power 2 USB 2 0 cable or USB cable from the rear of the unit USB 2 0 cable iPod iPhone Connect the iPod iPhone using the USB 2 0 cable accessory of the iPod iPhone Playback starts automatically 3 Select a song When iPod iPhone devices are connected to both front and rear USB input terminals the unit only detects and charges the first connected...

Страница 183: ...Ô Audiobooks 3 Select the desired item Repeat this procedure until the desired track is selected To return to the previous menu press BACK Selecting the playback modes 1 Enter PLAYBACK MENU screen 2 3 Repeat One Functions the same as Repeat One of the iPod All Functions the same as Repeat All of the iPod Random Song Functions the same as Shuffle Songs of the iPod Album Functions the same as Shuffl...

Страница 184: ... panel Preparation Make sure Show is selected in the Source Select AUX Source setting see page 28 1 Select AUX IN 2 Turn on the connected component and start playing the source 3 Adjust the volume 4 Adjust the sound as you want see page 23 Connecting an external component to the AUX input jack 3 5 mm stereo mini plug not supplied Portable audio player etc ...

Страница 185: ...y 1 Select EQ 2 Enter User setting mode 3 Select a frequency range Turn Press Turn Press 4 Adjust the sound elements of the selected frequency range 1 Press 4 to adjust the frequency 2 Press 5 to adjust the level 3 Turn the control dial to adjust the Q slope Sound elements Range selectable items Low Mid High Frequency 50 Hz 100 Hz 200 Hz 0 5 kHz 1 0 kHz 2 0 kHz 5 0 kHz 10 0 kHz 15 0 kHz Level 6 to...

Страница 186: ...ned off Set Clock Adjust the hour then the minute 4 Initial 0 00 24H 12H 12Hours 24Hours Select the time display mode 4 Clock Adjust 2 Auto Off The built in clock is automatically adjusted using the CT clock time data in the Radio Data System signal Cancels EQ EQ Equalizer Select a preset sound mode suitable to the music genre 23 Off User Rock Classic Pops Hip Hop Jazz Color Color Select Color 01 ...

Страница 187: ...level The volume level will automatically increase or decrease when you change the source Before making an adjustment select the source you want to adjust FIX appears on the display if FM FM LOW is selected as the source Subwoofer LPF Level Phase Press 4 to select the cutoff frequency to the subwoofer Off All signals are sent to the subwoofer LPF 55Hz LPF 85Hz LPF 120Hz Frequencies higher than 55 ...

Страница 188: ...rmation only once Repeats the scroll in 5 second intervals Cancels Pressing DISP for more than one second can scroll the display regardless of the setting Tag Display On Off Shows the Tag information while playing MP3 WMA AAC WAV tracks Cancels LCD Type Negative Positive Auto Negative pattern of the display Positive pattern of the display Positive pattern will be selected during the day time 9 whi...

Страница 189: ...become weak the unit switches to another station the programme may differ from the one currently received 11 The AF indicator lights up When the currently received signals become weak the unit switches to another station broadcasting the same programme The REG indicator lights up Cancels P Search 10 Programme search On Off Activates Programme Search 11 Cancels TA Volume 10 Traffic announcement vol...

Страница 190: ... change the drive when a multiple drives device is connected to the USB input terminal FRONT REAR iPod 17 iPod Switch iPod iPhone control Headunit Mode iPod Mode Controls iPod playback through the unit Controls iPod playback through the iPod iPhone Audiobooks Speed control of Audiobooks Normal Faster Slower You can select the playback speed of the Audiobooks sound file in your iPod iPhone Initial ...

Страница 191: ...cted for all the primary colors nothing appear on the display 5 Confirm the settings 6 Exit from the setting Select User to show your own colors for the buttons and display or You can set the start end time for dimmer 1 Display Dimmer Time Set Setting the time for dimmer Turn Press Turn Press 2 Adjust the dimmer start time 3 Adjust the dimmer end time 4 Exit from the setting Turn Press or Turn Pre...

Страница 192: ...e calls manually Reject The unit rejects all incoming calls Message Notice Only for the device being connected for BT FRONT BT REAR Phone On The unit informs you of the arrival of a message by ringing and displaying Received Message The display illuminates in blue see Ring Color on page 25 Off The unit does not inform you of the arrival of a message You can change the settings listed on the follow...

Страница 193: ...unit to transfer the phone book into the unit You can transfer a maximum of 300 numbers Phonebook Select You can preset the source of the phone book you want to synchronize Selectable only when the connected phone supports Phonebook Auto Synchronize AutoAccess Phone Auto synchronize from the phone memory AutoAccess SIM Auto synchronize from the SIM card Manual Trans Manually select the source to t...

Страница 194: ...ound File folder list may not appear correctly if too many hierarchies and folders are used Basic operations Turning on the power By pressing SRC on the unit you can also turn on the power If the source is ready playback also starts Turning off the power If you turn off the power while listening to a track playback will start from where it had been stopped previously next time you turn on the powe...

Страница 195: ... 4 for MP3 files and show WMA AAC Tag This unit can play back MP3 WMA AAC files meeting the conditions below Bit rate of MP3 WMA AAC 5 kbps 320 kbps Sampling frequency of MP3 48 kHz 44 1 kHz 32 kHz for MPEG 1 24 kHz 22 05 kHz 16 kHz for MPEG 2 Sampling frequency of WMA 8 kHz 48 kHz Sampling frequency of AAC 48 kHz 44 1 kHz The maximum number of characters for file folder names is 25 characters inc...

Страница 196: ...ection is disconnected Continue the conversation using your cellular phone When the unit is turned off the device is disconnected Depending on the shape of the USB devices and connection ports some USB devices may not be attached properly or the connection might be loose When connecting a USB mass storage class device refer also to its instructions This unit may not work properly with some USB hub...

Страница 197: ...Pods iPhone iPod with video 5th Generation 1 iPod classic 1 2 iPod nano iPod nano 2nd Generation iPod nano 3rd Generation 1 2 iPod nano 4th Generation 1 2 iPod Touch 1 2 iPod Touch 2nd Generation 1 2 iPhone iPhone 3G 1 2 1 Itisnotpossibletobrowsevideofilesonthe Videos menu 2 iPod Mode isavailable seepage20 If the iPod does not play correctly please update your iPod software to the latest version F...

Страница 198: ...e names are those of their respective owners Made for iPod means that an electronic accessory has been designed to connect specifically to iPod and has been certified by the developer to meet Apple performance standards Works with iPhone means that an electronic accessory has been designed to connect specifically to iPhone and has been certified by the developer to meet Apple performance standards...

Страница 199: ... be selected Check the Source Select AM Source setting see page 28 Disc playback Disc cannot be played back Insert the disc correctly CD R CD RW cannot be played back Tracks on the CD R CD RW cannot be skipped Insert a finalized CD R CD RW Finalize the CD R CD RW with the component which you used for recording Disc can neither be played back nor ejected Unlock the disc see page 12 Eject the disc f...

Страница 200: ...sorted according to the file system of the CD The elapsed playing time is not correct This sometimes occurs during playback This is caused by how the tracks are recorded on the disc eg variable bit rate Please Eject appears on the display Insert a disc that contains MP3 WMA AAC tracks No File appears on the display Selected folder is an empty folder Select another folder that contains MP3 WMA AAC ...

Страница 201: ...rding to the file system of the USB device Cannot Play appears on the display No USB appears on the display The unit cannot detect the USB device Check whether the connected USB device or the iPod iPhone is compatible with this unit The USB device is not connected properly Connect the USB device again Not Support appears on the display and track skips Check whether the track is a playable file for...

Страница 202: ...tions depend on the connected audio player Disconnect and connect the Bluetooth player again The unit does not response when you tried to copy the phonebook to the unit You may have tried to copy the same entries as stored to the unit Press DISP or BACK to exit iPod iPhone The iPod iPhone does not turn on or does not work Check the connecting cable and its connection Update the firmware version of...

Страница 203: ...he disc by the edges Do not touch its recording surface When storing a disc in its case gently insert the disc around the center holder with the printed surface facing up Make sure to store discs in cases after use Center holder To keep discs clean A dirty disc may not play correctly If a disc does become dirty wipe it with a soft cloth in a straight line from center to edge Do not use any solvent...

Страница 204: ...z to 20 000 Hz Signal to Noise Ratio 70 dB Line Out Level Impedance 5 0 V 20 kΩ load full scale Subwoofer Out Level Impedance 5 0 V 20 kΩ load full scale Output Impedance 1 kΩ Other Terminal USB input terminal USB cable AUX auxiliary input jack TUNER SECTION Frequency Range FM 87 50 MHz to 108 00 MHz FM LOW 65 00 MHz to 74 00 MHZ AM MW 522 kHz to 1 620 kHz LW 144 kHz to 279 kHz FM Tuner Usable Sen...

Страница 205: ... 1 1 USB 2 0 Data Transfer Rate Full Speed Full Speed Maximum 12 Mbps Low Speed Maximum 1 5 Mbps Compatible Device Mass storage class Compatible File System FAT 32 16 12 Playable Audio Format MP3 WMA AAC WAV Max Current DC 5 V 500 mA BLUETOOTH Version Bluetooth 2 0 Certified Power Class Class 2 Radio possible distance 10 m Service Area 10 m Profile HFP 1 5 OPP 1 1 A2DP 1 2 AVRCP 1 3 GENERAL Power ...

Страница 206: ... of How to reset your unit Затруднения при эксплуатации Пожалуйста перезагрузите Ваше устройство Для получения информации о перезагрузке Вашего устройства обратитесь на соответствующую страницу Маєте ПРОБЛЕМУ з функціонуванням Повторно налаштуйте систему Див сторінку Як повторно налаштувати пристрій ...

Страница 207: ...ования сильно нагревается Старайтесь его не трогать во время удаления устройства Список деталей для установки и подключения Следующие детали поставлены в комплекте с устройством При отсутствии какого либо элемента немедленно свяжитесь с дилером автомобильного специалиста JVC 0209DTSMDTJEIN EN RU UK 2009 Victor Company of Japan Limited УКРАЇНА Цей пристрій призначений для роботи під напругою 12 В п...

Страница 208: ... його встановлення кваліфікованого спеціаліста Видалення пристрою Перед видаленням пристрою ослабте кріплення тильної частини Bracket 3 Кронштейн 3 Кронштейн 3 Flat head screws M5 8 mm 3 Болты с плоской головкой M5 8 мм 3 Гвинти з пласкими голівками M5 8 mm 3 Note When installing the unit on the mounting bracket make sure to use the 8 mm long screws If longer screws are used they could damage the ...

Страница 209: ... авто Неправильне з єднання може спричинити тяжке пошкодження вашого пристрою Контакти шнура живлення та рознімання яке йде від корпуса авто можуть мати різні кольори 1 Від єднайте рознімання ISO 2 З єднайте кольорові провідники шнура живлення у порядку що наведений нижче на ілюстрації 3 Приєднайте провід антени 4 Виконайте кінцеве приєднання джгута провідників до пристрою 1 Не входить до комплект...

Страница 210: ...ів такими що не використовуються Рівень вихідного сигналу цього пристрою підтримується на високому рівні щоб підтримати відтворення звуку hi fi цим пристроєм При підключенні зовнішнього підсилювача до цього пристрою опустіть регулятор підсилення на зовнішнього підсилювачі для кращої роботи пристрою Remote lead blue with white stripe Провод внешнего устройства синий с белой полосой Провідник зовніш...

Отзывы: