background image

9

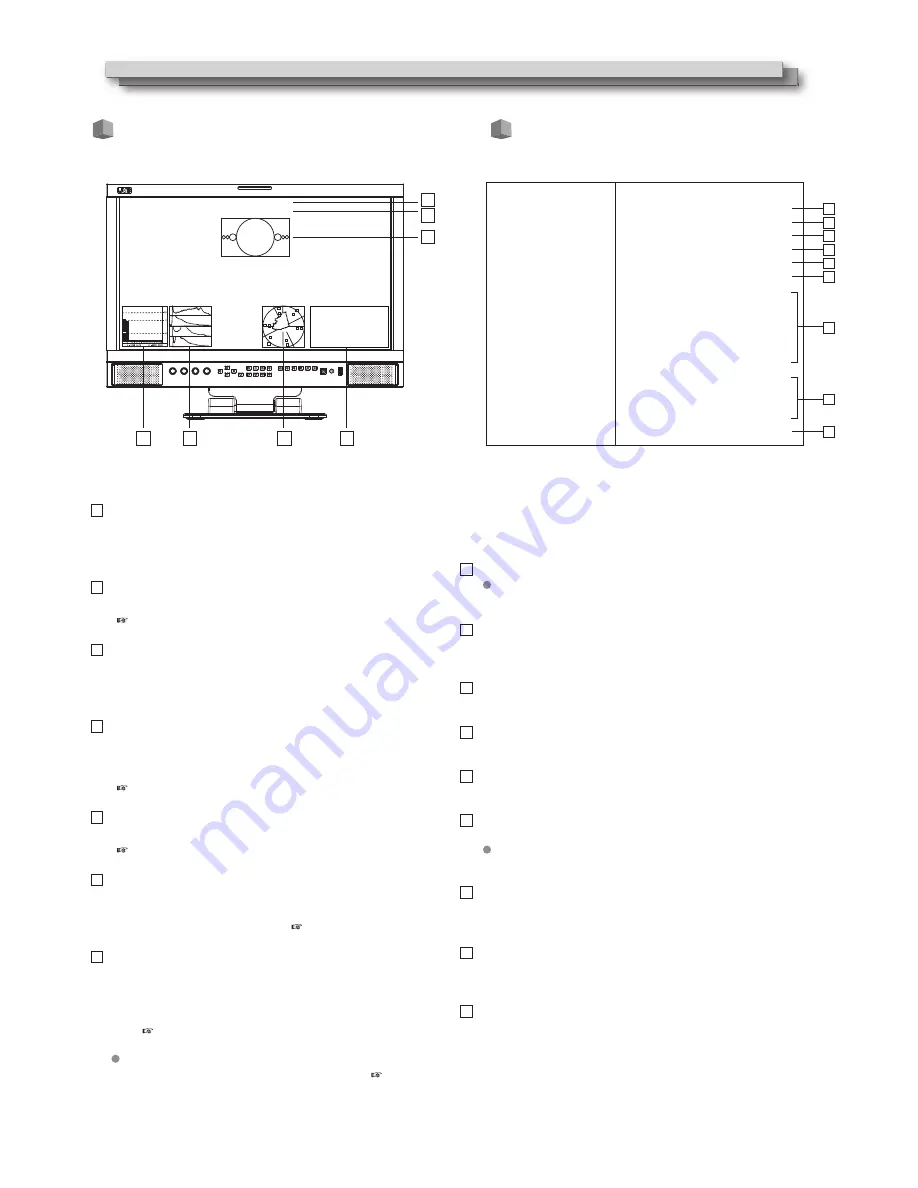
On the Information Display

Showing Input Signals

On the Status Display

-09

-20

-48

1 2 3 4 5 6 7 8 9 10111213141516

L -20DB 01CH

R -22DB 01CH

CAMERA 1

TC

00:15:13:07

Main Menu

Exit&Status

Picture

Color Temp

Func�on Key

GPI

UMD

Marker

Audio

Vector

Waveform

Display

System

OSD

Key Inhibit


Color Measurement

Auto Calibra�on


RGB

Status

HDMI                                            XXX

User Profile                                    XX

Color Temp                                XXXX

Scan Mode                                   XXX

Freeze Frame                               XXX

Odd/Even Frame                         XXX

F1                                                   XXX

F2                                                   XXX

F3                                                   XXX

F4                                                   XXX

F5                                                   XXX

F6                                                   XXX

Monitor IP                     XX.XX.XX.XX

Net Mask                       XX.XX.XX.XX

Gateway                        

XX.XX.XX.XX

Port                                               XXX

System Version                           XXX

1

2

3

4

5

6

7

8

9

Time code (SDI)

Under SDI input, the monitor can display Time code 
information (LTC, VITC1&2). If no Time code info is 
detected, it will display “TC UNLOCKED”.

UMD

Display TSL 3.1/4.0 UMD or User input Source ID.
(      page 12.)

AFD (SDI)

Under SDI input, the monitor can display AFD information. 
If no AFD information embedded in the SDI source, it will 
display “AFD: UNLOCKED”.

Audio VU/PPM meters

Display meters of SDI/HDMI embedded audio or analog 
audio. The audio meter display channels, on screen 
positions, markers and background colors are adjustable.
(      page 14.)

Histogram

Parallel display R/G/B/Y histogram for SDI and HDMI video.

(      page 15.)

Vector scope

Display vector scope with 100% and 75% markers for SDI and 
HDMI video. The vector scope pattern display positions, 
colors, background are adjustable. 

(      page 15.)

Waveform

Display waveform scopes for SDI and HDMI video with 

markers. The display waveform can be selected from Y/Cb/Cr/ 

R/G/B types, and single line display mode selectable. The 

waveform display positions, colors, background are adjust-

able. (      page 15.)

      All the above OSD information display support assign 
to F1-F6 keys and turn off or turn off the display. (     page 
11.)

Press “MENU” button, the main menu will pop up from the left 

top of the screen, and display the current working status, 

including: 

Input video format 

      If no video detected in current input source, it will display 

“No Signal”.

User Profile

The monitor can restore 3 user preference settings and 

display the current user profile info.

Color Temp

Display the current set color temperature value.

Scan Mode

Display the current scan mode.

Freeze Frame

Display the current status of Freeze Frame: ON/OFF.

Odd/Even Frame

Display the current status of Odd/Even Frame: ON/OFF.

      Will display gray and not available if the current input 

signal doesn’t support Odd/Even mode.

F1/F2/F3/F4/F5/F6

Display the current functions that assigned to F1-F6 function 

keys.

Monitor IP

Display the IP address, Net Mask, Gateway and Port of the 

monitor, for Webserver IP remote control function

System Version

Display the current firmware version.

1

1

2

3

4

5

6

7

8

9

2

3

4

5

6

7

1

2
3

4

5

6

7

Содержание DT-G17E

Страница 1: ...Version D For Customer Use Please read the Instruction Manual carefully and retain this information for future reference MULTI FORMAT LCD MONITOR INSTRUCTIONS DT G17E DT G21E DT G24E DT G27E ...

Страница 2: ...ing power supply voltage and countries Use only the power cord designated to ensure safety and EMC regulations of each countries This plug will fit only into a grounded power outlet If you are unable to insert the plug into the outlet contact your electrician to install the proper outlet Do not defeat the safety purpose of the grounded plug This product should be operated only with the type of pow...

Страница 3: ...ld use a mount recommended by the manufacturer Do not use this product near water Be sure to install the product in the place where proper temperature and humidity are kept This product becomes hot during its use Take enough care when handling the product Do not attempt to service this product yourself as opening or removing covers may expose you to dangerous voltages and other hazards Refer all s...

Страница 4: ...hine fire or the like When discarding batteries environmental problems must be considered and the local rules or laws governing the disposal of these batteries must be followed strictly 1 2 3 4 5 6 7 8 9 10 11 12 13 14 15 16 17 The LCD panel and backlight have life expectancy Due to the basic characteristics of the LCD panel an afterimage or uneven display may occur It is recommended that you chan...

Страница 5: ...t panel 8 Showing Input Signals 9 On the Information Display 9 On the Status Display 9 10 The operation procedure 10 Menu Transition Diagram 10 Main Menu 11 External Control 20 Using the UMD control 20 Using the GPI control 20 Using the Webserver IP control 21 Troubleshooting 23 24 General 24 LCD panel 24 Input output terminals 24 Dimensions 25 Available signals 26 ...

Страница 6: ...by 4 screws The Max tilt angle is down 3 and up 8 please make sure the setup location is stable 6 Installation Do not rest your arm on the monitor or lean against the monitor Do not touch the LCD panel when installing the monitor Be sure to install the monitor securely to prevent the monitor from falling over which may cause damage to the monitor or injury The monitor package provides a desktop st...

Страница 7: ... 16 CVBS terminals BNC Input Output terminals for the composite signals AUDIO IN terminals RCA Left and Right channels input terminals for the analog audio signals Set signal source as ANALOG CVBS RGB YPbPr the analog audio can be monitored as audio meters or output via Speaker Headphone Battery Plate Install V mount or Gold mount battery plates to power the monitor by V mount batteries Gold mount...

Страница 8: ...G HD SD SDI IN 1 terminal input SDI 2 the 3G HD SD SDI IN 2 terminal input HDMI the HDMI terminal input Y Pb Pr the Component Y Pb Pr terminals input RGB the RGB terminal input VIDEO the Composite terminal input The key light will indicate the current input source POWER key Press to switch on or swich off the monitor The standby power consumption is less than 0 5W comply with ErP rules To complete...

Страница 9: ...00 and 75 markers for SDI and HDMI video The vector scope pattern display positions colors background are adjustable page 15 Waveform Display waveform scopes for SDI and HDMI video with markers The display waveform can be selected from Y Cb Cr R G B types and single line display mode selectable The waveform display positions colors background are adjust able page 15 All the above OSD information d...

Страница 10: ...Mode UMD Vector Waveform Display System Color Measure Auto Calibration OSD RGB Key Inhibit Exit Waveform WFM Type WFM Position WFM Blending Exit Log Mode 1DLut Exit Probe Select Start Calibration Color Space Import Reset WFM Color WFM Single Line WFM Line Count Exit OSD Language OSD Blending OSD Duration Key Led Brightness Tally R Brightness Tally G Brightness Tally Y Brightness Soft Tally Positio...

Страница 11: ...ction value Select the color temperature Mode Adjusts the Red Gain Adjusts the Green Gain Adjusts the Blue Gain Adjusts the Red Bias Adjusts the Green Bias Adjusts the Blue Bias Setting value 2 2 equivalent to 2 2 1 8 equivalent to 1 8 2 4 equivalent to 2 4 2 6 equivalent to 2 6 3200k 5600K 6500K 9300K 0 to 255 0 to 255 0 to 255 0 to 255 0 to 255 0 to 255 Item Exit F1 F2 F3 F4 F5 F6 Setting value ...

Страница 12: ...lly info by GPI input 3 Source ID setting 1 Support 8 letters to input 2 Press MENU to select each letter space and press and to select letters from 3 Press MENU to confirm current letter and move to next space UMD letters and Tally1 Tally2 from external control devices of TSL 3 1 4 0 protocol Space 0 9 A Z a z _ CAMERA1 Tally1 UMD Tally2 CAMERA1 Tally1 Source ID Tally2 Source ID letters by manual...

Страница 13: ... Off 4 3 13 9 14 9 15 9 16 9 1 85 1 2 35 1 Off 80 85 90 93 95 Off On White Red Green Blue Black Gray Off Gray Black Marker Marker Select Off On Center Marker Off On Marker Settings for marker functions Safety Area Marker select Center Marker Marker Outside Marker 4 3 Safety Area 85 Center Marker On Marker 4 3 Safety Area 85 Fit Marker On 1 Fit Marker Turn off the Fit Marker the safety area size pe...

Страница 14: ...el output can be selected from Channel 1 8 When selected display channel is Channel 1 16 the left and right channel output can be selected from Channel 1 16 In the audio bar the left channel information will be in green and the right channel information will be in red Turn on turn off the audio alarm information Select the audio left and right channel to be de embed and output via speaker or headp...

Страница 15: ... On Vector scope pattern on screen display position setting Vector Position 1 Vector Blending Color White Green False Color Off Low High Histogram Off On Off Low High Histogram Blending Waveform Setting for Waveform patterns Waveform Y Cb Cr R G B Off On 0 to 1079 Bottom Left Bottom Right Center Top Left Top Right Low High Off White Green False Color Off On WFM Position 1 WFM Blending WFM Single L...

Страница 16: ...ettings to display Switch on logo or not Display settings when in Energy Save mode Set an idle time to enter Energy Save mode Firmware upgrade Driver Firmware upgrade Kernel Firmware upgrade ARM Setting value Off Odd Mode Even Mode Factory User1 User2 User3 Source Scan 1 Logo User1 User2 User3 No Yes No Yes app ulmage rootfs ubi Black Backlight Standby Gray Backlight 16 USB firmware upgrade Firmwa...

Страница 17: ...Insert the USB stick onto monitor USB port on the FRONT panel select the corresponding upload position to import the new file 6 Reset For any wrong cubes imported that caused wrong display colors you can reset the cubes to factory cubes here To do Return to Main Menu Select a camera log LUT to convert to Rec 709 Select the uploaded User 3DLUT cube Select 1DLUT color file Upload 3DLUT re calibrated...

Страница 18: ...on Progress 30 Please wait Auto Calibration Progress 100 Succeed Press INFO to quit X rite Eye One Pro OEM Please make sure the monitor is in dark room and the sensor probe is put in the center marker and close the screen Select Yes to start calibration Yes No Place Sensor Probe here i1 DISPLAY E0DIS3 DC0E X rite Specbos 1211 JETI Brand Model Sensor Probe Connection FRONT USB port connection Probe...

Страница 19: ...to Adjust and press MENU key the system will automatically adjust the RGB display Key Led Brightness setting Set the brightness of tally when it s red Set the brightness of tally when it s green Set the position of soft tally Set the blinking of soft tally Low Medium High Off High Low Medium High Low Medium Tally Y Brightness Set the brightness of tally when it s yellow High Low Medium Top Bottom ...

Страница 20: ...hanges the scan mode Freeze Frame setting Time code display Zebra display Vector display Audio Bar display Histogram display False Color display AFD display H V Delay display Marker display Color Bar display UMD display Audio Alarm display Color Temp setting R G B Mono setting Flip Mode setting Odd Even Mode setting Open Short Red Off Off Off Green Yellow 1 1 1 1 2 3 4 5 5 5 5 5 5 5 5 5 5 5 5 5 5 ...

Страница 21: ... TX 3 RX 4 5 6 RX 7 8 21 Using the Webserver IP Control Connect the monitor ETHERNET port into LAN and the monitor can be remote controlled by webserver The monitor default IP address is 192 168 1 99 To change the IP address please directly connect the monitor with a computer by RJ45 crossover wired cable one end T568A and another end T568B 1 Set the computer Ethernet IP address at 192 168 1 XXX D...

Страница 22: ... HDMI YPbPr RGB and VIDEO VOLUME CHROMA BRIGHT CONTRAST Directly enter the values to each item and click SET to apply The valid setting ranges Volume 0 100 Chroma 50 50 Bright 50 50 Contrast 50 50 Frame Click ON or OFF to turn on off the frame related settings Freeze Frame mode Odd Even Frame mode Low Latency mode Color Settings for color related items Gamma 1 8 2 2 2 4 2 6 Color Temp 3200K 5600K ...

Страница 23: ... rear side of the monitor Check DC input voltage or Battery voltage and capacity Press front POWER botton 7 7 8 8 24 7 8 8 7 8 16 11 12 20 17 18 17 19 Check and select the correct input video Check and confirm the video format is acceptable by the monitor Check the video source output condition and video cable connection Adjust volume level Plug off headphone socket to enable speaker Check the aud...

Страница 24: ... 643 5 mm 20 3 4 Height 426mm 14 1 8 Depth 55 8 mm 2 6 16 External dimensions with the stand excluding protruding parts External dimensions without the stand excluding protruding parts Weight without the stand Weight with the stand 3 95 kg 8 7 lbs 5 5kg 12 1lbs 5 8 kg 12 8 lbs 7 3kg 16 1lbs 6 8 kg 15lbs 8 3kg 18 3lbs 7 95 kg 17 5 lbs 9 45kg 20 8lbs Accessories AC power cord x 1 Monitor stand x 1 1...

Страница 25: ...p 10mm 427 382 366 310 215 252 185 61 11 73 75 26 64 100 100 105 VESA mounting holes Size M4 deep 10mm 573 527 439 386 296 252 61 11 112 74 26 60 185 100 100 143 VESA mounting holes Size M4 deep 10mm 61 11 126 67 26 87 185 100 200 163 100 VESA mounting holes Size M4 deep 10mm 643 599 479 426 338 252 DT G17E DT G21E DT G24E DT G27E ...

Страница 26: ...L PAL SECAM 480i 480i 576i 480p 480p 576p 640 480 640 480 720p60 720p60 720p50 1080i60 1080i60 1080i50 1080p60 1080p60 1080p50 1080p30 1080p30 1080p25 1080p24 1080p24 1080i60 1080i60 1080i50 1080i50 1080i50 1080p24 1080p24 1080p25 1080p30 1080p30 1080p50 1080p60 1080p60 Signal format shown in the status display Input terminal CVBS YPbPr VGA SDI HDMI Acceptable Not acceptable For signal formats oth...

Страница 27: ... 18 5 V Power 5 T M D S Data 1 shield 12 T M D S Clock 19 Hot Plug Detect 6 T M D S Data 1 13 Spare not connected 7 T M D S Data 0 14 Spare not connected Connect it to the mini D SUB15pin output terminal of a video device Notice on transportation Pin No Input signal 1 Red video signal 2 Green video signal 3 Blue video signal 4 Not connected 5 Ground 6 Red video signal return Pin No Input signal 7 ...

Страница 28: ...olo EU JVCKENWOOD Italia S p A Via G Sirtori 7 9 20129 Milano ITALIA Importeur Alleen EU JVCKENWOOD Belgium N V Leuvensesteenweg 248J 1800 Vilvoorde BELGIQUE Importeur Alleen EU JVCKENWOOD Europe B V Amsterdamseweg 37 1422 AC Uithoorn NEDERLAND Manufacturer JVCKENWOOD Corporation 3 12 Moriya cho Kanagawa ku Yokohama shi Kanagawa 221 0022 JAPAN 2018 JVCKENWOOD Corporation B5A 1310 20 Service Contac...

Страница 29: ...and HDMI High Definition Multimedia Interface and the HDMI Logo are trademarks or registered trademarks of HDMI Licensing Administrator Inc in the United States and other countries MULTIFORMAT LCD MONITOR DT G series ...

Отзывы: