


DP320 User's Manual
- 27 -
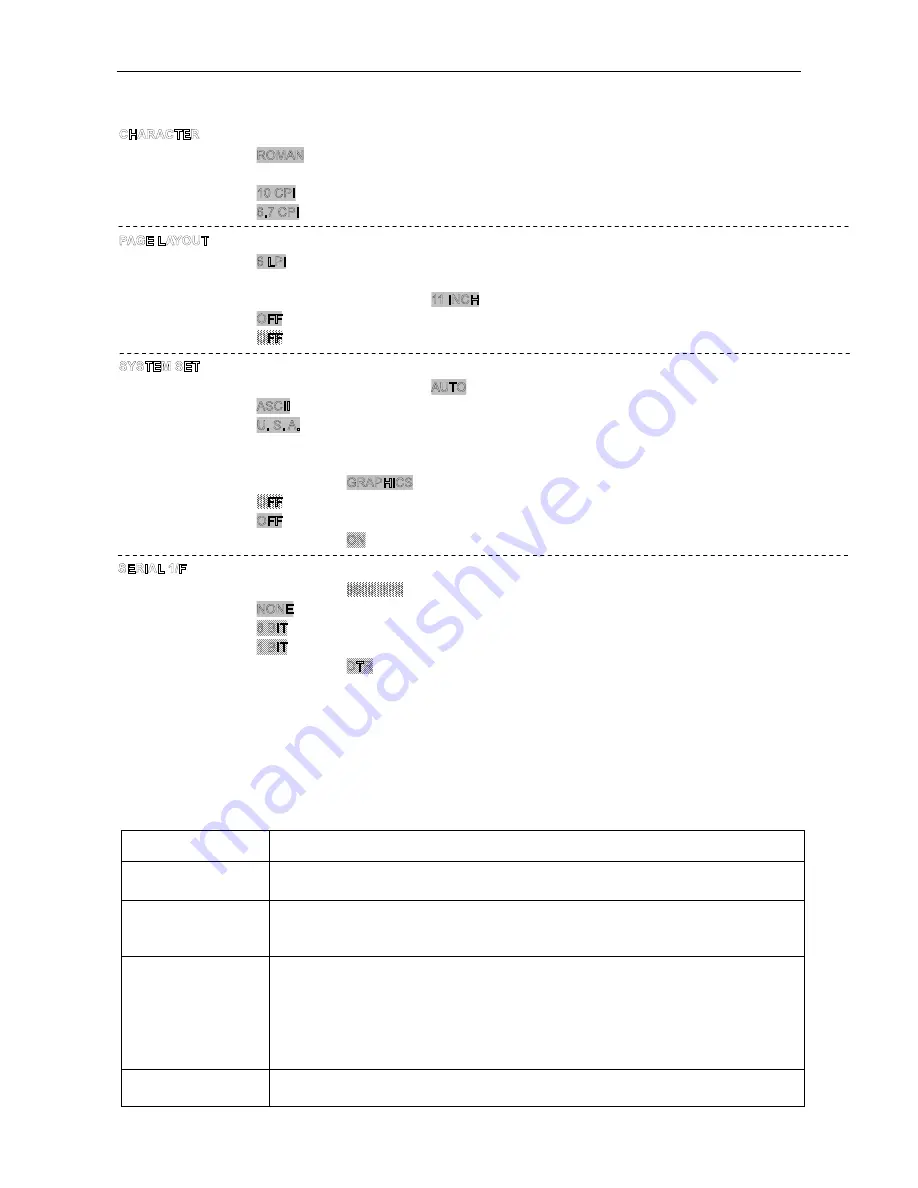
FONT
SANS SER
COURIER
PRESTIGE
SCRIPT
OCR-B
OCR-A
ORATOR
ENG PITCH
12 CPI
15 CPI
PROPORTIONAL
CHI PITCH
7.5 CPI
LINE SPACING
8 LPI
FORM LENGTH
3 INCH
11/3INCH
3.5 INCH
4 INCH
5 INCH
5.5 INCH
6 INCH
7 INCH
8.5 INCH
A4
12 INCH
PAGE SKIP
ON
COMPRESS PRI
ON
TEXT DIR
BI-DIR
UNI-DIR
CHAR. MODE
CHINA
INTL CHAR SET
FRANCE
GERMANY
U.K.
DENMARK1
SWEDEN
ITALY
SPAIN 1
JAPAN
NORWAY
DENMARK2
SPAIN 2
LATIN AM
KOREA
LEGAL
NETHER TURKEY
CHARACTER SET
ITALICS
QUIET MODE
ON
AUTO LF
ON
TEAR OFF
OFF
BAUD RATE
19200 BPS
24 BPS
19200 BPS
1200 BPS
PARITY
ODD EVEN
DATA BIT
7
BIT
STOP BIT
2
BIT
PROTOCOL XON/XOFF
Note: Because software settings always override the printer’s default settings, use your
software program to control the printer, if possible. See your software documentation
for more information.
3.2.1 Printer setting descriptions
This section describes all the settings available in the Printer Setting mode.
Options
Description
CHARACTER SET
Character tables contain the characters and symbols used in different
languages. Your printer includes a wide variety of character tables.
FORM LENGTH
This option is available only when you use continuous paper with the tractor.
You can set the page length to 8.5, 11, 12, or 70/6 (the length of A4 paper)
inches.
PAGE SKIP
When you turn on this feature, the printer skips over the perforations of
continuous paper, providing a 1-inch margin between the last line printed on
one page and the first line printed on the next. Because most software
programs set their own top and bottom margins, you should use this feature
only if your program does not provide them. This feature does not affect
single-sheet paper.
TEAR OFF
When you use continuous paper with the push tractor, this feature advances the
paper perforation to the tear-off position where you can easily tear off the
Jolimark DP320 Current Setting
Содержание DP320
Страница 1: ...User s Manual DP320 Dot Matrix Printer...
Страница 45: ......


