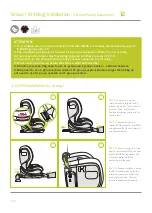
background image

7

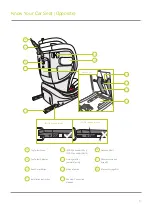
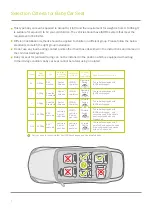
This type baby car seat is applied to /I/II/III and the requirement for weight is from 0 to 36kg. It 
is suitable for around 0 to 12 year-old children. The vehicle should have ISOFIX system that meet the 
requirement of ECE R14. 
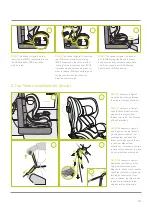
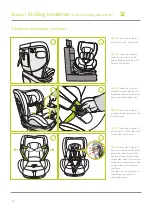
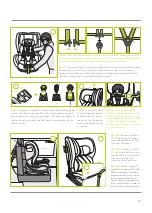
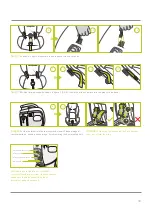
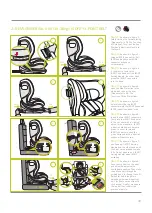
Different installation methods should be applied to children in different group. Please follow the below 
standards to match the right group installation.
Do not use any load bearing contact points other than those described in the instructions and marked in 
the child restraint system.
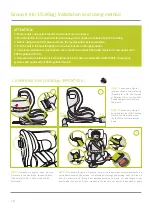
Baby car seat for rearward facing can not be installed in the position which is equipped with airbag.
In the driving condition, baby car seat cannot be lateral using or rotated.

Selection Criteria for Baby Car Seat

9months-

3years old

9months-

3years old

Group

Body

weight

Age

Children s

restraining

system

Installation

method

Direction

of

installation

Requirement for vehicles

0+

0-13kg

0-15

months

Rearward

Facing

5-point

harness

I

9-18kg

Rearward

Facing

5-point

harness

Forward

Facing

5-point

harness

9-18kg

I

Forward

Facing

vehicle s

3-point

seat belt

4-12

years old

15-36kg

II+III

Forward

Facing

4-12

years old

15-36kg

II+III

vehicle s

3-point

seat belt

vehicle s

3-point

seat belt

vehicle s

3-point

seat belt

top-tether

top-tether

top-tether

The vehicle equipped with

ISOFIX anchroages.

The vehicle equipped with

ISOFIX anchroages.

The vehicle equipped with

ISOFIX anchroages.

The vehicle equipped with

ISOFIX anchroages

 and

cannot be used if the vehicle

seat is equipped with only

2-point belt.
The vehicle equipped with 3-

point belt, and cannot be used 

if the vehicle seat is equipped 

with only 2-point belt.

Only can apply to the vehicle that has ISOFIX anchroages and 3-point safety belts.

Содержание Saturn

Страница 1: ...USER MANUAL Stroller Saturn IMPORTANT Retain for Future Reference Read Carefully www jikelbaby com FRANCE DESIGNED 0 EN 1888...

Страница 2: ...on No 44 04 series of amendments for general use in vehicles fitted with ISOFIX anchorages systems 2 It will fit vehicles with positions approved as ISOFIX positions as detailed in the vehicle handboo...

Страница 3: ...s likely if the vehicle manufacturer has declared in the vehicle handbook that the vehicle is capable of accepting a Universal child restraint for this age group This Child restraint is classified for...

Страница 4: ...be replaced with any other than the one recommended by the manufacturer because the cover constitutes an integral part of the restraint performance 10 The instructions can be retained on the child re...

Страница 5: ...Car Seat Function Introduction 8 Group 0 I 0 18kg Installation Rearward facing placement 9 Group I 9 18kg Installation Forward facing placement 13 5 Point Harness Removal 19 Group II III 15 36kg Inst...

Страница 6: ...g by baby from 9 12kg Central Adjuster Harness Adjustment Strap Side Protection Shoulder Pads 5 Harness Buckle 6 7 8 9 10 11 13 14 15 16 17 12 Installation Instruction Group 0 Cushion Using by baby 9...

Страница 7: ...uster 19 Rear Cover Button 20 Installation Instruction 21 22 ISOFIX Connector G0 I ISOFIT Connector GII III 23 Guiding slot for rearward facing 24 Side protection 25 Shoulder Harness Strap X2 28 Manua...

Страница 8: ...Group Body weight Age Children s restraining system Installation method Direction of installation Requirement for vehicles 0 0 13kg 0 15 months Rearward Facing 5 point harness I 9 18kg Rearward Facing...

Страница 9: ...t to close it you can press again to make it close like figure 1 As shown in above figure we suggest to open Side Protection one the side near the door Users can choose open it or not according to you...

Страница 10: ...FIX anchorages systems and approved to ECE Regulation No 14 2 The installation for Group 0 I is rearward facing and is applied to children from 0 to 18kg 3 This car seat for Group 0 I only has one sit...

Страница 11: ...he top tether Please refer to P8 The Function of Side Protection Pull Push Step 5 As shown in figure 5 insert the two ISOFIX connectors firmly into the ISOFIX fixed point in the car seat with a clicki...

Страница 12: ...hten the top tether until Top Tether Adjuster shows green Meanwhile shake the car seat to check the top tether is tightened favorably and correctly If you want to release top tether push the button to...

Страница 13: ...he position of pelvis The bottom of both shoulder pads should be close to the same horizontal line and pull down to the lowest position Methods to use harness buckle guide the two buckle latches toget...

Страница 14: ...and pull out some top tether strap Then put them in the headrest temporarily Pull Group I 9 18kg Installation Forward facing placement ATTENTION 1 Only suitable use in the listed vehicles fitted with...

Страница 15: ...e Protection in the side which is near the door Please refer to P8 The Function of Side Protection Step 7 As shown in figure 7 one hand pull ISOFIX Setting Handle and the other hand push the baby car...

Страница 16: ...e pull out the harness strap to release shoulder belt Step 4 As shown in figure 4 press the red button to open the harness buckle Step 5 As shown in figure 5 pull out both of the shoulder belt to both...

Страница 17: ...le bit One or two fingers is the best distance from the bottom of headrest to child s shoulders Step 7 As shown in figure 7 pull harness adjustment strap outward to fix child and avoid harness strap t...

Страница 18: ...the headrest to the suitable position Step 3 As shown in figure 3 tighten the top tether and put it in the headrest temporarily Then open the rear cover Step 4 remove the shoulder pads As shown in fig...

Страница 19: ...nto the rear cover and close it Please storage all removal parts As shown in above image finish removing the 5 point safety belt Attention When you install shoulder belt and harness yoke do not twist...

Страница 20: ...ure buckle in the right position 5 Universal Installation is only suitable use in the listed vehicles fitted with 3 point belt and approved to ECE Regulation No 16 6 Semi Universal Installation is onl...

Страница 21: ...ation window is red Step 7 As shown in figure 7 one hand pull ISOFIT Setting Handle and the other hand push the baby car seat base to make it fix Do not need to pull ISOFIT Setting Handle when ISOFIT...

Страница 22: ...emical cleaners and lubricants Hand Wash using the water under 30 Do not Bleach Do not Machine Dry Do not Iron Regularly check all important parts for damage Make sure that the mechanical components i...

Отзывы: