


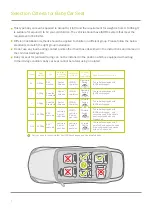


12
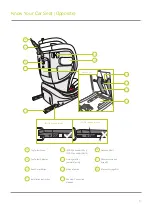
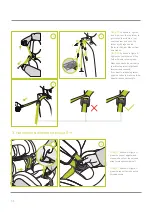
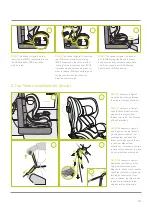
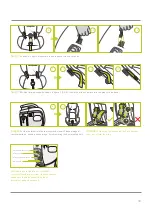
Step 4:
As shown in figure 4,
have your child sit on the seat to
ensure the lap belt restrict the
position of pelvis. Please check the
shoulder height, the shoulder belts
are required to place
a little bit higher level of your child's
shoulders. Too high or too low may
reduce the safety of the children's
restraining system.
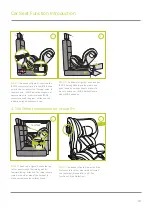
Step 3:
As shown in figure 3, pull
out both of
the shoulder belt to both sides of
the seat.
3
4
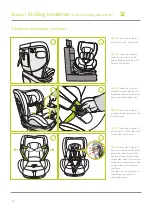
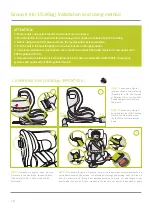
Step 5:
As shown in figure 5, pull harness adjustment strap outward to fix child and avoid harness strap to constrict child too much. It is better to
make adult palm can insert between harness strap and child's chest. Make sure the tightness is comfortable for your child and ensure the lap belt
restrict the position of pelvis.The bottom of both shoulder pads should be close to the same horizontal line and pull down to the lowest position.
Methods to use harness buckle: guide the two buckle latches together and engage them before
putting them into the harness buckle with a click nose. Pull the buckle latches to check whether
it is locked well. The buckle latches will be released if you press the red button.
5
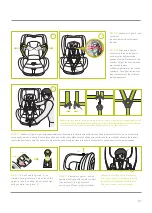
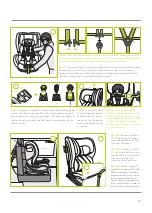
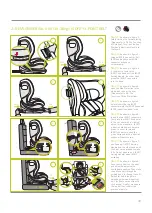
Step 6:
2. As shown in figure 6, in the
rearward-facing installation, when the child’s
weight is less than 18kg, the car seat’s right
sitting posture is only level 1.
Step 7:
As shown in figure 7, pull the
Headrest setting handle upward to adjust
the headrest to the right position
according to different height of children.
Pull
Attention: after sitting, adjust the headrest
to the right position. In the rearward facing
installation, shoulder pads should lower a
little bit or even up children's shoulders.
Level 1
Level 2


