14
07610-003-61-42-T
OPERATING INSTRUCTIONS
OPERATION
WARM-UP CYCLES
For a typical daily start-up, it may be necessary to run the machine through 3 cycles
to ensure that all of the cold water is out of the system and to verify that the unit is
operating correctly. To cycle the machine, ensure that the power is on and that the tub
has fi lled to the correct level. Lift the doors and the cycle light will illuminate. When the
light goes out, close the doors, the unit will start, run through the cycle, and shut off
automatically. Repeat this two more times. The unit should now be ready to proceed
with the washing of ware.
To wash a rack, open the doors completely (being careful for hot water that may drip
from the doors) and slide the rack into the unit.
Close the doors and the unit will start automatically. Once the cycle is completed,
open the door (again watching for the dripping hot water) and remove the rack of
clean ware. Replace with a rack of soiled ware and close the doors. The process will
then repeat itself.
Based upon usage, the pan strainer may become clogged with soil and debris as
the workday progresses. Operators should regularly inspect the pan strainer to
ensure it has not become clogged. If the strainer does, it will reduce the washing
capability of the machine. Instruct operators to clean out the pan strainer at regular
intervals or as required by work load.
At the end of the workday, close the doors. When the unit completes the cycle,
turn the power switch to the OFF position and open the doors. Remove and clean
the pan strainer. Remove the drain stopper from the tub and allow the tub to drain
(NOTE: the wash tank water will be hot so caution is advised). Once the wash tub is
drained, remove the pump suction strainer. Remove soil and debris from the strainer
and set to the side. Unscrew the wash and rinse arms from their manifolds. Remove
the endcaps and fl ush the arms with water. Use a brush to clean out the inside of
the arms. If the nozzles appear to be clogged, use a toothpick to remove the ob-
struction. Wipe the inside of the unit out, removing all soil and scraps. Reassembly
the wash and rinse arms and replace them in the unit. The arms only need to be
hand tight, do not use tools to tighten them down. Reinstall the drain stopper and
strainers and close the doors.
WASHING A RACK
OF WARE
OPERATIONAL
INSPECTION
SHUTDOWN &
CLEANING
Содержание TEMPSTAR
Страница 2: ......
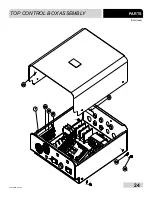
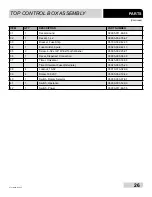
Страница 31: ...24 07610 003 61 42 T TOP CONTROL BOX ASSEMBLY PARTS Continued 26 1 29 28 30 33 34 36 ...
Страница 66: ...59 07610 003 61 42 T PARTS TEMPSTAR VENTLESS SYSTEM ASSEMBLY ...
Страница 74: ...07610 003 61 42 T 67 SCHEMATICS SOLID STATE 208 230V 50 60 HZ 1 3 PHASE TEMPSTAR TOP MOUNT W CYCLE SWITCHES ...
Страница 75: ...07610 003 61 42 T TEMPSTAR 208 230V 50 60 HZ 1 3 PHASE SCHEMATICS TEMPSTAR TOP MOUNT W CYCLE SWITCHES 68 ...
Страница 76: ...69 07610 003 61 42 T SCHEMATICS SOLID STATE 460 V 60 HZ 3 PHASE TEMPSTAR TOP MOUNT W CYCLE SWITCHES ...
Страница 77: ...70 TEMPSTAR 460 V 60 HZ 3 PHASE SCHEMATICS TEMPSTAR TOP MOUNT W CYCLE SWITCHES ...
Страница 79: ...72 TEMPSTAR LT NB 208 230V 50 60HZ 1 3 PHASE SCHEMATICS TEMPSTAR TOP MOUNT W CYCLE SWITCHES ...
Страница 80: ...73 07610 003 61 42 T SCHEMATICS TEMPSTAR NB LT 460V 50 60 HZ 3 PHASE TOP MOUNT UNIVERSAL TIMER ...
Страница 82: ...75 07610 003 61 42 T SCHEMATICS SDI OPTIONS ...
Страница 83: ...76 07610 003 61 42 T DRAIN QUENCH OPTIONS SCHEMATICS ...
Страница 85: ......


