background image

Operating the Operating Panel

58

No.

Element

Description

Reference

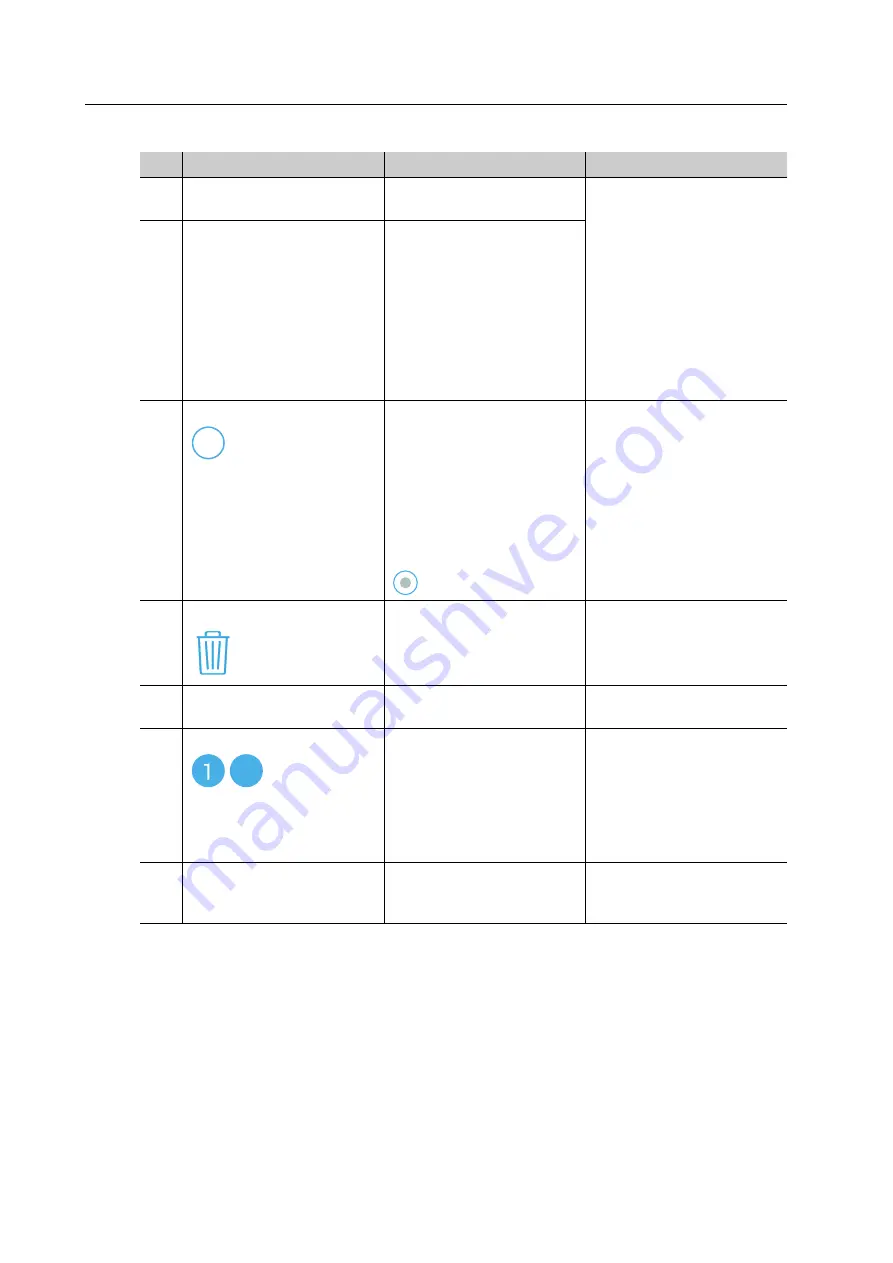
1

Milling job list

List of all available milling 
jobs

“Preparing milling 
jobs”, page 89

“Starting several milling 
jobs (Multi mode)”, 
page 108

“Deleting a not 
required milling job”, 
page 114

“Starting individual 
milling jobs (Single 
mode)”, page 107

2

Milling job

Details of the individual 
milling job

3

Symbol

The milling job cannot be 
selected for processing (5 
milling jobs have already 
been selected).
If less than 5 milling jobs 
have been selected (e.g. 
further milling jobs can be 
selected), the symbol will 
change to

-

4

Symbol

Delete the milling job 
from the list and remove 
from PrograMill One

“Deleting a not required 
milling job”, page 114

5

Status of the milling job

The colour of the outer 
ring indicates the status

“Status of the milling job”, 
page 59

6

Symbol

-

Milling job selected for 
machining (max. 5 milling 
jobs in the Multi mode).
The number indicates the 
position of the milling job 
in the processing 
sequence.

“Starting individual 
milling jobs (Single 
mode)”, page 107

“Starting several milling 
jobs (Multi mode)”, 
page 108

7

Type of milling job

The preview shows which 
restoration is created with 
the milling job

“Type of milling job”, 
page 59

5

Содержание PrograMill Base

Страница 1: ...ivoclardigital com PrograMill One Operating Instructions ...

Страница 2: ......

Страница 3: ...Working areas potential hazards and safety measures on the device 14 2 7 Safety instructions for potential hazard areas 16 2 8 Safety instructions for individual operating phases 18 3 Design and Function 20 3 1 Marking and labelling of PrograMill One 21 3 2 Design of PrograMill One 22 3 3 PrograMill One app and tablet 28 4 Transportation and Assembly 29 4 1 Choosing the location site 29 4 2 Transp...

Страница 4: ...3 6 4 Main menu Cases 56 6 5 Main menu ToDo 66 6 6 Main menu Service 71 7 Editing Milling Jobs 81 7 1 Special procedure to process zirconium oxide 81 7 2 Changing Refilling the water in the main tank and changing the filter 83 7 3 Preparing milling jobs 89 7 4 Starting individual milling jobs Single mode 107 7 5 Starting several milling jobs Multi mode 108 7 6 Performing an emergency stop 111 7 7 ...

Страница 5: ...device 134 10 2 Disposing of the device 134 11 Repair 135 11 1 Authorized service partners 135 11 2 Sending defective devices for repair 135 12 Technical Data 136 12 1 Classifications 136 12 2 Measurements weight 136 12 3 Ambient conditions 137 12 4 Electrical data 137 13 Appendix 138 13 1 Delivery form 138 13 2 Ordering spare parts 138 13 3 Recommended additional components 139 13 4 Approved tool...

Страница 6: ...cesses Should you lose these Operating Instructions you can download them from www ivoclarvivadent com For all types of technical questions please contact your authorized service partner 1 1 Target group Target group Duties Operator Keep these Operating Instructions available at the place where the unit is used also for future use Request personnel read and observe these Operating Instructions and...

Страница 7: ...arning WARNING WORD Name of source of danger cause of hazard or type of risk Consequences of non compliance with instructions Action in order to avoid danger Hazard example WARNING Risk of injury due to heavy lifting Injuries to the back due to overloading Only lift the device with the aid of the fork lift Unpack the device after transportation Warning symbol Warning word Danger level Consequences...

Страница 8: ...ed support of constructive tasks for the production of a product CAM Computer Aided Manufacturing Describes the use of a software independent of the CNC machine for creating the NC code CNC Computerized Numerical Control Describes an electronic method for controlling machine tools CNC machines EMC Electromagnetic Compatibility Describes the interference of electrical or electronic devices with the...

Страница 9: ...cument Clarification Checklist for your PrograMill One Information about requirements that must be observed for transportation installation and use of PrograMill One Safety Data Sheet PrograMill Fluid for One Information about the use of the PrograMill Fluid for One coolant concentrate Documentation on the blocks used Information on the use of blocks Documentation on the tools used Approved tools ...

Страница 10: ...areas of use materials and milling strategies approved by the manufacturer ensure processing without damage to the machine The machine has been designed for milling the following materials Glass ceramics IPS e max CAD IPS Empress CAD Composite blocks Tetric CAD Only approved blocks and tools can be identified and thus be used by PrograMill One via a data matrix code on the block or on the tool whi...

Страница 11: ...ed dental staff dental technicians and CNC technicians who have received training for operating the device The user is responsible for selecting the correct device settings 2 1 3 Intended environment The device is only permitted for use in closed rooms within the specified ambient conditions Ambient conditions for operation page 137 and in compliance with the requirements for safe installation Cho...

Страница 12: ...ies competence and monitoring of staff All work must only be carried out by qualified technical staff Personnel to be trained should only carry out work on the unit under the supervision of qualified technical personnel 2 4 Staff obligations Only operate the device in a technically perfect condition in a proper safety conscious and risk conscious manner and while observing these Operating Instruct...

Страница 13: ... dust vapours or other particles of dental materials during cleaning work wear a protective mask half mask with protection class FFP3 When carrying out cleaning work wear gloves When handling the PrograMill Fluid for One coolant concentrate and when cleaning the unit wear suitable protective equipment see Safety Data Sheet PrograMill Fluid for One Supporting documents page 9 ...

Страница 14: ...gnized technical safety regulations Hazardous areas which cannot be avoided by design are equipped with appropriate protective devices Nevertheless if the machine is used improperly there is a danger to life or risk of injury to the user or third parties In addition the device tools or workpieces may become damaged The working areas their potential hazards and applicable safety measures are shown ...

Страница 15: ...is running 2 Tank Removal of the tank for filling with coolant fluid and filter exchange Tank locking system protects against removal of the tank during operation Protection against electric shock health risks and danger to the environment due to leaking coolant fluid If the tank is not in place the device will not start The tank must be unlocked before removal Unlocking is not possible during act...

Страница 16: ...aMill One 2 7 2 Mechanics Whilst the device is in operation there are the following risks in the milling chamber or in the material and tool changer Risk of crushing Cutting injuries caused by tools Damage to the machine To avoid injury to the user from inside the unit never remove the covers Do not reach into the material and tool changer via the loading aid or the shaft Only reach in the milling...

Страница 17: ...installing Supporting documents page 9 To avoid the risk of electric shock only connect the device to a power supply with a protective earth conductor The mains plug is used as a supply circuit disconnecting means Always connect the mains plug to an easily accessible protective contact socket Connect the grounded and accessible safety contact socket to a separately secured circuit Make sure that t...

Страница 18: ... 137 2 8 3 Operation Keep unauthorized persons such as patients children and animals away from the unit In all cases of doubt regarding the safety of the device switch off the device and take suitable measures to prevent further use Prior to connecting power or operation check the device the accessories and protective equipment for any damage Do not use damaged non functioning equipment or accesso...

Страница 19: ...Work for the User page 125 2 8 5 Improper maintenance modifications and repairs Improper service and improper repairs or modifications will endanger patients and users and result in damage to the unit Should you carry out any repairs or maintenance to the system or modifications to the device or remove the housing without prior written consent by an authorized service partner all warranty claims a...

Страница 20: ...of the following components CNC milling machine PrograMill One Tablet with corresponding PrograMill One app to control the milling machine The PrograMill One system is not a stand alone system it is supplied with depending on the ordered system architecture an extending software Ivoclar Digital system solution For more information on CAD integrated solutions see further documentation The Ivoclar D...

Страница 21: ...ide The back of the milling machine has a type plate attached Symbols on the type plate No Description 1 Position of type plate Symbol Significance Manufacturer Year of manufacture format YYYY e g 2019 This product meets the requirements of the applicable EU directives Permitted supply voltage and supply frequency depending on country 2019 1 V 100 240 Hz 50 60 A 4 max ...

Страница 22: ...Design and Function 22 3 2 Design of PrograMill One 3 2 1 Front side 5 6 3 1 4 7 2 ...

Страница 23: ...adent standard holder or ESD pin B axis for One Max 8 milling grinding and cleaning tools Make sure that the cleaning tool is inserted into the tool holder slot marked with II The second position must be left empty 4 Tank with integrated filter Intake coolant fluid Filter for the used coolant fluid before it is reused in the milling chamber 5 Maintenance access with loading aid Loading the materia...

Страница 24: ... Function 24 3 2 2 Back side No Description Function 1 Network connection Connection to the power supply 2 LAN connection Connection to the local network 3 On Off switch Switching the device on and off 2019 3 2 1 ...

Страница 25: ...g or cleaning tools Milling the blocks 2 Inserted milling grinding or cleaning tool 3 Processing and changer arm B axis Placement of the tools into the spindle Holder for the block during the milling process 4 Inserted block 5 Opening to the milling chamber Access to the milling chamber 6 Membrane Sealing the milling chamber 7 Collection container Collection of solid and liquid milling and grindin...

Страница 26: ... tool changer via the loading aid The processing and changer arm provides the tool holders pos no 4 in the illustration for tools and block holders pos no 5 in the illustration for blocks from the block and tool changer cartridges at the loading aid where they can be removed loaded and inserted The illustrations of the block and tool holders in these Operating Instructions may differ slightly form...

Страница 27: ...s inserted into the tool holder slot marked with II The second position must be left empty 4 with 9 10 Tool holder Component for loading up to two tools by the user Arrow 9 shows the correct loading direction for the tool holder 4 in the loading aid The hooks 10 must point upwards when loading 5 with 6 8 Block holder Component for loading a block by the user Figures of the block 6 show the correct...

Страница 28: ...ill One app on the supplied tablet The PrograMill One app will be installed during the set up procedure Information on operating the tablet can be found in the manufacturer s Instructions for Use Information on using the app can be found in section Operating the Operating Panel page 50 PrograMill One ...

Страница 29: ...Do not place or operate the device in a potentially explosive environment In order to avoid overheating or corrosion on the device only operate the device within the permissible temperature range and ambient conditions Ambient conditions for operation page 137 Protect the device from moisture and heat direct sunlight radiators or other sources of heat Operate the device in a dust free environment ...

Страница 30: ...ess directly opposite the operator 2 Position the device in such a way that the maintenance access is aligned parallel to the position of the operator 3 Ensure the device is free standing and easily accessible a Do not fix the device to cabinets or shelves b Do not operate the device on or under other equipment c Maintain a distance to other devices Risk of stumbling and falling Avoid clutter in t...

Страница 31: ... device with suitable transport guards e g tension straps to prevent falling Avoid impact jerky movements and vibration during transportation Stay well clear of suspended loads or raised parts WARNING Risk of injury due to heavy lifting Injuries to the back due to overloading Transport and lift the device in pairs always hold the unit on the device floor Unpack the device after transportation Move...

Страница 32: ...hold the device on the handhold and the device floor Remove the fabric cover with handholds once the device is positioned on its definitive working surface Position the device carefully 1 Cut the transport bands with scissors 1 2 Fold in the handholds of the outer cardboard box The handhold will be unlocked 3 Remove the handhold of the outer cardboard box 2 4 Lift the outer cardboard box For this ...

Страница 33: ...he polystyrene from the box 5 7 Remove the accessories box from the box 6 8 With one person on each side grip the handholds and lift the device out of the box 7 We recommend that you keep the packaging for correct transportation in the event of service work 4 5 6 7 ...

Страница 34: ...remities Damage to the device Remove the fabric cover with handholds once it is positioned on its definitive working surface Position the device carefully Location site selected Choosing the location site page 29 Device unpacked Unpacking the unit page 32 1 With two people hold on to the handholds and place the device onto the workplace surface 1 2 Release the velcro bands 2 1 2 2 ...

Страница 35: ... signals of the OSD ring at any time and control all operating elements components and connections 5 Position the device so that there is no interference from other devices and so that it doesn t interfere with other devices Choosing the location site page 29 We recommend that you keep the packaging for possible maintenance and correct transportation 3 ...

Страница 36: ...sidual debris may be present in the milling chamber This does not constitute a product deficiency 1 Unpack the device at the place where it is used Unpacking the unit page 32 2 Check that all contents are complete Delivery form page 138 3 Check all components for transport damage 4 Report any transport damage or missing components immediately ...

Страница 37: ...Mill CAM Supporting documents page 9 To start up the device registration must be completed via the cloud system see https customer reg ivoclarvivadent com 5 1 Connecting the device to the power supply Only use the supplied power cable or an equivalent replacement power cable from Ivoclar Digital Ensure that the power supply requirements are correct Electrical safety page 17 Electrical data page 13...

Страница 38: ... connections Technical network specifications fulfilled Supporting documents page 9 Checklist for PrograMill One Network connection in house technology is secured Internet connection in house technology is secured Communication between the devices in the respective system solution sales partner or Ivoclar Vivadent Digital Instructor Master is secured 1 Connect one end of the patch cable to the Pro...

Страница 39: ...rst time When starting up for the first time or after long standing phases the procedure may take a little more time 1 Turn the On Off switch at the back of PrograMill One from 0 to I During the start up phase the OSD ring will blink in white Upon first switch on the device is in transport mode After any other switch on the device will automatically conduct a self test 2 Remove the transport safet...

Страница 40: ...e tablet and PrograMill One are switched on Switching on PrograMill One for the first time page 39 The tablet and PrograMill One are logged in to the same network 1 When using your mobile device for the first time Start the PrograMill One app Switching on the tablet page 39 The menu Auto Connect is shown automatically or If you would like to connect a different PrograMill One device to the app tha...

Страница 41: ...leaning tool inserted For security reasons the wizard will prompt you to acknowledge the following steps via the app The tablet and PrograMill One are switched on Switching on PrograMill One for the first time page 39 The tablet and PrograMill One are logged in to the same network PrograMill One is in the transport mode 1 Follow the instructions in the app The processing and changer arm will relea...

Страница 42: ...a slightly tilted position and insert it into the milling chamber 1 8 Shift the tilted collection container with the cover over the spindle 1 9 Insert the loading aid 1 in the direction of the arrow 10 Follow the instructions in the app We recommend that you keep the transport protection components for correct transportation in the event of service work 1 1 1 1 1 ...

Страница 43: ...ing injuries Only grasp the block holders on the sides marked with arrows The block holder is equipped with an arrow that indicates the correct insertion direction of the block holder into the loading aid 1 Insert the block holder into the loading aid according to the specified insertion direction 1 2 Place the block holder into the loading aid 2 3 Press the lever on the loading aid upwards until ...

Страница 44: ...ion direction of the tool holder into the loading aid 5 Insert the tool holder into the loading aid according to the specified insertion direction 1 6 Place the tool holder into the loading aid 2 7 Press the lever on the loading aid upwards until a resistance is felt Continue to push gently until the tool holder clicks into place 8 Repeat the procedure for all tool holders 9 Follow the instruction...

Страница 45: ...en handling ESD pins Wipe the ESD pins with a lint free cloth before use Clean the milling chamber including the collection container completely and very carefully with a dry clean soft cloth To avoid damaging sensitive components in the milling chamber avoid strong pressure scrubbing rubbing and wiping Do not clean with or enter the milling chamber using brushes tools sponges with metal component...

Страница 46: ... pin B axis for One 8 Insert the ESD pin tool holder for One as shown with the shaft phases pointing downwards into the processing and changer arm 9 Gently press the pin until it is firmly inserted 10 Follow the instructions in the app 11 Insert the loading aid according to the instructions of the app and follow the instructions of the app ...

Страница 47: ...nto the device Performing the automatic cleaning procedure page 127 CAUTION Sharp edges on the tool holder Cutting injuries Only grasp the tool holder on the closed sides front and back side For safety reasons the Wizard asks you to additionally confirm the following steps in the app 1 Remove the tool holder from the loading aid in the direction of the arrow ...

Страница 48: ...ted incorrectly Check the position of the cleaning tool Insert the cleaning tool as shown into the tool holder slot marked with II The second position must be left empty 2 Insert the cleaning tool as shown with the head pointing downwards into the tool holder slot marked with II so that the upper ring of the tool shaft locks into the tool holder The cleaning tool clicks securely into place in the ...

Страница 49: ...he ESD pins that are still in the device 5 7 4 Finalizing the set up 1 In order to remove the ESD pins that have remained in the device follow the instruction in the app 2 Check the app for further tasks and perform these tasks e g insert the tank The device will automatically perform a self test After successful self test the device is ready for operation 5 8 Using the app on other mobile devices...

Страница 50: ...ar basis The appearance of the user panel can vary from version to version Illustrations in these instructions may therefore be slightly different to the appearance in the app 6 1 Starting the app Tap on the icon The PrograMill One app will start When PrograMill One is connected to the app and the tablet the start screen will be shown Overview of the PrograMill One app page 51 If PrograMill One is...

Страница 51: ...PrograMill One app consists of the following areas No Element Description Reference 1 Navigation panel Display of the device name 2 Main area Main display area of the active menu 3 Main menu One Start menu with device overview Main menu One page 53 2 7 5 6 PrograMill One 1 3 4 ...

Страница 52: ...u ToDo Tasks to be performed by the user job dependent e g Insert tool Insert blocks Fill water tank Change the filter Main menu ToDo page 66 6 Main menu Service Display of the block positions in the material and tool changer Display of the tool positions in the material and tool changer Start the manual cleaning function and set the maintenance mode Additional settings of the device Main menu Ser...

Страница 53: ...Tasks Tasks that will be due shortly Pending tasks page 54 2 4 Messages regarding device status situation dependent Status indication that the device is ready for operation Pending tasks page 54 Device Messages and Troubleshooting page 116 3 OSD ring The colour of the OSD ring shows the current status of the device OSD ring status page 116 2 3 PrograMill One 4 1 1 3 ...

Страница 54: ...Element Designation Description Reference Water level low Water coolant fluid must be refilled shortly Changing Refilling the water in the main tank and changing the filter page 83 Manual cleaning Manual cleaning must be conducted shortly Carrying out manual cleaning work on the housing and in the milling chamber page 128 Replace filter The filter must be replaced shortly Changing Refilling the wa...

Страница 55: ...ance Device is in maintenance mode loading aid is unlocked or removed Main menu Service page 71 Cleaning Automatic cleaning is conducted Performing the automatic cleaning procedure page 127 Recalibrating Device is calibrated Removing the transport protection and preparing for initial operation page 41 Identifying Newly inserted blocks tools are identified Inserting tools page 89 Inserting blocks p...

Страница 56: ...s In the main menu Cases all milling jobs assigned to PrograMill One are edited It is divided into 3 sections New pending milling jobs Tab New page 57 Running milling jobs Tab Selected page 60 Completed milling jobs Structure of the tab Finished page 65 ...

Страница 57: ... 5 milling jobs for convenient chronological processing without the necessity of being present at the device You can transfer as many milling jobs as required to PrograMill One for later processing PrograMill One can process a maximum of 5 milling jobs in one milling sequence in the Multi mode 5 blocks can be placed in the material and tool changer This milling sequence can be defined as required ...

Страница 58: ...elected e g further milling jobs can be selected the symbol will change to 4 Symbol Delete the milling job from the list and remove from PrograMill One Deleting a not required milling job page 114 5 Status of the milling job The colour of the outer ring indicates the status Status of the milling job page 59 6 Symbol Milling job selected for machining max 5 milling jobs in the Multi mode The number...

Страница 59: ...ement Description Posterior crown Partial posterior crown Onlay Inlay Veneer Anterior crown Element Description Reference Job not ready for milling necessary tool or block has not been inserted Main menu ToDo page 66 Preparing milling jobs page 89 Job is ready for milling Tab Selected page 60 Starting individual milling jobs Single mode page 107 Starting several milling jobs Multi mode page 108 Jo...

Страница 60: ...layed in the Selected tab No Element Description Reference 1 Status indication starting and stopping the milling jobs Summary of the pending and running milling jobs Symbols to start and pause the milling jobs Top task from the main menu Cases Device status Structure of status display page 61 Starting individual milling jobs Single mode page 107 Starting several milling jobs Multi mode page 108 2 ...

Страница 61: ...xample of a pending milling job with tasks that must be done 3 Processing status of the milling jobs status only 1 2 3 etc Milling job ready for milling not yet started Preparing milling jobs page 89 Milling job is being processed Milling job not yet started 4 Typeand status of the milling job Type of restoration produced and current status of the milling job Type of milling job page 59 Status of ...

Страница 62: ...hich must be processed if applicable 3 Status bar milling job Left Elapsed time Right Total milling duration for all running and pending milling jobs 4 Milling duration Total remaining time in hh min for all pending and running milling jobs 5 Milling jobs Number of pending or running milling jobs 6 Symbols to start and pause the milling jobs symbol situation dependent Milling jobs can not yet be s...

Страница 63: ...the milling job Example Insert block indicated by the symbol displayed in the arrow at the right side Before starting the job 4 milling jobs are pending 3 milling jobs are ready for machining For the fourth milling job at least one task must be carried out in the ToDo section Example Insert block indicated by the symbol displayed in the arrow at the right side Before starting the job 4 milling job...

Страница 64: ...the processing queue During processing of the milling jobs After completion of the first milling job other milling jobs were paused and can be restarted at any time Pausing the processing of milling jobs after the current milling job and then continuing again page 110 All jobs have been completed and can be found in the tab Finished Status Description ...

Страница 65: ...ng and running milling jobs Symbols to start and pause the milling jobs Top task from the main menu ToDo Device status Structure of status display page 61 2 Unload milling job Section for milling job completion and unloading the final restoration tap Completing unloading the finished milling job page 112 3 Type and status of the milling job Type of restoration produced and indication that the mill...

Страница 66: ...ks that are still required to perform the selected milling jobs Preparing milling jobs page 89 This includes Insert required blocks Insert required tools Change water refill water reduce water Change the filter Identify tools and blocks Example Refill water MAINTENANCE MAINTENANCE 1 2 2 4 Tetric CAD HT A3 C14 IPS e max CAD HT A1 I12 IPS Empress CAD LT B1 C14 ...

Страница 67: ... Refilling the water in the main tank and changing the filter page 83 2 Section Tools List of tools still required for the active milling jobs Status displays in the section Tools page 70 Inserting tools page 89 3 Section Blocks List of blocks still required for the active milling jobs Status displays in the section Blocks page 70 Inserting blocks page 99 4 Section Identification Start manual iden...

Страница 68: ...y the Wizard will guide you step by step through the processing of the respective task s Example Insert the required blocks into the block holder example illustration After successfully completing the tasks the jobs can be started in the Cases menu Main menu Cases page 56 ...

Страница 69: ...he state of knowledge at the time of going to print With the introduction of new features this list will be continuously updated Element Description Reference Water level too high Changing Refilling the water in the main tank and changing the filter page 83 Water level too low Filter change required Perform the automatic cleaning procedure Performing the automatic cleaning procedure page 127 Perfo...

Страница 70: ...f the respective tools The ID shows the user which tools are actually required for the upcoming milling jobs By tapping on the respective entry in the list you can call up the corresponding Wizard which will then guide you through the upcoming task insert missing tools unload unused tools etc The following list of features corresponds to the state of knowledge at the time of going to print With th...

Страница 71: ...ve entry in the list you can start the identification manually As an alternative you can wait for the automatic identification by the device The device will automatically perform the identification within the next minutes 6 6 Main menu Service If a function is not active during a specific device status it will be greyed out In the main menu Service you can perform various configurations and preset...

Страница 72: ...ion Tools page 76 Inserting tools page 89 Start cleaning Perform manual cleaning at the device Carrying out manual cleaning work on the housing and in the milling chamber page 128 Maintenance mode Place the machine in maintenance mode to unlock the loading aid and perform work in the milling chamber Activate pump Start pump for a few seconds in order to drain liquid from the milling chamber Shut d...

Страница 73: ...ng to print With the introduction of new features this list will be continuously updated Element Description Reference No block inserted Inserting blocks page 99 Block is inserted and marked for identification The Data Matrix Code on the shaft will be read by the camera integrated into PrograMill One Block is inserted and correctly identified It is not required for any of the upcoming milling jobs...

Страница 74: ...corresponding milling job is ready for processing Starting individual milling jobs Single mode page 107 Starting several milling jobs Multi mode page 108 Block is currently in the milling chamber for identification Identification of the block failed The Data Matrix Code on the shaft could not be read unauthorized or damaged block unreadable code In such a case you can manually register the block u...

Страница 75: ...ools for calibration page 45 ESD pin B axis for One is in the material and tool changer Calibration is being conducted ESD pin tool holder for One is in the material and tool changer ESD pin tool holder for One is in the material and tool changer Calibration is being conducted Job failed Block is in the milling chamber Troubleshooting error table page 117 Job failed Block is again in the material ...

Страница 76: ...t Description Reference No tool inserted Inserting tools page 89 Tool is inserted and marked for identification The Data Matrix Code on the shaft will be read by the camera integrated into PrograMill One Tool is inserted and correctly identified It is not required for any of the upcoming milling jobs and is therefore not assigned to a job Removing unnecessary worn or defective tools page 95 Tool i...

Страница 77: ...efective tools page 95 Manually registering a non identified tool page 123 Worn tool Tool is in the spindle in the milling chamber Removing unnecessary worn or defective tools page 95 Worn tool The tool is again in the material and tool changer Job failed Tool is in the spindle in the milling chamber Job failed The tool is again in the material and tool changer Milling job is being processed tool ...

Страница 78: ...wn below the inserted tools In order to register those tools manually that could not be identified by the device tap this symbol For more information please refer to the following sections Troubleshooting error table page 117 Manually registering a non identified tool page 123 ...

Страница 79: ... corresponding update for the device is available In the section Settings the following information is shown Element Menu Description Reference Download machine update Download current software version onto the device Install machine update Install current software version onto the device Machine info Show information on the device name serial number PrograMill One PrograMill One ...

Страница 80: ...vice control another PrograMill One device with the app Connecting the tablet and PrograMill One page 40 Rename machine Customize the name of the machine Remote Adjust settings for remote operation Sensor data Define whether user data is transferred to the authorized service partner for service purposes and for product improvement Change language Set the language for the app s operating panel Regi...

Страница 81: ...re and execute these milling jobs in the app for processing by PrograMill One 7 1 Special procedure to process zirconium oxide The functionalities to process zirconium oxide will be available in an upcoming software version The processing of zirconium oxide after having milled other material types requires a special procedure which might differ slightly from the procedure described below Technical...

Страница 82: ...ain tank for zirconium oxide For reasons of safety the Wizard in the app guides you step by step through the individual steps The tanks are identical with the exception of their colour coding Preparation insertion and removal is done the same way The filter change is also identical No Designation Type of material Coolant fluid 1 Main tank with red colour code For all materials with the exception o...

Страница 83: ... and to the subsequent cleaning and maintenance of the tank and filter during operation It is not necessary to remove the filter on the initial start up The tank is equipped with a double bayonet closure Half turn of the tank lid When opening the tank the filter remains attached to the tank lid and can be removed together with the lid A half turn is suitable for water change More than half turn of...

Страница 84: ...ion of the coolant fluid Increased wear Reduced service life of the device and filter Use distilled water according to VDE0510 Always add the coolant concentrate PrograMill Fluid for One to the water NOTICE Falling or tipping of the tank Damage to the tank Carefully remove the tank fill and reinsert Ensure that the tank can not fall or tip 7 2 1 Preparing the coolant fluid filter change Press in t...

Страница 85: ...spose of the filter contents according to the instruction see safety data sheet Coolant Concentrate PrograMill Fluid for One Supporting documents page 9 5 Dispose of the tank contents according to the instruction see safety data sheet Coolant Concentrate PrograMill Fluid for One Supporting documents page 9 6 Fill the tank with water up to the middle of the marking between min and max with distille...

Страница 86: ...er change Finalizing coolant fluid filter change page 88 7 2 3 Changing the filter If you want to change the filter proceed as follows 1 Completely remove the tank from the device 1 2 Turn the tank lid in the direction of the arrow 2 until it is released from the tank and the filter 3 Remove the tank lid from the tank 1 2 1 ...

Страница 87: ...pose of the used filter according to country specific regulations 6 Dispose of the filter contents according to the instructions see safety data sheet Coolant Concentrate PrograMill Fluid for One Supporting documents page 9 7 Place the new filter into the tank 1 and turn in the direction of the arrow 2 1 2 2 1 ...

Страница 88: ... 9 Finalize coolant fluid filter change Finalizing coolant fluid filter change page 88 7 2 4 Finalizing coolant fluid filter change Place the tank as shown with the indentation 1 pointing towards the centre of the device and press in the direction of the arrow until the tank clicks into place 1 1 ...

Страница 89: ...nu Service The options will be described below 7 3 1 Inserting tools Observe the list of tools required for the different material types in section Approved tools for glass ceramic composite blocks page 139 You can either insert tools with the help of the Wizard in the main menu ToDo or as an advanced user insert tools independently into the material and tool changer via the main menu Service In t...

Страница 90: ...ed tools tap the tool of your choice The material and tool changer will be brought into position and the tool holder will be provided at the loading aid You can now insert the tool Inserting the tools into the device using the loading aid page 92 The app shows a Wizard which will guide you step by step through the insertion process Tetric CAD HT A3 C14 IPS e max CAD HT A1 I12 IPS Empress CAD LT B1...

Страница 91: ...t the sub menu Tools 2 In the list of tools tap on the position of your choice The material and tool changer will be brought into position and the tool holder will be provided at the loading aid You can now insert the tool Inserting the tools into the device using the loading aid page 92 The app shows a Wizard which will guide you step by step through the insertion process ...

Страница 92: ...yed on the app CAUTION Sharp edges on the tool holder Risk of cutting injury Only grasp the tool holder on the closed sides front and back sides CAUTION Sharp edged tools Cutting injuries by sharp cutting edges When handling the tools be careful not to injure yourself or others Only grasp the milling tools on the shaft not on the cutting edge For safety reasons the Wizard asks you to additionally ...

Страница 93: ...o the tool holder so that the upper ring on the tool shaft locks into the tool holder The tool clicks securely into place in the tool holder On the tool holder there is an arrow to show the correct direction of insertion for the tool holder in the loading aid 3 Insert the tool holder with tool in position into the loading aid according to the specified insertion direction 1 4 Place the tool holder...

Страница 94: ...ndicated by the symbol in the app for symbol description see Status displays in the section Tools page 70 If the tool has been successfully identified or an error occurred the symbol changes accordingly In case of an unsuccessful identification you can manually register the tool in the app In the event of a failed identification additional information on troubleshooting can be found in section Tro...

Страница 95: ...enu ToDo only the tools which are required for the milling jobs will be displayed In the menu Service Tools you have access to all tool holders The options will be described below Operating the material and tool changer via the main menu ToDo You are in the main menu ToDo The material and tool changer is not active In the Tools section in the list of required tools tap the tool of your choice The ...

Страница 96: ... are in the main menu Service The material and tool changer is not active 1 Select the sub menu Tools 2 In the list of tools tap the position of your choice The material and tool changer will be brought into position and the tool holder with the tool in place will be provided at the loading aid You can now remove the tool Removing tools from the device via the loading aid page 97 The app shows a W...

Страница 97: ... back sides CAUTION Sharp edged tools Cutting injuries by sharp cutting edges When handling the tools be careful not to injure yourself or others Only grasp the milling tools on the shaft not on the cutting edge For safety reasons the Wizard asks you to additionally confirm the following steps in the app 1 Remove the tool holder with the tool from the loading aid in the direction of the arrow ...

Страница 98: ...l holder 3 Dispose of worn tools or Tools which will be reused must be kept in the correct position for safe identification and protected against damage 4 Insert new tool in tool holder or place the empty tool holder into the device Inserting tools page 89 ...

Страница 99: ...ill be described below Operating the material and tool changer via the main menu ToDo You are in the main menu ToDo The material and tool changer is not active In the Blocks section in the list of required blocks tap the block of your choice The material and tool changer will be brought into position and the block holder will be provided at the loading aid You can insert the block Inserting the bl...

Страница 100: ...t the sub menu Blocks 2 In the list of blocks tap on the position of your choice The material and tool changer will be brought into position and the block holder will be provided at the loading aid You can insert the block Inserting the block into the device using the loading aid page 101 The app shows a Wizard which will guide you step by step through the insertion process ...

Страница 101: ...d insertion direction and then transferred to the material and tool changer CAUTION Sharp edges on the block holder Cutting injuries Only grasp the block holders on the sides marked with arrows For safety reasons the Wizard asks you to additionally confirm the following steps in the app 1 If the block holder is installed Remove the block holder from the loading aid in the direction of the arrow ...

Страница 102: ...sily the installation direction may be incorrect Rotate the block as illustrated with the metal shaft down until it fits easily into the block holder CAUTION Block inserted the wrong way around Damage to the device Damaged block Insert the block into the block holder according to the instructions Do not insert with force 2 Insert the block as shown 1 with the shaft pointing downwards into the bloc...

Страница 103: ...o e g for faster start of the milling job in the Single mode or Have the device automatically register the block e g when inserting numerous block in the Multi mode The block is identified scanned indicated by the symbol in the app for symbol description see Status displays in the section Blocks page 70 If the block has been successfully identified the symbol changes accordingly In case of an unsu...

Страница 104: ...ned below using an unused or defective block Operating the material and tool changer via the main menu ToDo You are in the main menu ToDo The material and tool changer is not active In the Blocks section in the list of required tools tap on your choice The material and tool changer will be brought into position and the block holder containing the block will be provided at the loading aid You can r...

Страница 105: ...b menu Blocks 2 In the list of blocks tap on the position of your choice The material and tool changer will be brought into position and the block holder containing the block will be provided at the loading aid You can remove the block Removing the block from the device via the loading aid page 106 The app shows a Wizard which will guide you step by step through the removal process ...

Страница 106: ...moving the block from the block holder 3 Dispose of the defective block according to the specifications in the instructions or Blocks which will be reused at a later stage must be kept in the correct position for safe identification and protected against damage 4 Insert the new block in the block holder or place the empty block holder into the device Inserting blocks page 99 ...

Страница 107: ...he milling job with the help of the Wizard The cleaning status of the unit is OK Cleaning and Maintenance Work for the User page 125 You are in the main menu Cases in the tab New 1 In order to start the milling jobs tap on the symbol in the status display The milling job is selected and marked with You can start the milling job in both tabs New or Selected 2 In order to start the milling job tap o...

Страница 108: ...sing PrograMill One can process a maximum of 5 milling jobs in one milling sequence in the Multi mode 5 blocks can be placed in the material and tool changer This sequence can be defined as required by the user After successful processing of the 5 defined milling jobs the next 5 can be prioritized and prepared You are in the main menu Cases At least two milling jobs are displayed 1 Tap on the tab ...

Страница 109: ...illing job related tasks are pending the first task will be shown in the status bar on the right side and the number of all pending tasks will be shown in the menu bar of the main menu ToDo 4 Click the first task in the status bar and perform all task one by one with the help of the Wizard or Perform the tasks in the main menu ToDo 5 As soon as all tasks are performed tap the following symbol in t...

Страница 110: ...nu Cases in the tab Selected 1 In order to pause the milling jobs example milling jobs 2 and 3 after the currently running milling job tap on the symbol in the status display The current milling job is processed until it is complete Once the current milling job has finished PrograMill One stops 2 In order to continue processing milling jobs 2 and 3 tap the symbol in the status display The next mil...

Страница 111: ...trolled manner Processing and changer arm is in the wrong position Danger of collision in the milling chamber and therefore damage to the device at the start of a new milling job or the resumption of a milling job Damage to the device Damage to blocks or tools Only use the emergency stop in extreme emergencies A milling job is processed You are in the main menu Cases in the tab Selected To activat...

Страница 112: ...es in the tab Finished In the list of finished jobs tap on the job of your choice The milling job is completed The material and tool changer will be brought into position and the block holder containing the milled restoration will be provided at the loading aid You can remove the restoration Removing the finished restoration at the loading aid page 113 The app shows a Wizard which will guide you s...

Страница 113: ...he direction of the arrow CAUTION Sharp edges on the restoration Cutting injuries Only grasp the restoration at the metal shaft 2 Remove the restoration from the block holder 3 Insert a new block in the block holder or place the empty block holder into the device Inserting blocks page 99 4 Clean the restoration Cleaning the restoration page 114 ...

Страница 114: ...ing further processing Clean the restoration before further processing Clean the restoration according to the specifications in the instructions of the respective material 7 8 Deleting a not required milling job The tab New in the Cases menu offers the option to delete not yet processed milling jobs from the list You are in the main menu Cases in the tab New At least one milling job is shown Tap o...

Страница 115: ...o not pull the power supply plug during active processing Do not switch off the device during operation with the on off switch Wait until the active milling processes have finished All active milling jobs have been successfully completed Sealing air has run for 20 minutes 1 In the menu select Service Shut down During the shut down the OSD ring blinks white from the milling chamber towards the On O...

Страница 116: ...ossibly user intervention required possibly output error code Contact your authorized service partner Orange blinking light white Display of maintenance tasks in the area of the loading aid Pending tasks for the operator Blue white sequential light Automatic cleaning is being conducted Blue green sequential light with coloured edge Device is active e g milling job is processed Blue green sequentia...

Страница 117: ...If the problem continues Contact your authorized service partner App does not recognize the device Switched on machine does not respond to input via tablet No network connection Check network connection and restore if necessary If the problem continues Please contact the in house technician Necessary updates have not been downloaded Download an update from the respective store iTunes Play Store et...

Страница 118: ...No milling jobs transmitted by the CAM software depending on the system architecture Transfer milling jobs to the milling machine again No network connection Check network connection and restore if necessary Transfer milling jobs to the milling machine again If the problem continues Please contact the in house technician Milling jobs will not start Tasks haven t been finished None or incorrect too...

Страница 119: ...thout suitable Data Matrix Code has been inserted Eject tool block Removing unnecessary worn or defective tools page 95 Insert a suitable tool block Inserting tools page 89 and Inserting blocks page 99 Register tool block manually Manually registering a non identified tool page 123 and Manuallyregistering a non identified block page 121 Data Matrix Code is scratched or damaged Tool block is recogn...

Страница 120: ...tact your authorized service partner Check the construction in the CAD and CAM software Transfer milling jobs to the milling machine again Insert a suitable tool block Inserting tools page 89 and Inserting blocks page 99 Construction error in the CAD software Error in the work preparation or milling path calculation in the CAM software depending on system architecture Error Possible reason s Solut...

Страница 121: ...Data Matrix Code on the shaft of a block cannot be read out during the identification process you can register the block manually To do so proceed as follows 1 Choose the section Blocks The list of inserted blocks is displayed The following symbol is shown in the entry of the non identified block ...

Страница 122: ...l settings e g choose the shade define the sinter shrinkage follow the instructions in the app The block is registered Select block type Cancel IPS e max CAD IPS Empress CAD PrograMill One Tetric CAD e max CAD i12 IPS e max CAD C14 IPS e max CAD C16 IPS Empress CAD i12 IPS Empress CAD C14 IPS Tetric CAD i12 Tetric CAD C14 ESD Pin for One ESD Pin B Axis for One I12 C14 C16 I12 C14 I12 C14 Unidentif...

Страница 123: ...e on the shaft of a tool cannot be read out during the identification process you can register the tool manually To do so proceed as follows You are in the main menu Service 1 Choose the section Tools The list of inserted tools is displayed The following symbol is shown in the entry of the non identified tool ...

Страница 124: ... will be displayed 3 Tap on the desired tool type 4 To confirm the tool type follow the instructions in the app The tool is registered Select tool Cancel PrograMill tool red g0 5 for One PrograMill tool red g1 2 for One Cleaning tool for One ESD Stift B Achse for One Unidentifiable in slot 1 PrograMill One Tools ...

Страница 125: ...xed with coolant concentrate must be collected separately and disposed of according to country specific requirements DANGER Improper cleaning and maintenance of the device Failure to observe the specified cleaning intervals stated in the app and defined in these instructions Danger to patients and users Damage to the device Only carry out work on the device described in this chapter and assigned t...

Страница 126: ... Operator According to app notifications Automatic cleaning program of the milling chamber Automatic cleaning by the system without intervention by the operator The machine will perform cleaning automatically depending on the number of processed milling jobs Performing the automatic cleaning procedure page 127 For automatic cleaning the cleaning tool must be inserted into the material and tool cha...

Страница 127: ...d in the delivery Upon initial start up the cleaning tool is inserted in the same way as a tool into the material and tool changer and usually remains in the device For easy handling the cleaning tool is placed into one of the tool holders The second location in the tool holder can not be used during this time The cleaning tool is inserted in the device Inserting the cleaning tool into the materia...

Страница 128: ...changer Inserting the cleaning tool into the material and tool changer page 47 The device is switched on You are in the main menu Service 1 If there is still water in the milling chamber at the time of cleaning Start the integrated suction pump via the menu Activate pump 2 In the menu tap on Start cleaning The app shows a Wizard which will guide you step by step through the cleaning process Shut d...

Страница 129: ... 3 Cleaning the housing WARNING Improper cleaning of the device Voltage carrying components come into contact with moisture Voltage carrying components are exposed Danger of electric shock Damage to the device Never remove the housing cover Ensure that no liquids or items enter into the inside of the device Clean the housing with a soft cloth dampened with tap water and a mild pH neutral detergent...

Страница 130: ...sing brushes tools sponges with metal components or any cleaning equipment other than that specified in this chapter Do not use sharp chlorine containing cleaners Only use mild pH neutral cleaning agents To avoid damaging the sensitive components in the milling chamber avoid strong pressure scrubbing rubbing and wiping In general do not clean the processing and changer arm the changer fork and noz...

Страница 131: ...uide you step by step through the individual cleaning tasks 1 Remove excess water with a dry towel 2 Grasp the collection container 2 and cover 2 by the handle 1 3 Hold the collection container and cover at a slight angle 4 Remove the collection container and cover from the milling chamber 1 2 ...

Страница 132: ...efully clean the drainage in the milling chamber with a cotton bud 8 Release the lateral locks of the collection container and remove the cover from the collection container 9 Remove residues in the inside of the collection container using a plastic spatula and dispose of according to local specifications documentation on the blocks used Supporting documents page 9 10 Rinse the collection containe...

Страница 133: ...and Maintenance Work for the User 133 9 3 5 Inserting the loading aid 1 Wipe the bottom of the maintenance access with a soft cloth dampened with water 2 Insert the loading aid 1 in the direction of the arrow 1 ...

Страница 134: ...at the storage requirements are met Ambient conditions for storage and transportation page 137 10 2 Disposing of the device The operator is responsible for proper disposal The product must not be disposed of in the household waste It must be collected separately from the household waste and disposed of according to local regulations for the disposal of electronic equipment in an environ mentally s...

Страница 135: ... the authorized service partners in your country contact your local distribution partner or Ivoclar Vivadent or go to http www ivoclarvivadent com 11 2 Sending defective devices for repair Use only the original packaging together with the corresponding foam material for transportation purposes 1 Take the device out of service before returning it to the authorized service partner Decommissioning pa...

Страница 136: ... Characteristics Value Test standards IEC 61010 1 2010 EN 61010 1 2010 UL 61010 1 2012 05 CAN CSA C22 2 No 61010 1 2012 05 Radio protection Electromagnetic compatibility EMV certified Noise level Measuring conditions 70 dB A All other action movements tool change axis movement etc 70 dB in 1 m distance Measuring conditions Tools standing time expired Measuring distance to sound source 1m Measureme...

Страница 137: ... Acceptable ambient pressure 500 mbar to 1060 mbar Characteristics Value Acceptable ambient temperature 15 C to 30 C Maximum relative humidity 80 for temperatures up to 31 C gradually decreasing to 50 relative humidity at 40 C condensation excluded Maximum operating altitude 2000 m 6561 feet above sea level elevation Characteristics Value Network connection 100 to 240 V 50 to 60 Hz Permissible vol...

Страница 138: ... without accessories Tablet PC 1 689262 Second tank 1 Patch cable 5 m green cat 5 1 662792 Power cable 1 country specific ESD pin spindle for One 1 689258 ESD pin B axis for One 1 689259 Block holder for One 6 689263 Tool holder for One 5 689264 Screen cleaner for One 1 689260 Collet 4 mm for One 1 689257 PrograMill filter for One 2 689265 PrograMill tool red g1 2 for One 1 689062 PrograMill tool ...

Страница 139: ... corresponds to the state of knowledge at the time of going to print For additional details go to http www ivoclarvivadent com The number in the article description corresponds to the shaft diameter in millimetres Further identification of the tools c coated coating for longer service life g grinder diamond coated grinder for wet processing of glass ceramics Item description Number Item number Pro...

Страница 140: ...Appendix 140 13 5 CE marking Declaration of Conformity ...

Страница 141: ......

Страница 142: ......

Страница 143: ......

Страница 144: ...k M5 No 1 Kecamatan Cisauk Kelurahan Sampora 15345 Tangerang Selatan Banten Indonesia Tel 62 21 3003 2932 Fax 62 21 3003 2934 www ivoclarvivadent com Ivoclar Vivadent s r l Via del Lavoro 47 40033 Casalecchio di Reno BO Italy Tel 39 051 6113555 Fax 39 051 6113565 www ivoclarvivadent it Ivoclar Vivadent K K 1 28 24 4F Hongo Bunkyo ku Tokyo 113 0033 Japan Tel 81 3 6903 3535 Fax 81 3 5844 3657 www iv...

Отзывы: