15
6X-1050a
3960 CAMERA
INSTALLATION AND OPERATION
room air (which typically has a high relative humid-
ity) by flowing dry nitrogen into the Schrader valve
and out the pressure relief valve. This relief valve
should be held open to aid in the flow of nitrogen
out of the camera.
This purging process removes moist room air
from inside the camera and provides an internal
relative humidity of five percent or less. A camera is
typically pressurized to 5 psig (34 kPa). Pressure
can be allowed to go below this — even down to
one or two pounds so long as the pressure does not
ever become zero. An occasional recharge of dry
nitrogen can be used to maintain pressure near 5
psig (34 kPa). If pressure continually drops it is an
indication of a slow leak. These pressure refer-
ences are gauge pressures (psig). They are relative
to the altitude above sea level at which they are
being measured.
2.8.1.2 Pressure Relief Valve
The pressure relief valve opens at about 20
psig (138 kPa). This relief pressure allows the 3960
to be taken to high altitude during transportation
without excess bleed off of dry nitrogen from the
camera housing. If the camera module should loose
some dry nitrogen during high altitude transporta-
tion (as indicated by a pressure reading below
about 5 psig) then some additional dry nitrogen may
be added to replenish the lost nitrogen.
This valve should be manually lifted off its seat
or pushed slightly to the side when it is desired to
flow dry nitrogen through the camera to purge
moisture laden atmospheric air from the camera
module.
Regularly applying pressure above 5 to 8 psig
(35 to 55 kPa) may cause seals to weaken and
leak.
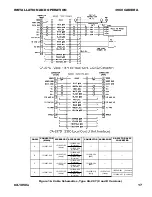
2.8.2 16-pin Connector
This connector is attached to the 34 inch (86
cm) long cable that is permanently attached to the
base of the 3960. Table 6 lists pin functions for a
115 V ac version of the 3960 and table 7 lists
functions for a 24 V ac version. Note that five of the
pins are not used — although different pins are
used to apply the line (hot) lead of 115 V ac and
one line of the 24 V ac power. The camera model
number identifies whether it is configured for 115 V
ac or 24 V ac operation.
Figure 10 is the pin location diagram of this
connector. It is a view from the mating side of the
connector. This view is identical to the wiring view of
a mating connector (supplied) for the system cable
that plugs into this 3960 connector.
The connector supplied for the system cable
should not be installed until it is verified that the
cable can be pulled through any conduit or other
restricted passage on its way to the mounting
location of the 3960.
2.9 Preparation for Shipment and Storage
Maintain the 3960 storage environment within
a range of -34 to 74 °C (-29 to 165 °F).
Figure 14. Camera Module Rear Panel
Figure 15. Model 9300 Local Control Panel (Optional Installation Equipment)

