76
Intel
®
Server System SR2600UR/SR2625UR Service Guide
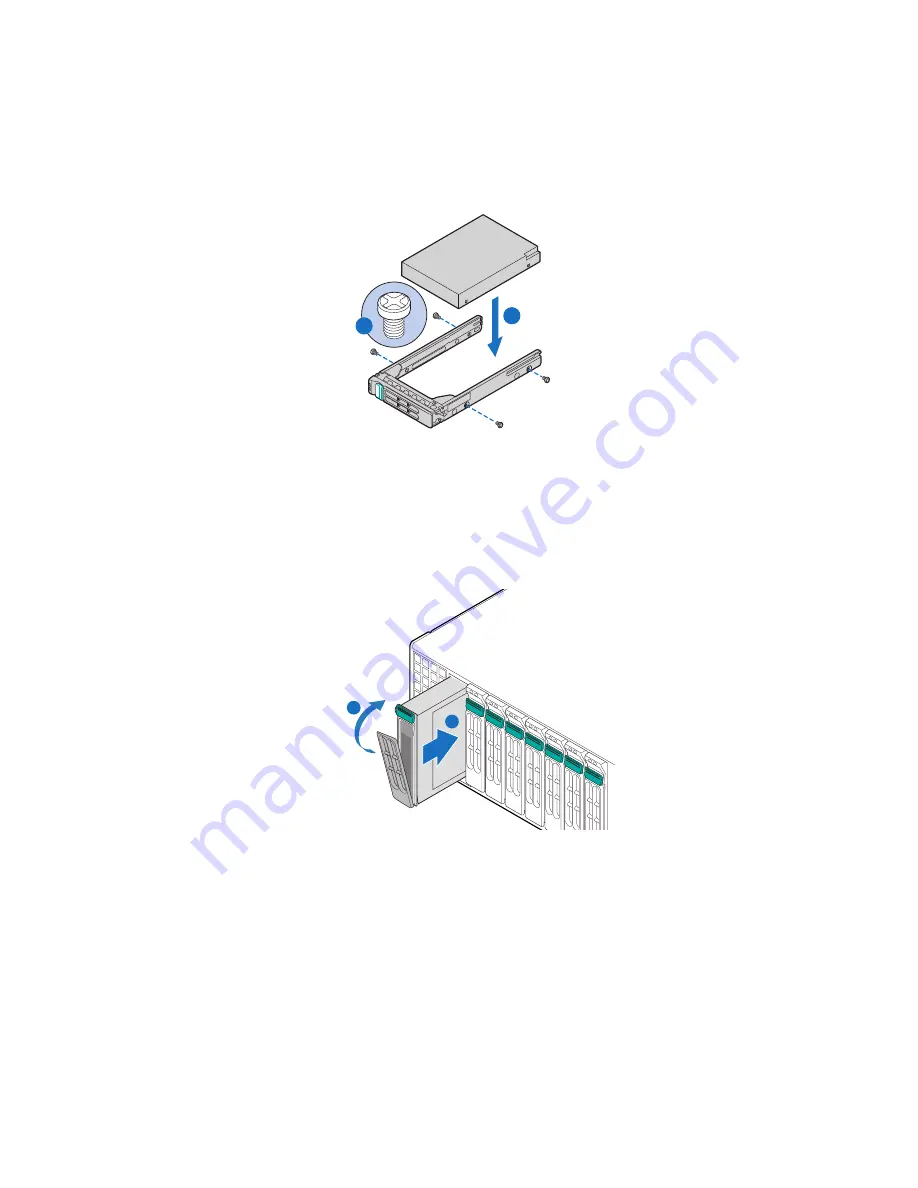
7. Align the holes in the drive to the holes in the drive carrier and attach it to the
carrier using the four screws that were attached to the plastic retention device (see
letter “B” in
Figure 61
).
Figure 61. Installing Hard Drive into Carrier
8. With the black lever held in the fully open position, slide the hard disk assembly
into the server system and push all the way until it clicks (see letter “A” in
Figure 62
).
9. Close the lever to lock the drive assembly into place (see letter “B” in
Figure 62
).
Figure 62. Installing Drive Assemby into the Server System
Removing a Hot-swap SAS/SATA Hard Disk Drive
To remove a hot-swap SAS/SATA hard disk drive from Intel
®
Server System SR2625UR,
follow these steps:
1. Press in on the green latch at the front of the hard drive carrier.
2. Pull out on the black lever to slide the carrier out from the server system.
AF0029
88
A
B
A
B
AF002989
Содержание SR2600URLX
Страница 4: ...iv Intel Server System SR2600UR SR2625UR Service Guide...
Страница 8: ...viii Intel Server System SR2600UR SR2625UR Service Guide...
Страница 18: ...xviii Intel Server System SR2600UR SR2625UR Service Guide...
Страница 20: ...xx Intel Server System SR2600UR SR2625UR Service Guide...
Страница 26: ...6 Intel Server System SR2600UR SR2625UR Service Guide...
Страница 28: ...8 Intel Server System SR2600UR SR2625UR Service Guide Figure 2 Intel Server System SR2625UR AF002819...
Страница 88: ...68 Intel Server System SR2600UR SR2625UR Service Guide Figure 51 Removing the Fan Baffle AF003021 A B C...
Страница 170: ...152 Intel Server System SR2600UR SR2625UR Service Guide...
Страница 180: ...162 Intel Server System SR2600UR SR2625UR Service Guide...
Страница 204: ...186 Intel Server System SR2600UR SR2625UR Service Guide...
Страница 228: ...210 Intel Server System SR2600UR SR2625UR Service Guide...


