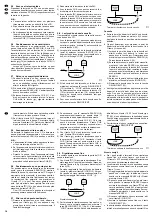
4) Zum erneuten Abspielen der Endlosschleife die
Taste RELOOP/EXIT betätigen.
Endlosschleife beenden und erneut aktivieren
➅
Tips
a Zwischen dem Start- und dem Endpunkt einer
Endlosschleife müssen mindestens 10 Frames
liegen (= 0,13 Sekunden), sonst wird die Schleife
weder gespeichert noch gestartet.
b Der Start- und der Endpunkt einer Endlosschleife
lassen sich auch auf einem Frame (
1
/
75
Sekunde)
genau festlegen:
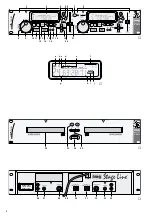
1) Beim Erreichen des Startpunktes zuerst mit
der Taste
auf Pause schalten. Den Punkt
genau mit dem Drehknopf SEARCH (8) an-
fahren. Dann die Taste A (10) drücken.
2) Jetzt entweder den Endpunkt manuell mit
dem Drehknopf SEARCH anfahren oder
zuerst die Wiedergabe mit der Taste
star-
ten und beim Erreichen es Endpunktes wieder
mit der Taste
auf Pause schalten und
dann den Endpunkt genau mit dem Drehknopf
SEARCH anfahren.
3) Nachdem der Endpunkt genau angefahren ist,
die Taste B/LOOP (12) betätigen.
4) Die Endlosschleife mit der Taste RELOOP/
EXIT (13) starten.
c Bei einer gespeicherten Endlosschleife lassen
sich der Start- und der Endpunkt auch verschie-
ben. Sobald der neue Punkt erreicht ist, die Taste
A bzw. B / LOOP drücken. Dieses kann bei Wie-
dergabe der Scheife, bei normaler Wiedergabe
oder im Pausenmodus und innerhalb oder außer-
halb der bisherigen Scheife erfolgen.
5.9 Geschwindigkeit und Tonhöhe verändern
Die Geschwindigkeit und damit gleichzeitig die Ton-
höhe läßt sich mit dem Schieberegler PITCH CON-
TROL (21) um max. ±16 % ändern.
1) Die Taste ON/OFF (4) drücken. Die LED „8 %“
über der Taste leuchtet (Grundeinstellung nach
dem Einschalten), der Einstellbereich beträgt
±8 %.
2) Wird ein anderer Einstellbereich benötigt (±16 %
für eine größere Geschwindigkeitsänderung oder
±4 % für eine feinere Einstellung), die Taste
PITCH (6) so oft betätigen, bis die entspre-
chende LED (4 %, 8 %, 16 %) leuchtet.
3) Die Geschwindigkeit mit dem Schieberegler
PITCH CONTROL (21) verändern. Im Display
wird die mit dem Schieberegler eingestellte pro-
zentuale Abweichung (f) von der Standardge-
schwindigkeit angezeigt. Die Geschwindigkeit
läßt sich im Bereich von 0 bis 8 % in 0,1-%-
Schritten verändern und im Bereich von 8 % bis
16 % in 0,2-%-Schritten.
4) Mit der Taste ON/OFF kann zwischen der mit
dem Schieberegler eingestellten Geschwindig-
keit und der Standardgeschwindigkeit hin- und
hergeschaltet werden.
5.10 Takt zwischen zwei Musikstücken an-
gleichen
Mit dem Steuerhebel (19) kann der Takt eines Titels
auf dem Laufwerk 1 an den Takt eines Titels auf dem
Laufwerk 2 angepaßt werden oder umgekehrt.
1) Mit der Taste ON/OFF (4) den Schieberegler
PITCH CONTROL (21) aktivieren. Die entspre-
chende LED (4 %, 8 %, 16 %) über der Taste muß
leuchten.
2) Mit dem Regler PITCH CONTROL die Geschwin-
digkeit des einen Titels an die Geschwindigkeit
des anderen Titels angleichen.
3) Mit dem Steuerhebel die Taktschläge beider
Musikstücke genau übereinanderlegen: Solange
der Steuerhebel nach rechts oder links gehalten
wird, läuft der Titel 20 % schneller bzw. langsa-
mer als mit Standardgeschwindigkeit, und alle
drei LEDs (4 %, 8 %, 16 %) blinken.
6
Klangeffekte aktivieren
Durch die beiden integrierten Effektgeneratoren las-
sen sich für jedes Laufwerk getrennt einer der fol-
genden Klangeffekte aktivieren:
1. FLANGER
2. FILTER (Baß- bzw. Höhenfilter)
3. DELAY (Echo)
1) Zur Auswahl des Effekts den Steuerhebel (19) so
oft kurz nach oben bewegen, bis die LED (20) der
entsprechenden Effektnummer blinkt.
2) Den Steuerhebel kurz nach unten bewegen, um
den Effekt einzuschalten. Die entsprechende
LED leuchtet jetzt kontinuierlich.
3) Mit dem Drehknopf SEARCH (8) den Klangeffekt
wie gewünscht verändern:
Bei FLANGER: durch Drehen entgegen dem
Uhrzeigersinn verlängert sich die Zeit eines
Effektdurchlaufs, durch Drehen im Uhrzeigersinn
wird sie immer kürzer.
Bei FILTER: durch Drehen entgegen dem Uhrzei-
gersinn werden immer mehr Höhen ausgeblen-
det, bis nur noch Bässe zu hören sind. Durch
Drehen im Uhrzeigersinn werden immer mehr
Bässe ausgeblendet, bis nur noch Höhen zu
hören sind.
Bei DELAY: durch Drehen entgegen dem Uhrzei-
gersinn wird der Echoeffekt immer schwächer,
bis nur noch ein Nachhall zu hören ist. Durch
Drehen im Uhrzeigersinn wird die Anzahl der
Echos erhöht.
4) Zum Ausschalten des Effektes den Hebel kurz
nach unten bewegen. Die LED (20) blinkt wieder.
Hinweis: Die mit dem Drehknopf SEARCH einge-
stellten Effektänderungen bleiben so lange gespei-
chert, bis der CD-Spieler mit dem Schalter POWER
(24) ausgeschaltet wird.
PLAY
c
LOOP
1) When the starting point is reached, first switch
to pause with the button
. Precisely select
the point with the control knob SEARCH (8).
Then press the button A (10).
2) Now either select the end point manually with
the control knob SEARCH or start the replay
with the button
first and when the end
point is reached, set the unit to pause again
with the button
. Then precisely select the
end point with the control knob SEARCH.
3) After precise selection of the end point,
actuate the button B/LOOP (12).
4) Start the continuous loop with the button
RELOOP/EXIT (13).
c It is also possible to displace the starting point
and the end point of a memorized continuous
loop. As soon as the new point is reached, press
the button A or B/LOOP. This is also possible
during replay of the loop, during normal replay or
in the pause mode and within or outside the pre-
vious loop.
5.9
Changing the speed and the pitch
The speed and simultaneously the pitch can be
changed with the PITCH CONTROL (21) by ±16 %
max.
1) Press the button ON/OFF (4). The LED “8 %”
above the button lights up (basic adjustment after
switching on), the control range is ±8 %.
2) If a different control range is required (±16 % for a
greater change in speed or ±4 % for a more pre-
cise adjustment), actuate the button PITCH (6)
so many times until the corresponding LED (4 %,
8 %, 16 %) lights up.
3) Change the speed with the PITCH CONTROL
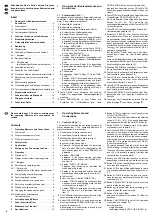
(21). The display shows the percentage deviation
(f) from the standard speed adjusted with the slid-
er control. The speed can be changed in steps of
0.1 % in the range of 0 % to 8 % and in steps of
0.2 % in the range of 8 % to 16 %.
4) The button ON/OFF switches from the speed
adjusted with the slider control to the standard
speed and vice versa.
5.10 Matching the beat between two music
pieces
With the control lever (19), the beat of a title in player
mechanism 1 can be matched to the beat of a title in
player mechanism 2 or vice versa.
1) Activate the PITCH CONTROL (21) with the but-
ton ON/OFF (4). The corresponding LED (4 %,
8 %, 16 %) above the button must light up.
2) Match the speed of one title to the speed of the
other title with the PITCH CONTROL.
3) Synchronize the beats of the two music pieces
with the control lever: As long as the control lever
is held to the right or the left, the title is played
20 % faster or slower than the standard speed,
and all three LEDs (4 %, 8 %, 16 %) start flashing.
6
Activating Sound Effects
The two integrated effect generators allow activation
of the following sound effects for each player
mechanism separately:
1. FLANGER
2. FILTER (for bass or high frequencies)
3. DELAY (echo)
1) To select the effect, move the control lever (19)
shortly upwards so many times until the LED (20)
of the corresponding effect number starts flash-
ing.
2) Shortly move the control lever downwards to
switch on the effect. The corresponding LED now
lights continuously.
3) Modify the sound effect as desired with the con-
trol knob SEARCH (8):
FLANGER: by turning the control knob counter-
clockwise, the effect duration is prolonged, by
turning it clockwise it gets shorter and shorter.
FILTER: by turning the control knob counter-
clockwise, more and more high frequencies are
faded out until only bass frequencies can be
heard. By turning it clockwise, more and more
bass frequencies are faded out until only high fre-
quencies can be heard.
DELAY: by turning the control knob counterclock-
wise, the echo effect gets poorer and poorer until
only a reverberation can be heard. By turning it
clockwise, the number of echos is increased.
4) To switch off the effect, shortly move the lever
downwards. The LED (20) starts flashing again.
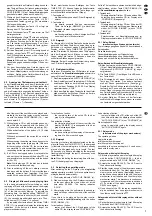
Note: The effect changes adjusted with the control
knob SEARCH are kept memorized until the CD
player is switched off with the POWER switch (24).
9
GB
D
A
CH
Содержание CD-350DJ/SI
Страница 11: ...11...
Страница 19: ...19...
Страница 26: ...Copyright by MONACOR International GmbH Co KG Bremen Germany All rights reserved www imgstageline com 06 01 01...


