background image

Installation 


VTM-2400 Installation and Operation Handbook 

11 

Configuring the VTM/TVM Series with the RCU-2400 Remote Control  

For the following configurations, the interconnecting cables can be extended using electronic 
distribution. There are two ways to configure the VTM-2400 with the RCU-2400 remote 
control: 


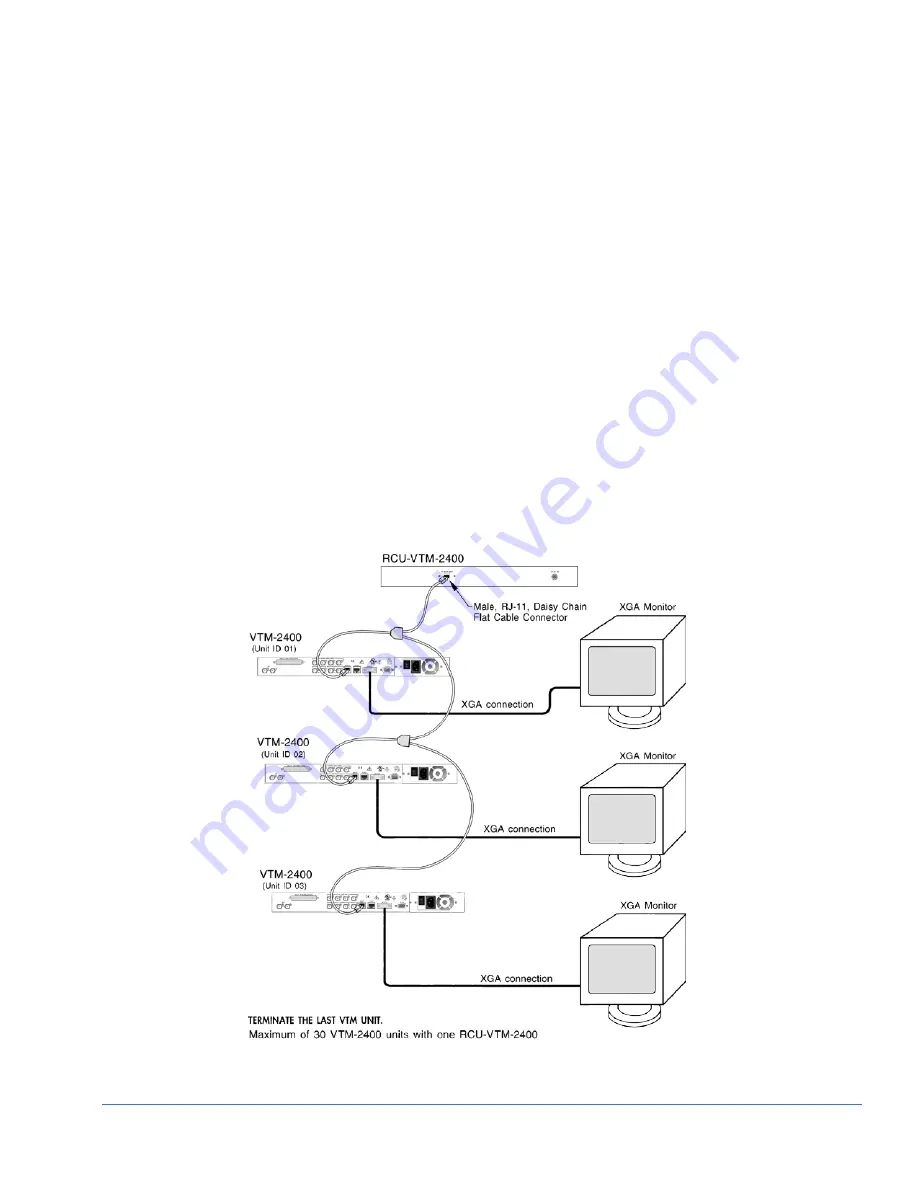
One RCU-2400 connected to one VTM-2400 unit using the REMOTE port. 


One RCU-2400 connected to multiple VTM-2400 using a multidrop cabling adaptor 
and straight through cable using RJ-11 connectors (not a standard telephone wire) 
that connects to the REMOTE ports on the back of the VTM-2400 units and to the TO 
MAIN UNIT connector on the back of the RCU. All VTM-2400 units must have unique 
unit IDs. The unit ID is the identification number of the VTM-2400 units, and can be 
set to any number within a range of 1 to 99 in the COMMUNICATIONS menu. The unit 
IDs should be different than the identification numbers of other units in the same 
system configuration. The REMOTE port must be terminated on the last VTM-2400 
unit, as shown in   

Figure 2-5

. The flat cable shown in 

Figure 2-5 

is a straight through 

cable. 

Figure 2-5. Connecting the RCU-2400 Remote Control Panel to Multiple VTM-2400 Units 


Содержание Videotek VTM-2400

Страница 1: ...Delivering the Moment Videotek VTM 2400 Multi Format HD and SD SDI Monitor Edition C Item 061782 Installation and Operation Manual...

Страница 2: ...n any way warrant description accuracy or guarantee the use for the product to which it refers Imagine Communications reserves the right without notice to make such changes in equipment design specifi...

Страница 3: ...e line voltage if appropriate If a different operating voltage is to be set use a fuse with the appropriate rating Refer to the Installation Instructions Units of Protection Class I with an AC supply...

Страница 4: ...plug has two blades and a third grounding prong The wide blade or the third prong is provided for your safety If the provided plug does not fit into your outlet consult an electrician for replacement...

Страница 5: ...agine Communications equipment Certification Labels and Symbol Locations On Imagine Communications equipment certification labels and symbols are located on the back panel rear chassis sides or bottom...

Страница 6: ...s products sold in the European Union will be fully RoHS compliant and lead free See the Imagine Communications Premier website for more information on dates and deadlines for compliance Spare parts s...

Страница 7: ...e EU will affix labels indicating that such products must be properly recycled See the Imagine Communications Premier website for more information on dates and deadlines for compliance Contact your lo...

Страница 8: ...m Electrical and Electronic Equipment WEEE Directive 2002 96 EC vi Section 1 Introduction 1 Video Standards Supported 2 Service and Support 4 Section 2 Installation 5 Inspecting the Shipment 5 Rack Mo...

Страница 9: ...ng the Waveform using the Setup Knobs 23 Sweep Button 23 MAG Button 24 Gain Button 24 Zoom Button 25 Placing the Waveform Display in Line Select Mode 25 Waveform Pane Menu Selections 26 Filter Selecti...

Страница 10: ...dio Display 41 Presets 41 Storing Presets 41 Recalling Presets 42 Preset 4 Factory Preset 42 Section 4 Global Setup Menu Functions 43 Navigating the Setup Menu 43 Setup Menu and Alarm Tables 43 Video...

Страница 11: ...Setup 60 Display Colors 61 Graticule Intensity 61 Monitor 61 Time Code 62 Communications Setup 62 RCU Port 62 IP Configuration 62 GPI Output Function 63 Unit ID 64 System Setup Menu 64 Panel and Prese...

Страница 12: ...VFlash 74 Updating with VFlash 74 Problems Causes and Solutions 74 Appendix A Specifications 77 Video Specifications 77 Audio Specifications 77 Control Specifications 79 Display Specifications 79 Tim...

Страница 13: ...e Software Copyright Information 95 FreeType License 95 LibJPEG License 95 CMU UCD Copyright Notice 95 Networks Associates Technology Inc Copyright Notice BSD 96 Cambridge Broadband Ltd Copyright Noti...

Страница 14: ...M 2400 in a Rack 6 Figure 2 2 VTM 2400 Back Panel Connectors 7 Figure 2 3 VTM 2400 Dedicated PC Connection 9 Figure 2 4 VTM 2400 Network PC Connection 10 Figure 2 5 Connecting the RCU 2400 Remote Cont...

Страница 15: ...ith Lissajous Display Diagram 40 Figure 4 1 Display Color Selection 61 Figure 4 2 Enter Password Screen 64 Figure 4 3 Enter New Time Screen 67 Figure 4 4 About Screen 68 Figure B 1 Analog Audio IN OUT...

Страница 16: ...lay Diagram 35 Table 3 12 Description of Alarm Status Display Diagram 36 Table 3 13 Alarm Status Pane Menu 37 Table 3 14 Description of Two Bar Graph Display with Lissajous Diagram 39 Table 3 15 Descr...

Страница 17: ...ard 83 Table B 2 XGA OUT Connector Pinouts 85 Table B 3 Pinouts for GPI TALLY Connector and GPI TALLY Breakout Board 86 Table B 4 Remote RJ 11 Control Connector Pinouts 87 Table B 5 VFlash RJ 45 Conne...

Страница 18: ......

Страница 19: ...are two analog stereo inputs four AES EBU inputs and 16 channels of embedded audio It also contains analog monitoring outputs of up to four channels simultaneously The VTM 2400 seamlessly integrates...

Страница 20: ...e VTM 2400 supports the following video standards For HD 1080i 60 1080i 59 94 1080i 50 1080p 30 1080p 29 97 1080p 25 1080p 24 1080p 23 98 1080p 30sF 1080p 29 97sF 1080p 25sF 1080p 24sF 1080p 23 98sF 7...

Страница 21: ...Introduction VTM 2400 Installation and Operation Handbook 3 The VTM 2400 front and back panels are illustrated in Figure 1 1 Figure 1 1 VTM 2400 Front and Back Panels Front Panel Back Panel...

Страница 22: ...e unit with Your company name address and telephone number The name of the contact person at your company The RA number The unit serial number An explanation of the problem To prevent shipping damage...

Страница 23: ...Customer Service Department for service and support see Service and Support on page 4 NOTE Refer to the enclosed packing sheet for the latest list of items that are supplied with the unit The box cont...

Страница 24: ...1 Mounting the VTM 2400 in a Rack Table 2 1 Parts Required to Rack Mount the VTM 2400 using the DRC 2 Key Item Number Quantity Description 1 831030 8 4 for each side Hardware screw 10 32 3 4 PP black...

Страница 25: ...n D sub male connector for analog audio inputs and outputs The supplied breakout board can be used for solderless connections 3 DIGITAL AUDIO INPUT 1 2 3 4 Optional female BNC connectors for AES EBU a...

Страница 26: ...ook These addresses are A static IP address unless Dynamic Host Configuration Protocol DHCP will be used A Subnet Mask An optional Gateway IP Be sure to record all addresses The Gateway address is onl...

Страница 27: ...ure and test the VTM 2400 3a For a dedicated PC connection connect the host PC with a network card to the VFLASH connector on the back panel of the VTM 2400 using a CAT5 crossover cable not included S...

Страница 28: ...DHCP Press the UP or DOWN button to toggle the state to ON Turn the LEFT RIGHT knob or press the SETUP ENTER button to highlight ACCEPT and then press SETUP ENTER The IP Address Subnet mask and Gatewa...

Страница 29: ...nectors not a standard telephone wire that connects to the REMOTE ports on the back of the VTM 2400 units and to the TO MAIN UNIT connector on the back of the RCU All VTM 2400 units must have unique u...

Страница 30: ...with the lower right panel selected is shown in Figure 3 2 Certain buttons function differently according to the selected pane Once the pane is selected more detailed settings can be configured This s...

Страница 31: ...cle the line select display to ODD EVEN or OFF 11 SWEEP Press to cycle the waveform between 1H one horizontal line of video or 1V one vertical field of video 12 ZOOM Press to cycle through the various...

Страница 32: ...ROW KNOB Rotate the knob to move the waveform left and right Rotate the knob to move left and right in the menu Global or Pane menu 21 UP DOWN ARROW KNOB Rotate the knob to move the waveform up and do...

Страница 33: ...rm of selected input 17 Indicates the aspect ratio of the picture 18 Displays the picture for the selected input 19 Icon location 20 Latest alarm displayed yellow indicates the current alarm blue indi...

Страница 34: ...to return to the Quad view Selecting a Video Input Press the Input A B button to cycle between input A or B Powering Down from the Front Panel Press and hold the EXIT and SETUP ENTER buttons simultane...

Страница 35: ...Rotate the knob to move the menu cursor up and down or to change a value or condition in a menu Reference Press the REF button change the Internal or External reference selection The default referenc...

Страница 36: ...4 Sample Quad Diagram Figure 3 5 Full Screen Display Diagram Main Title Bar The main title bar is displayed at the top of the screen and contains the company name date and time icon indicators most cu...

Страница 37: ...ane function section Waveform Vector Audio Picture or Alarm for more detailed information on the status bar that is displayed The Waveform Display Pressing the WFM function button accesses the Wavefor...

Страница 38: ...High Definition and Standard Definition 0 6125 V upper 75 chroma limit 0 525 V 75 luminance limit 0 350 V 50 point black for color difference channels 0 0875 V lower 75 chroma limit A waveform displa...

Страница 39: ...ranges are x1 00 x2 50 and x5 00 Change by pressing the GAIN button 7 Line select information Line select is shown as Line number with the ODD or EVEN field 8 WFM graticule Shows the WFM RGB or YCBCR...

Страница 40: ...General Operation 22 VTM 2400 Installation and Operation Handbook Figure 3 7 RGB and YCBCR Graticule Figure 3 8 RGB and YCBCR Zoom 0 mV Graticule Figure 3 9 RGB and YCBCR Zoom 700 mV Graticule...

Страница 41: ...ule by using the LEFT RIGHT NAVIGATION knob for horizontal movement and the UP DOWN NAVIGATION knob for vertical movement as shown in Figure 3 10 Centering the waveform is performed by using the Wavef...

Страница 42: ...magnification or to turn the magnification OFF The magnifications are shown below Component 1H Sweep magnifications 15 0 S 3 0 S and 1 5 S Component 1V Sweep magnifications 15 0 ms 3 0 ms 1 5 ms and 0...

Страница 43: ...expand to provide more resolution around the zoom point Placing the Waveform Display in Line Select Mode Pressing the LINE SELECT button enables the waveform pane to monitor a single line of a video s...

Страница 44: ...nd holding the WFM button enables the Waveform pane menu The Waveform Pane menu is described in Table 3 7 for HD SDI waveform monitoring and Table 3 8 for SD SDI waveform monitoring The submenus are d...

Страница 45: ...cted Y CB CR If RGB is selected R G B If YRGB is selected Y R G B CENTER WAVEFORM Press ENT WAVEFORM SETUP Press ENT Table 3 8 Waveform SD SDI Menu Structure Selection Selection Option COMPONENT FILTE...

Страница 46: ...ade and Overlay Selections Multiple components can be displayed in a single pane When PARADE is selected the components are shown next to one another i e Inputs Y then CB then CR in a YCBCR signal Whe...

Страница 47: ...vate the Center Waveform selection Once SETUP ENTER is pressed the waveform returns to the center of the waveform graticule Waveform Setup Press the SETUP ENTER button to access the global Waveform se...

Страница 48: ...lays the gain where Gain is 1 00 2 50 and 5 00 This is changed by pressing the GAIN button 6 Line select information Line select is shown as Line and the number with the ODD or EVEN field 7 Vector Sta...

Страница 49: ...th I Q Figure 3 16 Vector HD 75 100 Graticule Gain Button The standard gain in the vector is x1 00 The VTM 2400 can be used to set the gain amplification in the video signal using the Gain button The...

Страница 50: ...in Press the GAIN button to step through the available gain selections x1 00 x2 50 and x5 00 Zoom Button Press ZOOM to cycle through one of six displays Expand the center Expand the upper left quadran...

Страница 51: ...e At the bottom center of the display the pane displays the Line number and Odd or Even field as shown in Figure 3 18 Figure 3 18 Establishing Line Select 2 Press the LINE SELECT button again to alter...

Страница 52: ...of boxes in the vector graticule for both the 75 and 100 amplitudes Vector Position The Vector Position can be adjusted by using the UP DOWN and RIGHT LEFT knobs Center Vector Centering of the vector...

Страница 53: ...VIDEO FORMAT VIDEO A or B CONFIGURE menu 3 Aspect Ratio Displays the aspect ratio 4 Picture Displays the picture of the selected video input 5 Timecode Displays the location of the timecode informatio...

Страница 54: ...m Status Display Diagram Table 3 12 Description of Alarm Status Display Diagram Field Identifier Field Information Nomenclature 1 Input Displays the input 2 Display Label Displayed as ALARM STATUS 3 C...

Страница 55: ...g the SETUP button and selecting AUDIO SETUP CONFIGURE INPUT A thru B AUDIO TYPE menu ANALOG AES EBU A digital audio standard established jointly by the Audio Engineering Society AES and the European...

Страница 56: ...l adjustment is made in the AUDIO SETUP OUTPUT PREFERENCES menu The Audio Output Level adjustment default is 0 dB The phase bars are used to monitor the instantaneous phase relationship between two ch...

Страница 57: ...e associated with the meters Shown as 1 to 16 analog is 1 to 4 AES is 1 to 8 and Embedded is 1 to 16 4 Meter Response Displays the selected meter response VU Peak True Peak VU Peak VU True Peak 5 Scal...

Страница 58: ...OG menu and Peak Program Level and Analog menus Figure 3 22 Four Bar Graph with Lissajous Display Diagram Table 3 15 Description of Four Bar Graph with Lissajous Display Diagram Field Identifier Field...

Страница 59: ...Zoom Zoom when enabled Blank when disabled 12 Peak Program and Reference Level Markers Shows the peak and reference levels for the signal This can be adjusted in the AUDIO SETUP METER SETUP REF LEVEL...

Страница 60: ...ettings in the new preset The LED is illuminated and steady Any previous setup conditions at the selected preset are erased and the new settings are stored Recalling Presets NOTE Information must be s...

Страница 61: ...menu Press to move up in the menu or matrix screen Press to move down in the menu or matrix screen Rotate the knob to move up and down or to change a value or condition in a menu Rotate to move up or...

Страница 62: ...47 57 Audio Setup 47 57 Audio Alarms 51 71 Video Alarms Digital 52 71 Display Setup 53 60 Communications 54 62 System 55 64 About 56 68 NOTE The alarm descriptions are in Section 5 Alarm Descriptions...

Страница 63: ...on Selection Option Selection Option 1080p 29 97sF 1080p 25sF 1080p 24sF 1080p 23 98sF 720p 60 720p 59 94 720p 50 720p 30 720p 29 97 720p 24 720p 23 98 625 50 525 59 94 VIDEO B CONFIGURE AUTODETECT De...

Страница 64: ...80p 23 98sF 720p 60 720p 59 94 720p 50 720p 30 720p 29 97 720p 24 720p 23 98 625 50 525 59 94 Table 4 3 Waveform Setup Menu Selection Selection Option DIGITAL WAVEFORM GRATICULE PERCENT VOLTS Default...

Страница 65: ...TACK LOW 2 TO 6 MAX LOW is Default Table 4 5 Audio Setup Menu Selection Selection Option Selection Option Selection Option Selection Option CONFIGURE INPUT S A and B AUDIO TYPE ANALOG AES EBU Default...

Страница 66: ...TO 11 dB 8 dB is Default TYPE IIb 1 TO 11 dB 8 dB is Default TYPE I 8 1 TO 19 dB 8 dB is Default NORDIC 1 TO 11 dB 6 dB is Default DIN 45406 1 TO 13 dB 8 dB is Default PEAK PROGRAM LEVEL DIG DIGITAL...

Страница 67: ...n Option Selection Option TYPE IIa TYPE IIb TYPE I 8 NORDIC DIN 45406 DIGITAL SCALE TYPE I TYPE IIa TYPE IIb TYPE I 8 NORDIC DIN 45406 dBFS Default ZERO REF dBFS METER RESPONSE VU Default PEAK TRUE PE...

Страница 68: ...AL 100 is DEFAULT PERSISTENCE NORMAL 1 TO 6 INFINITE NORMAL is the Default ATTACK LOW 2 TO 6 MAX LOW is the Default AGC OFF Default ON LISSAJOUS DISPLAY SOUNDSTAGE Default X Y CONFIGURE PHASE BAR S PO...

Страница 69: ...4 ANALOG LEVEL 6 TO 24 dBu 24 dBu is Default DURATION 0 TO 60 SECONDS 2 Seconds is Default DIGITAL ENABLE CH 1 ENABLE CH 2 ENABLE CH 3 ENABLE CH 4 DIGITAL LEVEL 30 TO 0 dBFS 10 dBFS is Default DURATIO...

Страница 70: ...Digital Menu Selection Selection Option Selection Option Selection Option LOSS OF CARRIER ENABLE OFF Default ON DURATION 0 TO 60 Seconds 2 Seconds is Default DIGITAL GAMUT RGB GAMUT UPPER ENABLE OFF D...

Страница 71: ...ENABLE OFF Default ON DURATION 0 TO 60 Seconds 2 Seconds is Default Table 4 8 Display Setup Menu Selection Selection Option Selection Option Selection Option DISPLAY COLORS MATRIX SCREEN See Table 4 9...

Страница 72: ...A Purple X X X X LT Gray X X X X DK Gray X X X X LT Blue X X X X LT Green X X X X LT Cyan X X X X LT Red X X X X LT Purple X X X X Yellow X X X X White X X X X Table 4 10 Communications Setup Menu Se...

Страница 73: ...ID 1 TO 99 1 is Default Table 4 11 System Setup Menu Selection Selection Option Selection Option Selection Option PANEL LOCKOUT ENTER PASSWORD SCREEN LOCK UNLOCK FRONT PANEL PRESETS CHANGE PASSWORD E...

Страница 74: ...nu is used to select the unit of measurement for the digital waveform The selections are Volts or Percent The default selection for the Digital Waveform Graticule menu is VOLTS Waveform Intensity The...

Страница 75: ...efault Persistence Persistence is used to determine how long a data point pixel in the vector remains on the display The range of Persistence is NORMAL 1 TO 6 and INFINITE NORMAL is the default settin...

Страница 76: ...ing schemes can be made for the BAR TO INPUT MAP for each audio type Only one input can be assigned to a meter but multiple meters can be assigned to an input Meter Setup The Meter Setup submenu is us...

Страница 77: ...eter responses can be selected VU NORMAL PEAK TRUE PEAK VU PEAK VU TRUE PEAK PK Peak Hold PK PEAK HOLD TIME is a user selectable duration value of OFF 1 to 10 seconds or infinite The duration only app...

Страница 78: ...larity can be set to Normal or Reverse Damping The effect of higher damping in a phase meter is to show an averaged rather than a peak value of phase The Phase Bar Damping in the AUDIO SETUP METER SET...

Страница 79: ...e functions each function can use only one color Black cells in the Display Color Screen indicate color selections that can not be made for specific functions NOTE The background color is selectable T...

Страница 80: ...s used to configure the communication between the VTM 2400 and any peripheral hardware and Software connected to the unit RCU Port The RCU Port submenu controls the termination for the Remote Port on...

Страница 81: ...Subnet Mask on a network the Subnet Mask must be manually configured Unlike the IP address the Subnet Mask must be the same Subnet Mask as the network Subnet Mask See the System Administrator to dete...

Страница 82: ...nt than the identification numbers of other units in the same system configuration System Setup Menu The System Setup menu is used to control the system configuration selections Panel and Preset Locko...

Страница 83: ...SETUP ENTER button to move the cursor to select UNLOCK 13 Press the SETUP ENTER button 14 Use the UP and DOWN NAVIGATION buttons to move the cursor to select the Preset Number or front panel Presets m...

Страница 84: ...tons or the UP DOWN NAVIGATION knob to move the cursor to the COMMUNICATION SETUP menu 3 Press the SETUP ENTER button 4 Use the UP or DOWN buttons or the UP DOWN NAVIGATION knob to move the cursor to...

Страница 85: ...4 3 appears The Enter New Time screen is used to set the internal clock of the unit Press the UP and DOWN buttons or rotate the UP DOWN NAVIGATION knob to change the values of each time selection Pres...

Страница 86: ...lation and Operation Handbook About The About Screen shown in Figure 4 4 contains the model serial number module device and version Press the EXIT or SETUP ENTER or turn the LEFT RIGHT control knob to...

Страница 87: ...Global Setup Menu Functions VTM 2400 Installation and Operation Handbook 69 This page is intentionally blank...

Страница 88: ......

Страница 89: ...ith them in such cases use the duration to increase or decrease the general sensitivity Duration This value is used to determine how long an error must persist before it is reported Set the duration t...

Страница 90: ...occurs when there is deviation in the line number count RESERVED VALUES USED IMPROPERLY The Reserved Values Used Improperly alarm occurs when the eight most significant bits SD or all ten bits HD are...

Страница 91: ...e signal requirements Cold Starting the VTM 2400 NOTE A cold start resets all front panel and Setup menu selections to the factory default settings All user settings are lost If a problem persists aft...

Страница 92: ...device and wait 30 seconds 2 Turn on the power for the device while pushing and holding the EXIT button PRESET button and DOWN button Hold the buttons until the display appears 3 Once the quad displa...

Страница 93: ...onous Select Internal Reference INT REF and or verify that the External Reference signal is synchronous Problems displaying SD inputs Inputs not terminated Terminate Inputs Audio level reading too low...

Страница 94: ...Troubleshooting 76 VTM 2400 Installation and Operation Handbook This page is intentionally blank...

Страница 95: ...MPTE 272M 2004 SMPTE 294M 2001 and SMPTE 276M 1995 Data Rate 270 MB s 1 485 GB s Connectors 4 BNCs Hi Z passive looping Level 800 mV nominal Input EQ Up to 250 meters of 8281 at 270 MB S Up to 100 met...

Страница 96: ...reo channels balanced or unbalanced follows selected audio input Output level 24 dBu max 6 to 50 dB adjustable For digital audio 20 dBFs produces a 4 dBu analog output level Output connector 37 pin D...

Страница 97: ...ng an input on up to four different displays as picture waveform vector audio and alarm status simultaneously or individually as a full screen display of each separately Waveform YCBCR RGB or YRGB par...

Страница 98: ...Item Specification Waveform Sweep MAG selection x1 00 x5 00 and x10 00 Pressing the MAG button will cycle through x1 00 x5 00 and x10 00 horizontal magnification Waveform Step Gain selection x1 00 x2...

Страница 99: ...standard RJ 11 Power Requirements Item Specification AC power source 90 264 VAC 50 60 Hz nominal Power consumption 90 W maximum Mechanical Specifications Item Specification Dimensions Height 1 75 4 45...

Страница 100: ...ons Item Specification VTM A 3 OPT1 Advanced audio analysis option Display 2 or 4 channels with bar graph and lissajous 4 mono or 2 stereo analog 4 AES EBU and embedded inputs Analog monitoring output...

Страница 101: ...out Signal 1 Analog input 1 20 Analog input 1 2 Analog input 2 21 Analog input 2 3 Analog input 3 22 Analog input 3 4 GND 23 Analog input 4 5 Analog input 4 24 N C 6 N C 25 N C 7 N C 26 GND 8 N C 27 N...

Страница 102: ...stallation and Operation Handbook Figure B 1 Analog Audio IN OUT 37 Pin Male D Sub Connector for Audio Option Table B 1 Pinouts for Analog Audio IN OUT Connector and Audio Breakout Board Pinout Signal...

Страница 103: ...5 Pin Female D Sub Connector Table B 2 XGA OUT Connector Pinouts Pinout Signal Pinout Signal 1 XGA red output 9 N C 2 XGA green output 10 GND 3 XGA blue output 11 N C 4 N C 12 N C SDA 5 GND 13 XGA hor...

Страница 104: ...Figure B 4 GPI TALLY Breakout Board Table B 3 Pinouts for GPI TALLY Connector and GPI TALLY Breakout Board Pinout Signal Pinout Signal 1 ERROR SUM 9 LTC GND 2 Select input A 10 LTC 3 Select input B 1...

Страница 105: ...400 RCU 2400 1 OPEN Open GND 2 RX Received by VTM 2400 Transmit from RCU 3 RX Received by VTM 2400 Transmit from RCU 4 TX Transmit from VTM 2400 Received by RCU 5 TX Transmit from VTM 2400 Received by...

Страница 106: ...8 400 bps 5V DC IN Connects to the DC power plug on the RCU 2400 power supply A knurled ring enables the power plug to be secured to the jack after the plug is fully inserted This connection must be m...

Страница 107: ...terminated at the other end by selecting TERMINATION in the COMMUNICATIONS RCU PORT menu Figure C 2 Connecting the RCU to Multiple VTM 2400s 6 Once connected select the VTM 2400 instrument to be cont...

Страница 108: ...ons simultaneously to enable the selection mode The Phase LEDs flashes 2 Rotate the CURVED ARROW knob to search for a Unit ID Rotating clockwise scans UP through the UNIT IDs Rotating counterclockwise...

Страница 109: ...maximum DC output 5 V Mechanical Specifications Item Specification Dimensions Height 1 75 in 45 00 cm Width 19 00 in 48 26 cm Depth 2 90 in 7 36 cm Weight 2 30 lb 1 04 kg Environmental Specifications...

Страница 110: ...nit 92 VTM 2400 Installation and Operation Handbook Standard Accessories Item Specification Standard accessories DC power supply 115 230 VAC 50 60 Hz capability with detachable AC power cord 50 RCU 24...

Страница 111: ...ation and Operation Handbook 93 Pinouts Figure C 3 RCU 2400 to Main Unit RJ 11 Connector Table C 3 Pinouts for RCU 2400 to Main Unit Connector Pinout Signal 1 GND 2 Transmit from RCU 3 Transmit from R...

Страница 112: ...RCU 2400 Remote Control Unit 94 VTM 2400 Installation and Operation Handbook This page is intentionally blank...

Страница 113: ...reserved Permission to use copy modify and distribute this software and its documentation for any purpose and without fee is hereby granted provided that the above copyright notice appears in all cop...

Страница 114: ...etworks Associates Technology Inc nor the names of its contributors may be used to endorse or promote products derived from this software without specific prior written permission THIS SOFTWARE IS PRO...

Страница 115: ...ith the distribution The name of Cambridge Broadband Ltd may not be used to endorse or promote products derived from this software without specific prior written permission THIS SOFTWARE IS PROVIDED B...

Страница 116: ...conditions and the following disclaimer in the documentation and or other materials provided with the distribution Neither the name of the Sun Microsystems Inc nor the names of its contributors may b...

Страница 117: ...the names of its contributors may be used to endorse or promote products derived from this software without specific prior written permission THIS SOFTWARE IS PROVIDED BY THE COPYRIGHT HOLDERS AND CON...

Страница 118: ...Cisco Inc Beijing University of Posts and Telecommunications nor the names of their contributors may be used to endorse or promote products derived from this software without specific prior written p...

Страница 119: ...ame of Fabasoft R D Software GmbH Co KG or any of its subsidiaries brand or product names may not be used to endorse or promote products derived from this software without specific prior written permi...

Страница 120: ...ow you can do these things To protect your rights we need to make restrictions that forbid anyone to deny you these rights or to ask you to surrender the rights These restrictions translate to certain...

Страница 121: ...disclaimer of warranty keep intact all the notices that refer to this License and to the absence of any warranty and give any other recipients of the Program a copy of this License along with the Prog...

Страница 122: ...nding machine readable source code which must be distributed under the terms of Sections 1 and 2 above on a medium customarily used for software interchange or b Accompany it with a written offer vali...

Страница 123: ...is License 7 If as a consequence of a court judgment or allegation of patent infringement or for any other reason not limited to patent issues conditions are imposed on you whether by court order agre...

Страница 124: ...uthor to ask for permission For software which is copyrighted by the Free Software Foundation write to the Free Software Foundation we sometimes make exceptions for this Our decision will be guided by...

Страница 125: ...that you have the freedom to distribute copies of free software and charge for this service if you wish that you receive source code or can get it if you want it that you can change the software and...

Страница 126: ...ides other free software developers Less of an advantage over competing non free programs These disadvantages are the reason we use the ordinary General Public License for many libraries However the L...

Страница 127: ...interface definition files plus the scripts used to control compilation and installation of the library Activities other than copying distribution and modification are not covered by this License they...

Страница 128: ...ole must be on the terms of this License whose permissions for other licensees extend to the entire whole and thus to each and every part regardless of who wrote it Thus it is not the intent of this s...

Страница 129: ...inked without the Library or if the work is itself a library The threshold for this to be true is not precisely defined by law If such an object file uses only numerical parameters data structure layo...

Страница 130: ...place offer equivalent access to copy the above specified materials from the same place e Verify that the user has already received a copy of these materials or that you have already sent this user a...

Страница 131: ...he rights granted herein You are not responsible for enforcing compliance by third parties with this License 11 If as a consequence of a court judgment or allegation of patent infringement or for any...

Страница 132: ...ograms whose distribution conditions are incompatible with these write to the author to ask for permission For software which is copyrighted by the Free Software Foundation write to the Free Software...

Страница 133: ...method allows for the transport of varying data payloads in a constant data stream The DVB ASI transport stream rate is 270 Mb s Audio Breakaway Routing video and accompanying audio in separate signal...

Страница 134: ...r synchronization signal to establish a reference for the color information following it and is used by a color monitor to decode the color portion of a video signal The color burst acts as both ampli...

Страница 135: ...eo into a finished production EDH Error Detection and Handling A recommended practice defined in SMPTE RP 165 A system to generate and then detect video data errors in serial digital video systems Eff...

Страница 136: ...ique which simply fades the program video to black and program audio to silent This is used to end programs and to escape from embarrassing pictures or sounds Field A picture or picture portion which...

Страница 137: ...titute of Radio Engineers and is used as a unit of measurement In NTSC television 1 volt of signal equals 140 IRE units ISP Internet Service Provider Jitter A deformation of a signal affected by poor...

Страница 138: ...the keyer portion of the effects generator This is used to adjust the size of a preset pattern or for adjusting the size of a mask to block a portion of the key cut source from use in the keyer Matte...

Страница 139: ...ueing via Interrupt Foldback IFB to ENG vans and remote applications Some demodulators support PRO audio monitoring Program A transport stream combination of a video stream and one or more audio and d...

Страница 140: ...ansport stream packets vs total packets as accumulated over a designated period of time Signal to Noise Ratio Analog SNR A measurement of the noise level in a signal expressed in dB decibels as a rati...

Страница 141: ...ies magnitude and direction Vector Clip A special encoded clip version that limits only the CB and CR input video signals and does not affect nor is it affected by the luminance component This color o...

Страница 142: ...andbook Y C Also S video Describes the separation of video signal luminance and chrominance components Zero Carrier Pulse chopper In a TV demodulator removes the carrier in the vertical interval for a...

Страница 143: ...ES 73 Clock 15 Cold Start 76 Communications Setup Menu 64 Connectors Back Panel 7 Analog Audio In Out 7 Digital Audio IN OUT 7 ENET 7 Option C and D 7 Ref 7 Remote 7 Control Specifications 82 Controls...

Страница 144: ...Time 61 Phase Bar 40 62 Picture Display 36 Pinouts Remote RJ 11 Control Connector 91 Power Requirements Specifications 85 Preset Lockout 67 69 Presets 43 Factory Preset 44 Recalling 44 Storing 44 R R...

Страница 145: ...enu 59 Vertical Audio Meter 40 Video Format Critical Amplitude Limits 20 Unit of Measure 20 Video Format Menu 58 Video standards supported 1 VTM Other Options Specifications 87 W Warm Start 77 Wavefor...

Страница 146: ......

Страница 147: ......

Страница 148: ...Item Number 061782 Rev C Printed 09 12...

Отзывы: