background image

I-CAM 380/I-CAM 640 P-SERIES USER MANUAL

48

9-14-5     Isotherms

An Isotherm is a definable, high-contrast overlay that allows users to locate 

regions exhibiting similar temperatures or highlight and define hot/cold regions 

of monochromatic images. Users can only define isotherm.

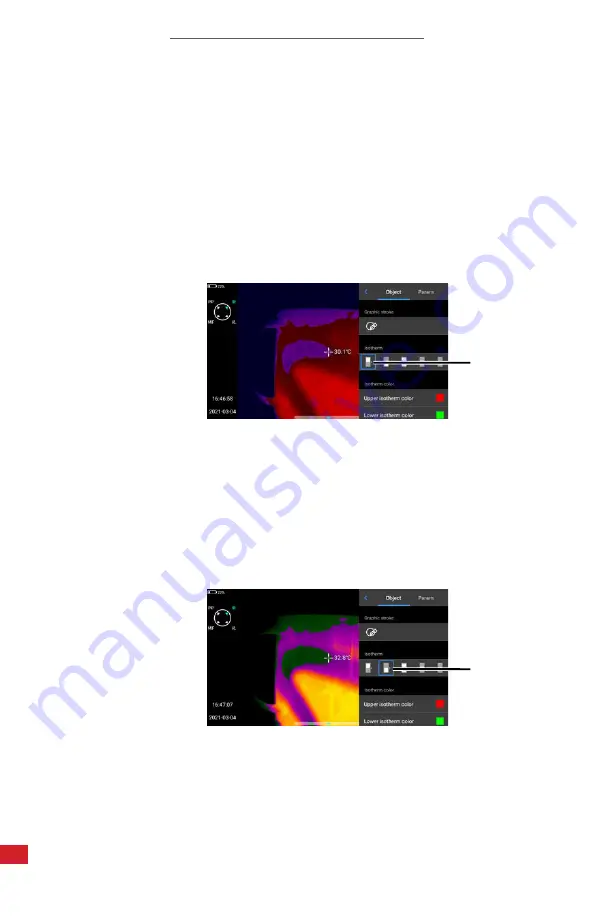
8-14-5-1      Hot Isotherm

A hot isotherm blocks out hottest temperatures detected in a scene. Block high 

temperatures as follows:

1. 

Using the touchscreen, tap the Tools icon. A side menu appears.

2.  Tap the isotherm icon. Menu closes automatically as isotherm is created.

2.

8-14-5-2     Cold Isotherm

A cold isotherm blocks out coldest temperatures detected. Block low 

temperatures as follows:

1. 

Using the touchscreen, tap the Tools icon. A side menu appears.

2.  Tap the isotherm icon. Menu closes automatically as isotherm is created.

2.

ISOTHERMS  ARE  SHOWN  AS  A  BLOCK  OF  WHITE  COLOR  ON  THE  LEVEL  & 

SPAN ICON LOCATED INSIDE THE TOOLS MENU. DISABLE AN ISOTHERM BY 

SELECTING THE GRAY PALETTE BAR.

Содержание I-CAM 380 Series

Страница 1: ...THE UNIT ON IMPORTANT SAFETY INFORMATION INSIDE 2105 W Cardinal Dr Beaumont TX 77705 ICI cameras fall under US Federal Law and Export Control For more information contact us 409 861 0788 sales infraredcameras com www infraredcameras com Edit Text Out Ind Industry Revision 11 2021 002 ...

Страница 2: ...I CAM 380 I CAM 640 P SERIES USER MANUAL 2 Revision History 11 2021 001 11 2021 002 Document created Specifications updated ...

Страница 3: ...e and Definitions of Interface 16 Package Includes 18 Quick Start Instructions 19 7 1 Tripod Setup 19 7 2 Battery Installation 21 7 3 Memory Card 23 7 4 Charging Instructions Option 1 25 7 5 Charging Instructions Option 2 26 7 6 Lens installation 27 Operation Instructions 28 8 1 How to Charge the Battery 28 8 1 1 Charging via Battery Charging Base 28 8 1 2 Charging via Power Adapter 28 8 2 Power O...

Страница 4: ...Videography Settings 39 8 14 Real time Thermal Analysis 40 8 14 1 Temperature Range 40 8 14 2 Emissivity 40 8 14 3 Analysis Objects 42 8 14 3 1 Create Analysis Objects 42 8 14 3 2 Linear Analysis Objects 42 8 14 3 3 Free Hand Analysis Objects 43 8 14 3 4 Temperature Differential Analysis T 43 8 14 3 5 Adjust Analysis Object Settings 44 8 14 3 6 Move an Analysis Object 44 8 14 3 7 Resize an Analysi...

Страница 5: ... Humidity 56 8 15 4 4 Atmospheric Transmission 57 8 15 4 5 Optical Transmission 57 8 16 Annotations 58 8 16 1 Voice Annotations 58 8 16 2 Sketch on Image 58 8 16 3 Typed Notes 59 8 17 Reports 60 8 17 1 Create a Report 60 8 17 2 Print a Report 61 8 17 3 Report Settings 61 8 17 3 1 Report Logo 61 8 17 3 2 Headers 62 8 17 3 3 Footers 62 8 17 3 4 PDF Template 63 8 18 Media Management 63 8 18 1 Review ...

Страница 6: ...ic Shutoff 75 8 19 10 Connection Services 75 8 19 10 1 Wi Fi Settings 75 8 19 10 2 Personal Hotspot 76 8 19 10 3 Local IP Information 77 8 19 10 4 Cloud Services 78 8 19 10 5 Bluetooth Settings 78 8 19 11 Display Brightness Settings 79 8 19 12 Volume Settings 79 8 19 13 Date and Time Settings 80 8 19 13 1 24 Hour Time 80 8 19 13 2 Time Zones 80 8 19 13 3 Manually Set Date Time 80 8 19 14 Language ...

Страница 7: ...ubleshooting 89 11 1 Thermal imager does not power on 89 11 2 Thermal imager shuts off unexpectedly 89 11 3 No thermal image 89 11 4 Unclear or dark visible images 89 11 5 Camera out of focus 89 11 6 Temperature data is missing or has strange readings 89 11 7 Temperature readings are incorrect 90 11 6 Memory card error 90 About ICI 91 ...

Страница 8: ...written permission of Infrared Cameras Inc The documentation must not in whole or part be copied photocopied reproduced translated or transmitted to any electronic medium or machine readable form without prior consent in writing from Infrared Cameras Inc Names and marks appearing on the products herein are either registered trademarks or trademarks of Infrared Cameras Inc and or its subsidiaries A...

Страница 9: ...uipment The crossed out wheeled bin symbol indicates that waste electrical and electronic equipment should not be discarded together with unseparated household waste but must be collected separately All local authorities have established collection schemes under which residents can dispose of equipment at a recycling center or other collection points or WEEE will be collected directly from househo...

Страница 10: ...mitted from the first 1 1000th of an inch of a subject Environment of use industrial and petrochemical buildings electrical plants security rooms science labs animal reserves as well as environmental conservatories and aerial integrations among others You agree that this product is for civilian use only and shall not use applications that may infringe the rights of third parties medical and safety...

Страница 11: ...I CAM 380 I CAM 640 P SERIES USER MANUAL 11 2 9 Training To read about infrared training visit https infraredtraininginstitute com ...

Страница 12: ...not become charged in the specified charging time If you continue to charge the battery it can become hot and cause an explosion or ignition Injury to persons can occur Do not attach the batteries directly to a car s cigarette lighter socket Using the incorrect equipment can cause the battery to become hot or cause an explosion Only use the correct equipment to discharge the battery Using the inco...

Страница 13: ...oblems occurs Clean the case with a damp cloth and a weak soap solution Do not use abrasives isopropyl alcohol or solvents to clean the case or lens screen Be careful when cleaning the infrared lens Do not clean the infrared lens too vigorously This can damage the anti reflective coating Avoid condensation Taking the imager from cold to hot will cause condensation in thermal imager To protect the ...

Страница 14: ...cus Automatic manual Measurement Distance 0 15 m minimum 0 3 m minimum Spectral Band 7 5 μm to 14 μm Thermal Sensitivity NETD 45 mK 0 045 C at 30 C 86 F 30 mK 0 03 C at 30 C 86 F Frame Rate 30 Hz optional 9 Hz Dynamic Range 14 bit Humidity 95 non condensing Pixel Operability 99 Shock Vibration 25 G 2 G Dimensions without lens 206 mm x 135 mm x 145 mm L x W x H 0 5 mm 8 11 x 5 31 x 5 71 L x W x H 0...

Страница 15: ...or LCD rotating touchscreen 1280 x 720 Viewfinder 1280 x 960 LCOS screen Voice Annotation 60 seconds image IP Rating IP54 Laser Class II 650 nm 1 mW supports laser ranging Language Multinational Mosaic N A Yes Automatic alarms Interval photography duration and frequency Voice and text annotation Speaker Microphone Internal non uniformity correction NUC 1 4 20 tripod support Wi Fi and Bluetooth sup...

Страница 16: ...rmity Correction C 3 Laser Range 4 Zoom 5 Capture Record 6 Speaker 7 Germanium Lens 8 Lens Change Button 9 LED Flashlight 10 Laser 11 Viewfinder 12 Diopter Regulator 13 Power 14 Mode Dial 15 Micro HDMI 16 Type C 17 AC Adapter 18 RJ 45 19 Visible Camera 5 Structure 1 11 12 15 18 19 13 16 14 17 2 3 4 5 6 7 9 8 10 HDMI ...

Страница 17: ...bstick up down left right T5 click enter 6 Menu 2 5 8 6 9 7 10 12 11 4 1 3 7 Back Close 8 Replay 9 Level Span 10 Microphone 11 SD Card Slot 12 Battery Bay THE THUMBSTICK IS A FOUR WAY DIRECTIONAL JOYSTICK WITH T5 CLICK FEATURE WHICH FUNCTIONS AS AN ENTER KEY USERS WILL HEAR A CLICK WHEN PRESSING AND DEPRESSING IT ...

Страница 18: ... 18 6 Package Includes I Cam Device Battery x2 Power Adapter ENSURE ALL SYSTEM EQUIPMENT AND COMPONENT ITEMS ARE PRESENT BEFORE BEGINNING INSTALLATION SD Card HDMI to Micro HDMI Cable Type C to USB Cable Ethernet Cable Charging Base HDMI HDMI ...

Страница 19: ...arged device to a tripod using the 20 mount located on the body The camera can be used as a handheld device A MAKE SURE TRIPODS DO NOT BLOCK THE DIRECT PATH OF PERSON S TO BE IMAGED TO ENSURE THE EQUIPMENT WILL NOT BE MOVED OR KNOCKED DOWN USING A DIVIDING BARRIER WILL HELP KEEP TRIPODS SEPARATE FROM THE PATH ...

Страница 20: ...FOR MORE THAN FIVE SECONDS TO SHUT DOWN THE CAMERA AFTER POWERING OFF WAIT TEN SECONDS BEFORE POWERING THE DEVICE ON AGAIN THE THERMAL IMAGER NEEDS SUFFICIENT WARM UP TIME FOR THE MOST ACCURATE TEMPERATURE MEASUREMENTS AND BEST IMAGE QUALITY THIS TIME CAN OFTEN VARY BY ENVIRONMENTAL CONDITIONS IT IS BEST TO WAIT A MINIMUM OF 10 MINUTES FOR THE DEVICE TO COMPLETELY WARM UP ...

Страница 21: ...buckle MAKE SURE TO HOLD THE CAMERA FIRMLY IN BOTH HANDS WHEN REMOVING OR REPLACING THE BATTERY DO NOT FORCE THE BATTERY INTO THE BATTERY BAY IF USER FEELS SIGNIFICANT RESISTANCE REMOVE THE BATTERY AND ENSURE METAL CONTACTS ARE ALIGNED BEFORE TRYING TO PLACE BATTERY INTO THE BATTERY BAY B A Slide the battery bay latch lock Slide the battery bay cover latch C Open the battery bay cover ...

Страница 22: ...uckle Battery will be ejected ENSURE BATTERY COVER IS PROPERLY CLOSED IMPROPER CLOSURE OF BATTERY COVER MAY EXPOSE THE BATTERY AND INTERNAL ELECTRONICS TO ELEMENTAL DAMAGE F G H Close the battery bay Slide the battery bay latch to secure the battery bay cover For extra security slide the battery bay latch lock ...

Страница 23: ... BE INSERTED FIRST IF THERE IS RESISTANCE FLIP THE CARD AROUND AND TRY AGAIN D Insert the SD Card into the card bay until a clicking sound is heard MAKE SURE TO HOLD THE CAMERA FIRMLY IN BOTH HANDS WHEN REMOVING OR REPLACING THE MEMORY CARD C Open the battery bay cover B A Slide the battery bay latch lock Slide the battery bay cover latch ...

Страница 24: ... is heard then release Memory card will be ejected ENSURE BATTERY COVER IS PROPERLY CLOSED IMPROPER CLOSURE OF BATTERY COVER MAY EXPOSE THE BATTERY AND INTERNAL ELECTRONICS TO ELEMENTAL DAMAGE F G H Close the battery bay Slide the battery bay latch to secure the battery bay cover For extra security slide the battery bay latch lock ...

Страница 25: ...WN ON A FLAT AND STABLE DESK OR TABLE WHILE CHARGING ENSURE THE IMAGER IS NEAR ROOM TEMPERATURE BEFORE CHARGING THE DEVICE DO NOT CHARGE IN EXTREMELY HOT OR COLD AREAS THE BATTERY CAPACITY MAY BE DECREASED IF CHARGED IN AN EXTREME TEMPERATURE ENVIRONMENT IF YOU DO NOT USE THE IMAGER FOR A LONG PERIOD OF TIME PUT THE DEVICE IN A COOL AND DRY ENVIRONMENT THE BATTERY WILL DISCHARGE OVER TIME THEREFOR...

Страница 26: ...arging base B Plug the jack end of the power adapter into the battery charging base REMOVE THE BATTERIES FROM THE DEVICE BEFORE CONTINUING WITH THIS METHOD OF CHARGING WHEN THE BATTERY IS NOT PLACED IN THE BATTERY CHARGING BASE THE INDICATOR LIGHT FLASHES THE LIGHT TURNS RED WHEN THE BATTERY IS PLACED AND CHARGING WHEN THE BATTERY IS FULLY CHARGED THE LIGHT TURNS GREEN ...

Страница 27: ...N TURN THE LENS COUNTER CLOCKWISE C D Align the lens threads with the U shaped notch upwards Rotate the lens counter clockwise until a clicking sound is heard MAKESURETOHOLDTHECAMERAFIRMLYINBOTHHANDSWHENCHANGING THE LENS A B Press the lens changing button Rotate the attached lens clockwise to remove PLACE THE LENS IN ITS LENS CONTAINER WHEN NOT IN USE TO AVOID DAMAGE TO THE LENS AVOID DROPPING OR ...

Страница 28: ...1 Charging via Battery Charging Base 1 Plug the jack end of the power adapter into the battery charging base 2 Align the positive and negative terminals of the battery and the battery charging base then insert batteries into the battery charging base 3 Plug the power adapter cord of the battery charging base into a 110v 120V electrical outlet 8 1 2 Charging via Power Adapter 1 With the battery ins...

Страница 29: ... takes approximately 50 seconds for the head up display to load and the camera to begin taking measurements To power the device off push and hold the Power button until a prompt appears Press OK to turn off the device Tap Cancel to leave device powered on AFTER POWERING OFF WAIT TEN SECONDS BEFORE ATTEMPTING TO POWER THE DEVICE ON AGAIN 8 3 User Interface The device interface appearance 1 5 2 6 7 ...

Страница 30: ...r On Off the Flashlight Use the flashlight to assist visibility in dark locations 1 Using the touchscreen tap the Quick Access Menu bar located at the bottom of the screen Quick Access Menu opens 2 Tap the Flashlight button to power on the light Feature highlights blue when enabled Tap the Flashlight button again to power off the light 3 Press the Back button to close the Quick Access Menu 8 3 1 O...

Страница 31: ...Quick Access Menu opens 2 Tap the Laser button to power on the laser Feature highlights blue when enabled Tap the Laser button again to power off the laser 3 Press the Back button to close the Quick Access Menu 8 4 3 Laser Range Users can determine the distance to a target object by using the Laser Range function This tool sends out a pulse of laser light and measures the round trip time to estima...

Страница 32: ... at the target object press the C button then wait until focusing is finished Correct focus is important in all imaging applications Correct focus makes sure that the infrared energy is correctly directed onto the pixels of the detector Without the correct focus the thermal image can be blurry and the radiometric data will be inaccurate W T C W T Cor 8 6 Non uniformity Correction Non uniformity co...

Страница 33: ... left corner of the main interface 8 9 1 Picture in Picture Displays an infrared image over a visible image 8 8 LCD Viewfinder Toggle The LCD screen is enabled by default to display the main interface after startup Press the LCD Viewfinder button to switch between the LCD screen and viewfinder Press the LCD Viewfinder button again to restore the LCD screen display and disable the viewfinder W T C ...

Страница 34: ... 2 Infrared Displays the thermal image only 8 9 3 Visible Displays the visible light image only 8 9 4 Enhanced Mode MIF Displays a digitally enhance image overlay over a thermal image Use the Thumbstick to align the images before capturing an image ...

Страница 35: ...enu by pressing the Close button 8 11 Capture an Image or Video Save images as follows 1 Find and aim the thermal device at the target 2 Adjust the focus until the image is clear 3 Press the Capture button to take an image Long press the Capture button to record a video Depending on user settings the media will either auto save or freeze without saving 8 11 1 Auto Saving Auto saving is enabled by ...

Страница 36: ...2 Media Freezing Freeze holds media on the screen without saving This can be useful in situations where storing media is unnecessary Users can enable the settings imaging freezing as follows 1 Press the Menu button to open the main menu The Record Mode abbreviated Rec Mode tab should be open by default 2 Using the touchscreen tap Snap Mode A rotary menu appears 3 Press up or down on the Thumbstick...

Страница 37: ...te 2 8 12 Panoramic Imaging Users may capture a series of images to stitch into one panoramic image This function requires the ThermoTools analysis software 8 12 1 Enable Panoramic Imaging Capture a series of images for panoramic stitching as follows 1 Using the touchscreen tap and drag upwards on the Quick Access Menu bar located at the bottom of the screen Quick Access Menu opens 2 Tap the Panor...

Страница 38: ...witch The switch will turn green when active and new settings will appear Disable the timer by tapping the switch again 3 Tap Time Interval A rotary menu appears 4 Use the rotary dials to set minutes and seconds by pressing and holding the on screen dials one at a time then drag up or down on the touchscreen to set parameters 5 Press the Back button to exit the rotary menu 6 Tap Total Images A rot...

Страница 39: ...e switch will turn green when active and new settings will appear Disable the timer by tapping the switch again 4 Tap Time Lapse A rotary menu appears 5 Press up or down on the Thumbstick to define the amount of time to lapse between video captures 6 Press the Back button to exit the rotary menu 7 Tap Duration A rotary menu appears 8 Press up or down on the Thumbstick to define the length of the v...

Страница 40: ... adjust to the temperatures detected in the scene 3 Press the Back button to exit the rotary menu 1 8 14 2 Emissivity To more accurately measure materials with a low emissivity an emissivity correction is necessary The emissivity displays on the LCD screen in the upper right corner as E x xx Change the emissivity as follows 1 Using the touchscreen tap the emissivity value Emissivity Menu appears 2...

Страница 41: ...ctor is 0 90 This simplification does not work on shiny surfaces or unpainted metals as they have an emissivity of 0 6 These materials are not good at radiating energy and are classified as low emissivity Material Emissivity Water 0 36 Stainless steel 0 14 Aluminum plate 0 09 Asphalt 0 96 Concrete 0 97 Cast iron 0 81 Rubber 0 95 Wood 0 85 Brick 0 75 Tape 0 96 Brass plate 0 06 Human skin 0 98 PVC p...

Страница 42: ...lines circles and rectangles Add an analysis object as follows 1 Using the touchscreen tap the Tools icon A side menu appears 2 Tap on the preferred shape Menu closes automatically and the analysis object appears on screen 2 8 14 3 2 Linear Analysis Objects Linear analysis objects are special and appear on screen with a chart that graphs temperature points along the shape Create a linear analysis ...

Страница 43: ... the Tools icon A side menu appears 3 Press down on the Thumbstick to scroll through the menu until the icon is visible 4 Tap on the icon to enable the temperature differential analysis function Menu closes automatically New analysis objects cannot be created while the function is enabled Skip to Step 6 if new analysis objects are required 5 Select two analysis objects following the on screen prom...

Страница 44: ...s objects settings as follows 1 Create an analysis object or tap an existing temperature analysis object to select it 2 Using the touchscreen press and hold the temperature analysis shape until a side menu appears 3 Adjust settings as preferred Tap the center icon to align the temperature analysis object to the center of the screen 4 Tap outside the menu to close the side menu 3 4 2 8 14 3 6 Move ...

Страница 45: ...l a side menu appears 3 Tap the eraser icon to delete the analysis object Menu closes automatically 3 2 8 14 3 7 Resize an Analysis Object Resize an analysis object as follows 1 Create an analysis object or tap an existing temperature analysis object to select it 2 Using the touchscreen press and hold a yellow node at the edge of a temperature analysis shape then drag to resize 2 MOVE ANY NODE TO ...

Страница 46: ...ers change depending on the physics of the scene Preferably any temperature detected by the thermal device falls between the maximum and minimum temperature detected If a number falls outside this range the image may wash out i e the extraneous energy in the viewing environment may reduce the perceived contrast of the image Adjust the gain control numbers to improve contrast 8 14 4 1 Auto Gain Con...

Страница 47: ...stick to select a temperature 7 Press the Back button to save and exit the rotary menu 8 14 4 3 Semi Auto Gain Control S AGC The Semi Auto Gain Control S AGC function assists users in fine tuning image contrast based on a temperature differential T Adjust the gain controls as follows 1 Press the Level Span button on the back of the device until the Ⓢ icon appears below the Level Span bar A T numer...

Страница 48: ...high temperatures as follows 1 Using the touchscreen tap the Tools icon A side menu appears 2 Tap the isotherm icon Menu closes automatically as isotherm is created 2 8 14 5 2 Cold Isotherm A cold isotherm blocks out coldest temperatures detected Block low temperatures as follows 1 Using the touchscreen tap the Tools icon A side menu appears 2 Tap the isotherm icon Menu closes automatically as iso...

Страница 49: ...oses automatically as isotherm is created 2 8 14 5 4 Extra Field Isotherm An extra field isotherm blocks out the middle temperatures detected but leaves the hottest and coldest temperatures unblocked Block temperatures as follows 1 Using the touchscreen tap the Tools icon A side menu appears 2 Tap the isotherm icon Menu closes automatically as isotherm is created 2 ISOTHERMS ARE SHOWN AS A BLOCK O...

Страница 50: ...s automatically as isotherm is disabled 2 8 14 5 6 Isotherm Settings Adjust the colors that make up the isotherm color blocks as follows 1 Using the touchscreen tap the Tools icon A side menu appears 2 Press down on the Thumbstick to scroll through the menu until the isotherm color options are visible 3 Tap the isotherm color block to change A rotary menu appears 4 Press up or down on the Thumbsti...

Страница 51: ...ayed Disable the alarm by tapping the switch again 4 Press the Back button to exit the main menu 8 14 6 2 Threshold Settings Adjust the alarm threshold as follows Enable an alarm as follows 1 Press the Menu button to open the main menu 2 Using the touchscreen tap the Temperature Alarm abbreviated Temp Alarm tab 3 Using the touchscreen toggle the preferred temperature alarm setting to the On positi...

Страница 52: ... 14 6 4 Visual Alarm A visual alarm in the form of a bell shows automatically on screen when thresholds are either met or exceeded The default high temperature alarm is 35 C 95 F This means a visible alarm will trigger at temperatures above 35 C 95 F The default low temperature alarm is 32 C 89 6 F This means a visible alarm will trigger at temperatures below 32 C 89 6 F Users can adjust the thres...

Страница 53: ...ap redo to replace changes 6 Tap Done to save palette Tap Cancel to discard changes Custom Palette Area closes automatically 1 3 4 2 8 15 Image Processing 8 15 1 Analysis Area When images and videos are captured they are stored internally Media can be viewed for post processing as follows 1 Press the Review button to open the image gallery 2 Press and hold on the screen then drag up or down to scr...

Страница 54: ...n with two fingers then splay fingers in opposite directions The image will zoom in up to 10 times Close splayed fingers to zoom out When the infrared image is enlarged the infrared image can be scrolled by swiping a single finger in any area of the screen IMAGE ZOOMING IS NOT AVAILABLE OUTSIDE OF THE ANALYSIS AREA FOR INSTRUCTIONS ON DIGITAL ZOOMING DURING IMAGE CAPTURE SEE SECTION 8 7 DIGITAL ZO...

Страница 55: ...to exit processing 8 15 3 Post Capture Analysis Users that did not create analysis objects isotherms or gather temperature differential T information during the initial media capture process can do so during image processing Access the analysis tools as follows 1 Press the Review button to open the image gallery 2 Press and hold on the screen then drag up or down to scroll through the image galler...

Страница 56: ... atmosphere even on bright days Water of all three states can be found naturally in the atmosphere Water in any state is an obstacle to accurate temperature measurements When the wave passes through the water particles a part of its energy is absorbed and a part is scattered Therefore the electromagnetic wave is attenuated Correct for atmospheric attenuation by defining humidity as follows 1 Press...

Страница 57: ...n percentage 8 Press the Back button to save and exit the rotary menu 9 Press the Back button repeatedly to exit processing 8 15 4 5 Optical Transmission The accuracy of temperature readings is dependent on the physics of the scene Errors in temperature measurements are mainly caused by two things 1 the variation of the emissivity value 2 the temperature range Ensure all physics values are entered...

Страница 58: ...k button repeatedly to exit the gallery 8 16 Annotations 8 16 1 Voice Annotations Voice annotations can be up to 60 seconds in length Add annotations to an image as follows 1 Capture an image 2 Press the Review button to open the image gallery 3 Press and hold on the screen then drag up or down to scroll through the image gallery Locate a video by tapping the Videos icon at the bottom of the scree...

Страница 59: ...m of the screen 4 Tap on media to open it in the Review Area 5 Tap the flag icon A drop down will appear 6 Tap the text icon to open the Text Tag Area Keyboard appears 7 Type notes using the on screen keyboard 8 When finished typing notes tap anywhere outside the keyboard to close the keyboard 9 Tap Done to save notes and exit the Text Tag Area 10 Press the Back button repeatedly to exit the galle...

Страница 60: ...chscreen to input preferred text 7 Press down twice on the Thumbstick to enter the Comments field 8 Use the keyboard by tapping the touchscreen to input preferred text 9 Press down once on the Thumbstick to enter the Footer field 10 Use the keyboard by tapping the touchscreen to input preferred text 11 Press the Back button to close the keyboard 12 If creating a multi page report scroll to the nex...

Страница 61: ...C end of the Type C to USB cable into the device 2 Plug the USB end of the Type C to USB cable into an available USB computer port 3 Power on the device 4 Save image into the following directory CAMERA Internal storage DCIM GCamera externalPdf pdfExternalLogoPic 5 On the device press the Menu button to open the main menu 6 Press down on the Thumbstick until the Report Parameters abbreviated Report...

Страница 62: ...7 Tap Done to save and exit header sub tab Tap Cancel to cancel assignment 8 Press the Back button to exit the main menu 8 17 3 3 Footers Users can predefine a 15 character footer for generated reports Define a footer as follows 1 Press the Menu button to open the main menu 2 Press down on the Thumbstick until the Report Parameters abbreviated Report Param tab opens 3 Using the touchscreen tap Foo...

Страница 63: ...e stored internally Media can be viewed at any time as follows 1 Press the Review button to open the image gallery 2 Press and hold on the screen then drag up or down to scroll through the image gallery Locate a video by tapping the Videos icon at the bottom of the screen 3 Tap on media to open it in the Review Area Tap on the visible light picture in the lower right corner to expand tap anywhere ...

Страница 64: ... screen 3 Tap on media to open it in the Review Area 4 Press the trash can icon in the bottom right corner A prompt appears 5 Using the touchscreen press Delete to erase the media Tap Cancel to cancel deletion 6 Press the Back button repeatedly to exit the gallery 4 8 18 2 Review Media on SD Card Images and videos that have been transferred to the removable SD Card can be viewed on the device as f...

Страница 65: ... to input preferred name 6 Tap Done on the keyboard 7 Tap Done to save changes Tap Cancel to cancel changes Text Window closes automatically 8 Press the Back button repeatedly to exit the gallery 4 8 18 4 Favorite Media Users can favor tag images and videos This can be useful for report building as tagged images can be quickly located and added to the report generator Favorite media as follows 1 P...

Страница 66: ...information window 5 Press the Back button repeatedly to exit the gallery 8 18 7 Export Media When images and videos are captured they are stored internally and can be transfered to a removable SD Card as follows 1 Press the Review button to open the image gallery 2 Press and hold on the screen then drag up or down to scroll through the image gallery Locate a video by tapping the Videos icon at th...

Страница 67: ...ers can automatically track temperature data on screen as well as add or remove items from the heads up display as follows 1 Press the Menu button to open the main menu 2 Press down on the Thumbstick until the Image Tags tab opens 3 Using the touchscreen toggle the preferred heads up display settings to the On position by tapping the switch The switch turns green when active Disable the heads up d...

Страница 68: ...settings as follows 1 Press the Menu button to open the main menu 2 Press down on the Thumbstick until the Preference Settings abbreviated Pref Setting tab opens 3 Using the touchscreen tap New Preference sub tab 4 Tap the input box next to Name Keyboard appears 5 Use the keyboard by tapping the touchscreen to input preferred text 6 Tap Done Keyboard closes and name is saved automatically 7 Define...

Страница 69: ... for each parameter 6 Tap Done after editing the global preferences Sub tab will close Settings are saved automatically Tap Cancel to cancel editing process 7 Tap the preferred preferences to enable the settings Settings are enabled when the check mark turns blue To reset the device to the original global preferences toggle the Default Preferences abbreviated Default Pref setting to the On positio...

Страница 70: ...to the On position by tapping the switch The switch turns green when active 4 Press the Back button to save and exit the main menu 8 19 4 Password Protection Settings 8 19 4 1 Enable Password Protection The device can be assigned a 6 digit passcode to protect it from unauthorized use The passcode will need to be entered on device start up Assign a passcode as follows 1 Press the Menu button to ope...

Страница 71: ...RD PROTECTION THEN RE ENABLING THE PASSWORD PROTECTION AS A PASSCODE MUST BE ASSIGNED BEFORE PROTECTION CAN BE ENABLED THE PASSCODE CAN BE RESET AUTOMATICALLY BY DISABLING THE PASSWORD PROTECTION AFTERWARDS A NEW PASSCODE CAN BE ENTERED TO RE ENABLE PASSWORD PROTECTION 8 19 4 2 Disable Password Protection Disable the password protection as follows 1 Press the Menu button to open the main menu 2 Pr...

Страница 72: ... UNIT IS SELECTED FOR YOUR APPLICATION CELSIUS FAHRENHEIT AND KELVIN UNITS ARE AVAILABLE CHANGING THE C BUTTON FUNCTION WILL ALTER HOW THE BUTTON PERFORMS USERS CAN PROGRAM THE BUTTON TO PERFORM A NON UNIFORMITY CORRECTION NUC CHANGE THE COLOR PALETTE REPLACE RIBBON BECOME A SHORTCUT TO THE OBJECT PARAMETERS MENU AUTO FOCUS OR TURN ON THE LED LIGHT 8 19 6 Temperature Units By default the imager is...

Страница 73: ...h or yards code 5 Press the Back button to save and exit the rotary menu 6 Press the Back button to save and exit the main menu HIGHER MEGAPIXEL IMAGES TAKE UP MORE SPACE OPT FOR A LOWER RESOLUTION IMAGE IF CAPTURING A LARGE NUMBER OF IMAGES 8 19 8 General Save Settings 8 19 8 1 Visible Camera Settings The default resolution for visible images is 1024 x 768 Users can achieve up to 13 MP as follows...

Страница 74: ...g the switch The switch turns green when active Disable Laser Ranging on capture setting by tapping the switch again The switch turns gray when disabled 4 Press the Back button to save and exit the main menu 8 19 9 Power Management Settings Power management is disable by default 8 19 9 1 Sleep Hibernation Mode Sleep mode is disabled by default When enabled the camera will sleep after an assigned a...

Страница 75: ...60 minutes or Never Selecting Never will disable automatic shutoff mode The selected option will have a blue check mark next to it 5 Press the Hibernation button to save and exit the sub tab 6 Press the Back button to save and exit the main menu 8 19 10 Connection Services 8 19 10 1 Wi Fi Settings Connect to wireless Internet as follows 1 Press the Menu button to open the main menu 2 Press down on...

Страница 76: ...spot name as follows 1 Press the Menu button to open the main menu 2 Press down on the Thumbstick until the Internet Connection tab opens 3 Using the touchscreen tap Local Name sub tab 4 Tap input box next to name Keyboard appears 5 Use the keyboard by tapping the touchscreen to input the new name 6 Tap Done to save and exit the sub tab Tap Cancel to cancel changes 7 Press the Back button exit the...

Страница 77: ... for each input box 6 Tap Done to save and exit the sub tab Tap Cancel to cancel changes 7 Press the Back button exit the main menu 8 19 10 3 2 Set the PC IP Address Set the local connection IP address of desktop computer as follows 1 Click on Windows icon 2 Click on Settings 3 Click on Network and Internet 4 Click on Ethernet 5 Click on Change Adapter Settings 6 Right click on Ethernet and choose...

Страница 78: ...RY TIME IT IS POWERED ON 8 19 10 4 Cloud Services Coming Soon 8 19 10 5 Bluetooth Settings Connect to Bluetooth as follows 1 Press the Menu button to open the main menu 2 Press down on the Thumbstick until the Bluetooth tab opens 3 Using the touchscreen toggle Bluetooth to the On position by tapping the switch The switch turns green when active Available Bluetooth devices will populate Disable Blu...

Страница 79: ...o set brightness level 3 Press the Back button to close the Quick Access Menu 8 19 12 Volume Settings Users can change the volume settings as follows 1 Using the touchscreen tap the Quick Access Menu bar located at the bottom of the screen Quick Access Menu opens 2 Press and hold the volume bar then drag up or down on the touchscreen to change the volume level Release to set volume level 3 Press t...

Страница 80: ... Press the Menu button to open the main menu 2 Press down on the Thumbstick until the General tab opens 3 Using the touchscreen tap Time Date sub tab 4 Tap Time Zone sub tab 5 Press and hold the on the screen then drag up or down on the touchscreen to scroll through the time zone list 6 Tap the relevant time zone 7 Tap Time Date Saving and conversion occurs automatically 8 Press the Back button ex...

Страница 81: ...he main menu 2 Press down on the Thumbstick until the General tab opens 3 Press right on the Thumbstick to access sub tabs 4 Press down on the Thumbstick until Language tab is highlighted 5 Using the touchscreen tap Language sub tab 6 Press down on the Thumbstick to scroll through the language list 7 Using the touchscreen tap the preferred language The selected option will have a blue check mark n...

Страница 82: ...ing the touchscreen tap About sub tab Information is displayed 4 Press the Back button exit the main menu 8 19 17 License Information Access license information as follows 1 Press the Menu button to open the main menu 2 Press down on the Thumbstick until the General tab opens 3 Using the touchscreen tap License Information abbreviated License Info sub tab Information is displayed 4 Press the Back ...

Страница 83: ... follows 1 Press the Menu button to open the main menu 2 Press down on the Thumbstick until the General tab opens 3 Press right on the Thumbstick to access sub tabs 4 Press down on the Thumbstick until Format SD Card tab is highlighted 5 Using the touchscreen tap Format SD Card sub tab 6 Tap Confirmed to format the SD Card Tap Cancel to cancel formating 7 Press the Back button exit the main menu S...

Страница 84: ... latest version of APK upgrade package file in the path IrCamera memory device GCamera update 3 Press the Menu button to open the main menu 4 Press down on the Thumbstick until the General tab opens 5 Using the touchscreen tap Software Upgrade sub tab 6 Tap Application Upgrade 7 Tap Install to perform the upgrade Tap Cancel to cancel operation 8 Press the Back button exit the main menu PERFORMING ...

Страница 85: ...ve Processor i3 or above RAM 8 GB or above Graphics Card 2G or higher support OpenGL Hard Disk 40 GB or higher with memory disk 2 G or above 9 2 Software Installation ICI s ThermoTools software is provided as a download Customer service can be contacted for a downloadable copy 1 Visit https drive 263 net link a1xy930lqXazUSW 2 Click Thermotools_Release exe 3 Click Download and follow your browser ...

Страница 86: ...ck Yes if you agree to continue software installation Click No to abort installation 7 Click Next 8 Click I Agree to agree to terms of license agreement 9 Choose components Click Next 10 Optionally change installation location by clicking Browse Click Install 11 Click Close ...

Страница 87: ...rom the start menu 2 Click Apps 12 Launch ThermoTools from the start menu 3 Find ThermoTools in the list and click it 4 Click Uninstall 5 Click Uninstall to confirm you want to uninstall 6 Grant system permission Click Yes if you agree to uninstall the software Click No to cancel process 7 Click OK ...

Страница 88: ...clean replace the cloth and repeat the wiping process 10 2 Disinfecting the Camera Surface Do not use corrosive cleaning solutions on the optical glass components It is recommended to disinfect the camera surface regularly with a non corrosive sanitizing product Follow the directions provided by the manufacturer of the cleaning solution Adhere to the sanitation protocols and cleaning schedule set ...

Страница 89: ...d battery Charge battery 11 3 No thermal image Open the lens cap If lens is foggy use professional equipment to clean the lens 11 5 Camera out of focus Adjust Lens Focus Adjuster 11 4 Unclear or dark visible images Turn on lights in imaging area Turn on device light If lens is foggy use professional equipment to clean the lens 11 6 Temperature data is missing or has strange readings Add a measurem...

Страница 90: ...rning on the thermal imager and before temperature measurement Ensure the correct temperature range is selected The default temperature range is 40 C to 150 C 40 F to 302 F When measuring high temperature objects ensure the temperature range is set to the 100 C to 800 C 212 F to 1472 F range Device is at proper height Ensure device is in focus Adjust emissivity Adjust for ambient temperature Wait ...

Страница 91: ...pectors and operators in space power companies medical pulp and paper food industry research and development and various process industries You can see our products and services used in industrial commercial and government applications worldwide Additionally our ICI 7320 was awarded Product of the Month by NASA Originally named Texas Infrared still DBA Infrared Cameras Inc has been in business sin...

Отзывы: