iCanView240/250 User’s Guide
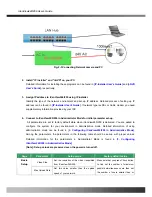
other IP sharing devices sit in-between the client and the IP video products. For more detailed information
regarding the use of IP sharing device refer to the document
[Use of Private IP network using IP-sharing-
device]
.
②
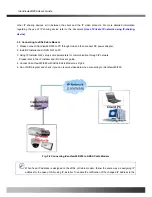
3.2. Connecting to xDSL/Cable Modem
1. Please connect iCanView240/250 to PC through Hub and then connect DC power adapter.
2. Install IP-Installer and i-NVR S/W on PC
3. Using IP Installer S/W, set up some parameters for communication through IP network
Please refer to the IP installer and i-NVR user’s guide.
4. Connect iCanView240/250 with ADSL/Cable Modem as Fig.3.2
5. Run i-NVR program and check if you can receive video data when connecting to iCanView240/250.
Fig. 3-2 Connecting iCanView240/250 to ADSL/Cable Modem
When fixed IP address is assigned to the xDSL or Cable modem, follow the same way as assigning IP
address for the case of LAN using IP-installer. To enable the notification of the changed IP address to the
Rev.1.0 (Dec.2006)
22
Содержание iCanView 240
Страница 1: ...iCanView240 250 User s Guide Rev1 0 Dec 2006...
Страница 40: ...iCanView240 250 User s Guide Save the setup parameters SAVE Rev 1 0 Dec 2006 40...
Страница 60: ...iCanView240 250 User s Guide Rev 1 0 Dec 2006 60...
Страница 61: ...iCanView240 250 User s Guide C Installation using Embedded Mount Type Rev 1 0 Dec 2006 61...
Страница 62: ...iCanView240 250 User s Guide Rev 1 0 Dec 2006 62...
Страница 64: ...iCanView240 250 User s Guide A 2 Mounting Accessories Optional Rev 1 0 Dec 2006 64...


