iCanView240/250 User’s Guide
3. Connecting iCanView240/250 to IP Network
iCanView240/250 supports LAN, xDSL, and Cable modem. It also supports shared IP environment where single
IP address is shared by at least 2 IP devices. Refer to
[IP-Installer User’s Guide]
for details of setting the IP
address for iCanView240/250.
3.1. Connecting to LAN
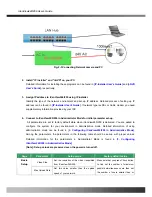
In case of connecting the iCanView240/250 to LAN, it is generally connected as in Fig. 3-1.
Fig. 3-1 Connecting iCanView240/250 to LAN
1. Follow through steps 1 to 3 in Section 2.6 to assign IP address to iCanView240/250.
2. Check if you can receive video data when connecting to iCanView240/250 using the viewer program.
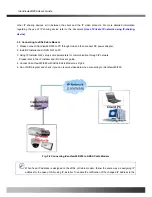
4. When one or more IP video products are connected through a IP sharing device (i.e. router) to a larger network
(i.e. the internet), in order to access each unit from outside the local area network, each device must have a
unique RTSP (Real Time Stream Protocol) and HTTP port number. You must also conFig. your IP sharing
device for “port forwarding”. This is to enable the IP sharing device to forward packet data with unique port
number (RTSP and HTTP) to unique internal IP address (local IP address). If you only plan to access multiple
units from within a local area network, you do not need to change the RTSP and HTTP port numbers, unless
Rev.1.0 (Dec.2006)
21
Содержание iCanView 240
Страница 1: ...iCanView240 250 User s Guide Rev1 0 Dec 2006...
Страница 40: ...iCanView240 250 User s Guide Save the setup parameters SAVE Rev 1 0 Dec 2006 40...
Страница 60: ...iCanView240 250 User s Guide Rev 1 0 Dec 2006 60...
Страница 61: ...iCanView240 250 User s Guide C Installation using Embedded Mount Type Rev 1 0 Dec 2006 61...
Страница 62: ...iCanView240 250 User s Guide Rev 1 0 Dec 2006 62...
Страница 64: ...iCanView240 250 User s Guide A 2 Mounting Accessories Optional Rev 1 0 Dec 2006 64...


