14
IBM® Netfinity® 6000R Installation Guide
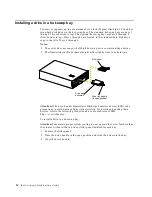
Installing a drive in a hot-swap bay
Your server supports up to a maximum of six 1-inch (26 mm) slim-high, 3.5-inch, hot-
swap hard disk drives in the hot-swap bays. The standard hot-swap bays are bays 1
through 3 (from bottom to top). The optional hot-swap bays are bays 4 through 6
(from bottom to top). Bays 1 through 3 are located in the standard hard disk drive
cage, to the left of bays 4 through 6.
Notes:
1. The server does not support half-high hot-swap drives or internal tape drives.
2. The illustrations in this document might differ slightly from your hardware.
Attention:
When you handle Electrostatic Discharge-Sensitive devices (ESD), take
precautions to avoid damage from static electricity. For details on handling these
devices, refer to the following Web site and use a search term of ESD:
http://www.ibm.com/
To install a drive in a hot-swap bay:
Attention:
To maintain proper system cooling, do not operate the server for more than
10 minutes without either a drive or filler panel installed for each bay.
1. Remove the filler panel.
2. Place the drive handle in the open position and slide the drive into the bay.
3. Close the drive handle.
Filler panel
Drive tray
assembly
Drive tray handle
(in open position)
Содержание Netfinity 6000R
Страница 1: ...IBM IBM Netfinity 6000R Installation Guide SC09 N820 30...
Страница 2: ......
Страница 3: ...IBM IBM Netfinity 6000R Installation Guide...
Страница 6: ...IBM Netfinity 6000R Installation Guide...
Страница 11: ...ix Statement 4 18 kg 37 lbs 32 kg 70 5 lbs 55 kg 121 2 lbs CAUTION Use safe practices when lifting...
Страница 18: ...6 IBM Netfinity 6000R Installation Guide...
Страница 36: ...24 IBM Netfinity 6000R Installation Guide...
Страница 46: ...34 IBM Netfinity 6000R Installation Guide...
Страница 62: ...50 IBM Netfinity 6000R Installation Guide...
Страница 64: ...52 IBM Netfinity 6000R Installation Guide...
Страница 65: ......

