2.
The illustrations in this document might differ slightly from your hardware.
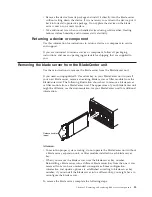
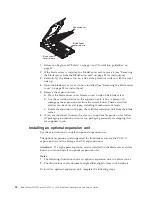
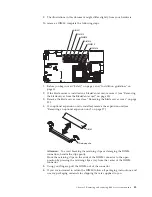
To remove a DIMM, complete the following steps.
DIMM 1
DIMM 2
DIMM 3
DIMM 4
DIMM 5
DIMM 6
1.
Before you begin, read “Safety” on page v and “Installation guidelines” on
page 31.
2.
If the blade server is installed in a BladeCenter unit, remove it (see “Removing
the blade server from the BladeCenter unit” on page 33).
3.
Remove the blade server cover (see “Removing the blade server cover” on page
35).
4.
If an optional expansion unit is installed, remove the expansion unit (see
“Removing an optional expansion unit” on page 37).
DIMM
Retaining clip
Attention:
To avoid breaking the retaining clips or damaging the DIMM
connectors, handle the clips gently.
Move the retaining clips on the ends of the DIMM connector to the open
position by pressing the retaining clips away from the center of the DIMM
connector.
5.
Using your fingers, pull the DIMM out of the connector.
6.
If you are instructed to return the DIMM, follow all packaging instructions, and
use any packaging materials for shipping that are supplied to you.
Chapter 5. Removing and replacing blade server components
45
Содержание BladeCenter HS12 Type 1916
Страница 1: ...BladeCenter HS12 Type 8014 8028 or 1916 Problem Determination and Service Guide...
Страница 2: ......
Страница 3: ...BladeCenter HS12 Type 8014 8028 or 1916 Problem Determination and Service Guide...
Страница 36: ...24 BladeCenter HS12 Type 8014 8028 or 1916 Problem Determination and Service Guide...
Страница 186: ...174 BladeCenter HS12 Type 8014 8028 or 1916 Problem Determination and Service Guide...
Страница 190: ...178 BladeCenter HS12 Type 8014 8028 or 1916 Problem Determination and Service Guide...
Страница 198: ...186 BladeCenter HS12 Type 8014 8028 or 1916 Problem Determination and Service Guide...
Страница 203: ......
Страница 204: ...Part Number 60Y1601 Printed in USA 1P P N 60Y1601...


