


processing load between the microprocessors. If your blade server comes with one
microprocessor, you can install a second microprocessor. To use SMP, obtain an
SMP-capable operating system. For a list of supported operating systems and other
options, go to http://www.ibm.com/pc/us/compat/.
Attention:
To ensure proper blade server operation when you install a second
microprocessor, observe the following precautions:
v
Always install microprocessors that have the same cache size and type, the
same clock speed, and identical internal and external clock frequencies (including
system bus speed).
v
Ensure that the microprocessor with the lowest feature set is the startup
(bootstrap) microprocessor installed in the Microprocessor 1 socket (location
U66).
Notes:
1. For a list of microprocessors supported by your blade server, go to the
ServerProven
®
list at http://www.ibm.com/pc/us/compat/.
2. Thoroughly review the documentation that comes with the microprocessor, so
that you can determine whether you need to update the blade server BIOS
code. The latest level of BIOS code for your blade server is available from the
World Wide Web. See Appendix A, “Getting help and technical assistance”, on
page 65 for the World Wide Web addresses.
3. The microprocessor sockets in this server contain built-in termination for the
microprocessor bus; therefore, no terminator card is required if a second
microprocessor is not installed in microprocessor socket 2. However, for proper
airflow, this socket must contain a microprocessor heat-sink filler, sometimes
called a microprocessor baffle.
4. The microprocessor speeds are automatically set for this server; therefore, you
do not need to set any microprocessor frequency-selection jumpers or switches.
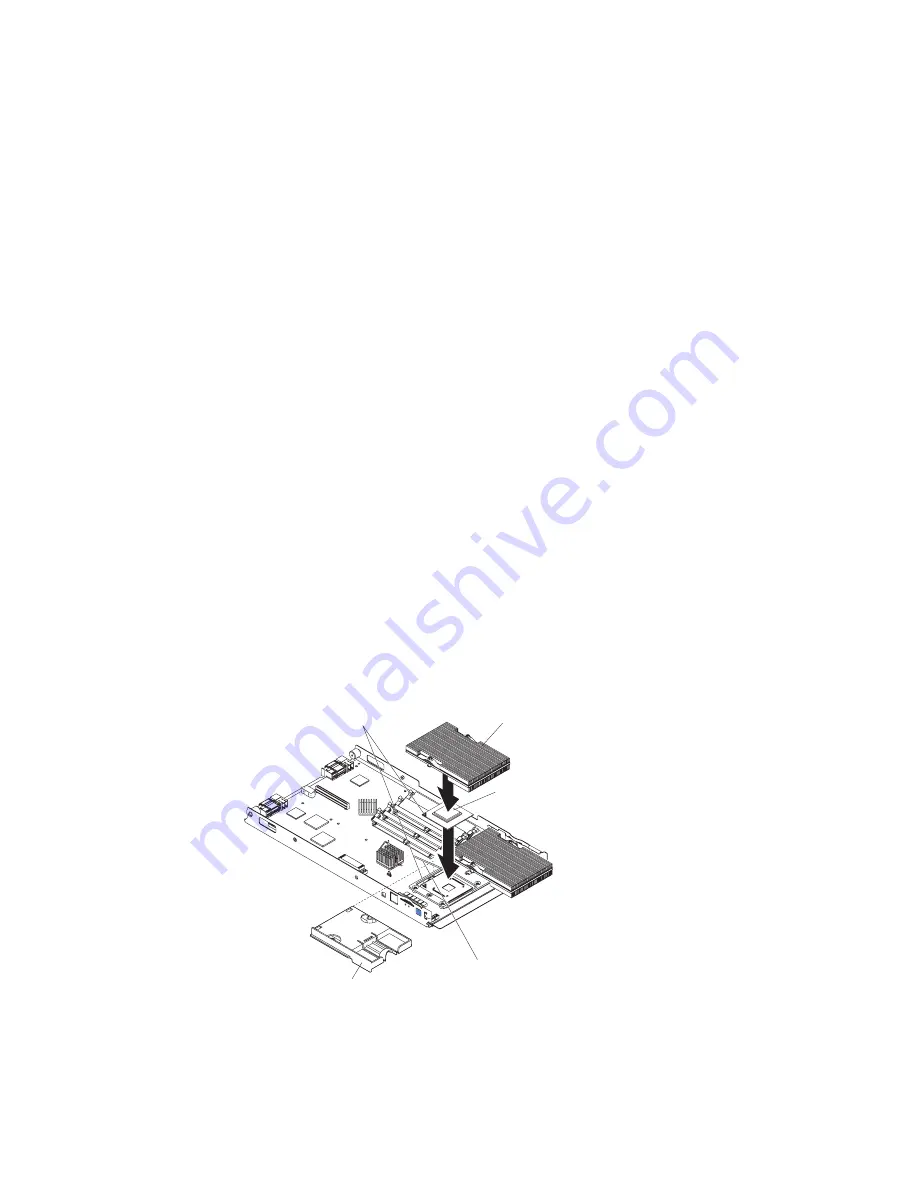
The following illustration shows how to install the second microprocessor on the
system board.
Heat sink
Microprocessor
Microprocessor
locking lever
Heat sink filler
Alignment marks
Complete the following steps to install an additional microprocessor:
1. Review the information in “Safety” beginning on page vii and “Installation
guidelines” on page 19.
26
BladeCenter HS20 Type 8832: Installation and User’s Guide
Содержание BladeCanter HS20
Страница 3: ...BladeCenter HS20 Type 8832 Installation and User s Guide ERserver...
Страница 7: ...Japanese Voluntary Control Council for Interference VCCI statement 83 Index 85 Contents v...
Страница 8: ...vi BladeCenter HS20 Type 8832 Installation and User s Guide...
Страница 14: ...xii BladeCenter HS20 Type 8832 Installation and User s Guide...
Страница 26: ...12 BladeCenter HS20 Type 8832 Installation and User s Guide...
Страница 32: ...18 BladeCenter HS20 Type 8832 Installation and User s Guide...
Страница 58: ...44 BladeCenter HS20 Type 8832 Installation and User s Guide...
Страница 66: ...52 BladeCenter HS20 Type 8832 Installation and User s Guide...
Страница 68: ...54 BladeCenter HS20 Type 8832 Installation and User s Guide...
Страница 98: ...84 BladeCenter HS20 Type 8832 Installation and User s Guide...
Страница 102: ...88 BladeCenter HS20 Type 8832 Installation and User s Guide...
Страница 103: ......
Страница 104: ...Part Number 59P6556 Printed in U S A 1P P N 59P6556...


