background image

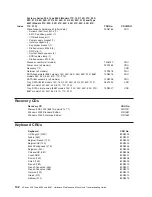
Keyboard

CRU No.

Hungarian (208)

89P8316

Iceland (197)

89P8317

Italy (142)

89P8319

Japanese (194)

89P8320

Korean

89P8321

LA Spanish (171)

89P8322

Norwegian (155)

89P8323

Polish (214)

89P8324

Portuguese (163)

89P8325

Romanian (446)

89P8326

Russian (443)

89P8327

Serbian/Cyrillic (118)

89P8329

Slavic (245)

89P8330

Spanish (172)

89P8331

Swedish/Finn (153)

89P8332

Swiss, F/G (150)

89P8333

Thailand (191)

89P8334

Turkish (440)

89P8335

Turkish (179)

89P8336

UK English (166)

89P8337

US English-EMEA (103P)

89P8338

Yugoslav/Lat (234)

89P8339

Power cord CRUs

For your safety, IBM provides a power cord with a grounded attachment plug to use
with this IBM product. To avoid electrical shock, always use the power cord and
plug with a properly grounded outlet.

IBM power cords used in the United States and Canada are listed by Underwriter’s
Laboratories (UL) and certified by the Canadian Standards Association (CSA).

For units intended to be operated at 115 volts: Use a UL-listed and CSA-certified
cord set consisting of a minimum 18 AWG, Type SVT or SJT, three-conductor cord,
a maximum of 15 feet in length and a parallel blade, grounding-type attachment
plug rated 15 amperes, 125 volts.

For units intended to be operated at 230 volts (U.S. use): Use a UL-listed and
CSA-certified cord set consisting of a minimum 18 AWG, Type SVT or SJT,
three-conductor cord, a maximum of 15 feet in length and a tandem blade,
grounding-type attachment plug rated 15 amperes, 250 volts.

For units intended to be operated at 230 volts (outside the U.S.): Use a cord set
with a grounding-type attachment plug. The cord set should have the appropriate
safety approvals for the country in which the equipment will be installed.

IBM power cords for a specific country or region are usually available only in that
country or region.

Chapter 8. Parts listing, Type 8482 and 8487

103

Содержание 84875MU

Страница 1: ...xSeries 206 Type 8482 and 8487 Hardware Maintenance Manual and Troubleshooting Guide...

Страница 2: ......

Страница 3: ...xSeries 206 Type 8482 and 8487 Hardware Maintenance Manual and Troubleshooting Guide...

Страница 4: ...ces on page 141 v The most recent version of this document is available at http www ibm com pc support 16th Edition April 2009 Copyright International Business Machines Corporation 2004 2007 US Govern...

Страница 5: ...der aux op rations d crites par les instructions Lesen Sie alle Sicherheitshinweise bevor Sie eine Anweisung ausf hren Accertarsi di leggere tutti gli avvisi di attenzione e di pericolo prima di effe...

Страница 6: ...iv xSeries 206 Type 8482 and 8487 Hardware Maintenance Manual and Troubleshooting Guide...

Страница 7: ...16 Downloading the diagnostic program 17 Starting the diagnostic programs and viewing the test log 17 Diagnostic error message tables 18 Error charts 18 Small computer system interface SCSI messages...

Страница 8: ...al connectors 55 Ultra320 SCSI connector 55 Universal Serial Bus connectors 56 Video connector 57 Chapter 6 Field replaceable units 59 Hard disk drive backplane 60 SCSI mini PCI X adapter 61 Rear fan...

Страница 9: ...ervice and support 106 Hardware service and support 106 Appendix B Related service information 107 Safety information 107 General safety 107 Electrical safety 108 Safety inspection guide 109 Handling...

Страница 10: ...viii xSeries 206 Type 8482 and 8487 Hardware Maintenance Manual and Troubleshooting Guide...

Страница 11: ...nstructions for installing some options v Option Installation Guide This document is in PDF on the IBM xSeries Documentation CD It contains instructions for installing removing and connection optional...

Страница 12: ...nient or problem situations v Attention These notices indicate potential damage to programs devices or data An attention notice is placed just before the instruction or situation in which damage could...

Страница 13: ...rt v Two serial ports v One parallel port v Dual port Serial ATA controller v One internal Ultra320 SCSI port mini PCI slot v Integrated RAID capability v Four Universal Serial Bus USB v2 0 ports two...

Страница 14: ...this button to release a CD from the CD ROM drive CD ROM drive activity LED When this LED is lit it indicates that the CD ROM drive is in use Diskette eject button Press this button to release a diske...

Страница 15: ...at the server is off and still connected to an ac power source standby mode Power control button Press this button to turn the server on and off manually System error LED When this LED is lit it indic...

Страница 16: ...nector Connect a USB device to this connector USB 2 connector Connect a USB device to this connector Ethernet connector Use this connector to connect the server to a network Serial 2 connector Connect...

Страница 17: ...ter II user interface v If the operating system supports the systems management software for an optional Remote Supervisor Adapter II the systems management software can turn on the server v If the op...

Страница 18: ...rn off the server if the operating system supports this feature v If the operating system stops functioning you can press and hold the power control button for more than 4 seconds to turn off the serv...

Страница 19: ...e the network as a startable device and you can customize where the network startup option appears in the startup sequence Enable the Intel Gigabit Ethernet Utility from the Configuration Setup Utilit...

Страница 20: ...bit Ethernet Utility program is part of the BIOS code in the server You can use it to configure the network as a startable device and you can customize where the network startup option appears in the...

Страница 21: ...gs in the Configuration Setup Utility program Complete the following steps to use the Boot Menu program to change the startup sequence of your server 1 Turn off the server 2 Restart the server 3 Press...

Страница 22: ...12 xSeries 206 Type 8482 and 8487 Hardware Maintenance Manual and Troubleshooting Guide...

Страница 23: ...t determine whether the failing server is part of a shared hard disk drive cluster two or more servers sharing external storage devices If you suspect that it is part of a cluster you can run all diag...

Страница 24: ...ocessor system error logs a If the system error log indicates a damaged field replaceable unit FRU replace the FRU and run the diagnostic programs to confirm that the problem has been solved b If the...

Страница 25: ...check the operation of system components and some of the installed options If POST finishes without detecting any problems the first window of the operating system opens or an application program appe...

Страница 26: ...complex problems indicated by error messages should be performed by trained service personnel Sometimes the first error to occur causes additional errors In this case the server displays more than one...

Страница 27: ...tly of the operating system and must be run either from a CD or diskette This method of testing is generally used when other methods are not accessible or have not been successful in isolating a probl...

Страница 28: ...test log data is maintained only while the diagnostic programs are active When you exit from the diagnostic programs the test log is cleared Save the test log to a file on a diskette or to the hard d...

Страница 29: ...is normal for the standby power LED to be lit when the server is connected to ac power regardless of whether the server is on or off When the server is connected to ac power and the LED is not lit it...

Страница 30: ...JP1 CMOS jumper JP2 6 Remove the boot block recovery jumper from pins 1 and 2 7 Replace any adapters that were removed then replace the support bracket and replace the side cover see Removing and inst...

Страница 31: ...on page 20 shows the location of the jumper on the system board 6 Move the CMOS recovery jumper from pins 1 and 2 to pins 2 and 3 7 Wait 60 seconds then return the CMOS recovery jumper to pins 1 and 2...

Страница 32: ...Remove adapters and disconnect the cables and power connectors to all internal and external devices until the server is at the minimum configuration required to start the server see Minimum operating...

Страница 33: ...bility you can remove or install the component while the server is running Orange can also indicate touch points on hot swap components See the instructions for removing and installing a specific hot...

Страница 34: ...ave the device where others can handle and damage it v While the device is still in its static protective package touch it to an unpainted metal part of the server for at least 2 seconds This drains s...

Страница 35: ...emove or install the component while the server is running Orange can also indicate touch points on hot swap components See the instructions for removing or installing a specific hot swap component fo...

Страница 36: ...k the side cover then pull the cover release latch away from the server and push the cover toward the rear of the server Lift the side cover off the server and set it aside Key lock Cover release latc...

Страница 37: ...de cover see Removing the side cover on page 26 3 Locate the bezel release lever then press the bezel release lever toward the front of the server 4 Pull the top of the bezel away from the chassis the...

Страница 38: ...llation guidelines on page 23 and the safety information beginning at Safety information on page 107 2 Remove the side cover Removing the side cover on page 26 3 Pull out on the rear end of the suppor...

Страница 39: ...ir of DIMMs you install in DIMM 1 and DIMM 3 memory connectors must be the same size speed type and technology You can mix compatible DIMMs from various manufacturers If you install a second pair of D...

Страница 40: ...ace on the server Then remove the new DIMM from the package 8 Turn the DIMM so that the DIMM keys align correctly with the slot 9 Insert the DIMM into the connector by aligning the edges of the DIMM w...

Страница 41: ...ee Replacing the CD ROM drive in bay 2 on page 35 and Replacing the diskette drive in bay 3 on page 36 Some hot swap models come with an IDE CD ROM drive in bay 1 a 3 5 in 1 44 MB diskette drive in ba...

Страница 42: ...conversion kit available separately v The electromagnetic interference EMI integrity and cooling of the server are protected by having all bays and PCI slots covered or occupied When you install a dri...

Страница 43: ...v Use of controls or adjustments or performance of procedures other than those specified herein might result in hazardous radiation exposure DANGER Some laser products contain an embedded Class 3A or...

Страница 44: ...ing a 5 25 in drive in bay 2 push the drive into the bay If you are installing a 3 5 in drive in bay 2 you must attach the 5 25 in conversion kit available separately to the 3 5 in drive Note Only a 3...

Страница 45: ...Disconnect the CD ROM drive connectors and cables Note The illustrations in this document might differ slightly from your hardware Drive clip 6 Press the blue latch in the direction of the arrow to r...

Страница 46: ...the side of the diskette drive and snap it into the screw holes on the side of the new diskette drive making sure that the blue side of the clip is facing outward and the arrow on the clip is pointin...

Страница 47: ...sing the hard disk drive When the amber hard disk drive status LED is lit continuously it indicates that the drive is faulty and must be replaced The server hot swap bays are connected to a hard disk...

Страница 48: ...rface on the server then remove the drive from the package and place it on a static protective surface 7 Install the hard disk drive in the hot swap bay a Make sure that the tray handle is open that i...

Страница 49: ...14 Installing a non hot swap SCSI hard disk drive in bay 4 5 6 or 7 Some server models come with non hot swap SCSI hard disk drives Before you install a non hot swap SCSI hard disk drive read the foll...

Страница 50: ...static protective package containing the drive to any unpainted metal surface on the server then remove the drive from the package and place it on a static protective surface 8 Set any jumpers or swi...

Страница 51: ...the signal cable so that it does not block the airflow to the rear of the drives or over the microprocessor and memory 14 Connect the power cable to the back of the drive The connectors are keyed and...

Страница 52: ...ling Bay 4 is a non hot swap drive bay and requires cabling as you would normally cable a non hot swap drive See Installing a drive in bay 2 or 4 on page 32 for information about how to install a hard...

Страница 53: ...are used on a single cable one must be designated as the master device and the other as the subordinate device otherwise the server might not recognize some of the IDE devices The master and subordina...

Страница 54: ...on If you need to change the switch settings or jumper settings on the adapter follow the instructions that come with the adapter v Read the documentation that comes with the operating system v The se...

Страница 55: ...ny 5 Remove the frame support bracket see Removing and installing the support bracket on page 28 6 Rotate the rear adapter retention bracket to the open unlocked position and remove it from the server...

Страница 56: ...screws The expansion slot screws are stored on the frame support bracket 14 Replace the frame support bracket see Removing and installing the support bracket on page 28 then go to Completing the inst...

Страница 57: ...begin obtain the following items v A flat blade screwdriver v An adjustable wrench v A 19 mm 0 75 in rope clip or wire rope similar to National Manufacturing number 3230 stock number 176 735 v Thread...

Страница 58: ...al If you replace the original lithium battery with a heavy metal battery or a battery with heavy metal components be aware of the following environmental consideration Batteries and accumulators that...

Страница 59: ...2 Follow any special handling and installation instructions supplied with the replacement battery 3 Turn off the server and all attached devices 4 Disconnect all power cords then disconnect all exter...

Страница 60: ...efore you replace the side cover see Removing and installing the support bracket on page 28 and Replacing the bezel Note The rear adapter retaining bracket rests against the server side cover You migh...

Страница 61: ...SI controller with RAID capabilities or has a ServeRAID controller installed and you have installed or removed a hard disk drive see the ServeRAID documentation that comes with the server for informat...

Страница 62: ...erver from a tower model to a rack model You can then install the server in a rack cabinet To order a Tower to Rack Kit for the server contact your IBM marketing representative or authorized reseller...

Страница 63: ...The following illustration shows the locations of these connectors Power cord Mouse Keyboard Parallel Serial 1 Serial 2 USB 2 USB 1 Ethernet Video 1 2 The following sections describe these connectors...

Страница 64: ...this connector USB ports and devices are disabled during the power on self test POST Parallel connector Use this connector to connect a parallel device The following illustration shows a parallel conn...

Страница 65: ...I cable from the system board SCSI connector to an internal channel connector on the RAID adapter see Cabling an optional SCSI adapter on page 46 An optional external SCSI connector might be installed...

Страница 66: ...standards on the ANSI Web site at http www ansi org Adhering to these standards will help to ensure that the server operates correctly Universal Serial Bus connectors Use a Universal Serial Bus USB 2...

Страница 67: ...o connect a monitor to the server The connector is dark blue to help you identify it The following illustration shows an industry standard 15 pin analog video connector on the rear of the server 1 5 1...

Страница 68: ...58 xSeries 206 Type 8482 and 8487 Hardware Maintenance Manual and Troubleshooting Guide...

Страница 69: ...board external connectors 71 System board LEDs 72 System board switches and jumpers 73 System board removal 73 This chapter describes the removal of server components Important The field replaceable u...

Страница 70: ...ant Be sure to identify in which bay each drive belongs so that they are in the correct order when reinstalled 4 Pivot the drive cage out until it locks in position 5 Disconnect the three cables from...

Страница 71: ...g the side cover on page 26 and Removing and installing the support bracket on page 28 3 Remove any adapters see Installing an adapter on page 44 that impede access to the SCSI mini PCI X adapter 4 Di...

Страница 72: ...o insert it firmly into the socket 4 Make sure that the plastic stand offs snap into place in the SCSI mini PCI X adapter Rear fan Note v Read Installation guidelines on page 23 v Read the safety noti...

Страница 73: ...ps to remove the control panel assembly 1 Turn off the server and attached devices then disconnect all power cords and external cables 2 Remove the cover and support bracket see Removing the side cove...

Страница 74: ...to route the cables carefully and snap the operator information panel into place Front USB connector assembly Note v Read Installation guidelines on page 23 v Read the safety notices at Safety inform...

Страница 75: ...ps routing the cable correctly and snapping the front USB connector assembly into place Power supply Note v Read Installation guidelines on page 23 v Read the safety notices at Safety information on p...

Страница 76: ...at secure the power supply to the chassis 5 Lift the power supply out of the chassis disengaging it from the two connectors on the chassis Note The illustrations in this document might differ slightly...

Страница 77: ...es 2 Turn the server on its side so that it is laying flat with the cover facing up 3 Remove the cover and support bracket see Removing the side cover on page 26 and Removing and installing the suppor...

Страница 78: ...ive material 8 Lift the fan sink up and out of the server Note It might be necessary to gently twist the heat sink to loosen it from the microprocessor 9 Rotate the locking lever on the microprocessor...

Страница 79: ...ystem board System board option connectors The following illustration shows the system board connectors PCI X slot 1 DIMM 4 DIMM 3 DIMM 2 DIMM 1 Battery Remote Supervisor Adapter II Microprocessor PCI...

Страница 80: ...IDE Microprocessor power Microprocessor fan Microprocessor fan error LED Serial ATA connectors Front USB Diskette drive Wake on LAN System fan 1 System fan 1 error LED System error LED SCSI backplane...

Страница 81: ...nnectors The following illustration shows the external input output port connectors on the system board Mouse Keyboard Parallel Serial 1 Serial 2 USB 2 USB 1 Ethernet Video 1 2 Front USB Chapter 6 Fie...

Страница 82: ...he system board DIMM 1 error LED DIMM 2 error LED DIMM 3 error LED DIMM 4 error LED System fan 2 error LED Microprocessor fan error LED System fan 1 error LED Standby power LED 72 xSeries 206 Type 848...

Страница 83: ...pre existing firmware that the customer provides on a diskette or CD image Complete the following steps to remove the system board 1 Turn off the server and attached devices then disconnect all power...

Страница 84: ...tem board be sure to remove all traces of existing adhesive material from the microprocessor before applying the new adhesive material v DIMMs see Installing a memory module on page 29 Notes a The pow...

Страница 85: ...board To reinstall the board place it into position in the server and slide it toward the rear of the server until the holes on the system board are aligned with the holes in the chassis then replace...

Страница 86: ...76 xSeries 206 Type 8482 and 8487 Hardware Maintenance Manual and Troubleshooting Guide...

Страница 87: ...determine if the component being replaced is a CRU or a FRU 2 Check the configuration before you replace a FRU Configuration problems can cause false errors and symptoms 3 For IBM devices not supporte...

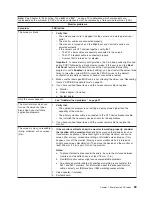
Страница 88: ...e read test failed 1 Battery 2 System board 1 1 4 BIOS EEPROM checksum failed v System board 1 2 1 Programmable Interval Timer failed v System board 1 2 2 DMA initialization failed v System board 1 2...

Страница 89: ...ort failed v System board 3 2 2 Parallel port failed v System board 3 2 4 Failure comparing CMOS memory size against actual 1 DIMM 2 Battery 3 System board 3 3 1 Memory size mismatch occurred 1 DIMM 2...

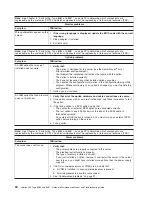
Страница 90: ...162 Device configuration error Note Be sure to load the default settings and any additional desired settings then save the configuration 1 Run the Configuration Setup Utility program 2 Battery 3 Faili...

Страница 91: ...ette boot record 1 Diskette 2 Diskette drive 3 Cable 4 System board 604 Diskette drive error 1 Run the Configuration Setup Utility program 2 Diskette drive 3 Cable 4 System board 662 Diskette drive co...

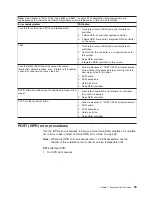
Страница 92: ...le 5 System board 6 Battery 8603 Pointing device error 1 Pointing device 2 System board 00012000 Microprocessor machine check 1 Microprocessor 2 System board 00019701 Processor failed BIST 1 Microproc...

Страница 93: ...port test 1 Check loopback plug connected to externalized serial port 2 Check cable from externalized port to system board 3 System board 011 XXX 001 Failed COM2 serial port test 1 Check loopback plug...

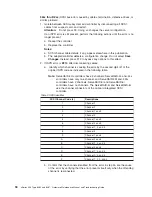
Страница 94: ...level 3 Microprocessor 1 4 System board 089 XXX 002 Failed optional microprocessor test 1 Verify microprocessor 2 is installed and seated correctly 2 Verify BIOS code is at latest level 3 Microproces...

Страница 95: ...BIOS 2 System board 405 XXX 00n Failed Ethernet test on adapter in PCI slot n 1 For n 0 system board 2 For n 0 adapter in PCI slot n 3 System board 405 XXX a0n Failed Ethernet test on adapter in PCI s...

Страница 96: ...te See Chapter 8 Parts listing Type 8482 and 8487 on page 99 to determine which components are replaceable by the customer CRU and which components must be replaced by a field service technician FRU C...

Страница 97: ...U Note See Chapter 8 Parts listing Type 8482 and 8487 on page 99 to determine which components are replaceable by the customer CRU and which components must be replaced by a field service technician F...

Страница 98: ...e automatically disabled a DIMM bank when it detected a problem or a DIMM bank could have been manually disabled 2 Check POST error log for error message 289 v If the DIMM was disabled by a system man...

Страница 99: ...d c System board Only the cursor appears v See Undetermined problems on page 97 The monitor works when you turn on the server but goes blank when you start some application programs 1 Verify that v Th...

Страница 100: ...does not work now 1 Verify that all of the option hardware and cable connections are secure 2 If the option comes with its own test instructions use those instructions to test the option 3 If the fai...

Страница 101: ...installed one is seated properly 2 Failing serial port adapter A serial device does not work 1 Verify that v The device is compatible with the server v The serial port is enabled and is assigned a un...

Страница 102: ...jumpers flash latest level BIOS and firmware for controller Remove jumpers 2 ServeRAID controller 3200 Code DRAM error 1 Install download jumpers flash latest level BIOS code and firmware for controll...

Страница 103: ...specific channel or channels that cause the error 1 Follow indications at POST ISPR error procedures Follow those instructions before continuing with the next steps listed in this index 2 SCSI cable 3...

Страница 104: ...the original ISPR code as indicated in the following table Note ServeRAID 4H controllers have 4 channels ServeRAID 4L and 4Lx controllers have only one channel and ServeRAID 4M and 4Mx controllers ha...

Страница 105: ...cables attached to the suspect card and restart Attention Do not press F5 Doing so changes the server configuration If ISPR code is EF10 after disconnecting cables follow these steps until the error i...

Страница 106: ...or v An improperly installed cable v A defective cable 1 External SCSI devices must be turned on before you turn on the server 2 Make sure that the cables for all external SCSI devices are connected c...

Страница 107: ...e server is cabled correctly 3 Remove or disconnect the following devices one at a time until you find the failure turn on the server and reconfigure each time v Any external devices v Surge suppresso...

Страница 108: ...gnostics version Type and version level v Hardware configuration Print print screen configuration currently in use BIOS level v Operating system software Type and version level Note To eliminate confu...

Страница 109: ...nformation is for the xSeries 206 Type 8482 models 11X 14X 15X 21X 24X 25X 31X 34X 35X 41X 44X 45X 51X 54X 55X 91X and Type 8487 models 21X 24X 25X 41X 44X 45X 51X 54X 55X 61X 71X 91X 1 2 3 4 5 6 7 8...

Страница 110: ...800 3 2 1M 8482 models 31X 34X 35X 25K9902 FRU 12 Microprocessor 3 2GHz 8482 models 41X 44X 45X 8487 models 41X 44X 45X 61X 26K8380 FRU 12 Microprocessor 3 4GHz 8482 models 51X 54X 55X 8487 models 51...

Страница 111: ...sembly all models 13N2419 FRU Card SATA RAID 8487 models 61X 71X 71P8650 CRU EMC shield 3 5 all models 32P8501 CRU EMC shield 5 25 all models 32P8503 CRU Feet system kit all models 59P8537 CRU Filler...

Страница 112: ...91X 13N2418 FRU SATA filler assembly all models 13N2928 CRU Tray SATA 8482 models 14X 15X 24X 25X 34X 44X 54X 91X 8487 models 24X 44X 54X 61X 71X 91X 26K7344 CRU Tray SATA simple swap 8482 models 14X...

Страница 113: ...ratories UL and certified by the Canadian Standards Association CSA For units intended to be operated at 115 volts Use a UL listed and CSA certified cord set consisting of a minimum 18 AWG Type SVT or...

Страница 114: ...Pakistan Samoa South Africa Sri Lanka Swaziland Uganda 14F0033 Abu Dhabi Bahrain Botswana Brunei Darussalam Channel Islands China Hong Kong S A R Cyprus Dominica Gambia Ghana Grenada Iraq Ireland Jor...

Страница 115: ...by following the troubleshooting procedures that IBM provides in the online help or in the publications that are provided with your system and software The information that comes with your system als...

Страница 116: ...are supported by Support Line in your country or region go to http www ibm com services sl products For more information about Support Line and other IBM services go to http www ibm com services or go...

Страница 117: ...es hazards to the customer or that makes the equipment unsafe v Before you start the machine ensure that other service representatives and the customer s personnel are not in a hazardous position v Pl...

Страница 118: ...ore you start to work on the machine unplug the power cord If you cannot unplug it ask the customer to power off the wall box that supplies power to the machine and to lock the wall box in the off pos...

Страница 119: ...om injury This guide addresses only those items However good judgment should be used to identify potential safety hazards due to attachment of non IBM features or options not covered by this inspectio...

Страница 120: ...ntil they are inserted into the product v Avoid contact with other people v Wear a grounded wrist strap against your skin to eliminate static on your body v Prevent the part from touching your clothin...

Страница 121: ...ation maintenance or reconfiguration of this product during an electrical storm v Connect all power cords to a properly wired and grounded electrical outlet v Connect to properly wired outlets any equ...

Страница 122: ...n laser products such as CD ROMs DVD ROM drives fiber optic devices or transmitters are installed note the following v Do not remove the covers Removing the covers of the laser product could result in...

Страница 123: ...pply do not turn off the electrical current supplied to the device The device also might have more than one power cord To remove all electrical current from the device ensure that all power cords are...

Страница 124: ...os equipamentos ao qual esse produto ser conectado a tomadas corretamente instaladas v Sempre que poss vel utilize apenas uma das m os para conectar ou desconectar cabos de sinal v Nunca ligue qualqu...

Страница 125: ...iar a bateria pelo correio para a IBM Instru o 3 PRECAUCI N Quando produtos a laser unidades de CD ROM unidades de DVD dispositivos de fibra tica transmissores etc estiverem instalados observe o segui...

Страница 126: ...ecida ao dispositivo O dispositivo tamb m pode ter mais de um cabo de alimenta o Para remover toda a corrente el trica do dispositivo assegure que todos os cabos de alimenta o estejam desconectados da...

Страница 127: ...Appendix B Related service information 117...

Страница 128: ...118 xSeries 206 Type 8482 and 8487 Hardware Maintenance Manual and Troubleshooting Guide...

Страница 129: ...Appendix B Related service information 119...

Страница 130: ...120 xSeries 206 Type 8482 and 8487 Hardware Maintenance Manual and Troubleshooting Guide...

Страница 131: ...Appendix B Related service information 121...

Страница 132: ...122 xSeries 206 Type 8482 and 8487 Hardware Maintenance Manual and Troubleshooting Guide...

Страница 133: ...Appendix B Related service information 123...

Страница 134: ...t ce produit v Lorsque cela est possible n utilisez qu une seule main pour connecter ou d connecter les c bles d interface v Ne mettez jamais un quipement sous tension en cas d incendie ou d inondatio...

Страница 135: ...Si des produits laser sont install s tels que des unit s de CD ROM ou de DVD des p riph riques contenant des fibres optiques ou des metteurs r cepteurs prenez connaissance des informations suivantes v...

Страница 136: ...s l arriv e de courant lectrique l int rieur de la machine Il se peut que votre unit dispose de plusieurs cordons d alimentation Pour isoler totalement l unit du r seau lectrique d branchez tous les c...

Страница 137: ...teckdosen mit ordnungsgem geerdetem Schutzkontakt anschlie en v Signalkabel m glichst einh ndig anschlie en oder l sen v Keine Ger te einschalten wenn die Gefahr einer Besch digung durch Feuer Wasser...

Страница 138: ...rkabeln oder Transmitter installiert ist beachten Sie folgendes v Das Entfernen der Abdeckungen des CD ROM Laufwerks kann zu gef hrlicher Laserstrahlung f hren Es befinden sich keine Teile innerhalb d...

Страница 139: ...ungsschalter am Netzteil wird die Stromversorgung f r den Server nicht unterbrochen Der Server k nnte auch mehr als ein Netzkabel aufweisen Um die gesamte Stromversorgung des Servers auszuschalten mu...

Страница 140: ...a collegata a questo prodotto ad una presa elettrica correttamente cablata e munita di terra di sicurezza v Quando possibile collegare o scollegare i cavi di segnale con una sola mano v Non accendere...

Страница 141: ...izioni nazionali e locali Avviso 3 ATTENZIONE Quando si installano prodotti laser come ad esempio le unit DVD CD ROM a fibre ottiche o trasmettitori prestare attenzione a quanto segue v Non rimuovere...

Страница 142: ...isattiva la corrente elettrica fornita all unit L unit potrebbe disporre di pi di un cavo di alimentazione Per disattivare la corrente elettrica dall unit accertarsi che tutti i cavi di alimentazione...

Страница 143: ...Appendix B Related service information 133...

Страница 144: ...134 xSeries 206 Type 8482 and 8487 Hardware Maintenance Manual and Troubleshooting Guide...

Страница 145: ...Appendix B Related service information 135...

Страница 146: ...136 xSeries 206 Type 8482 and 8487 Hardware Maintenance Manual and Troubleshooting Guide...

Страница 147: ...de alimentaci n con un cableado correcto cualquier equipo que vaya a estar conectado a este producto v Si es posible utilice una sola mano cuando conecte o desconecte los cables de sent al v No encie...

Страница 148: ...l Declaraci n 3 PRECAUCI N Cuando instale productos l ser como por ejemplo CD ROM unidades DVD dispositivos de fibra ptica o transmisores tenga en cuenta las advertencias siguientes v No retire las cu...

Страница 149: ...corriente el ctrica suministrada al dispositivo Es posible tambi n que el dispositivo tenga m s de un cable de alimentaci n Para eliminar la corriente el ctrica del dispositivo aseg rese de desconect...

Страница 150: ...140 xSeries 206 Type 8482 and 8487 Hardware Maintenance Manual and Troubleshooting Guide...

Страница 151: ...OF ANY KIND EITHER EXPRESS OR IMPLIED INCLUDING BUT NOT LIMITED TO THE IMPLIED WARRANTIES OF NON INFRINGEMENT MERCHANTABILITY OR FITNESS FOR A PARTICULAR PURPOSE Some states do not allow disclaimer of...

Страница 152: ...States other countries or both Microsoft Windows and Windows NT are trademarks of Microsoft Corporation in the United States other countries or both UNIX is a registered trademark of The Open Group in...

Страница 153: ...if any for the non IBM products is provided by the third party not IBM Some software may differ from its retail version if available and may not include user manuals or all program functionality Produ...

Страница 154: ...ickel metal hydride and battery packs from IBM equipment For information on proper disposal of these batteries contact IBM at 1 800 426 4333 Have the IBM part number listed on the battery available pr...

Страница 155: ...4 installing 31 problems 86 CD ROM drive continued removing 35 chart troubleshooting 18 checkout general 13 checkout procedure 14 components 25 system board 69 configuration parallel port 54 updating...

Страница 156: ...installing 31 hardware problems 15 heat output 3 hot swap and hot plug devices drives 25 38 hot swap and hot plug devices continued fans 25 hot swap drive bay identification 36 installing 38 I IDE co...

Страница 157: ...tton 5 power cords 103 power supply specifications 3 power supply removing 65 power switch 5 power cord connector 6 power on LED 5 problem determination tips 98 problems CD ROM drive 86 expansion encl...

Страница 158: ...and jumpers 73 system board connectors external port 71 internal cable 70 internal cables 69 SCSI 55 internal connectors SCSI 70 jumper blocks 73 LEDs 72 removing 73 system error LED 5 system reliabil...

Страница 159: ......

Страница 160: ...Part Number 49Y0092 Printed in USA 1P P N 49Y0092...

Отзывы: