background image


Manual 

ibaPADU-S-IT-16


66


Issue 1.10 


12 

Technical Data 

12.1 

Main data 

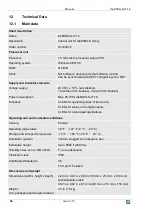
Short description 

Name 

ibaPADU-S-IT-16 

Description 

Central unit for ibaPADU-S family 

Order number 

10.124012 

Processor unit 

Processor 

1.6 GHz Atom processor, single CPU 

Operating system 

Windows CE® 5.0 

RAM 

512 MB 

Clock 

Not buffered / optional external buffering via X30 
Can be synchronized via DCF77 (Digital input) or NTP 

Supply and indicator elements 

Voltage supply 

24 V DC ± 10 % not stabilized,  
1 A (without I/O modules), 3 A (with I/O modules) 

Power consumption 

Max. 20 W for ibaPADU-S-IT-16 

Indicators 

4 LEDs for operating status of the device 

8 LEDs for status of the digital inputs 

4 LEDs for customized applications 

Operating and environmental conditions 

Cooling 

Passive 

Operating temperature 

32 °F … 122 °F (0 °C … 50 °C) 

Storage and transport temperature 

-

13 °F … 158 °F (-25 °C … 70 °C) 

Installation position 

Vertical, plugged into backplane bus 

Installation height 

Up to 6562 ft (2000 m) 

Humidity class acc. to DIN 40040 

F, no condensation 

Protection class 

IP20 

Certification/Standards 

CE  

FCC part 15 class A 

Dimensions and weight 

Dimensions (width x height x depth) 

2.20 in x 8.43 in x 5.83 in (56 mm x 214 mm x 148 mm) 
with installation rack: 
9.02 in x 8.62 in x 6.14 in (229 mm x 219 mm x 156 mm) 

Weight 
(incl. packaging and documentation) 

3.3 lb (1.5 kg) 


Содержание ibaPADU-S-IT-16

Страница 1: ...1 Issue 1 10 ibaPADU S IT 16 Manual Issue 1 10 Central unit for the ibaPADU S family ...

Страница 2: ... registered trademark of the Microsoft Corporation Other product and company names mentioned in this manual can be labels or registered trademarks of the corre sponding owners Certification The product is certified according to the European standards and directives This product meets the general safety and health requirements Further international customary standards and directives have been obser...

Страница 3: ...2 Indicator elements 15 7 2 1 Operating status 15 7 2 2 LEDs L5 L8 15 7 2 3 Status of digital inputs L10 L17 16 7 3 Operating elements 16 7 3 1 ON OFF switch S11 16 7 3 2 Rotary switches S1 and S2 16 7 3 3 System function pushbutton S10 17 7 4 Communication interfaces 17 7 4 1 Connections FO cables X10 and X11 17 7 4 2 Network connection X22 17 7 5 Digital inputs X5 17 7 5 1 Connection diagram Pin...

Страница 4: ...gs 31 9 3 1 System time 31 9 3 2 Time synchronization of the local ibaPADU S IT 16 system 32 9 4 Make settings on the Website 34 9 4 1 Accessing the Website 34 9 4 2 Website structure 35 10 Updates 41 10 1 Update via Web Interface 41 10 2 Update via ibaPDA 42 10 3 Updating the modules 42 11 iba applications 43 11 1 ibaLogic V4 43 11 1 1 Configuring ibaPADU S IT 16 as platform 43 11 1 2 Automatic u...

Страница 5: ...ain data 66 12 2 Interfaces 67 12 3 Digital inputs 67 12 4 Dimensions 68 12 5 Connection diagram 74 12 5 1 Pin assignment voltage supply 24 V X14 74 12 5 2 Pin assignment digital inputs X5 74 13 Accessories and related products 75 14 Appendix 78 14 1 Acronyms 78 14 2 Index 79 15 Support and contact 80 ...

Страница 6: ...t is included in delivery The documentation of the ibaPADU S family comprises the following manuals Central units The manuals of the ibaPADU S IT 16 central units and ibaPADU S CM contain the following information Scope of supply System requirements Description of the device Mounting Demounting Start up Configuration Technical data Accessories Modules The manuals for the single modules contain spe...

Страница 7: ...ossible consequences and risks on the basis of his her specialist train ing knowledge and experience and knowledge of the standard regulations 1 2 Notations In this manual the following notations are used Action Notations Menu command Menu Logic diagram Call of menu command Step 1 Step 2 Step 3 Step x Example Select menu Logic diagram Add New logic di agram Keys Key name Example Alt F1 Press keys ...

Страница 8: ...ocess and the system or ma chine to be controlled there is a risk of death or severe injury The non observance of this safety information may result in a potential risk of death or severe injury The non observance of this safety information may result in a potential risk of injury or material damage Note A note specifies special requirements or actions to be observed Important note Note if some sp...

Страница 9: ...ing Condition Monitoring Data logger Transient Fault Recorder Noise recognition and excentricity analysis Power Quality Monitoring Signal management Control Fast drive and position control Due to the integrated processor a RAM and the Windows CE operating system ibaLogic applications can be loaded into the device as compiled runtime version With these types of applications the measuring signals ca...

Страница 10: ...ss and have a look if the parts might be damaged The scope of delivery comprises ibaPADU S IT 16 device Covering caps for FO cables USB and Ethernet 16 pin terminal block with spring terminals Digital input channels 2 pin terminal block with spring terminals Voltage supply Manual German and English DVD iba Software Manuals ...

Страница 11: ...ructions Strictly observe the operating voltage range Never supply the device with a voltage other than 24 V DC 10 A higher voltage may destroy the device or be dangerous to life Modules and CPU must NOT be attached or detached to from the rack under voltage Switch off ibaPADU S IT 16 or disconnect power supply before attaching detaching the modules Important note Do not open the device Opening th...

Страница 12: ...lease see http www iba ag com An FO input card of the ibaFOB D type Firmware version beginning with V2 00 build 170 ibaFOB io D ibaFOB io Dexp ibaFOB 2io D ibaFOB 2io Dexp ibaFOB 2i D ibaFOB 2i Dexp with ibaFOB 4o D add on module ibaFOB 4i D ibaFOB 4i Dexp with ibaFOB 4o D add on module ibaFOB io ExpressCard for Notebooks FO cable bidirectional and or Ethernet cable 5 2 Software ibaPDA V6 beginnin...

Страница 13: ...inserted into the corresponding holes on the backplane 4 Press the device firmly against the backplane and secure it with the fixing screws Important note Always screw tight the device and the modules If you do not screw it tight connecting or disconnecting the connectors for the inputs and outputs might cause damages Figure 1 Mounting the device 6 2 Dismounting 1 Switch off the device 2 Remove al...

Страница 14: ...D digital inputs L10 L17 Connection for digital inputs X5 Fixing screws Indicators L5 L8 Network interface X22 Rotary switches S1 S2 System function pushbutton S10 Connection FO output TX X10 Connection FO input RX X11 X23 for service purposes only X24 X25 USB host interfaces for future func tions Figure 2 Front view X30 Buffer voltage connector 9 15 V DC HW B3 or higher Figure 3 Bottom view ...

Страница 15: ...ime system not started Flashing ibaLogic PMAC started and program is running On ibaLogic PMAC started L3 White Off No FO reception on RX Flashing FO reception existing FO protocol detected but does not match the internally defined FO protocol On FO reception OK L4 Red Off Normal status no faults Flashing Disturbance applications internal to the device do not run On Device failure during start up I...

Страница 16: ...e is rebooted 7 3 2 Rotary switches S1 and S2 With the S1 rotary switch you can define the iba FO transfer protocol and the cascading addresses in the FO network Position 0 all previous ibaNet protocols except 32Mbit Flex only in cooperation with ibaLogic Position 1 F ibaNet 32Mbit Flex the position of the switch defines the device address within the cascade For further information see chapter 8 2...

Страница 17: ...fer protocol also configuration data can be transferred via FO cable Connection Description X10 output TX FO send interface X11 input RX FO receive interface 7 4 2 Network connection X22 Via the X22 network connection you can integrate the device into an Ethernet network For further information please see chapter 9 2 1 Establish communication to the device via the network 7 5 Digital inputs X5 7 5...

Страница 18: ...can be chosen and configured for each signal independently You have got the following filters at your dispos al Off without filter Stretch rising edge Stretch falling edge Stretch both edges Delay both edges For each filter a debounce time has to be defined in µs This debounce time can have a value between 1µs 65535µs Off The measured input signal is transferred without filtering ...

Страница 19: ...lling edge the output signal green switches to logical 0 and keeps this value for the defined debounce time Thereafter the channel is transparent again and waits for the next falling edge Figure 6 Debounce filter Stretch falling edge Stretch both edges With the first edge the output signal ocher follows the initial signal blue and keeps the logical level for the duration of the defined debounce ti...

Страница 20: ...Voltage supply X14 The external voltage supply is connected by a 2 pin connector Only connect the device to an external voltage supply 24 V DC 10 unregulated Pay attention to polarity 7 6 2 Buffer voltage X30 The connection of a buffer voltage is supported with hardware version B3 and software version 02 06 001 or higher The following functions can be buffered in case of a power failure Time FO li...

Страница 21: ...pturing recording analyzing Recording the signals with ibaPDA 8 1 2 Measuring system with ibaPDA and ibaLogic Figure 10 Modular measuring system with intelligent pre processing Pre processing of signals with ibaLogic e g filtering of disturbances in the signal Parameter data calculation from raw data Recording of all signals in ibaPDA Raw signals from the I O modules Pre processed signals from iba...

Страница 22: ...8 1 4 ibaPADU S IT 16 in hierarchical automation systems Figure 12 Modular measuring system as fast local controller Master control program on the ibaLogic PC Fast local control Fast deterministic communication via ibaNet to the central computer 8 2 FO cascading With 32Mbit Flex you can group up to 15 modular systems to a ring topology Figure 13 Ring topology with ibaPADU S IT 16 ...

Страница 23: ...tion of the rotary switch S1 Min telegram cycle Tcycl Max signal sampling frequency Direction of communica tion x directional Max data volume in bytes Max number of participants in FO ring to pology ibaNet 3Mbit 01 1 ms 1 kHz uni 136 B 64 Integer 64 binary values 8 ibaNet 32Mbit 50µs 01 50 µs 20 kHz uni 144 B 64 Integer 64 binary values 1 ibaNet 32Mbit 100µs 01 100 µs 10 kHz uni 288 B 128 Integer ...

Страница 24: ...out system settings No access to passwords update and ibaLogic admin 1234 Changing passwords Displaying and changing network settings Displaying and changing system time Installing updates Loading and starting ibaLogic runtime version 9 1 2 Network parameters Interfaces Default setting Ethernet network X22 Fixed IP address 192 168 1 1 DHCP inactive Subnet mask 255 255 255 0 Standard gateway 0 0 0 ...

Страница 25: ... Web interface The Webpages allow you to define passwords configure network settings and time behavior and to install updates See chapter 9 4 Make settings on the Website In this chapter we describe how to set up a network connection via the following interfac es Network interface X22 FO cable only with ibaNet 32Mbit Flex Directly on the device 9 2 1 Establish communication to the device via the n...

Страница 26: ...e device in the URL 192 168 1 1 The device can also be run with a DHCP protocol i e a DHCP server automatically as signs an IP address Important note The device can be operated with a DHCP protocol only in networks with a DHCP server When delivered no DHCP protocol is activated When DHCP is activated please proceed as follows 1 Connect the PC and the device with a network cable to a hub switch or ...

Страница 27: ...Manager See chapter 11 2 1 Configuration in the I O Manager 2 Start Autodetect of the FO link which the ibaPADU S system is located on Click with the right mouse button on the link of the FOB D card in the tree 3 Now the PADU S module opens On the General tab the IP address is shown by which the device can be reached via FO cable e g 172 16 0 101 4 Start a Web browser on the PC and insert the IP a...

Страница 28: ...bmit See chapter 9 4 2 5 network tab 9 2 4 Network settings directly on the device The IP address can be set by means of the S1 and S2 rotary switches and the S10 pushbutton There are 2 possibilities activate the IP address you have entered last set a new fixed IP address The network address consists of 4 parts the so called octets calculated by means of Hex values The LEDs L5 L8 show by flashing ...

Страница 29: ... 1 16 17 18 19 20 21 22 23 24 25 26 27 28 29 30 31 2 32 33 34 35 36 37 38 39 40 41 42 43 44 45 46 47 3 48 49 50 51 52 53 54 55 56 57 58 59 60 61 62 63 4 64 65 66 67 68 69 70 71 72 73 74 75 76 77 78 79 5 80 81 82 83 84 85 86 87 88 89 90 91 92 93 94 95 6 96 97 98 99 100 101 102 103 104 105 106 107 108 109 110 111 7 112 113 114 115 116 117 118 119 120 121 122 123 124 125 126 127 8 128 129 130 131 132...

Страница 30: ...er a Gateway just finish after the subnet mask setting LED 5 be gins to flash again and wait for approx 60 seconds Important note If you abort the input while entering the IP address or while entering the subnet mask wait for approx 60 seconds then the default IP address will be set 192 168 1 1 255 255 255 0 Important note Position the S1 rotary switch on the initial position and S2 on 0 Enabling ...

Страница 31: ...be buffered refer to chapter 7 6 2 Buffer voltage X30 Figure 15 Time settings Please choose the time zone from a list and apply the choice by clicking on Set Time zone Then choose one of the time method see system time and time synchronization In case you want summer and winter time always to be set automatically please mark the Enable automatic DST option Apply the settings by clicking on Set Tim...

Страница 32: ...baPADU S IT 16 internal system time via the NTP protocol provided that an Ethernet connection X22 is established to the Internet or a local NTP server Figure 16 Time synchronization with NTP protocol 1 Access the ibaPADU S system Website via the browser 2 Choose the time tab 3 Choose Obtain Systemtime from NTP Server and enter the IP address of the NTP server you want to use 4 Apply the settings b...

Страница 33: ...6 digital input channel to which the time signal is connected clock polarity Choose the value of the digital input signal that corresponds to the active state clock format Default DCF77 offset from UTC minutes Enter the time difference between the DCF clock and the UTC in minutes additional offset for DST minutes Enter the additional daylight saving time offset of the DCF77 clock in minutes 5 Appl...

Страница 34: ...line depending on the type of physical connection When connection established via Then address URL Ethernet TCP IP interface DHCP e g S IT 16 000050 Ethernet TCP IP interface fixed IP address e g http 192 168 1 1 FO cable ibaNet 32Mbit Flex e g http 172 16 0 101 Important note ibaPADU S using Windows 7 Windows Vista Windows Server 2008 When working under Windows 7 Windows Vista or Windows Server 2...

Страница 35: ...opened 9 4 2 Website structure The Website contains the following tabs Tab Functions padu admin info Displaying general information about the device X X firmware Displaying current firmware X X eventlog Displaying system events X passwords Displaying passwords and possibility to change them X network Displaying network settings and changing them Displaying Changing time Displaying system time and ...

Страница 36: ...he values on the info tab Figure 20 info tab There are three information groups on this page Product code and serial number identify the device If you need support hard and software versions of the device may be helpful Under Processing unit you find information about the system cycle and RAM Under Network connectivity you find the current transfer rates of the ibaNet Opti cal and Ethernet interfa...

Страница 37: ... events like e g updates are recorded With the clear eventlog button you can delete the entries Figure 22 eventlog tab 9 4 2 4 passwords tab On the passwords tab you can change passwords as admin The default settings for user and passwords are as follows User Password padu 1234 admin 1234 Figure 23 passwords tab 1 If you want to change a password please enter it into the fields For safety purposes...

Страница 38: ...n IP address IP Address Subnet Mask Default Gateway If you want to assign a fixed network address to the device please ask the network admi nistrator for these parameters and enter them For applying the changed network settings please click on the submit button If you have made a mistake when typing the address please click on the reset entries button The settings are reset to the last valid versi...

Страница 39: ... 8 digital inputs tab On the digital inputs tab you get information about the digital inputs integrated into the device You cannot make any settings on this tab Figure 25 digital inputs tab 9 4 2 9 ibaLogic tab On the ibaLogic tab you can only do the following as admin Check which version of the ibaLogic runtime PMAC runs on the device Start stop PMAC manually Configure the automatic starting beha...

Страница 40: ...device enable activating autostart disable deactivating autostart Persistent Image Displaying if an ibaLogic program is stored on ibaPADU S IT 16 which can be started automatically triggered by autostart of the PMAC 9 4 2 10 notes tab On the notes tab you can enter notes e g for notes on wiring or on recording of changes By clicking on save notes the notes are permanently stored on the device Figu...

Страница 41: ...hed the device is rebooted Please do not switch off the device when an update is running This might damage the de vice Installing an update can take some minutes 10 1 Update via Web Interface Start the ibaPADU S IT 16 Website in your browser On the update tab click on the Browse button and choose the padusit_ v xx yy zzz iba update file By clicking on Start Update you start the update Figure 28 Up...

Страница 42: ...ware tab When the software version of a module does not match the overall release version of the central unit ibaPADU S IT 16 does an automatic up or downgrade of the module There after the module is ready to be used Important note After the update ibaPADU S IT 16 reboots This can take up to 5 minutes As soon as the green system LED L1 is flashing regularly and none of the LEDs L5 L8 is on the dev...

Страница 43: ...latform Configure signals as inputs and outputs Configure the evaluations in the program designer Save the project on ibaPADU S IT 16 There it can run autonomously without serv er client Note Saving the project on the platform ensures that the autostart function of the loaded ibaLogic is activated on ibaPADU S IT 16 11 1 1 Configuring ibaPADU S IT 16 as platform Switch on the ibaLogic PC and start...

Страница 44: ...ts in this workspace you need to activate the new project Configure ibaPADU S IT 16 as platform via the Tools Platform configuration menu Figure 32 Start platform configuration For creating or configuring a platform please click in the dialog under the project name on New item or on the platform Figure 33 Configuring a new platform Please click on the Edit button The Edit platform configuration di...

Страница 45: ...Apply the name or the IP address by clicking on OK Tip With a click on Search PMAC the ibaPADU S IT 16 devices available in the network are displayed An alternative way for creating a platform is to open the Current Platform dropdown menu and select Add platform If ibaPADU S IT 16 is configured as platform yet you can choose the platform via the dropdown box in the menu line Figure 35 Choose platf...

Страница 46: ...rsion of ibaPADU S IT 16 is compatible to the ibaLogic version If not you are asked au tomatically to update the ibaPADU S IT 16 Important note An automatic update of the ibaLogic runtime on ibaPADU S IT 16 requires a release ver sion beginning with v02 04 001 of ibaPADU S IT 16 With an ibaPADU S IT 16 version lower than v02 04 001 it will also be displayed if it is necessary to update the firmwar...

Страница 47: ... On the Hardware Configuration tab you can make the settings for ibaLogic and all avail able resources If ibaPADU S IT 16 is configured as platform it is offered as Interrupt source only for ibaPADU S IT 16 Under time base you set the smallest possible cycle time The Enable Watchdog func tion is not released for ibaPADU S IT 16 yet The Force Driver Restart function is not needed for ibaPADU S IT 1...

Страница 48: ...nd can be assigned Additionally you can access fur ther signals in the signal tree e g Sample Time The meaning of the signals Signal Meaning Inputs DI_24V_Ch 00 07 Digital input signals of ibaPADU S IT 16 StatusIn Status information about the plugged input mo dule for output module without function 0 Module not initialized 1 Module running 1 Mistake e g module cannot be initialized StatusOut Statu...

Страница 49: ...ternal must be chosen In this case the FiberOptics_IO module of ibaPADU S IT 16 is displayed as virtual ibaPADU S module in ibaPDA This is also the default setting If External is chosen as setting for the input External is also the only option that can be chosen as setting for the output This is the only possible combination Without ibaPDA the 3 3Mbit and 32Mbit protocols can be combined in any wa...

Страница 50: ...al 0 32Mbit 1000µs 1024 Integer 1024 Digital or 512 Real 512 Digital 0 32Mbit Col 8x 3 3Mbit input links see above Any combination of Real and Integer links 0 Use with ibaPDA Figure 38 Modular measuring system with intelligent pre processing In the example above External has to be chosen as FO protocol for input and output The communication between ibaPADU S IT 16 and ibaPDA is done in the 32Mbit ...

Страница 51: ...as stand alone system with ibaLogic runtime the meas ured values may be saved in iba measuring files by means of a DAT_FILE_WRITE DFW function block see chapter 11 1 4 DAT_FILE_WRITE function block Note After having done all signal settings and before doing the Assign signal option you al ways need to apply the signal settings by clicking on the Apply button Assigning signals After having defined ...

Страница 52: ...ion Figure 42 Signals as inputs and outputs In the program designer you can define the evaluations or pre processings and load the project into the Programmable Measurement and Automation Controller PMAC on the ibaPADU S IT 16 CPU Other documentation For a detailed description of the program designer and further information on processing please refer to the ibaLogic manual ...

Страница 53: ... the directory field is C dat Further subdirectories can freely be configured The Windows file browser button right to the Directory field must not be used The measuring files saved on ibaPADU S IT 16 can be downloaded manually or by means of the ibaDatCoordinator software In order to access the data with ibaDatCoordinator a file path must be specified within the application IP or hostname of ibaP...

Страница 54: ...the connector e g Filter type and choose Input and Data type UINT under the Connector type option Figure 44 Editing Off task connector Meaning of the default values for the debounce filter 0 Debounce filter switched off 1 Stretch rising edge 2 Stretch falling edge 3 Stretch both edges 4 Delay both edges You find the explanations of the settings in chapter 7 5 2 Debounce filter Now connect the OTC ...

Страница 55: ... with current values Now the program is in the online mode Mistakes that are made during compiling loading etc are shown in the event window You can find the event window below the programming field You can hide this window or posi tion it anywhere on the screen Now choose Evaluation Store program on PMAC Figure 47 Storing program on PMAC You can shut down the ibaLogic PC and even remove it while ...

Страница 56: ... Press the system function pushbutton S10 and keep it pressed firmly up to the stop point and switch on the device again 4 Wait for the green LED L1 to flash rapidly This can take some time The ibaLogic pro gram is deleted 5 Release the S10 system function pushbutton Important note Finally position the S1 rotary switch on its initial position and S2 on 0 Now the device has to be switched off and o...

Страница 57: ...ttings and ibaPDAand ibaLogic fit each other The following parameters have to be considered ibaLogic V4 Sampling time of the buffered input signals ibaPDA V6 Time base for the PADU S module ibaLogic V4 Configuration of the debounce filter filter type debounce filter ibaPDA V6 Configuration of the debounce filter ibaLogic V4 FO protocol external ibaPDA V6 FO protocol 32Mbit Flex ibaPADU S IT 16 Swi...

Страница 58: ...le The list of the available modules is displayed Choose ibaPADU S IT 16 Now the device is shown in the module tree Drag the device to the address that is set on the device with the S1 rotary switch Link 1 15 under the device while keeping the right mouse button pressed Position 1 F corresponds to address 1 15 5 Click on the General tab on Read configuration from device The connected modules are d...

Страница 59: ...K for applying a new configuration 11 2 2 PADU S General tab Figure 49 PADU S module General tab Basic settings Locked A locked module can only be changed by an authorized user Enabled Data capturing for this module is enabled Name You can enter a name for the module Timebase Specifies the time base for data capturing that is used for ibaPADU S IT 16 and the connected modules ...

Страница 60: ...More functions Read configuration from device Reads the configuration that has been stored last from the device Write configuration to device Writes the current configuration to the device Changed settings are applied by clicking on OK or Apply 11 2 3 PADU S Diagnostics tab Figure 50 PADU S module Diagnostics tab Here you find information about the hardware version firmware version FPGA version an...

Страница 61: ...sswords as described in chapter 9 1 4 Network settings and passwords remain stored After the reset the following message appears and the device will be automatically re initialized with the deleted I O settings After that carry out an Autodetection as described in chapter 11 2 1 11 2 4 PADU S Analog tab The Analog tab appears when signal capturing with the analog input modules has been started In ...

Страница 62: ...10 11 2 5 PADU S Digital tab The Digital tab appears when signal capturing with the digital input modules has been started In the list you can see the configured digital signals and the current values Figure 52 PADU S module Digital tab ...

Страница 63: ...S General tab Module No Logical module number for clearly referencing the signals e g when printing and for ibaAnalyzer Advanced Enable debug signals False no debug signals enabled True debug signals enabled Debug signals If debug signals are enabled additional signals are displayed in the digital tab like status information about the modules the fiber optic interface and the software ...

Страница 64: ... are displayed in the analog tab Figure 55 ibaPADU S IT 16 module Debug signals in the Analog tab Signal Meaning Analog Sample time seconds Time period since system start in seconds Sample time fraction part Fractions of this second 1 s 4 294 967 295 fractions Digital All digital signals Status signals for service purposes ...

Страница 65: ... menu you can choose the operating mode for the decounce filter You have got the following settings at your disposal Off stretch rising edge stretch falling edge stretch both edges delay both edges See chapter 7 5 2 Debounce filters Debounce time µs Here you can define the debounce time in µs Enable Enabling disabling the signal Note Configure the plugged analog and digital modules For a detailed ...

Страница 66: ...S IT 16 Indicators 4 LEDs for operating status of the device 8 LEDs for status of the digital inputs 4 LEDs for customized applications Operating and environmental conditions Cooling Passive Operating temperature 32 F 122 F 0 C 50 C Storage and transport temperature 13 F 158 F 25 C 70 C Installation position Vertical plugged into backplane bus Installation height Up to 6562 ft 2000 m Humidity clas...

Страница 67: ...ectrically isolated protected against reverse polarity single ended Debounce filter 4 different settings can be chosen Input signal Max input voltage 24 V DC 60 V permanent Signal level log 0 Signal level log 1 6 V 6 V 10 V 10 V Input current 1 mA constant Sampling rate Up to 40 kHz can be chosen freely Delay Typ 10 µs Electrical isolation Channel channel Channel housing 2 5 kV AC 2 5 kV AC Connec...

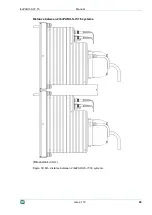
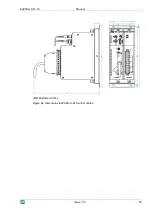
Страница 68: ...Manual ibaPADU S IT 16 68 Issue 1 10 12 4 Dimensions ibaPADU S IT 16 Dimensions in mm Figure 57 Dimensions ibaPADU S IT 16 Dimensions in mm Figure 58 Dimensions ibaPADU S IT 16 with cables ...

Страница 69: ...ibaPADU S IT 16 Manual Issue 1 10 69 Distance between 2 ibaPADU S IT 16 systems Dimensions in mm Figure 59 Min distance between 2 ibaPADU S IT 16 systems ...

Страница 70: ...Manual ibaPADU S IT 16 70 Issue 1 10 ibaPADU S IT 16 and backplane Dimensions in mm Figure 60 Dimensions ibaPADU S IT 16 with backplane ...

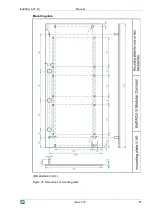
Страница 71: ...ibaPADU S IT 16 Manual Issue 1 10 71 Mounting plate Dimensions in mm Figure 61 Dimensions of mounting plate ...

Страница 72: ...1 10 Backplane ibaPADU S B4S with mounting angles Dimensions in mm Figure 62 Dimensions mounting angles with ibaPADU S B4S Backplane ibaPADU S B1S for one central unit and one module Dimensions in mm Figure 63 Dimensions ibaPADU S B1S ...

Страница 73: ...ibaPADU S IT 16 Manual Issue 1 10 73 Dimensions in mm Figure 64 Dimensions ibaPADU S B1S with modules ...

Страница 74: ...2 Pin assignment digital inputs X5 X5 Pin Connection 1 Digital input 00 2 Digital input 00 3 Digital input 01 4 Digital input 01 5 Digital input 02 6 Digital input 02 7 Digital input 03 8 Digital input 03 9 Digital input 04 10 Digital input 04 11 Digital input 05 12 Digital input 05 13 Digital input 06 14 Digital input 06 15 Digital input 07 16 Digital input 07 ...

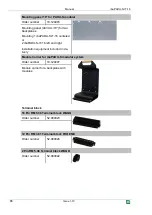
Страница 75: ...livery ibaPADU S B1S Order number 10 124002 Backplane with mounting angle for 1 ibaPADU S IT 16 with 1 I O module w x h x d 3 91 in x 9 72 x 1 06 in 99 2 mm x 247 mm x 27 mm ibaPADU S B Order number 10 124001 Backplane with DIN rail clip for 1 ibaPADU S IT 16 without I O modules Mounting systems Set of mounting angles for PADU S modular Order number 10 124006 2 x for mounting 1 ibaPADU S B4S 10 12...

Страница 76: ... 2 ibaPADU S IT 16 left and right Installation equipment included in de livery Module Carrier for ibaPADU S modular system Order number 10 124007 Module carrier for a backplane with modules Terminal block 16 Pin RM 5 08 Terminal block WAGO Order number 52 000023 12 Pin RM 3 81 Terminal block PHOENIX Order number 52 000024 2 Pin RM 5 08 Terminal block WAGO Order number 52 000022 ...

Страница 77: ...0 PCI Express card 2 inputs 2 outputs ibaFOB 4i Dexp 11 118000 PCI Express card 4 inputs ibaFOB io ExpressCard 11 117000 For measuring with the notebook iba FO p2 5 50 102050 5 m Duplex FO cable for connecting an ibaPADU S IT 16 module iba software Product Order no Remark ibaPDA V6 1024 ibaPDA V6 2048 30 610240 30 620480 Online data capturing system For up to 1024 signals For up to 2048 signals ib...

Страница 78: ...Protocol DST Daylight Saving Time FO Fiber Optics GMT Greenwich Mean Time NTP Network Time Protocol PMAC Programmable Measurement and Automation Controller RTC Real Clock Time TCP IP Transmission Control Protocol Internet Protocol UTC Universal Time Coordinated WINS Windows Internet Name Service ...

Страница 79: ...ogram deleting 16 17 55 saving on runtime 54 ibaPDA Configuration in the I O Manager 56 IP address setting directly on the device 28 setting on Website 38 via FO 38 59 N Network connection 17 via network interface 26 Network parameters 24 Network settings 25 directly on the device 15 16 17 28 on the Web interface 28 Website 38 Notes entering notes 40 NTP protocol 32 O Off task connector 53 Operati...

Страница 80: ... require support specify the serial number iba S N of the product Contact Headquarters iba AG Koenigswarterstr 44 90762 Fuerth Germany Phone 49 911 97282 0 Fax 49 911 97282 33 Email iba iba ag com Contact Mr Harald Opel Regional and Worldwide For contact data of your regional iba office or representative please refer to our Website www iba ag com ...

Отзывы: