


117592
4-11
REV C
from under the mower.
15.
Raise the rear of the mower and remove the jack stands.
Lower the mower.
16.
Lower and secure the seat platform
Warner Clutch Re-gap Adjustment
Procedures
The air gap is only adjustable on clutches that have a
removable shim (see Figure 4-32).
When to remove shim:
When a clutch has worn to the extent that the existing air-gap
is too large to allow for complete clutch engagement (clutch
may engage easily when cold but has problems engaging when
hot), the brake shim can be removed to reduce air gap and allow
the clutch to continue to function.
After verifying that proper voltage and current are supplied to
the clutch, follow the procedure outlined below.
NOTE:
Before proceeding, the clutch must be installed on
the engine crankshaft and the retaining bolt torqued to 45-48 ft-
lbs.
Procedure:
With engine off, key removed and clutch disengaged and
using a pneumatic line, blow out any debris from under the
brake pole and around the aluminum spacers. Figure 4-29
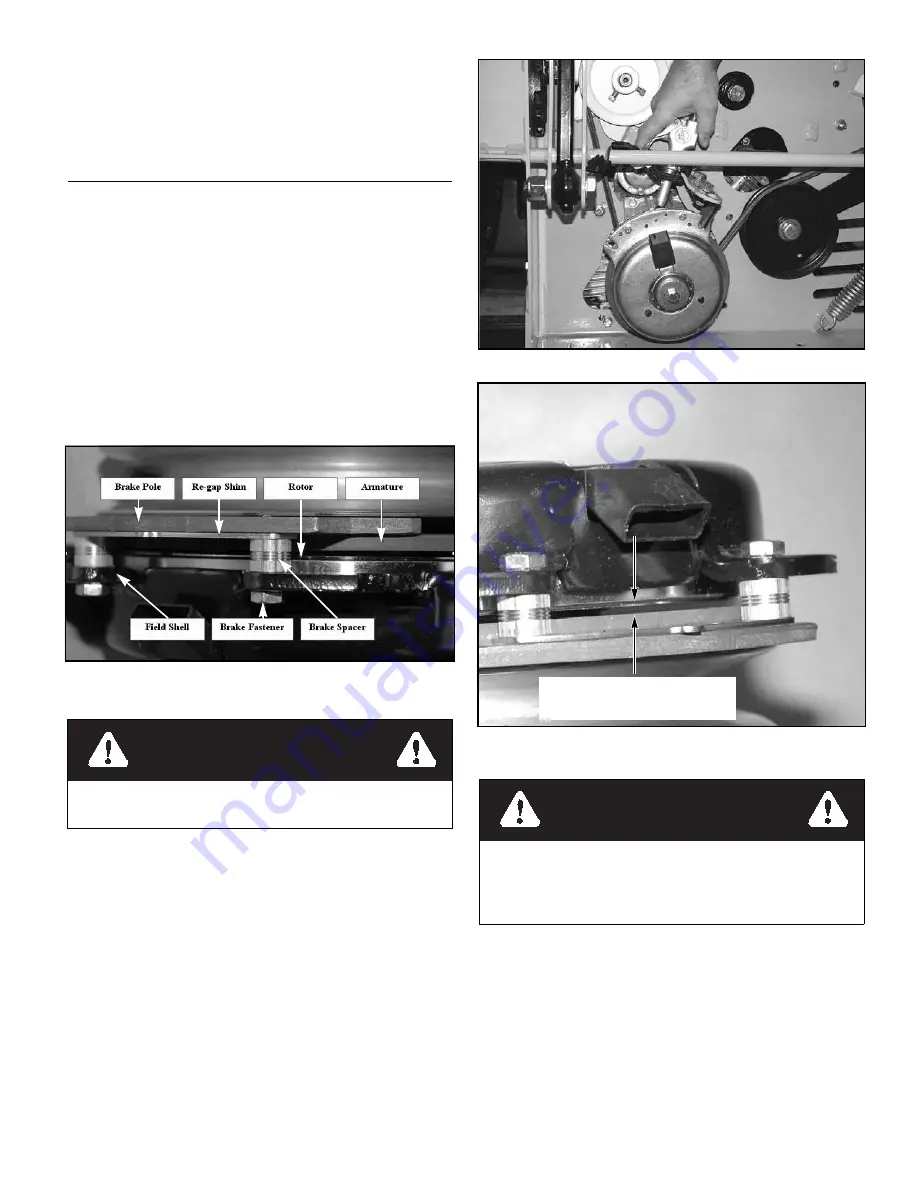
Check the air gap between rotor & armature with feeler gage.
If the gap is less than .070”, then follow the troubleshooting
procedure outlined in Warner Electric P1177 installation
troubleshooting guide available on Warner Electric’s web site-
www.Warnerelectric.com. If the air gap is over .070”, follow the
procedure outlined below. Figure 4-30
1.
Loosen both brake mounting bolts 1/2 to 1 full turn as
shown in Figure 4-31.
2.
Using needle nose pliers, or by hand, take hold of the tab
and remove shim (do not discard shim until proper clutch
function has been confirmed). Figure 4-32
3.
Using a pneumatic line, blow out any debris from under
the brake pole and around the aluminum spacers. Figure
4-29
4.
Re-torque each bolt (M6 X 1) to 120 in.-lbs.
5.
Using a .015” thick feeler gage, verify that a gap is
present between the rotor and armature face on both ends
of the brake pole as shown. Figure 4-33 and Figure 4-34
a.
If the gap is less than .015” the clutch must be
Figure 4-28
WARNING
Always wear adequate eye protection when servicing the
mower.
Figure 4-29
Figure 4-30
WARNING
Do not remove brake pole from field shell/armature. The
brake pole tracks match with the clutch brake and need to
continue to match after shim is removed to ensure proper
brake torque. Figure 4-28
Be certain that the gap between the
rotor and armature face is greater
than .070” prior to shim removal.
Содержание Super Z HD
Страница 1: ...117592 REV C Super Z HD General Service Manual 200 South Ridge Road Hesston Kansas 67062...
Страница 6: ...REV C 1 2 117592...
Страница 10: ...REV C 2 4 117592...
Страница 12: ...REV C 3 2 117592...
Страница 30: ...REV C 5 6 117592...
Страница 40: ...REV C 7 2 117592 Electrical Schematic Kawasaki Mowers with serial number 12122104 and later...
Страница 41: ...117592 7 3 REV C Electrical Schematic Kawasaki DFI...
Страница 42: ...REV C 7 4 117592 Electrical Schematic Briggs Stratton...
Страница 50: ...INDEX PAGE PAGE REV C 1 2 117592...