62 Organizing Contacts, Appointments, Tasks, and Other Information
6.1 Contacts
Contacts
Contacts is your address book and information storage for the people and businesses you
communicate with. Store phone numbers, e-mail addresses, home addresses, and any other information that
relates to a contact, such as a birthday or an anniversary date. You can also add a picture or assign a ring tone
to a contact.
From the contact list, you can quickly communicate with people. Tap a contact in the list for a summary of
contact information. From there, you can call or send a message.
There are two types of contacts that you can create on your device:
•
Outlook contacts
. Contacts that are stored on your device, which can be created on your device or
synchronized with your PC or the Exchange Server.
•
Windows Live contacts
. Contacts that you communicate with using Windows Live Messenger or MSN.
Just like Outlook contacts, you can also enter complete information for a Windows Live contact. For
more information, see “Add Windows Live contacts” in Chapter 10.
Tip
If you use Outlook on your PC, you can synchronize contacts between your device and PC.
Note
You can only add Windows Live contacts after you have set up Windows Live on your device.
Add new contacts
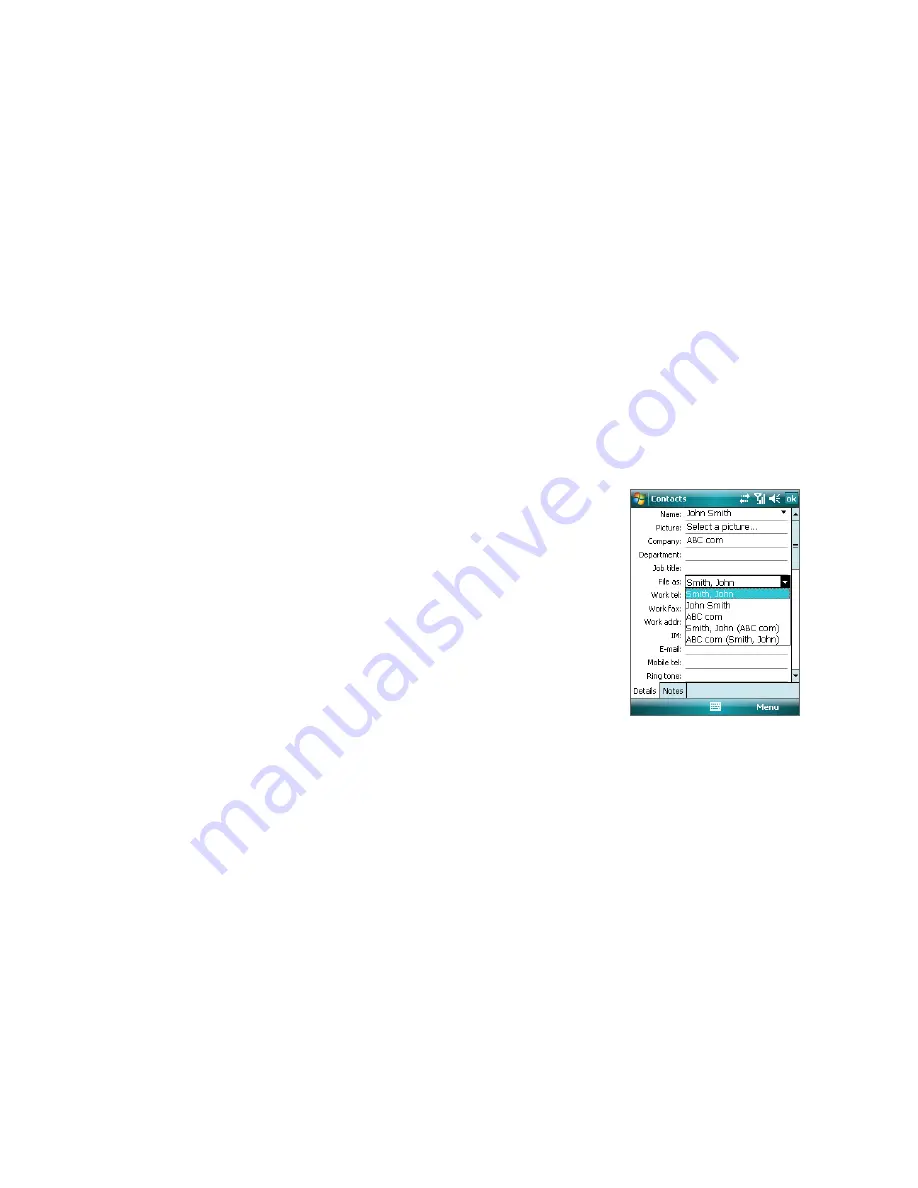
To add a contact on your device
1.
Tap
Start > Contacts
, or from the Today Screen tap
Contacts
.
2.
Tap
New
, select
Outlook Contact
, and enter the contact
information.
3.
In the
File as
field, choose how you want the contact name to
appear in the contact list.
4.
To add a photo of the contact, tap
Select a picture
, then select
the picture file or tap
Camera
to take a photo of the contact.
This photo appears on the Phone screen when you receive a
call from the contact.
5
To assign a ring tone to the contact, tap the
Ring tone
field,
scroll through the list of tones, then select a desired tone.
6.
When finished, tap
OK
.
Notes
•
If someone who is not in your list of contacts calls you, you can create a contact from Call History by tapping
and holding a phone number and then tapping
Save to Contacts
from the shortcut menu.
•
To save a phone number that is contained in a message, tap the phone number, then tap
Menu > Save to
Contacts
.
•
To edit contact information, tap the contact name then tap
Menu > Edit
.
View, organize and search
To view contact information
1.
Tap
Start > Contacts
, or from the Today Screen tap
Contacts
.
2.
Slide your finger upward on the touch screen to scroll down the contact list.
To scroll up the contact list, slide your finger downward on the touch screen.
Note
For detailed instructions on how to use finger scrolling, see "Finger scrolling and finger panning" in Chapter 1.
Содержание TouchFLO
Страница 1: ...DA User Manual...
Страница 32: ...32 Getting Started...
Страница 46: ...46 Using Phone Features...
Страница 54: ...54 Setting Up Your Device...
Страница 69: ...7 1 Messaging 7 2 Text Messages 7 3 Setting Up E mail Accounts 7 4 Using E mail Chapter 7 Exchanging Messages...
Страница 88: ...88 Working With Company E mail and Meeting Appointments...
Страница 96: ...96 Working With Documents and Files...
Страница 109: ...11 1 Camera 11 2 Camera Album 11 3 Pictures Videos 11 4 Windows Media Player Mobile Chapter 11 Experiencing Multimedia...
Страница 124: ...124 Experiencing Multimedia...
Страница 131: ...13 1 Voice Speed Dial Chapter 13 Using Other Applications...
Страница 134: ...134 Using Other Applications...
Страница 135: ...Appendix A 1 Specifications A 2 Regulatory Notices A 3 Additional Safety Information...


