


Heat sink assembly
All heat sink assembly spare part kits include replacement thermal material.
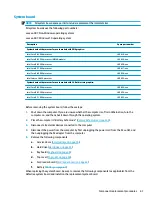
Description
Spare part number
Heat sink for use in models with UMA graphics
L00840-001
Heat sink for use in models with discrete graphics
L00841-001
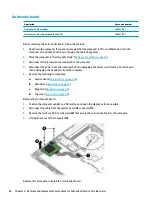
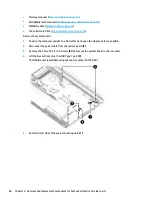
Before removing the heat sink assembly, follow these steps:
1.
Shut down the computer. If you are unsure whether the computer is off or in Hibernation, turn the
computer on, and then shut it down through the operating system.
2.
Place the computer in “Battery Safe mode” (
).
3.
Disconnect all external devices connected to the computer.
4.
Disconnect the power from the computer by first unplugging the power cord from the AC outlet, and
then unplugging the AC adapter from the computer.
5.
Remove the following components:
a.
Service doors (
b.
Hard drive (
)
c.
Keyboard (
)
d.
Top cover (
)
e.
Card reader board (
f.
Battery (
g.
System board (
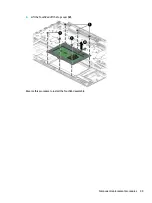
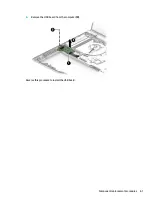
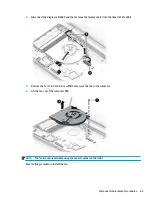
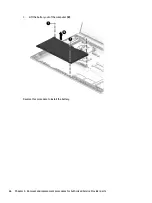
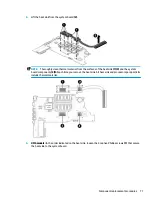
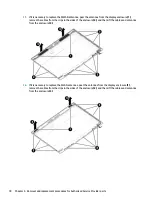
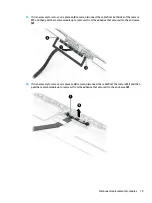
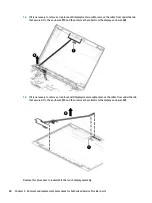
Remove the heat sink assembly:
1.
Position the system board upside-down.
2.
Discrete models: In the order indicated on the heat sink, loosen the 6 captive Phillips screws (1) that
secure the heat sink to the system board.
70
Chapter 6 Removal and replacement procedures for Authorized Service Provider parts
Содержание ProBook 450 G5
Страница 1: ...HP ProBook 450 G5 Notebook PC Maintenance and Service Guide ...
Страница 4: ...iv Important Notice about Customer Self Repair Parts ...
Страница 6: ...vi Safety warning notice ...
Страница 10: ...x ...
Страница 32: ...Display components 22 Chapter 3 Illustrated parts catalog ...
Страница 118: ...WWAN module removal 41 spare part numbers 41 108 Index ...


