176 Chapter 11 Paper transport
ENWW
Clearing paper jams
When a paper jam occurs, the system warning indicator appears in the control panel. A
warning symbol appears in the schematic window indicating the paper jam location.
WARNING!
Press an
Emergency Stop
button before performing this procedure.
1
On the control panel, click the warning symbol. The
Warning Message
window opens
with a message that describes the current problem. Paper jams occur most frequently
in the following locations: paper input, blanket, impression drum, perfector, and exit
rotors. However, a paper jam can occur anywhere in the paper path or adjacent areas.
2
Clear the sheets that are jammed in the paper path.
WARNING!
Operating the system while the doors are open is dangerous and may cause injury. Beware of
moving parts.
3
Immediately check for paper residue or ink residues on the blanket. If there are
residues, immediately perform the blanket recovery procedure. See ‘Recovering the
blanket surface’ on page 121.
4
Perform the appropriate procedure according to the following warning message:
•
Paper Misfeed, or TRN_PIS_feed_timing
When this message appears, access the input area, pull jammed paper out gently,
and remove all shreds. Check the paper input feeding mechanism. This message
also appears when there is insufficient vacuum, with the result that no paper has
been fed into the machine.
•
For any paper jams, or Paper never reached sensor
Refer to the schematic window, Figure 11-40. When this message appears, check
for any paper or ink residue in the press rotors, duplex unit, exit tray, or on the
blanket. Remove any jammed paper. If there is residue, perform the blanket
recovery procedure immediately. See ‘Recovering the blanket surface’ on page
121. Make sure that no paper shreds are left in the grippers and verify impression
paper integrity.
•
Paper reached the stop gate in skew,
or
Paper reached the stop gate in delay
When either of these messages appear, check the paper stack, rear conveyor
jogger, front static guide, and the vacuum volume on the Paper Feed Unit.
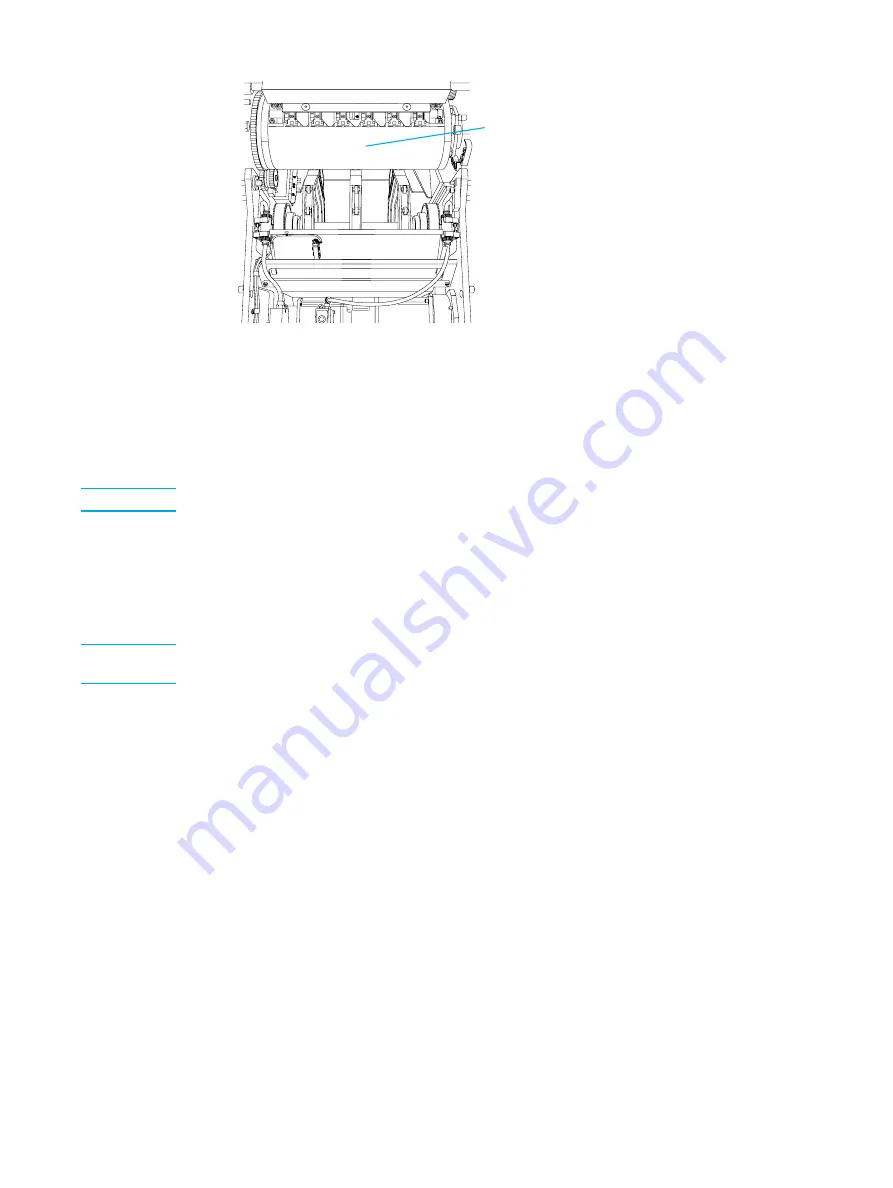
Figure 11-39. Impression drum access
Impression drum
Содержание Indigo press 3050
Страница 1: ...HP Indigo press 3050 User guide English version ...
Страница 2: ...hp indigo press 3050 user guide ...
Страница 13: ...12 Chapter 1 Preface ENWW ...
Страница 23: ...22 Chapter 2 Getting started ENWW ...
Страница 41: ...40 Chapter 4 HP Indigo press 3050 basics ENWW Figure 4 5 Related topics ...
Страница 53: ...52 Chapter 5 The main windows ENWW ...
Страница 83: ...82 Chapter 6 Operating the press ENWW ...
Страница 91: ...90 Chapter 7 Operator routines ENWW Figure 7 7 Inner front wall O O O O ...
Страница 99: ...98 Chapter 7 Operator routines ENWW ...
Страница 131: ...130 Chapter 9 Blanket ENWW 6 Click Next Figure 9 22 First transfer Wizard define the correct pressure here Rear Front ...
Страница 136: ...ENWW 135 10PIP This chapter contains the following sections z Overview z Replacing the PIP ...
Страница 189: ...188 Chapter 11 Paper transport ENWW ...
Страница 190: ...ENWW 189 12Impression drum This chapter contains the following sections z Overview z Replacing the impression paper ...
Страница 212: ...ENWW 211 15Scorotron This chapter contains the following sections z Overview z Scorotron maintenance procedures ...
Страница 219: ...218 Chapter 15 Scorotron ENWW ...
Страница 254: ...ENWW 253 17Pre transfer erase PTE This chapter contains the following sections z Overview z Cleaning the PTE cover ...
Страница 257: ...256 Chapter 17 Pre transfer erase PTE ENWW ...
Страница 271: ...270 Chapter 19 Chiller ENWW ...
Страница 272: ...ENWW 271 20Long term shutdown This chapter contains the following section z Long term shutdown ...
Страница 287: ...286 Appendix B Service and support ENWW ...


