ENWW
Scorotron maintenance procedures 215
13
Use the following procedure to set the wire in the path (see Figure 15-5):
a
Pass the wire from the supply bobbin through the tension pulley at the other end
of the unit (not shown in figure).
b
Route the wire over the pulley (1), under the guide (2), and over the plastic
damper (3).
c
Make sure that the wire is sitting properly in the tension pulley at the other end of
the unit. Then, tense the wire by turning the supply bobbin.
d
Route the wire over the damper (4), under the guide (5), over the pulley (6), and
under the pulley (7).
14
Close the bobbin cover and reattach it using the Phillips screw.
15
Rotate the plastic gear by hand to tighten the wire and ensure free movement. The
spring-loaded idler pulley retracts.
16
Return the grids to their slots by sliding each on its rails, hooking up the first on the
inner end, and then pressing the latch and hooking up the outer end. Return the grid
to its previous position. The grid side that formally faced out should be mounted face
out.
17
Insert the scorotron unit in its slot in the machine and lock it with the latch. The unit is
locked when you hear a click.
18
Stretch the corona wire.
WARNING!
Make sure that you remove all tools and materials from the unit and that all the doors are closed
before operating the machine.
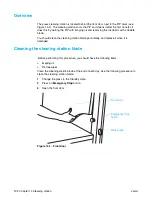
Figure 15-5. Corona wire routing
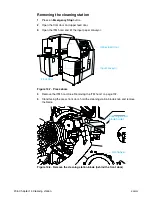
Figure 15-6. Drive gear on the back of the scorotron
1
3
4
5
6
7
PVC bobbin
Steel bobbin
Damper
2
Drive gear for PVC bobbin
Содержание Indigo press 3050
Страница 1: ...HP Indigo press 3050 User guide English version ...
Страница 2: ...hp indigo press 3050 user guide ...
Страница 13: ...12 Chapter 1 Preface ENWW ...
Страница 23: ...22 Chapter 2 Getting started ENWW ...
Страница 41: ...40 Chapter 4 HP Indigo press 3050 basics ENWW Figure 4 5 Related topics ...
Страница 53: ...52 Chapter 5 The main windows ENWW ...
Страница 83: ...82 Chapter 6 Operating the press ENWW ...
Страница 91: ...90 Chapter 7 Operator routines ENWW Figure 7 7 Inner front wall O O O O ...
Страница 99: ...98 Chapter 7 Operator routines ENWW ...
Страница 131: ...130 Chapter 9 Blanket ENWW 6 Click Next Figure 9 22 First transfer Wizard define the correct pressure here Rear Front ...
Страница 136: ...ENWW 135 10PIP This chapter contains the following sections z Overview z Replacing the PIP ...
Страница 189: ...188 Chapter 11 Paper transport ENWW ...
Страница 190: ...ENWW 189 12Impression drum This chapter contains the following sections z Overview z Replacing the impression paper ...
Страница 212: ...ENWW 211 15Scorotron This chapter contains the following sections z Overview z Scorotron maintenance procedures ...
Страница 219: ...218 Chapter 15 Scorotron ENWW ...
Страница 254: ...ENWW 253 17Pre transfer erase PTE This chapter contains the following sections z Overview z Cleaning the PTE cover ...
Страница 257: ...256 Chapter 17 Pre transfer erase PTE ENWW ...
Страница 271: ...270 Chapter 19 Chiller ENWW ...
Страница 272: ...ENWW 271 20Long term shutdown This chapter contains the following section z Long term shutdown ...
Страница 287: ...286 Appendix B Service and support ENWW ...


