background image

Getting Started

1-6

Installing Your System

The Digital AlphaStation 255 Family Installation Information you received with your
system graphically outlines the steps to follow in installing your system.

_______________________ CAUTIONS __________________________

1. To ensure proper cooling, verify that air can flow freely into the system front

and out the system rear and left side.

2. The system is designed to be installed horizontally on a desktop.  Do not use

a stand or rack that would hold the system on its side unless it is a Digital
stand that is approved for your system.

____________________________________________________________

Check to make sure that you received all your system components.  (See Appendix F,
Equipment Log, to list your equipment.)  If something is missing, please contact your
distributor or Digital representative.

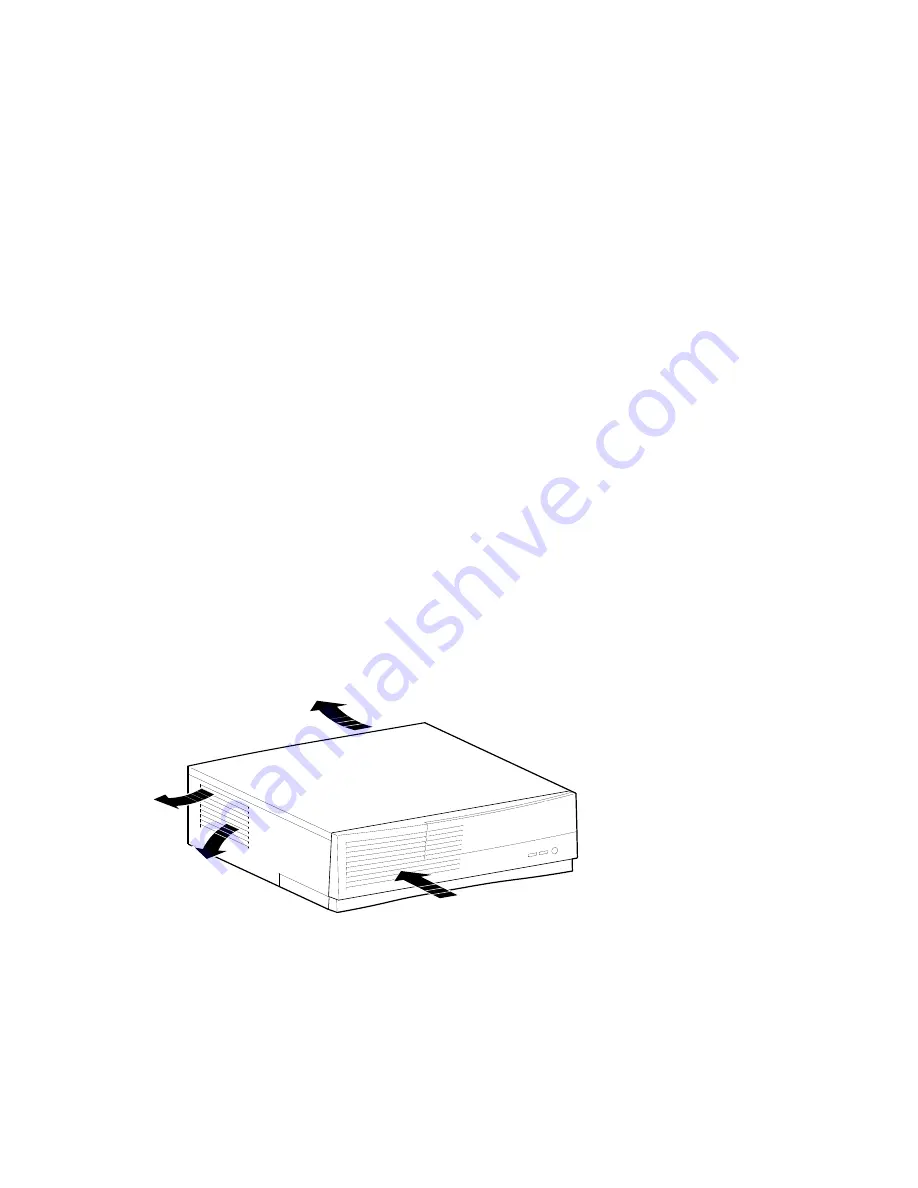
Position your system so that air can flow freely to and from the vents, as Figure 1–3
shows.  Take care not to block any of the vents.


Figure 1–3:  System Airflow

Содержание AlphaStation 255 Series

Страница 1: ...DigitalAlphaStation 255Family UserInformation Order Number EK VLLXA UI B01 Digital Equipment Corporation Maynard Massachusetts ...

Страница 2: ... Use duplication or disclosure by the U S Government is subject to restrictions as set forth in subparagraph c 1 ii of the Rights in Technical Data and Computer Software clause at DFARS 252 227 7013 Copyright 1996 Digital Equipment Corporation All Rights Reserved The following are trademarks of Digital Equipment Corporation AlphaGeneration AlphaStation DEC Digital OpenVMS ThinWire and the DIGITAL ...

Страница 3: ...uipment off and on the user is encouraged to try to correct the interference by one or more of the following measures Reorient or relocate the receiving antenna Increase the separation between the equipment and receiver Connect the equipment into an outlet on a circuit different from that to which the receiver is connected Consult the dealer or an experienced radio TV technician for help The user ...

Страница 4: ......

Страница 5: ...ts 1 7 Network Connection 1 9 Starting Your System 1 9 Preloaded Operating System Software 1 10 Microsoft Windows NT Workstation 1 10 Digital UNIX 1 11 OpenVMS Alpha 1 11 Switching Console Firmware 1 11 If No Operating System Is Installed 1 11 Turning Off Your System 1 12 Computer Security 1 13 Optional Lock 1 13 Passwords 1 13 2 System Overview Introduction 2 1 Energy Management 2 1 System Featur...

Страница 6: ... Disks 3 5 CMOS Setup Tasks 3 6 Advanced CMOS Setup 3 8 Utilities 3 9 Configuring with SRM Firmware 3 11 Introduction 3 11 Conventions 3 11 Booting the System 3 13 Boot Command Examples 3 14 Setting and Showing Environment Variables 3 14 Set Command 3 14 Set Command Examples 3 15 Show Command 3 16 Show Command Examples 3 17 Environment Variables 3 18 Adding ISA Bus Devices 3 19 ISA Configuration U...

Страница 7: ...ation 4 11 Installing Optional Internal SCSI Storage Devices 4 12 Installing SCSI Disk Drives 4 12 Installing Drives in the Lower Right Side Bracket 4 14 Installing a Drive in the Floppy Bracket 4 16 Installing External Options 4 17 Cabling for a Printer or Other Parallel Device 4 17 External SCSI Options 4 17 Internal Cable Layout 4 18 Replacing the Battery 4 23 Replacing the Left Side Panel and ...

Страница 8: ...1 7 Figure 1 5 Connecting Cables and Power Cords 1 8 Figure 1 6 Starting Your System 1 9 Figure 2 1 Front View of System 2 3 Figure 2 2 Rear Connectors 2 4 Figure 2 3 System Unit Components 2 6 Figure 2 4 Motherboard Components 2 8 Figure 2 5 Keyboard 2 10 Figure 3 1 AlphaBIOS Boot Screen 3 2 Figure 3 2 AlphaBIOS Setup Screen 3 3 Figure 3 3 Display System Configuration Screen 3 4 Figure 3 4 Hard D...

Страница 9: ...lacing the Battery 4 24 Figure 4 17 Replacing the Left Side Panel and Top Cover 4 25 Figure 4 18 Using the Optional Kensington Lock 4 26 Figure A 1 Cleaning Your Mouse A 2 Figure B 1 Motherboard Switch and Jumper Locations B 10 TABLES Table 1 1 Recommendations for Posture and Work Habits 1 3 Table 1 2 Operating System Shutdown 1 12 Table 2 1 Front Components 2 3 Table 2 2 Rear Connectors 2 4 Table...

Страница 10: ...OpenVMS Port Mapping B 5 Table B 9 Keyboard and Mouse Connector Pinouts B 6 Table B 10 SCSI Port Pinouts B 7 Table B 11 System Input Power Requirements B 8 Table B 12 System Output Power Specifications B 8 Table B 13 Motherboard Switch Settings B 11 Table B 14 Motherboard Jumper Settings B 13 Table C 1 I O Address Map C 1 Table C 2 Default System Interrupt Assignments C 2 Table C 3 DMA Channel Ass...

Страница 11: ... also find general system information such as console commands and system care here These systems include a new power management feature which ensures that the system uses significantly less power when it is idle Details on power management hardware capabilities of the family of 255 systems are available in the Digital Alphastation 255 Family Technical Information Audience If you are operating con...

Страница 12: ...s and connections Chapter 3 Configuring Your System Using AlphaBIOS firmware and SRM firmware Chapter 4 Installing System Options Installing hard disk compact disc and tape drives memory option cards printer cable and external SCSI cable Chapter 5 Troubleshooting Possible causes and actions to solve problems Appendix A System Care Cleaning your system monitor and mouse Appendix B Technical Specifi...

Страница 13: ...on Abbreviations This guide uses the following abbreviations Abbreviation Meaning CD Compact disc CD ROM Compact disc read only memory CPU Central processing unit DMA Direct memory access DRAM Dynamic random access memory DROM Diagnostic read only memory FDC Floppy disk controller flashROM Electrically erasable rewriteable nonvolatile memory GB A GB suffix to a numerical value indicates size in gi...

Страница 14: ...icates size in megabytes for example 550 MB A megabyte equals 1 048 576 bytes MHz Megahertz MAU Media adapter unit ns Nanoseconds NVRAM Nonvolatile random access memory PCI Peripheral component interconnect RISC Reduced instruction set computing ROM Read only memory SCSI Small computer system interface SIMM Single in line memory modules SRM Digital UNIX and OpenVMS console firmware SROM Serial rea...

Страница 15: ...mpatibility with other products or pointers to other information ____________________________________________________________ __________________________ HINT_____________________________ A HINT includes suggestions to make your computing tasks easier ____________________________________________________________ Additional Information Resources You may wish to consult the following information resou...

Страница 16: ...Wide Web http www windowsnt digital com support alphabios for further technical details on AlphaBIOS firmware This online guide introduces the AlphaBIOS firmware and gives directions on configuring starting updating and troubleshooting Alpha systems Contact your distributor or Digital representative for other available product related information ...

Страница 17: ... system can stand alone or function as a client in an office network environment This chapter describes how to start install restart and turn off your system You can also find information here about preloaded software as well as guidelines for system security Figure 1 1 shows a typical Digital AlphaStation 255 system Figure 1 1 AlphaStation 255 System ...

Страница 18: ...d software has been installed Carefully review the software license agreement shipped with your system ____________________________________________________________ ________________________WARNING___________________________ When unpacking and moving system components be aware that some components such as the system unit or monitor may be too heavy for you to safely lift alone If you are doubtful ab...

Страница 19: ...rom the seat so you do not compress the area behind them which could restrict the blood flow 4 Your upper body is erect and your lower back is supported with a backrest Keyboard and Mouse 5 Your wrists are straight and do not flex more than 15 degrees They are supported and do not rest on sharp edges If you use a mouse rest your hand on the mouse so your wrist is not on the work surface Operate th...

Страница 20: ...of your work area and distribute the lighting evenly on your work area Noise Keep background noise at a minimum Background noise above 65 dBA is tiring Sound absorbing materials for example curtains carpeting and acoustic tile can help reduce background noise Temperature 20 23 degrees C 68 74 degrees F Humidity 30 70 Ventilation Provide adequate air ventilation to operate the equipment and avoid f...

Страница 21: ...d for 230 Volt AC input power Modifying the power cord can cause personal injury and severe equipment damage ____________________________________________________________ Power cords supplied with the Digital AlphaStation 255 system meet the following criteria UL and CSA Certified cord rated for use at 250 Volts AC with a current rating that is at least 125 of the current rating of the Digital Alph...

Страница 22: ...s designed to be installed horizontally on a desktop Do not use a stand or rack that would hold the system on its side unless it is a Digital stand that is approved for your system ____________________________________________________________ Check to make sure that you received all your system components See Appendix F Equipment Log to list your equipment If something is missing please contact you...

Страница 23: ...gure 1 4 shows 115 V 230 V 1 2 Figure 1 4 Voltage Selector Switch ________________________ CAUTION___________________________ Improper voltage selection can damage the system s power supply ____________________________________________________________ 2 Ensure that the power switch is in the off O side pushed in position 3 Connect the mouse keyboard video cable microphone headphone and power cords ...

Страница 24: ...ing Cables and Power Cords 4 If you have an external SCSI small computer system interface device or SCSI storage box connect the SCSI cable to the SCSI port on the rear of the system See the SCSI Termination section in Chapter 5 Troubleshooting ...

Страница 25: ...NIX or OpenVMS operating systems the ThinWire port is selected by default You can change port types by using the following SRM console commands set ewa0_mode twisted for the twisted pair 10Base T port set ewa0_mode AUI for the ThinWire port After changing the port type init or power cycle the machine Starting Your System Perform the following steps in order to start boot your Digital AlphaStation ...

Страница 26: ...on of the AlphaStation 255 system your operating system came preloaded If you ordered a Microsoft Windows NT Workstation version the operating system is not preloaded Disk 0 on the first SCSI bus however is partitioned and formatted so that you can immediately install the operating system Depending on how the environment variables are set your system shows one of the operating system specific disp...

Страница 27: ...ot OpenVMS if auto_action is set to Boot when you power on your system F For more information refer to your operating system documentation Switching Console Firmware AlphaStation 255 console firmware resides in flashROM The flashROM is loaded with SRM firmware for OpenVMS and Digital UNIX systems or AlphaBIOS firmware for Windows NT systems You can change from SRM to AlphaBIOS or from AlphaBIOS to...

Страница 28: ...d from Table 1 2 below Table 1 2 Operating System Shutdown Operating System Action Microsoft Windows NT Workstation From the Program Manager File Menu choose Shutdown or press Ctrl Alt Del Choose the OK button to confirm Digital UNIX Type the following from a superuser account shutdown h now OpenVMS Type the following from a privileged account sys system shutdown 3 Wait for the operating system to...

Страница 29: ...of these options Optional Lock To provide system security you may wish to purchase an optional Kensington lock order number PCP3H AG for your Digital AlphaStation 255 system Passwords For additional security most screen saver and pause screen displays can have password protection enabled Also see the discussion of AlphaBIOS and SRM console security in Chapter 5 Troubleshooting of this text ...

Страница 30: ......

Страница 31: ...ly less power Details on power management hardware capabilities of the family of 255 systems are available in the Digital Alphastation 255 Family Technical Information System Features Your Digital AlphaStation 255 system uses a high performance DECchip 21064A CPU central processing unit System features include Memory DRAM Up to 1 GB gigabyte DRAM Primary cache 16 KB instruction cache and 16 KB dat...

Страница 32: ... greater speed and improved expandability PCI removes various types of peripheral controllers from the slower ISA bus and connects them directly to a wider faster data path The result is faster data transfers for devices such as SCSI controllers and high end video adapters a critical advantage when you are running graphic and I O intensive software The PCI bridge chip in the chipset can be the PCI...

Страница 33: ...cator Function 1 Floppy drive optional Location of 3 5 inch drive bay 2 Floppy eject button Ejects floppy diskette when pushed 3 CD ROM drive 5 25 inch half height front accessible drive bay 4 CD ROM eject button Opens the CD loading drawer 5 Reset button This button resets the system and causes the self test to run 6 Power indicator Lights when the system is on 7 Disk activity indicator Lights wh...

Страница 34: ... 7 8 10 11 12 13 14 15 16 17 18 20 21 9 1 2 19 Figure 2 2 Rear Connectors Table 2 2 Rear Connectors Figure Legend Connector Function 1 Power on off switch Turns AC power on or off 2 Key lock Locking mechanism for system cover 3 MAU Media adapter unit optional 4 Enhanced bidirectional parallel port Connects an industry standard parallel printer or other parallel device ...

Страница 35: ...reen indicates that the system is linked to the network Yellow indicates network activity 14 Twisted pair connector Connector to the embedded Ethernet controller 15 COM port 2 Connector for communications port 2 16 COM port 1 Connector for communications port 1 17 SCSI port Provides the interface between the system unit and external SCSI devices This connector must have a terminator if no SCSI dev...

Страница 36: ...ew 2 6 System Unit Components Figure 2 3 shows the location of the Digital AlphaStation 255 system unit components Table 2 3 lists the system unit components 1 2 3 4 5 6 7 8 10 11 9 Figure 2 3 System Unit Components ...

Страница 37: ... 4 SIMMs each 3 Power supply with internal fan 4 Cable routing areas 5 CD ROM drive Located below the CD ROM drive is storage for one 1 6 inch high 3 5 inch hard drive or two 1 inch high 3 5 inch hard drives 6 Speaker 7 3 5 inch 1 44 MB floppy disk drive optional 8 Cooling fan 9 Riser card for ISA and PCI option cards 10 Motherboard 11 Typical PCI option card size varies with option ...

Страница 38: ...iew 2 8 Motherboard Figure 2 4 shows the locations of the motherboard components Table 2 4 lists the motherboard components 2 3 4 5 6 7 8 9 10 11 12 13 14 15 16 17 18 19 20 21 22 1 Figure 2 4 Motherboard Components ...

Страница 39: ... 5 Internal SCSI connector 6 Front panel connector 7 DECchip 21064A CPU socketed 8 Interrupt PAL 9 Factory diagnostic port 10 Factory serial ROM if present 11 Battery 12 Riser card connector 13 Ethernet ID ROM 14 Headphone jack 15 Microphone jack 16 Audio line in jack 17 Network LEDs 18 Twisted pair Ethernet connector 19 COM 2 port 20 COM 1 port 21 External SCSI port and parallel port 22 Mouse and...

Страница 40: ... that swing down and lock into place Refer to Table 2 5 for information on keyboard key groups and functions F Refer to your operating system or application software documentation for software specific key functions 2 3 4 5 6 7 1 MLO 012158 Figure 2 5 Keyboard Table 2 5 Key Groups and Functions Figure Legend Key Key Group Function 1 Escape key This key is program specific Its function is determine...

Страница 41: ...n activated 5 Numeric keypad These keys perform numeric functions and software defined functions including cursor control The NumLock key allows you to toggle between the numeric functions and software defined functions 6 Cursor control key group These keys control the movement of the highlighted cursor on the monitor screen 7 Alphanumeric key group The keys are typewriter specific ...

Страница 42: ......

Страница 43: ...Selecting a copy of the Windows NT system to boot Displaying system configuration information Setting up the hard disk Setting the date and time Enabling and setting the delay for auto start Setting or changing the AlphaBIOS password Starting AlphaBIOS When the system is powered on and the power on self tests POST sucessfully completes the AlphaBIOS firmware is loaded and started AlphaBIOS perform...

Страница 44: ...ot screen Figure 3 1 The boot screen lists each of the different copies of the Windows NT operating system that have been installed on your system Choose the operating systems to boot and press Enter Enter the AlphaBIOS Setup program by pressing F2 Figure 3 1 AlphaBIOS Boot Screen ...

Страница 45: ...rt the AlphaBIOS Setup program by pressing F2 while the boot screen is displayed Figure 3 2 shows the AlphaBIOS Setup screen Use the setup screen to select the desired task Press Escape to return to the boot screen Figure 3 2 AlphaBIOS Setup Screen ...

Страница 46: ...he configuration category you wish to view Figure 3 3 shows the Systemboard Configuration category Figure 3 3 Display System Configuration Screen Memory Configuration The memory configuration display shows bank size the starting address of each bank and the capacity of the SIMMs in the bank Hard Disk Configuration The hard disk configuration screen displays information about recognized disk drives...

Страница 47: ... ports Setting Up the Hard Disks AlphaBIOS makes it easy to format and partition hard disks on the system Typically you partition and format drive 0 Using the Windows NT Disk Administrator you can quickly partition and format the other drives Select Hard Disk Setup from the AlphaBIOS Setup screen Figure 3 4 shows the Hard Disk Setup screen Figure 3 4 Hard Disk Setup Screen Press F7 to perform an e...

Страница 48: ...rt enabling and delay There also is an advanced CMOS setup mode used to control PCI parity checking memory testing AlphaBIOS password and SCSI termination To enter the CMOS Setup select CMOS Setup from the AlphaBIOS Setup screen Use Tab to move among the fields Figure 3 5 CMOS Setup Screen Date and Time When setting the time use the 24 hour format for example 10 00 p m should be expressed as 22 00...

Страница 49: ... is the amount of time the boot screen is displayed before the default system is automatically started This delay gives you the opportunity after resetting or power cycling the system to select another operating system to start or to enter AlphaBIOS setup CMOS Setup Options Color Pressing F3 repeatedly cycles through the available AlphaBIOS color schemes Advanced Pressing F6 displays the Advanced ...

Страница 50: ...turning on parity checking Extended Memory Test Extended memory test can be enabled or disabled When enabled the memory test writes and then reads several patterns of data to main memory This testing verifies the integrity of the memory Password Setup To help maintain system security AlphaBIOS provides two levels of password protection system setup and system startup When system setup protection i...

Страница 51: ...d and termination is set appropriately Advanced CMOS Setup Options Discard changes Pressing Escape restores the settings in effect when you entered advanced CMOS setup This does not discard changes made to standard CMOS setup Save changes Pressing F10 saves changes you have made in advanced CMOS setup When exiting CMOS setup you also must save your changes at the CMOS setup screen for the changes ...

Страница 52: ... A maintenance program such as a RAID configuration utility is run directly from the AlphaBIOS utility menu To run a maintenance program follow this procedure 1 Start AlphaBIOS setup select Utilities select Run Maintenance Program from the submenu and press Enter 2 In the Current Partition field select the hard disk partition floppy disk or CD ROM drive from which to run the program Type the progr...

Страница 53: ...g the system configuration Adding ISA bus devices Conventions Table 3 1 shows the conventions used in SRM firmware Table 3 1 SRM Conventions Item Convention Console prompt Maximum command length 255 characters Multiple contiguous spaces or tabs Treated as a single space Command abbreviations Allowed if not ambiguous Command qualifiers or options Prefix with a space and a dash Numbers Hexadecimal u...

Страница 54: ... â Recalls previous commands The last 16 commands are stored Ctrl C Terminates the foreground process Ctrl D or ß Moves the cursor left one position Ctrl E Moves the cursor to the end of the line Ctrl F or à Moves the cursor right one position Ctrl H Moves the cursor to the beginning of the line Ctrl O Suppresses resumes toggles console output Ctrl Q XON Resume flow of data to the console Ctrl S X...

Страница 55: ...lags longword longword Specifies additional information for the operating system For systems with OpenVMS root number and boot flags are specified here For Digital UNIX systems the following symbolic values may be used i interactive boot s boot to single user a autoboot to multiuser Use the set boot_osflags command to set an environment variable that specifies a default boot flag value protocols e...

Страница 56: ...ed dec2 sys from Ethernet port ewa0 boot protocol bootp ewa0 Boots using TCP IP BOOTP protocol from Ethernet port ewa0 boot flags 0 1 Boots the system from the default boot device using flag settings 0 1 boot halt dka0 Loads the image from disk dka0 but remains in console mode Setting and Showing Environment Variables Set Command The set command is used to set or modify the value of an environment...

Страница 57: ...ts default value integer Creates an environment variable as an integer string Creates an environment variable as a string Set Command Examples Table 3 6 shows set command examples and their descriptions Table 3 6 SRM Set Command Examples Command Description set bootdef_dev ewa0 The default boot device is set to ewa0 set auto_action boot The console attempts to boot following an error halt or power...

Страница 58: ...on Description config Displays the current memory configuration PCI logical slots and ISA logical slots based on ISACFG utility input to the configuration database device device name Displays the devices and controllers in the system Specifying a device name returns information on that device only envar Displays the value of the environment variable specified error Displays error log information m...

Страница 59: ... Bus ID 7 Lists device information such as system designation drive model or Ethernet address show memory 64 Meg of System Memory Bank 0 32 MB 8 MB per Simm Starting at 0x2000000 Bank 1 32 MB 8 MB per Simm Starting at 0x0 Bank 2 No Memory Detected Lists system RAM bank sizes and starting addresses Bank 2 is always unused in the AlphaStation 255 system show See the environment variable section List...

Страница 60: ... boot to single user a autoboot to multiuser bootdef_dev Sets shows the default device or device list from which the system will attempt to boot If the system software is pre loaded the variable is preset to point to the device containing the pre loaded software Otherwise the default value is null bus_probe_algorithm Selects which method the firmware uses to probe the PCI bus for PCI devices durin...

Страница 61: ... edit the configuration file and rebuild the kernel pci_parity This variable controls PCI parity checking at the PCI bridge chip Parity checking is performed if on disabled if off and dependent on the SCSI controller revision if sniff Default is off Certain PCI adapters have been known to generate bad parity on the PCI under certain loading conditions which results in system errors Ensure that you...

Страница 62: ...URATION UTILITY Name I O IRQ DMA Mem Length Enabled MOUSE 60 12 Y KBD 60 1 Y COM1 3f8 4 Y COM2 2f8 3 Y LPT1 3bc 7 Y FLOPPY 3f0 6 2 Y HELP Enter up to 15 char device name KEY HELP Arrows TAB to move RET once to submit entry RET 2nd time to exit To add an ISA option first enter the device s name then move to the next field and enter its I O address and so forth For example to add a DE205 Ethernet co...

Страница 63: ...FG MESSAGE ERROR IRQ conflict with reserved IRQ values 0 2 8 11 or 13 If you entered a DMA value of 2 rather than nothing the following message is displayed ISACFG MESSAGE ERROR DMA conflict with slot 0 dev 5 You can delete an entire entry by using the Backspace key ISACFG Utility Command Format The syntax of the ISACFG command is isacfg slot slot dev device all rm mk mod field value The ISACFG co...

Страница 64: ...nit Initializes the configuration table to the default settings iobase 0 5 Specifies up to six I O base registers in hexadecimal for a particular device entry irq 0 3 Allows you to assign up to four IRQ interrupt request channels to the device use decimal IRQ levels membase 0 2 Specifies up to three R W ISA memory regions in hexadecimal memlen 0 2 Specifies the length corresponding to membase 0 2 ...

Страница 65: ...priate command options 4 init Typing init allows the changes to be used 5 Configure the ISA option Use the manual that came with your ISA option to set the proper configuration 6 Turn off the system and install the ISA option Refer to Chapter 3 Configuring Your System 7 Turn on the system and boot The operating system boots and sees the new ISA option ISACFG Command Examples This section shows exa...

Страница 66: ...e0 530 iobase1 388 _ irq0 9 dmachan0 0 dmachan1 1 handle PCXBJ enadev 1 Disabling the audio subsystem isacfg slot 2 rm Adding the FAX MODEM option add_fax or the following two commands isacfg mod slot 0 dev 3 enadev 0 isacfg slot 4 dev 0 ml handle COM4 irq0 3 _ iobase0 2e8 etyp 1 enadev 1 Displaying the configuration database isacfg all Modifying the IRQ0 entry of an option isacfg mod slot 1 irq0 ...

Страница 67: ...ated to installing system options on your Digital AlphaStation 255 system Opening and closing the system cover Removing the front door Installing additional system memory Installing expansion boards PCI bus options Installing internal drives Connecting external devices Replacing the battery ...

Страница 68: ...eripheral devices 2 Unplug the power cord and remove the video cable 3 Wait at least 15 seconds to allow time for the power supply capacitors to discharge safely 4 Facing the rear of the unit unlock the chassis lock 5 Locate and loosen the thumb screw that fastens the top cover to the rear panel Place your thumbs on the upper corners of the rear panel pull back on the cover and lift the cover up a...

Страница 69: ...Installing System Options 4 3 2 3 5 1 4 Figure 4 1 Unlocking and Removing Top Cover and Side Panel ...

Страница 70: ...e 4 2 and perform the following steps 1 Remove the system top cover see the previous section on Removing Top Cover and Side Panel 2 Rotate the door upward to the open position This position allows access to the front accessible devices 3 Unhook the right tab attached to the rear bracket on the inside of the door 4 Unhook the left tab by squeezing in the plastic tab located near the floppy drive tr...

Страница 71: ...ies 33 bits of the 132 bit bus width All SIMMs in a bank must be identical To add memory modules SIMMs refer to Figure 4 3 as you perform the following steps 1 Install the SIMM into the socket at an angle Ensure that the notch is aligned with the protrusion in the bottom of the connector Rock the SIMM gently until it is seated evenly into the bottom of the socket Tip the SIMM upright until both th...

Страница 72: ...stem and unplug the power cord from the wall outlet 2 Unlock and remove the top cover panel as described earlier in this chapter 3 Squeeze the tabs on both sides of the rear of the floppy drive tray to release it from the enclosure Slide the drive assembly toward the rear of the system unit and lift and remove it 4 Remove the data and power cables from the floppy drive assembly Note the position o...

Страница 73: ... NT or Digital UNIX The OpenVMS operating system does not support shared interrupts ____________________________________________________________ F Refer to your option module documentation for instructions on configuring a PCI or an ISA option module To install an expansion board refer to Figure 4 5 as you perform the following steps 1 Unlock and remove the top cover and side panel 2 Pick an avail...

Страница 74: ...____________________ The bottom ISA slot accepts only half size ISA cards ____________________________________________________________ 3 Unscrew and remove the metal filler plate for the slot you have chosen 4 Insert the new expansion card into the riser board slot See Figure 4 6 Push the board firmly into the socket ...

Страница 75: ...______ When adding ISA options to Digital UNIX or OpenVMS systems run the ISA configuration utility type ICONFIG at the SRM console prompt to configure the option See Chapter 3 Configuring Your System for more information on this utility ____________________________________________________________ F For more information on operating system specific options refer to your operating system documentat...

Страница 76: ...vice installation you must be familiar with the available SCSI addresses SCSI bus length limits and SCSI termination ________________________ CAUTION ___________________________ Failure to properly set up the SCSI termination may result in loss of data or damage to the file system ____________________________________________________________ SCSI Addresses SCSI IDs Before installing a SCSI drive yo...

Страница 77: ...drives Both ends and only at the ends of the SCSI bus must be terminated correctly External Like the internal SCSI bus the external end of the SCSI bus also must be terminated When no SCSI devices are present on the external SCSI bus the bus is automatically terminated on the motherboard When however an external SCSI cable is present the automatic external termination is disabled and the last exte...

Страница 78: ...elow the CD ROM drive contains a drive tray that accommodates up to two 3 5 inch by 1 0 inch hard disks or one 3 5 inch by 1 6 inch hard disk The lower section floppy drive bay can accommodate one 1 0 inch hard disk The maximum total capacity is two drives To install an internal SCSI device follow this procedure 1 Turn off your system and unplug the power cord from the wall outlet 2 Unlock and rem...

Страница 79: ...rive is secured within the bracket by two screws It is not necessary to remove the cables from the CD ROM For convenience you can rest the CD ROM assembly on the power supply 6 Referring to Figure 4 8 remove the locking pin and push in the button latch on the right side of the enclosure to release the drive tray 7 Slide the drive tray back and lift it up and out of the enclosure ...

Страница 80: ...rive Tray Installing Drives in the Lower Right Side Bracket Before you begin refer to the documentation that came with your drive to determine how to configure the drive To install drives in the lower right side bracket refer to Figure 4 9 and the next procedure ...

Страница 81: ...les to the drives before fully inserting and securing the drive tray Verify that the cables are connected in the correct orientation All cables and most connectors are keyed so that you cannot connect them incorrectly If your drive is not keyed you must connect pin 1 of the cable to pin 1 of the connector Pin 1 of the cable is on the edge with the colored stripe or pattern Pin 1 of the connector i...

Страница 82: ...readed holes in the drive Mount the drive in the floppy bracket securing it with the four screws provided with the drive two on each side 3 Connect the power and SCSI cables to the drive before fully inserting and securing the floppy bracket Verify that the cables are connected in the correct orientation All cables and most connectors are keyed so that you cannot connect them incorrectly If your d...

Страница 83: ...pment as well as the appropriate instructions in this section ____________________________________________________________ Cabling for a Printer or Other Parallel Device Connect the cable to the parallel port as Figure 4 11 shows Be sure that you are using the correct type of printer cable If your cable has the incorrect type of connector you need an adapter or a different cable 1 2 Figure 4 11 Ca...

Страница 84: ...last external SCSI device using the appropriate terminator Make sure that any other external SCSI devices have their terminators removed or disabled _________________________ NOTE ____________________________ If you remove an external SCSI cable from the rear panel SCSI connector the external port must be properly terminated ____________________________________________________________ Internal Cab...

Страница 85: ...able Configuration Table 4 2 Power Supply Cable Configuration Legend Component 1 Power supply 2 12 5 VDC to motherboard 3 3 3 VDC to motherboard 4 Power connector for optional hard drive 5 Floppy drive or tape drive optional 6 CD ROM drive 7 Hard drive 8 Hard drive optional ...

Страница 86: ...6 2 Figure 4 13 SCSI Cable Configuration Table 4 3 SCSI Cable Configuration Legend Component 1 Motherboard internal SCSI bus connector J4 2 Tape drive optional 3 Hard drive 4 Hard drive optional 5 CD ROM drive 6 Internal SCSI bus terminator ...

Страница 87: ...nstalling System Options 4 21 1 2 Figure 4 14 FDC Cable Configuration Table 4 4 FDC Cable Configuration Legend Component 1 FDC floppy drive controller connector on motherboard J6 2 Floppy drive optional ...

Страница 88: ...udio Cable Layout Table 4 5 MAU and Audio Cable Layout Legend Component 1 MAU cable connects to system board connector J19 optional 2 MAU card cable connects to MAU card connector J2 optional 3 Audio connector on motherboard J5 4 Audio connector at CD ROM drive ...

Страница 89: ...plosion Replace the battery only with the same or equivalent type recommended by the manufacturer Discard used batteries according to manufacturer s instructions ____________________________________________________________ ________________________ CAUTION___________________________ Take care not to bend the spring that holds down the battery A bent spring could result in poor battery contact and i...

Страница 90: ...Installing System Options 4 24 Figure 4 16 Replacing the Battery ...

Страница 91: ...e 3 2 1 4 Figure 4 17 Replacing the Left Side Panel and Top Cover 1 Line up the four locating pins on the bottom of the side panel with the slots in the enclosure push in and slide forward to lock the left side panel into place 2 Slide the top cover forward to lock it into place Fasten the top cover with the thumbscrew Use the chassis lock to secure the top cover ...

Страница 92: ... Figure 4 18 and secure the lock onto your system as shown 4 Connect the power cord and plug it into the wall outlet 5 Turn on the system F For more information on operating system specific options refer to your operating system and option documentation 1 2 Figure 4 18 Using the Optional Kensington Lock ...

Страница 93: ...ing 2 Check the power indicator on the monitor Also check the monitor keyboard and mouse cables to ensure that they are connected and seated properly 3 Press the Reset button Try rebooting your system 4 Make sure that all cables and connections are secure 5 Contact Digital Services or your service provider for software or hardware related problems __________________________NOTE ___________________...

Страница 94: ...identify and solve problems that could occur with your system disk drive audio and monitor Table 5 1 System Troubleshooting Problem Possible Cause Action Power indicator not on System is not plugged in No power at the wall outlet Internal power supply cables not reconnected after installing options Power supply failure Correct voltage not set Turn off the system plug it in and then turn it back on...

Страница 95: ... Defective video controller module Console environment variable is set to serial Keyboard or video controller missing or malfunctioning Adjust the brightness and contrast controls Turn on the monitor Check all monitor connections Refer to the video module documentation for more information Try another monitor Replace the video module From the SRM prompt change the variable to graphics set console ...

Страница 96: ...thered information to identify target devices for boot command and verify that the system sees all installed devices Windows NT Use the AlphaBIOS firmware to display system configuration Look at the hard disk configuration to determine what hard disk is available Verify the operating system selection information Check and set the environment variables if necessary Digital UNIX and OpenVMS Use the ...

Страница 97: ...want it to System is set to autoboot Auto_action is set to BOOT Digital UNIX and OpenVMS Press ctrl C s during self test or before the windowing system starts Once you are at the console prompt type set auto_action halt to prevent autobooting Windows NT When AlphaBIOS starts press a down arrow to stop the autostart countdown Target boot device not listed in show device show config SRM or in the Al...

Страница 98: ... the keyboard port Mouse driver not installed Mouse ball sticking Connect the mouse and restart the operating system Connect the mouse to the mouse port and restart the operating system Install the appropriate mouse driver refer to your supplied application software documentation Refer to the section on cleaning the mouse System forgets some environment variables or the time of day while powered o...

Страница 99: ...er reference You will need to reset environmental variables after invoking the procedure below Perform the following steps 1 Power off the system 2 Open the system box 3 Set the configuration DIP switches to erase NVRAM 4 Power on the system and wait for the console to start 5 Power the system off 6 Reset the configuration DIP switches to original settings 7 Reassemble system 8 Power on the system...

Страница 100: ...oppy diskette is wrong density Floppy diskette is worn or damaged Floppy diskette is write protected Floppy drive is empty Format the floppy diskette Use a floppy diskette of the proper density for your drive Try another floppy diskette Slide the write protect switch so the hole is not visible Insert a floppy diskette Table 5 3 Audio Troubleshooting Problem Possible Cause Action No sound Cables no...

Страница 101: ...Monitor signal cable loose or damaged Monitor out of sync Console environment variable is set to serial Adjust accordingly Try another monitor Try another monitor Inspect connector pins Replace cable if damaged If you have a three wire monitor try setting sync to the green signal with the SRM firmware For the first ZLXp controller set tga_sync_green to 1 for the second ZLXp controller set tga_sync...

Страница 102: ...ected a memory test failure 1 3 3 The SROM code could not find at least 2 MB of good memory 3 2 1 The DROM code was unable to read the header of the flashROM or the flashROM checksum failed Therefore the DROM code attempted to boot from the floppy diskette The attempt failed because there was no boot block on the floppy diskette 3 2 3 The DROM code was directed to load the floppy diskette but ther...

Страница 103: ...cleaning do not allow any excess fluid to leak into the system keyboard or monitor Wait until the system is completely dry before applying power ____________________________________________________________ Cleaning Your System Unit Clean the outside of the system periodically with a soft cloth lightly moistened with a mild detergent solution Do not use solvents or abrasive cleaners Cleaning Your M...

Страница 104: ...ps across the screen when you are using the mouse the ball inside the mouse may need cleaning To clean the ball perform the following steps as Figure A 1 shows 1 Turn the mouse over and remove the plate on the bottom 2 Remove the locking ring and rubber ball 3 Clean the ball and rollers with a cotton swab that has been lightly dampened with a mild detergent 4 Replace the ball and plate 1 3 2 Figur...

Страница 105: ...ction Packing Your System describes Packing Your System If you are moving the system a short distance for example from one room to another in the same building you do not have to pack it If you are shipping the system or moving it by vehicle though pack it to avoid damage Pack the system in the original packing material and containers If you did not save the boxes and packing material use a sturdy...

Страница 106: ......

Страница 107: ...his appendix describes the following technical characteristics of the Digital AlphaStation 255 system System specifications External system connectors Expansion slot current limitations System current requirements Motherboard switches and jumpers ...

Страница 108: ...ondary cache Write back 1 MB megabyte Table B 2 System Specifications Attributes Specification PCI clock 33 33 Mhz 30 0 ns cycle time Slots Two PCI one PCI ISA combination and one ISA only Memory Expandable up to 1 GB Total SCSI bus length 3 meters 9 8 feet for fast SCSI operation 4 meters 13 1 feet for slow SCSI operation Memory is expandable up to 1 GB when 128 MB SIMMs are available Table B 3 S...

Страница 109: ...ge humidity noncondensing 10 to 90 relative humidity maximum wet bulb 46 C 114 F Altitude Operating Nonoperating 3 048 m 10 000 ft maximum 12 190 m 40 000 ft maximum Table B 5 Acoustics Preliminary Declared Values per ISO 9296 and ISO 7779 Product Sound Power Level LWAd B Idle Operate Sound Pressure Level LpAm dBA operator position Idle Operate AlphaStation 255 with 1 GB disk 4 8 5 1 40 42 Current...

Страница 110: ...terface to a printer or other parallel devices Table B 6 lists pin assignments An asterisk after a signal name indicates an active low signal Table B 6 Bidirectional Parallel Port Pinouts DB25 Pin Signal Function 1 STB R Strobe 2 PRTD0 Printer data bit 0 3 PRTD1 Printer data bit 1 4 PRTD2 Printer data bit 2 5 PRTD3 Printer data bit 3 6 PRTD4 Printer data bit 4 7 PRTD5 Printer data bit 5 8 PRTD6 Pr...

Страница 111: ...ur operating system information to confirm which of the baud rates from the preceding list your operating system supports Table B 7 9 Pin Serial Port Pinouts DB9 Pin Signal Function 1 DCD Data carrier detect 2 RXD Receive data 3 TXD Transmit data 4 DTR Data terminal ready 5 GND Ground 6 DSR Data set ready 7 RTS Request to send 8 CTS Clear to send 9 RI Ring indicator Table B 8 shows the port mappin...

Страница 112: ...nectors consist of two 6 pin mini DIN connectors Table B 9 lists their pin assignments Table B 9 Keyboard and Mouse Connector Pinouts Pin Keyboard Signals Mouse Signals 1 KB Data MS Data 2 Reserved Reserved 3 Ground Ground 4 5 Volts dc 5 Volts dc 5 KB Clock MS Clock 6 Reserved Reserved ...

Страница 113: ...al Pin Signal 1 gnd 26 DB 0 2 gnd 27 DB 1 3 gnd 28 DB 2 4 gnd 29 DB 3 5 gnd 30 DB 4 6 gnd 31 DB 5 7 gnd 32 DB 6 8 gnd 33 DB 7 9 gnd 34 DB P 10 gnd 35 gnd 11 gnd 36 gnd 12 reserved 37 reserved 13 open 38 TERMPWR 14 reserved 39 reserved 15 gnd 40 gnd 16 gnd 41 ATN 17 gnd 42 gnd 18 gnd 43 BSY 19 gnd 44 ACK 20 gnd 45 RST 21 gnd 46 MSG 22 gnd 47 SEL 23 gnd 48 CD 24 gnd 49 REQ 25 gnd 50 I O ...

Страница 114: ...e B 11 lists the input power requirements Table B 12 shows the output voltage specifications Table B 11 System Input Power Requirements Rated Voltage Range Rated Input Current Operating Frequency Range 100 Volts AC 120 Volts AC 5 5 A 47 Hz 63 Hz 220 Volts AC 240 Volts AC 3 A 47 Hz 63 Hz Table B 12 System Output Power Specifications Voltage Output Range Output Current Amps 3 3 3 17 3 465 0 0 20 5 0...

Страница 115: ...itches and Jumpers Switches and jumpers allow you to set specific system parameters Figure B 1 shows the locations of the switchpack and jumpers J29 and J30 on the motherboard with a CPU speed set for 233 Mhz Table B 13 lists the switch settings ...

Страница 116: ...ic component unless you are safely grounded Wear a grounded wrist strap or touch an exposed metal part of the system unit chassis A static discharge from your fingers can permanently damage electronic components ____________________________________________________________ On Off 1 2 3 4 5 6 7 8 J30 J29 Figure B 1 Motherboard Switch and Jumper Locations ...

Страница 117: ...ROM containing the console firmware should be loaded into memory and started If switches 1 and 2 are both in the On position at power up the RTC and NVRAM are cleared Return to normal operation by powering off the system placing switches 1 and 2 back to the Off position and powering on the system again See Chapter 5 Troubleshooting for details FlashROM Protect Switch Function Description 3 Off On ...

Страница 118: ... generated sound The default position Off is used when no sound driver is installed There is no volume control for TC sound CPU Speed Switches CPU Clock Rate Description 6 7 8 MHz On Off On Off On Off On Off On On Off Off On On Off Off On On On On Off Off Off Off 133 166 200 233 266 300 333 366 These switches set the CPU clock speed In order to run your system at a higher speed you must install th...

Страница 119: ...or sensing for example Digital StorageWorks devices using the high availability storage subsystem fault bus When sensing is disabled an external terminator is always required even if no external SCSI device is present If an external SCSI device is attached to the SCSI connector the automatic SCSI terminator turns off The SCSI bus must be terminated at the end of the external bus J30 1 to 2 2 to 3 ...

Страница 120: ......

Страница 121: ...ents SCSI small computer system interface ID assignments I O Address Map Table C 1 presents information on the I O address map Table C 1 I O Address Map ISA I O Addresses Devices 0060 0064 Keyboard and mouse 0070 0071 Time of year clock 02F8 02FF Serial port 2 0378 037F Parallel port 03F0 03F7 Floppy disk 03F8 03FF Serial port 1 0530 0533 Audio subsystem base address ...

Страница 122: ...ce is not installed in a PCI slot the IRQ associated with that slot remains unavailable for ISA devices For example if PCI slot 2 is empty IRQ9 is not available for any other device Table C 2 Default System Interrupt Assignments IRQ Source Windows NT Specific Preassignments 0 Timer counter 1 Keyboard 2 Internal cascade of IRQ8 15 3 Serial port 2 or ISA slot 4 Serial port 1 or ISA slot 5 Parallel p...

Страница 123: ..._________________________________________________ DMA Channel Assignments The DMA channel assignments for ISA options are shown in Table C 3 This information is useful when adding ISA options to your system Avoid DMA channel conflicts by not assigning multiple devices to the same channel Table C 3 DMA Channel Assignments Channel Device 0 Audio or 87303 ECP parallel port 1 Audio or 87303 ECP parall...

Страница 124: ...ents information on the default SCSI ID assignments Table C 4 SCSI ID Assignments ID Device 7 Host adapter 6 Available 5 Tape drive if present 4 CD ROM drive 3 Available 2 Available 1 Second hard disk if present 0 First hard disk typically the system disk ...

Страница 125: ...shROM for the console firmware The flashROM contains either the AlphaBIOS firmware for the Windows NT operating system or the SRM console firmware for the Digital UNIX and OpenVMS operating systems Update Utility Use the update utility to update your AlphaBIOS and SRM firmware or change from SRM to AlphaBIOS firmware or vice versa The update utility contains three images the update utility itself ...

Страница 126: ...ou should see a display similar to the following while the update utility is loading and executing bootstrap code read in base 11e000 image_start 0 image_bytes ea800 initializing HWRPB at 2000 initializing page table at 110000 initializing machine state setting affinity to the primary CPU jumping to bootstrap code ff fe fd fc fb fa f9 f8 f7 f6 f5 ef df ee ed ec f4 eb ea e9 e8 e7 e5 X3 7 10895 buil...

Страница 127: ...g device completed APU I Programming device APU I Programming device completed Apu 5 Use the verify command to verify the integrity of the SRM or AlphaBIOS firmware First enable verbose mode by typing verbose then type verify and either SRM or ARC for AlphaBIOS Apu verbose Apu verify SRM 6 To exit the update utility cycle the power Leave the power off for at least 20 seconds ______________________...

Страница 128: ...At the SRM prompt type set os_type nt 2 Load and start the firmware update utility as shown previously in this section 3 At the Apu prompt type update arc Specifying arc causes the AlphaBIOS firmware to load Make sure you have the latest version available firmware version before updating The following example shows the AlphaBIOS firmware being loaded The actual information may change between versi...

Страница 129: ...date srm Specifying srm causes the SRM firmware to load Make sure you have the latest version available firmware version before updating The following example shows the SRM firmware being loaded The actual information may change between versions Apu update srm APU I ROM 0 1 Contents will be destroyed APU I Are you ready to Program Device y n y APU I Programming device APU I Programming device comp...

Страница 130: ......

Страница 131: ...nstructions and refer to the appropriate operating system documentation Using the table below first locate the operating system you want to install and refer to the appropriate table number If you want to Go to Table Install Windows NT Workstation on a properly partitioned and formatted disk E 1 Set up partitions for a Windows NT Workstation installation E 2 Install Digital UNIX E 3 Install OpenVM...

Страница 132: ...________________________________________ Starting a Windows NT Workstation Installation Digital partitions and formats disk 0 on the first SCSI controller in non RAID Windows NT Workstation systems The partitions are set up as follows Partition 1 typically the C drive is the size of the disk less 6 MB and formatted FAT Normally you select convert to NTFS during the Windows NT installation Partitio...

Страница 133: ...r or If your system type is listed select system Press Enter Skip to step 7 Insert the manufacturer supplied hardware support disk message is displayed 5 Insert the hardware manufacturer supplied hardware support disk Press Enter when ready You have chosen to change your computer type to one supported by a disk provided by a hardware manufacturer Please insert manufacturer supplied hardware suppor...

Страница 134: ...Press Enter You have asked to change the type of display to be installed 11 Insert the provided display driver diskette Press Enter You have chosen to change your computer s display type to one supported by a hardware manufacturer supplied disk 12 Select the appropriate display driver Press Enter You can choose your graphics card type from the list displayed 13 Select The above list matches my com...

Страница 135: ... 1 From the AlphaBIOS boot screen press F2 AlphaBIOS setup screen displays 2 Select Hard Disk Setup If disk 0 is not partitioned a message asking if you would like to proceed with default disk partitioning displays 3 Press F10 to continue Express Setup Complete screen displays 4 Press Enter A list of disks including partitions displays 5 Press Escape AlphaBIOS setup screen displays Refer to Table ...

Страница 136: ...ital UNIX Installation Step Action Result 1 At the SRM prompt type set boot_osflags Clear the boot_osflags variable 2 At the SRM prompt type set auto_action halt Halts the system at the console prompt each time the system is turned on crashes or when the reset button is pushed 3 Insert the Digital UNIX for AXP Systems CD ROM into the CD drive CD ROM drive is ready 4 At the SRM prompt type show dev...

Страница 137: ...nstructions on loading the SRM firmware ____________________________________________________________ Table E 4 Starting an OpenVMS Installation Step Action Result 1 Insert the OpenVMS CD ROM into the CD drive CD ROM drawer closes 2 At the SRM prompt type show dev List of devices displays dka0 0 0 6 0 DKA0 RZ26L 441A dka400 4 0 6 0 DKA400 RRD43 3213 dva0 0 0 0 1 DVA0 3 From the SRM console boot the...

Страница 138: ......

Страница 139: ...ware components Update the Equipment Log when you add options Equipment Log The log consists of six tables which you can use to record the following information Your system s hardware components Table F 1 Your system s ISA equipment configuration Table F 2 Your SCSI small computer system interface device address settings Table F 3 Your system s hardware configuration Table F 4 The operating system...

Страница 140: ...ce 1 Additional storage device 2 Additional storage device 3 Additional storage device 4 Use Table F 2 to keep track of your AlphaStation 255 system s expansion options The upper portion of the table shows the standard devices You can use the lower portion of the table to record the parameters of ISA or PCI devices you add to the riser card The columns refer to information the SRM console used on ...

Страница 141: ... DMAmode and chan IRQ 0 3 Keyboard KBD 0 60 1 Mouse MOUSE 0 60 12 Serial Line 1 COM1 0 3F8 4 Serial Line 2 COM2 0 2F8 3 Parallel Port LPT1 0 3BC 3 if used 7 FDC FLOPPY 0 3F0 2 if used 6 Riser Card ISA Expansion Slots Table F 3 SCSI Addresses Address Device 0 1 2 3 4 CD ROM drive 5 6 7 SCSI controller ...

Страница 142: ...unit speed and model Firmware version SROM DROM AlphaBIOS SRM Memory size Bank 0 Bank 1 Video module Table F 5 Installed Software Operating System or Application Software Version Number License Number Date Installed Which Disk Table F 6 Additional Component Information Component Vendor Model Number Serial Number Date Installed ...

Страница 143: ...ity 3 8 set date and time 3 6 setup 3 3 Audience xi Audio troubleshooting 5 8 B Battery replacement procedure 4 22 type 5 6 Baud rates serial port B 5 Booting auto start with AlphaBIOS 3 6 using AlphaBIOS 3 2 C Cable layout internal 4 17 Cleaning computer A 1 monitor screen A 1 mouse A 2 CMOS setup 3 6 advanced 3 8 Computer cleaning A 1 controls and indicators 2 3 initial troubleshooting 5 1 movin...

Страница 144: ...0_protocols 3 19 language 3 19 modifying 3 14 os_type 3 19 pci_parity 3 19 pka0_fast 3 19 setting 3 14 tga_sync_green 3 19 Equipment log 5 2 Ergonomics 1 2 Expansion board 4 8 Expansion box connecting 4 16 F Features keyboard 2 10 SCSI 2 2 Firmware update utility D 1 updating D 1 Flash update utility D 2 Floppy drive removing 4 6 I Initial troubleshooting 5 1 input power requirements B 8 Install o...

Страница 145: ...16 Problem solving 5 1 R Rear panel 2 4 connector functions 2 4 Removing top cover 4 2 4 3 Reset button 5 1 S SCSI bus length 4 11 controller 2 2 expansion box 4 16 external options 4 16 port B 7 Security 1 13 Serial port B 5 baud rates B 5 SIMMs 4 5 adding 4 5 Site preparation ergonomics 1 2 Slots combination 2 2 ISA 2 2 PCI 2 2 Software license notice label 1 2 Specifications acoustic B 3 comput...

Страница 146: ...cking 4 3 Top cover removal 4 2 Troubleshooting audio 5 8 boot device not listed 5 5 boot problem 5 4 computer 5 2 dead battery 5 6 disk read and write problem 5 8 display problems 5 9 initial 5 1 keyboard 5 6 monitor power indicator problem 5 9 mouse 5 6 system forgets settings 5 6 Turning off system 1 12 U Unlocking top cover 4 2 4 3 Update utility D 1 V Voltage selector switch 1 7 2 5 W Windows...

Отзывы: