


10
Chapter 4
Installation and Start-up
Subject to technical changes
Rev. 1.01.08
4.4
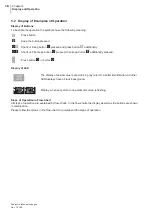
Exchange of Controller
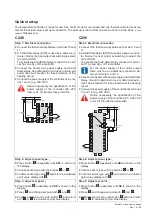
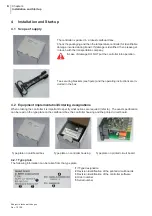
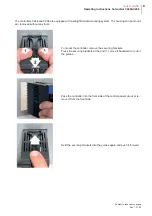
For an exchange of a controller the housing need not to be removed.
4.5
Electrical Connection and Base Configuration
The wiring system is implemented on the screwed terminals on the rear side with the appropriate cable lugs. Ca-
bles with a cross section of 0.5 to 1.5mm
2
can be employed.
The start-up of the controller includes the electrical installation as well as the correct configuration. Succeeding
the terminal allocation and instructions on the configuration are given in detail.
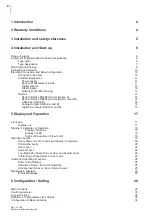
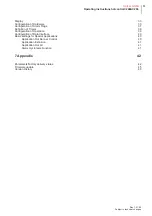
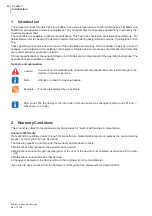
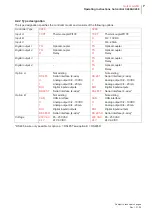
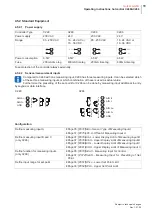
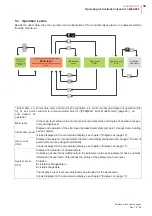
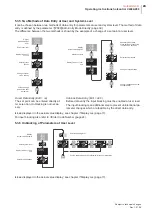
4.5.1 Connection overview
The terminal overview is glued on one side of the controller next to the type plate. All feasible connections are
drawn in. Only controller configured variants can be used.
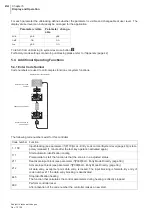
Press the lock at the lower end of the front side and remove the controller from
the housing (see figure).
Only controllers of the same type should be exchanged. Notice to take over the setting of the controller.
The controller may be installed and put into operation by specialist personnel only.
Before switch-on of the control zones it is to be ensured that the controller is configured for the appli-
cation. An incorrect configuration can lead to damage to the control section or to injuries to persons.
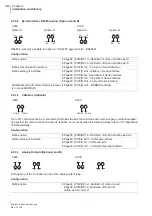
C248
C296
With power supply
85...250 VAC:
With power supply 24 V:
With
power
supply
85...250 VAC:
With power supply 24 V:
1
2
3
4
5
6
7
8
9
10
11
12
13 14
15 16
N
L
0V
+12VDC
DOUT
1
DOUT
2
DIN
GND
STI
I
R TS
DIN1+/DOUT1-
RS485 TX-
AOUT1-
RS485 TX- (4-wire)
DIN1-/DOUT1+
RS485 TX+
AOUT1+
RS485 TX+ (4-wire)
DIN2+/DOUT2-
CAN-L
AOUT2-
RS485 RX- (4-wire)
DIN2-/DOUT2+
CAN-H
AOUT2+
RS485 RX+ (4-wire)
+/
~
-/
~
1
2
3
4
5
6
7
8
9
10
11
12
13 14
15 16
0V
+12VDC
DOUT
1
DOUT
2
DIN
GND
STI
I
R TS
24V
DIN1+/DOUT1-
RS485 TX-
AOUT1-
RS485 TX- (4-wire)
DIN1-/DOUT1+
RS485 TX+
AOUT1+
RS485 TX+ (4-wire)
DIN2+/DOUT2-
CAN-L
AOUT2-
RS485 RX- (4-wire)
DIN2-/DOUT2+
CAN-H
AOUT2+
RS485 RX+ (4-wire)
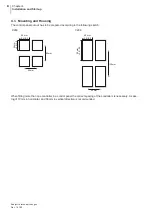
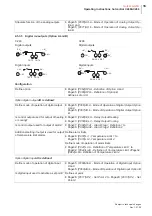
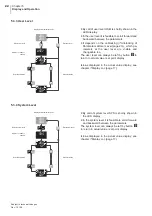
1
2
3
4
5
6
7
8
9
10
11
12
13
14
15
16
17
18
19
20
21
22
23
24
25 26
27 28
DIN1-/DOUT1+
RS485 TX+
AOUT1+
RS485 TX+ (4-wire)
DIN1+/DOUT1-
RS485 TX-
AOUT1-
RS485 TX- (4-wire)
DIN2-/DOUT2+
CAN-H
AOUT2+
RS485 RX+ (4-wire)
DIN2+/DOUT2-
CAN-L
AOUT2-
RS485 RX- (4-wire)
N
L
R
TS
R
TS
R
TS
0V
DOUT
1
DOUT
2
DOUT
3
DOUT
4
+12VDC
DIN1
DIN2
0V
STI
I
I0V
0/4...20mA
0/2...10
V
A
B
C
1
2
3
4
5
6
7
8
9
10
11
12
13
14
15
16
17
18
19
20
21
22
23
24
25 26
27 28
R
TS
R
TS
R
TS
0V
DOUT
1
DOUT
2
DOUT
3
DOUT
4
+12VDC
DIN1
DIN2
0V
STI
I
I0V
0/4...20mA
0/2...10
V
A
B
C
+/
~
-/
~
24V
DIN1-/DOUT1+
RS485 TX+
AOUT1+
RS485 TX+ (4-wire)
DIN1+/DOUT1-
RS485 TX-
AOUT1-
RS485 TX- (4-wire)
DIN2-/DOUT2+
CAN-H
AOUT2+
RS485 RX+ (4-wire)
DIN2+/DOUT2-
CAN-L
AOUT2-
RS485 RX- (4-wire)
Содержание hotcontrol C248
Страница 2: ......


