


14
ENGLISH
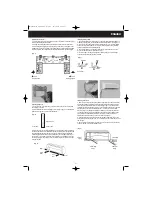
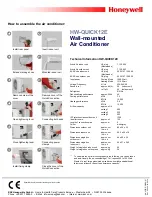
Tightening Lever
6. Insert the male part of the quick connector into the female part of the quick
connector. Release the tightening sleeve and the tightening sleeve shifts back.
Note: Orientating pin is downward.
7. Close the tightening lever and press it tight.
Note: The tightening lever cannot be fixed in its correct position, if the tightening
sleeve is not released completely. In this case reconnect the two parts of the quick
connector and repeat above mentioned installation steps 4 to 7.
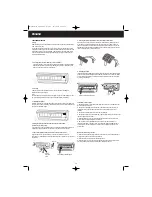
8. At the end of the male part of the quick connector is the male part of the power
clamp.
Below this power clamp, there is an additional fixation clamp in order to fix and
strain-relieve the power cord. Take out that fixation clamp by unscrewing the
screws. On the outdoor unit is the female part of the power clamp on the Terminal
Board. Connect these two parts by sliding the male part of the power clamp into the
female part of the power clamp. After you checked that the two parts of the power
clamp are firmly fixed and connected, fix the power cord of the female part by
assembling the fixation clamp at the outdoor unit. Ensure that the black-insulated
power cord part has been fixed with the fixation clamp, as shown in Fig. 4. Also
make sure that the fixation clamp is firmly fixed and that the power cord is strain-
relieved and not be affected by stretch and twist stress.
9. Install the cover of the quick connector on the outdoor unit and tighten the
screws. Make sure that the power cord will pass through the cord opening at the
right side of the cover of the quick connector and that the cover is firmly fixed.
1
2
3
4
Male Part of the
Power Clamp
Power Clamp
Fixation Clamp
Female Part of the
Power Clamp
HW-QUICK12E_GB_OM.qxd 4/2/07 12:04 PM Page 14


